

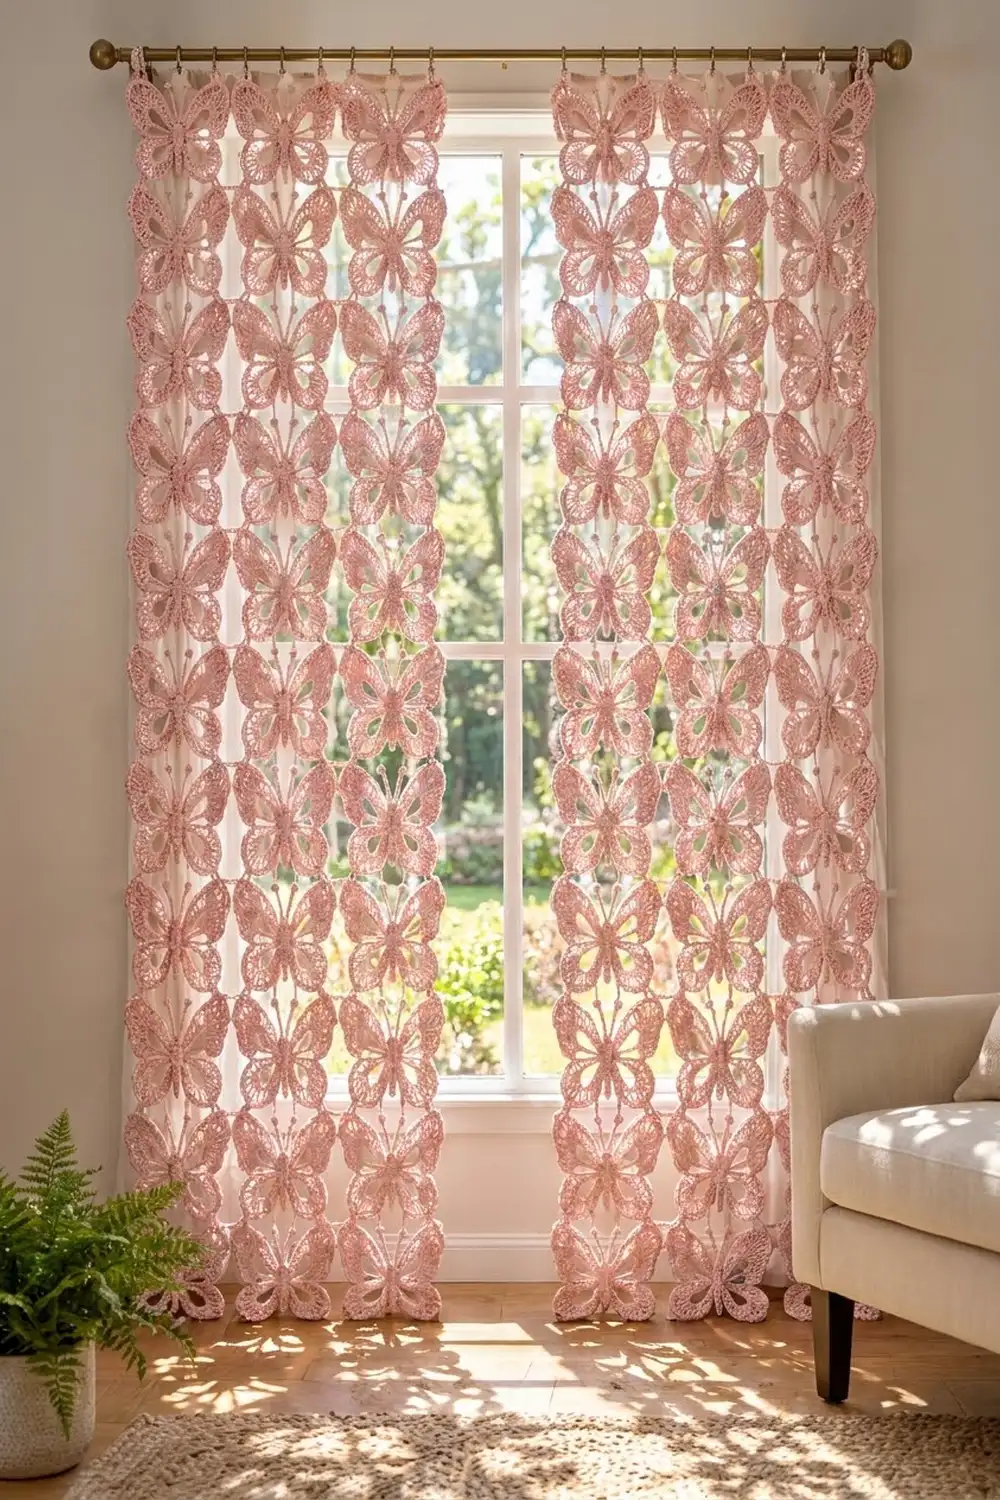
These lacy curtain panels are made entirely from blush pink butterflies. Each butterfly has two rounded upper wings, two smaller lower wings, and a teardrop opening in every wing. A raised, ridged body and knobbed antennae give each one a little dimension. When the panels hang in a sunny window, light passes through the wing openings and the gaps between the motifs.
The pattern uses one color and a smooth DK cotton, so the stitches look clear and slightly glossy. The style is airy and romantic without looking fussy. All instructions use US crochet terms.
Each finished panel measures 23.25″ × 69″ (59.1 × 175.3 cm) including the top band. The rod loops add about 1.25″ (3.2 cm). The pattern makes a matching pair.
Construction: each butterfly is crocheted in the round from a center ring with four chain loops that become the wings. A separate tube body with antennae is sewn on top. The motifs are joined as you go at their wing points with short chain bars, 3 across and 11 down. A four-row top band with rod loops finishes the panel.
Finished Size and Construction
- Finished panel size: 23.25″ × 69″ (59.1 × 175.3 cm), plus loops
- Skill level: Intermediate
- Terminology: US
- Yarn weight: DK (light #3) cotton
- Hook: 4.0 mm (G-6)
- Number of pieces: 33 butterflies per panel, 66 for the pair
- Layout: 3 motifs wide × 11 motifs tall per panel
- Motif size: 7.25″ wide × 5.5″ tall (18.4 × 14.0 cm), blocked
- Join gap: 0.75″ (1.9 cm)
- Size before border: 23.25″ × 68″ (59.1 × 172.7 cm)
- Border depth: 1″ (2.5 cm) top band only; the sides and bottom stay open
Materials
Use a mercerized DK cotton, or a cotton blend with a similar yardage, at about 125 m (137 yd) per 50 g. Cotton keeps the wing shapes crisp and hangs without stretching. Avoid fuzzy yarns, because they blur the teardrop openings.
- Blush Pink: 800 g, about 2000 m (2187 yd) for the pair. That is 400 g / 1000 m (1094 yd) per panel.
Each motif uses about 24 m (26 yd). The quantities above include a margin of roughly 20% for gauge differences and joining.
Tools:
– 4.0 mm (G-6) crochet hook
– Tapestry needle
– 12 locking stitch markers
– Rustproof pins and a blocking board
– Spray bottle
– Measuring tape
– Small yarn scraps for stuffing the heads
Abbreviations (US Terms)
- ch – chain
- sl st – slip stitch
- sc – single crochet
- hdc – half double crochet
- dc – double crochet
- tr – treble crochet
- sc2tog – single crochet 2 together
- BLO – back loop only
- sp – space
- st(s) – stitch(es)
Special stitch: popcorn (pc). Work 4 dc in the same stitch. Remove the hook from the loop, insert it front to back into the first dc, pick up the dropped loop and pull it through.
Join bar. At a joining point, work sc, ch 3, sl st in the matching ch-2 sp of the neighboring motif, ch 3, sc. This replaces (sc, ch 2, sc).
Gauge and Checkpoints
Top band gauge: 16 sc = 4″ (10.2 cm), which is 4 sc per inch.
Before you start the panel, make one complete butterfly and block it. Check it against these measurements:
- After Rnd 2: the center ring is about 0.75″ (1.9 cm) across, and the upper loops reach about 2″ (5.1 cm) out from the ring.
- After Rnd 3: wingspan about 5″ (12.7 cm).
- After Rnd 4: wingspan about 6.75″ (17.1 cm).
- After Rnd 5, blocked: 7.25″ wide × 5.5″ tall (18.4 × 14.0 cm).
If the motif is too big, go down to a 3.75 mm hook. If it’s too small, go up to 4.5 mm. Every 0.25″ (0.6 cm) of error per motif becomes 0.75″ (1.9 cm) across the panel width and 2.75″ (7.0 cm) down its length.

Butterfly Motif (Make 33 per panel)
Work in the round with the right side facing. Don’t turn.
Rnd 1: Ch 8, sl st to the first ch to form a ring. Ch 1, work 16 sc in the ring, sl st to the first sc. (16 sc)
Rnd 2 (wing loops): Ch 1, then:
– sc in the first 3 sc, ch 22, sk 1 sc (upper-left loop);
– sc in the next 2 sc, ch 16, sk 1 sc (lower-left loop);
– sc in the next 3 sc, ch 16, sk 1 sc (lower-right loop);
– sc in the next 2 sc, ch 22, sk 1 sc (upper-right loop);
– sc in the last 2 sc. Sl st to the first sc.
(12 sc, two ch-22 loops, two ch-16 loops)
The gap at the top (5 sc) is wider than the gap at the bottom (3 sc), which leaves room for the head.
Rnd 3 (inner wing band): Sl st in the next 2 sc.
– Upper-left loop: work (2 sc, 3 hdc, 7 dc, 5 tr, 7 dc, 3 hdc, 2 sc) into the loop. (29 sts)
– Sl st in the next 2 sc.
– Lower-left loop: work (2 sc, 2 hdc, 5 dc, 3 tr, 5 dc, 2 hdc, 2 sc). (21 sts)
– Sl st in the next 3 sc.
– Lower-right loop: work the same as the lower left. (21 sts)
– Sl st in the next 2 sc.
– Upper-right loop: work the same as the upper left. (29 sts)
– Sl st in the last 2 sc and in the first sl st.
(100 wing sts; the sl sts are not counted)
The ch-loops stay open inside the stitches. These are the teardrop wing openings.
Rnd 4 (outer wing band): Sl st in each sl st between wings throughout. Work each wing in the stitches of its own Rnd 3 band.
Upper wings, each:
– sc in 2 sc;
– 2 hdc in each of the next 3 hdc;
– [dc in next dc, 2 dc in next dc] 3 times, dc in next dc;
– 2 tr in each of the next 5 tr;
– dc in next dc, [2 dc in next dc, dc in next dc] 3 times;
– 2 hdc in each of the next 3 hdc;
– sc in 2 sc.
(46 sts per upper wing)
Lower wings, each:
– sc in 2 sc;
– 2 hdc in each of the next 2 hdc;
– [dc, 2 dc in next] twice, dc;
– 2 dc in each of the next 3 tr;
– dc, [2 dc in next, dc] twice;
– 2 hdc in each of the next 2 hdc;
– sc in 2 sc.
(32 sts per lower wing)
Round total: 46 + 32 + 32 + 46 = 156 sts.
Rnd 5 (rim and points): Sc in each st, sl st in each sl st between wings. Work (sc, ch 2, sc) in these point stitches:
| Wing | First point | Second point |
|---|---|---|
| Upper left | st 14 = top point | st 33 = side point |
| Lower left | st 10 = side point | st 23 = bottom point |
| Lower right | st 10 = bottom point | st 23 = side point |
| Upper right | st 14 = side point | st 33 = top point |
Each upper wing has 46 sts worked 1 per st plus 2 extra sc, for 48 sc and 2 ch-2 sps. Each lower wing has 32 + 2 = 34 sc and 2 ch-2 sps.
Round total: 156 + 8 extra = 164 sc and 8 ch-2 sps. Fasten off and weave in the ends.
The points mirror each other on the two sides (14 + 33 = 47, and 10 + 23 = 33), so the motif comes out symmetrical. Left-handed crocheters get a mirrored motif, which works the same way.
Body with Antennae (Make 33 per panel)
Rnd 1: Work 6 sc in a magic ring. (6)
Rnd 2: [Sc in next st, 2 sc in next st] 3 times. (9)
Rnds 3–4: Sc in each st. (9)
Rnd 5: [Sc in next st, sc2tog] 3 times. (6)
Stuff the head lightly with yarn scraps.
Rnds 6–14: Working in BLO, sc in each st. (6) The unused front loops form the ridges on the body.
Rnd 15: Sc2tog 3 times. (3)
Fasten off and leave a 12″ (30.5 cm) tail. The body measures about 3.25″ (8.3 cm) long.
Antennae: Join the yarn with a sl st in a Rnd 3 stitch at the top of the head. Ch 9, work a pc in the 4th ch from the hook, then sl st in each of the next 5 ch. Sk 1 head st and sl st in the next st. Repeat once for the second antenna. Fasten off.
Each antenna has 1 pc and 5 sl sts and is about 1.25″ (3.2 cm) long.
Attach: Center the body over the ring, with the head in the wide top gap and the abdomen running down between the lower wings. Sew it through the Rnd 1 sc using the tail.
Make All Pieces
For each panel, make 33 butterflies in Blush Pink, all with bodies attached before you join them. For the pair, make 66.
Row 1:  B  B  B   <- top band
Row 2:  B  B  B
  ...  (11 rows)
Row 11: B  B  B
Joining
Join as you go while working Rnd 5, row by row from the top down.
- Row 1: Finish Motif 1 completely. On each next motif in the row, replace its upper-left and lower-left side points with join bars into the neighbor’s upper-right and lower-right side points.
- Rows 2–11: The new motif’s top points join with join bars to the bottom points of the motif above it. Its left side points join to the neighbor on the left, as in Row 1.
Each point is joined only once, so the stitch counts don’t change: still 164 sc per motif. Per panel there are 44 side joins and 60 vertical joins.
Keep each ch-3 relaxed but not loose. The bars should lie flat without pulling the wing rims into points.
Size checkpoint: Row 1 measures 23.25″ (59.1 cm) wide: 3 × 7.25″ + 2 × 0.75″. Each new row adds 6.25″ (15.9 cm). After 11 rows the panel measures 68″ (172.7 cm): 5.5″ + 10 × 6.25″.
Border: Top Band
Only the top edge gets a band. The sides and bottom keep the open butterfly outline you see in the photo.
Band gauge: 4 sc per inch.
Row 1 (RS): Join with sc in Motif 1’s upper-left side point. Then:
– Per motif: ch 6, sc in the upper-left top point, ch 13, sc in the upper-right top point, ch 6, sc in the upper-right side point. Including the first sc, that’s 4 sc + 25 ch = 29 sts.
– Per gap: ch 3, then sc in the next motif’s upper-left side point (that sc counts toward the next motif’s 29). That’s 3 sts per gap.
Where a side point already has a join bar, insert the hook under the bar strands next to the motif you are on.
Row total: 3 × 29 + 2 × 3 = 93 sts.
Row 2: Ch 1, turn. Sc in each sc and ch. (93 sc)
Row 3: Ch 1, turn. Sc in each st. (93 sc)
Row 4 (rod loops): Ch 1, turn. Sc in the first 3 sc, [ch 12, sk 3 sc, sc in the next 4 sc] 12 times, ch 12, sk 3 sc, sc in the last 3 sc. Fasten off.
Row 4 has 13 loops and 54 sc. Check: 54 sc + 39 skipped sts = 93.
Why the math works: each motif is 7.25″ × 4 sc per inch = 29 sts, and each gap is 0.75″ × 4 = 3 sts. 87 + 6 = 93 sc, which equals 23.25″ (59.1 cm), the exact width of the joined panel. No stitches are added at the seams. The band is 1″ (2.5 cm) deep, which brings the panel to 69″ (175.3 cm).
Final Blocking
- Soak the panel in cool water for 10 minutes. Press out the water; don’t wring.
- Roll it in towels to remove excess moisture.
- Lay it flat and pin the top band straight to 23.25″ (59.1 cm).
- Pin each motif to 7.25″ × 5.5″ (18.4 × 14.0 cm), keeping the columns vertical.
- Pin the join bars straight so every gap is 0.75″ (1.9 cm).
- Open each teardrop wing opening with a pin at its tip.
- Shape the bodies and antennae with your fingers.
- Let it dry completely, then unpin.
Final Quality-Control Checklist
- Every motif has 164 sc and 8 points.
- All wing openings are open and teardrop-shaped.
- Bodies are centered, with the heads in the top gaps.
- The antennae knobs are firm.
- All 104 joins are secure and even.
- The panel measures 23.25″ × 69″ (59.1 × 175.3 cm).
- The top band has 93 sts and 13 loops.
- All ends are woven in.
Troubleshooting
- Wings ruffle: your Rnd 4 is too loose. Tighten your tension or drop a hook size.
- Wing opening closes up: work the Rnd 3 stitches a little looser around the chain loop.
- Panel leans: a row’s joins were made to the wrong points. Check the point positions (stitches 14/33 and 10/23).
- Band ripples: recount Row 1. Each motif needs exactly 29 sts and each gap exactly 3.
- Body flops sideways: sew it down along its whole length, not just at the head.
Care
Hand wash in cool water with mild soap, then dry flat and re-block. Don’t hang the panel wet, because the weight will stretch the motifs.
Final Notes
The measurement chain is: a 7.25″ × 5.5″ (18.4 × 14.0 cm) motif, 0.75″ (1.9 cm) gaps, a 23.25″ × 68″ (59.1 × 172.7 cm) joined panel, and a 93-stitch top band that brings it to 69″ (175.3 cm). If you match the first motif to its checkpoints, the rest of the measurements will follow. Make two panels and hang them on your rod.
Happy crocheting!