

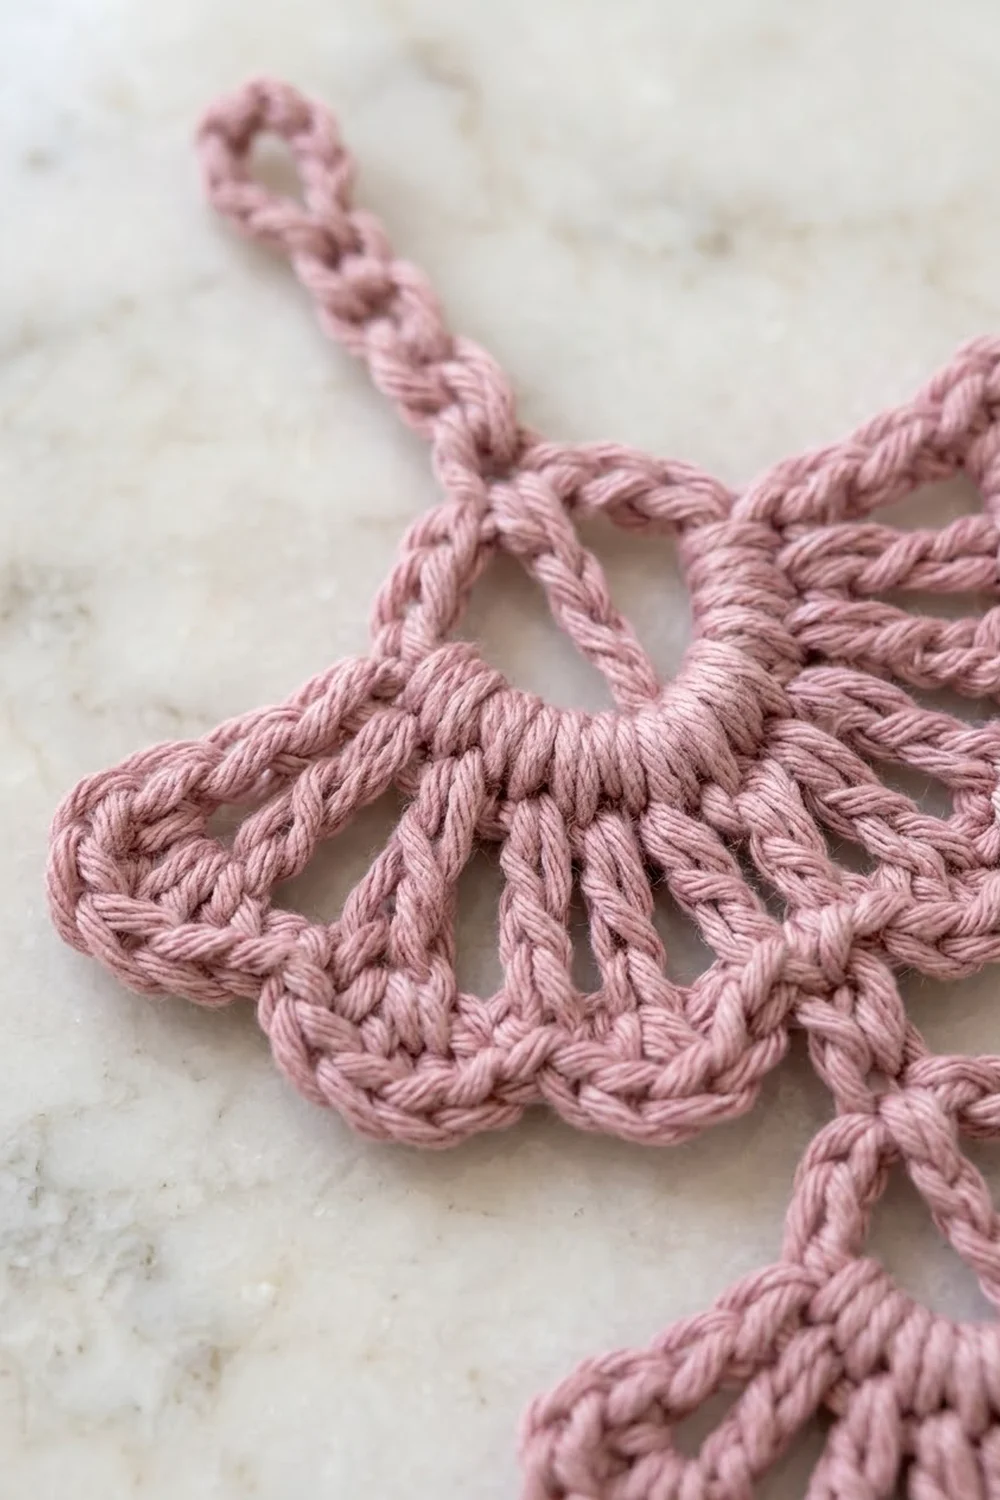
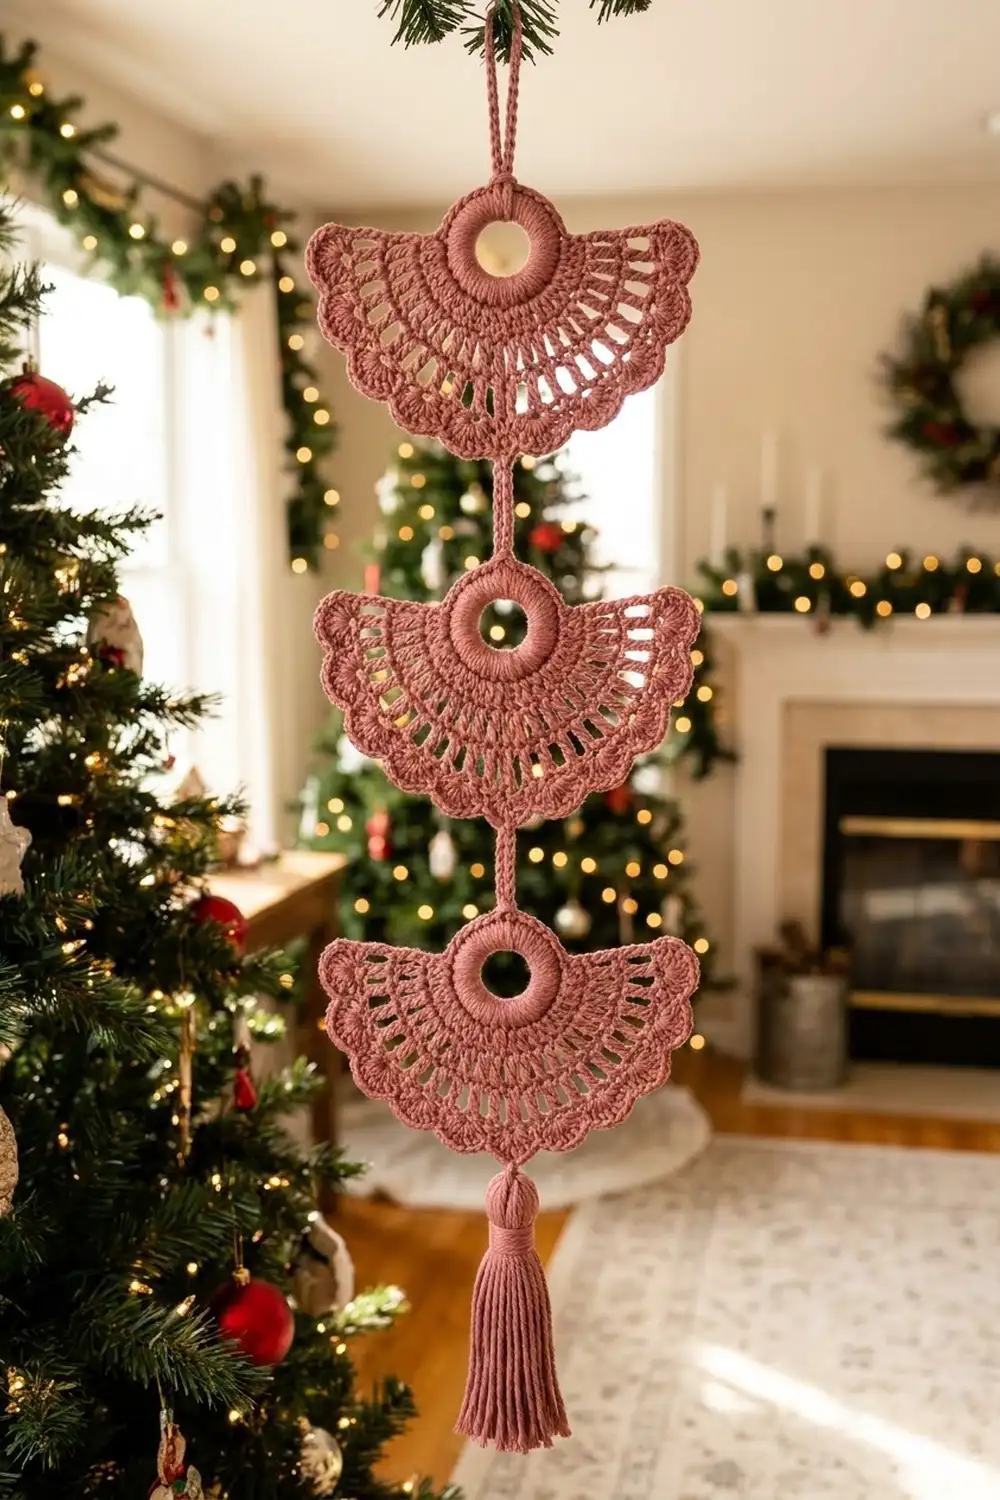
This hanging strand is one continuous chain cord with three open fan motifs and a full tassel at the bottom. Each fan looks like a small ginkgo leaf. A covered ring sits at the top center, open spokes spread out from it, and a scalloped shell edge runs around the curve.
The sample uses one color, a soft dusty rose (blush pink). A matte cotton or cotton-blend yarn gives the fans crisp stitch definition and helps the tassel hang straight. The look is light and decorative. The strand works as a door or window hanger, a wall accent, or a holiday ornament.
The pattern uses US crochet terms. The finished strand measures about 17.375 in (44.1 cm) from the top of the hanging loop to the end of the tail chain. The 4 in (10.2 cm) tassel brings the total length to about 21.375 in (54.3 cm). Each fan is 5 in (12.7 cm) wide.
You make the item in two passes. First, crochet the whole spine in one go: the hanging loop, the cords, and three covered rings, each with a chain bar across its center. Then join yarn at each ring and work three rows of fan across the ring’s lower half. Wrap the tassel and tie it on last.
Finished Size and Construction
- Finished size: 17.375 in (44.1 cm) strand + 4 in (10.2 cm) tassel = 21.375 in (54.3 cm) total
- Skill level: Easy / advanced beginner
- Terminology: US crochet terms
- Yarn weight: Worsted (#4), cotton or cotton blend
- Hook: US H-8 (5 mm)
- Number of pieces: 1 continuous crocheted strand, plus 1 wrapped tassel
- Layout: 3 fans stacked vertically on one cord, flat top edge up, scallops down
- Fan size: 5 in (12.7 cm) wide x 3.125 in (7.9 cm) tall, measured from the ring top to the bottom scallop
- Fan size before border: 4.25 in (10.8 cm) wide after Row 3
- Border depth: 0.375 in (1.0 cm) shell edge (Row 4)
Materials
Yarn. Choose a smooth worsted-weight cotton or cotton blend with a matte finish. Pure acrylic works, but the fans curl more and need firmer blocking. Avoid fuzzy or brushed yarns, because they hide the open spokes.
- Dusty rose (blush pink): 35 g, about 55 m
This total covers the spine (about 4 g), three fans (about 6 g each, 18 g total) and the tassel (about 5 g). It includes a margin of about 8 g for your test fan and tails.
Tools:
- US H-8 (5 mm) crochet hook
- 3 locking stitch markers
- Yarn needle
- Sharp scissors
- Stiff card, 4.5 in (11.4 cm) tall, for the tassel
- Blocking mat, rustproof pins and a spray bottle
- Measuring tape or ruler
Abbreviations (US Terms)
- ch – chain
- sl st – slip stitch
- sc – single crochet
- dc – double crochet
- sp – space
- st(s) – stitch(es)
- PM – place marker
- RS / WS – right side / wrong side
- [ ] – repeat the steps inside the brackets the stated number of times
Special stitch – Shell: work 5 dc into the same ch-2 sp.
Special technique – Center bar: after covering a ring, ch 3 and sl st into the ring’s bottom sc. The chain lies straight down across the ring opening and forms the vertical line through the center of each ring.
Gauge and Checkpoints
Exact gauge matters less for a hanger than for a garment, but it controls the strand’s length and the fans’ width. Make one test fan before you start the full strand.
Test fan: ch 10, then sl st in the 10th ch from hook to form a ring. Work Rnd 1 of the ring, then Rows 2–4 of the fan as written below. Leave out the cords.
Base gauge: 4 ch = 1 in (2.5 cm).
Checkpoints:
- After ring Rnd 1: the covered ring measures 1.25 in (3.2 cm) across the outside.
- After fan Row 2: the fan measures 2.75 in (7.0 cm) from tip to tip along the straight top edge.
- After fan Row 3: 4.25 in (10.8 cm) wide and 2.125 in (5.4 cm) deep below the top edge.
- After fan Row 4: 5 in (12.7 cm) wide and 2.5 in (6.4 cm) deep below the top edge.
If your fan is too big: switch to a US G-6 (4 mm) hook, or pull up a shorter loop on each yarn-over in the Row 2 and Row 3 dc.
If your fan is too small: switch to a US I-9 (5.5 mm) hook. Also make sure you aren’t pulling the ring chain tight when you join it.
If the fan width is right but the cords come out too long or too short, change only how tightly you chain. Don’t change the chain counts, because the marker positions depend on them.
Part 1: The Spine
Work the spine in one piece from the top down. Don’t fasten off until the end.
Hanging loop: ch 8, sl st in the first ch to form a loop. The loop hangs about 1 in (2.5 cm) long.
Top cord: ch 12, which measures 3 in (7.6 cm).
Ring (work 3 times)
Form the ring: ch 10, sl st in the 10th ch from hook. This join is the top of the ring, where the cord meets it.
Rnd 1: ch 1, work 16 sc into the ring so the chain is completely covered. Sl st in the first sc to join. (16 sc)
Number the sc from the top: sc 1 is at 12 o’clock, sc 5 at 3 o’clock, sc 9 at 6 o’clock (the bottom) and sc 13 at 9 o’clock. You’ll work each fan across sc 5 through sc 13.
Center bar: ch 3, sl st in sc 9. The chain crosses the ring from top to bottom.
Lower cord after Rings 1 and 2: ch 13, and PM in the 7th ch counted from sc 9. Chains 1–7 form the in-fan cord, about 1.75 in (4.4 cm). Chains 8–13 form the gap cord, 1.5 in (3.8 cm). Then form the next ring.
Lower cord after Ring 3: ch 11, and PM in the 7th ch counted from sc 9. Chains 8–11 form the tail chain, 1 in (2.5 cm). Fasten off and leave a 12 in (30.5 cm) tail to tie on the tassel.
Spine checkpoint: you now have a hanging loop, 3 covered rings of 16 sc each with a center bar, and 3 markers. Measured flat, the distance from the top of the loop to the top of Ring 1 is 4 in (10.2 cm).
Part 2: The Fan (work on each ring)
Lay the spine RS up with the hanging loop pointing away from you. The cord stays on the RS of the fan and runs down its center.
Row 1 is the ring’s Rnd 1 above.
Row 2 (RS): join yarn with a sl st in sc 5. Ch 5 (counts as dc + ch 2), [dc in next sc, ch 2] 7 times, dc in next sc (sc 13). Turn. (9 dc, 8 ch-2 sps)
The center dc goes into sc 9, next to the sl st of the center bar. Work it under both loops of the sc.
Because sc 5 and sc 13 sit exactly at the sides of the ring, the row ends line up through the ring’s center. This is what gives the fan its flat top edge.
Row 3 (WS): ch 3 (counts as dc), dc in the same st. [Ch 2, skip ch-2 sp, 2 dc in next dc] 8 times. The last 2 dc go into the 3rd ch of the turning ch-5. Turn. (18 dc in 9 pairs, 8 ch-2 sps)
This is a growth row: each of the 9 dc from Row 2 becomes a pair. The ch-2 sps stay at 8, which keeps the spokes open and fanning out.
Checkpoint: the fan measures 4.25 in (10.8 cm) wide.
Row 4 is the border, written in the Border section below. After Row 4, fasten off and weave both ends along the WS of the spokes.
Border: Scalloped Shell Edge (Row 4)
Border gauge: one shell plus one sc pair measures about 0.9 in (2.3 cm) along the outer curve.
Row 4 (RS): ch 1, sc in first 2 dc. [Shell in next ch-2 sp, sc in next 2 dc] 8 times. The last sc goes into the top of the turning ch-3. (18 sc + 40 dc; 8 shells)
Catching the cord: after the 4th shell you reach the 5th dc pair, which is the center pair. Remove the marker from the cord. Work each of the next 2 sc through both the dc and the marked cord chain. This anchors the in-fan cord at the fan’s bottom center. The 7 cord chains have to stretch about 0.125 in (0.3 cm) to reach this point, and that small stretch keeps the cord taut and straight.
Count per side: split the fan at the center pair.
- Left half: 4 sc pairs + 1 sc of the center pair = 9 sc, plus 4 shells = 20 dc
- Right half: 9 sc + 20 dc, the same as the left
- Total: 18 sc + 40 dc = 58 sts
Why the math works. Row 2 has 9 dc, so it has 8 gaps between them. Row 3 doubles each dc into a pair and keeps the same 8 gaps. Row 4 puts 1 shell in each of the 8 gaps and 2 sc on each of the 9 pairs: 8 x 5 = 40 dc and 9 x 2 = 18 sc. With an even number of gaps, a sc pair lands at the bottom point instead of a shell. That’s where you catch the cord, and it makes the two halves exact mirror images.
Edge checkpoint: the fan measures 5 in (12.7 cm) wide and 2.5 in (6.4 cm) from the top edge to the bottom center. The shells add 0.375 in (1.0 cm) all around the curve.
Repeat Rows 2–4 on Rings 2 and 3.
The Tassel
- Wrap yarn 30 times around the 4.5 in (11.4 cm) card. Each wrap uses about 9 in (22.9 cm) of yarn.
- Slide the 12 in (30.5 cm) tail from the end of the tail chain under all the wraps along the top edge of the card. Tie it tightly with a square knot.
- Cut the wraps open along the bottom edge of the card.
- Cut a separate 12 in (30.5 cm) strand. Wrap it 6 times around the bundle, 0.5 in (1.3 cm) below the top, to form the tassel head. Knot it, then use the needle to bury both ends inside the tassel.
- Trim the bottom evenly so the tassel is 4 in (10.2 cm) long, head included.
Final Blocking
- Spray the strand lightly until it is damp but not wet. Cotton blocks well with water alone.
- Lay it RS up on the blocking mat and straighten the cord from the loop down to the tassel.
- Pin each fan’s two tips first, 5 in (12.7 cm) apart, so the top edge forms a straight line through the ring’s center.
- Pin the bottom center scallop 2.5 in (6.4 cm) below the top edge. Then pin the remaining shells evenly around the curve.
- Pin each ring into a circle 1.25 in (3.2 cm) across, with the center bar running straight up and down.
- Check each gap cord: it should measure 1.5 in (3.8 cm) from the bottom of one fan to the top of the next ring.
- Let it dry completely, which takes about 4–6 hours. Steam the tassel separately and comb the strands straight with your fingers.
Final Quality-Control Checklist
- [ ] The hanging loop is closed and about 1 in (2.5 cm) long
- [ ] Each ring has 16 sc and a straight center bar
- [ ] Each fan has 9 dc in Row 2, 9 pairs in Row 3 and 8 shells in Row 4
- [ ] Each fan is 5 in (12.7 cm) wide with a flat top edge
- [ ] The in-fan cord is caught at the center pair of every fan
- [ ] Each gap cord is 1.5 in (3.8 cm) and all three fans are centered on the cord
- [ ] The strand measures 17.375 in (44.1 cm) without the tassel
- [ ] The tassel is 4 in (10.2 cm) long, evenly trimmed, with a firm head
- [ ] All ends are woven into the WS of the spokes or hidden in the tassel
Troubleshooting
The fan’s top edge dips or humps. Row 2 started in the wrong sc. Count again from the ring join: Row 2 must begin in sc 5 and end in sc 13.
The fan cups instead of lying flat. Row 3 is too tight. Work the ch-2 spaces more loosely, or go up one hook size for Rows 3–4 only.
The fan ruffles. The shells are too full for your tension. Work 4 dc per shell instead of 5. Each half then has 16 dc, for 32 dc in total.
The cord hangs loose behind the fan. The cord wasn’t caught in Row 4. Unravel back to the center pair and work the 2 sc through the marked chain.
The fans aren’t the same size. After Row 3, measure each fan against your test fan. Redo any fan that is off by more than 0.25 in (0.6 cm).
The tassel splays out. Tighten the head wrap, then steam the strands downward.
Care
Hand wash in cool water with a mild soap. Roll it in a towel to press out the water, then lay it flat and reshape it to the blocking measurements to dry.
Final Notes
Every measurement in this pattern builds on one base gauge of 4 ch = 1 in (2.5 cm). At that gauge, the covered ring measures 1.25 in (3.2 cm) across. Row 2 widens the fan to 2.75 in (7.0 cm), Row 3 to 4.25 in (10.8 cm) and the shell edge to 5 in (12.7 cm).
The strand’s length adds up the same way:
- 1 in (2.5 cm) hanging loop
- 3 in (7.6 cm) top cord
- three fans at 3.125 in (7.9 cm) each
- two gap cords at 1.5 in (3.8 cm) each
- 1 in (2.5 cm) tail chain
Together these make 17.375 in (44.1 cm). The 4 in (10.2 cm) tassel brings the total to 21.375 in (54.3 cm).
If you love the look, you can hang several finished strands side by side on a curtain rod. Make each strand exactly as written here.
Happy crocheting!