

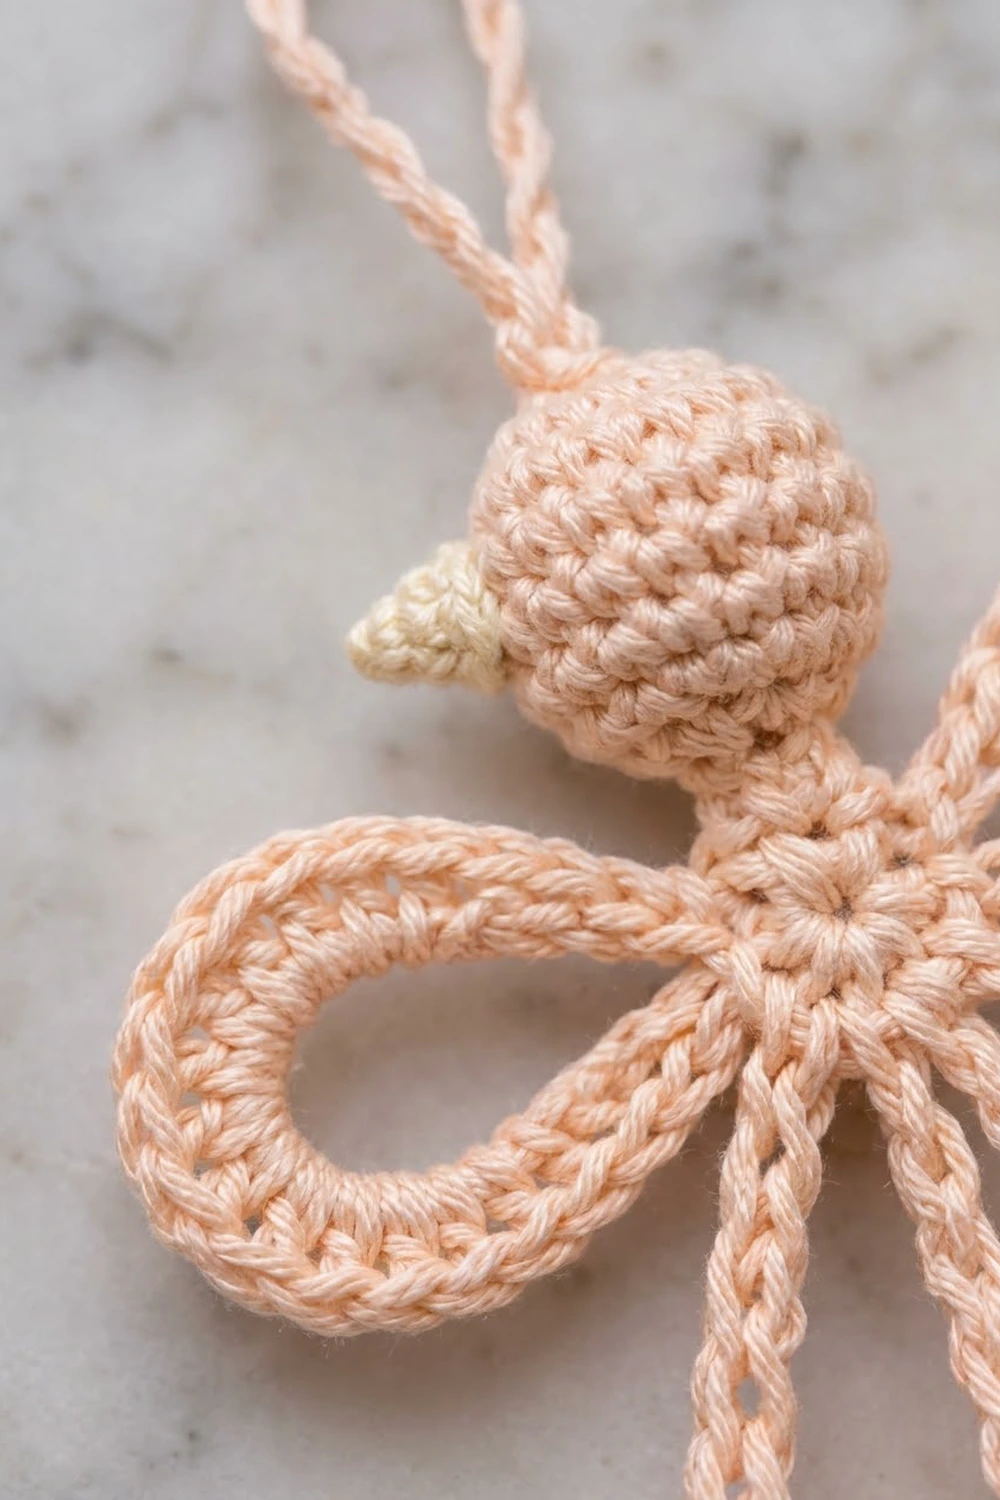
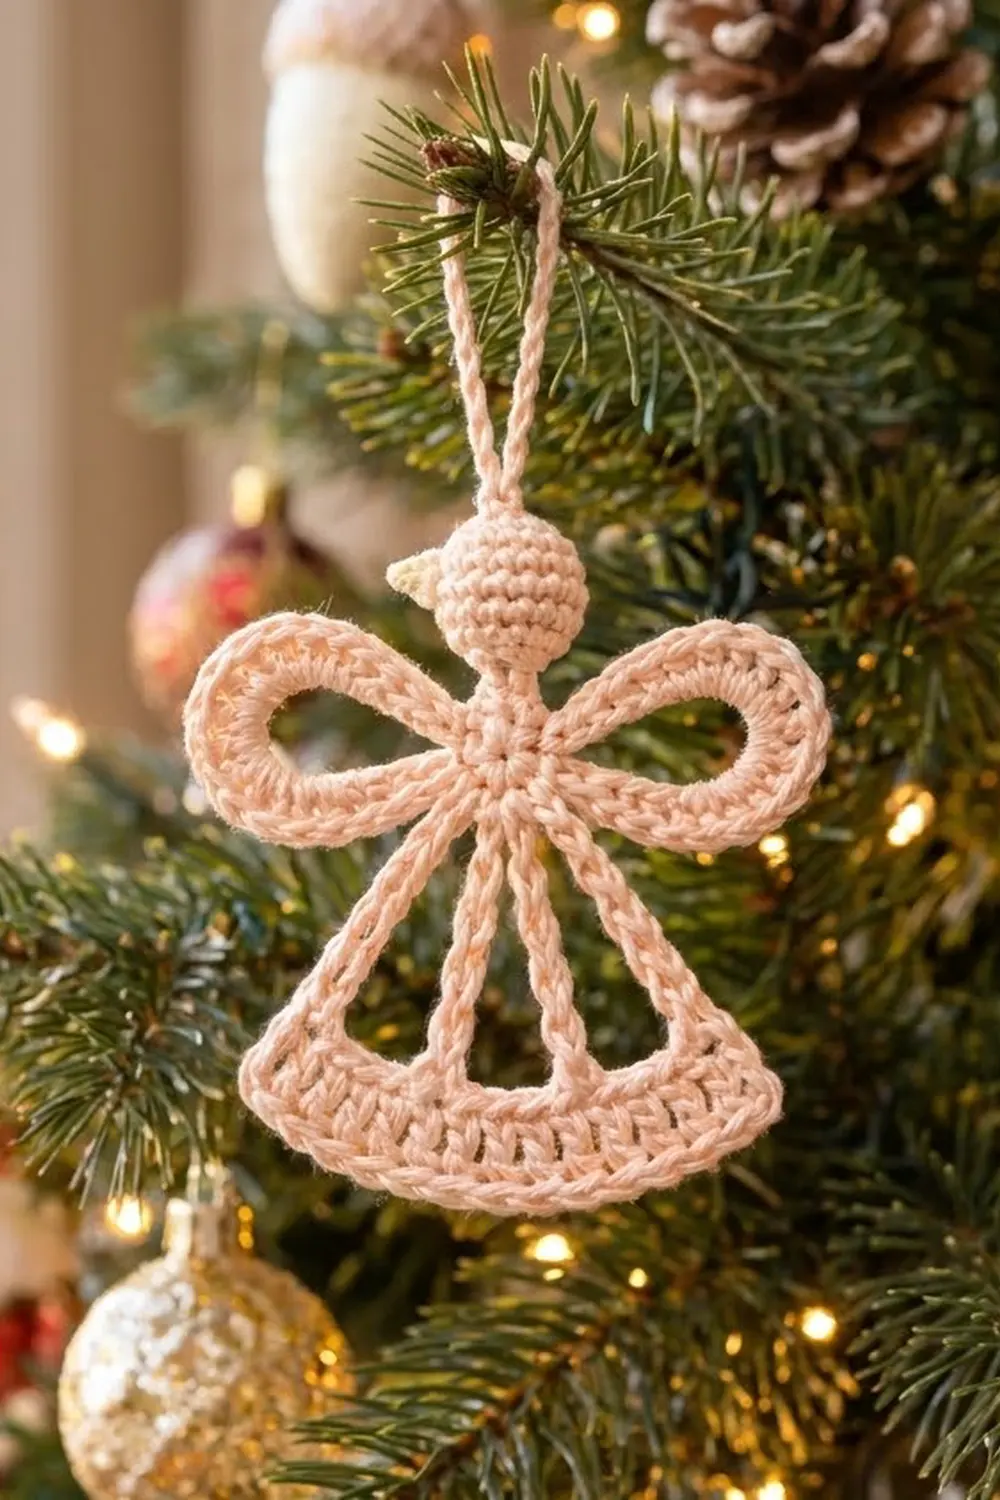
This little angel is mostly air. A stuffed ball head sits on a small solid waist disc. Two looped wings open out to the sides, and four corded spokes fan down into a curved hem. Because the skirt is open, the light passes through it, which is why it looks so pretty on a lit tree.
The sample is worked in soft peach cotton. A tiny cream cone is sewn to the side of the head as a little topknot accent. Smooth mercerized yarn shows the stitch texture best, but any light, crisp cotton will work.
The pattern uses US crochet terms. The finished angel measures about 3.5 in (8.9 cm) across the wings and 3.75 in (9.5 cm) from the top of the head to the bottom of the hem. The hanging loop adds about 1.25 in (3.2 cm).
Construction is simple and done in order. Make the head and cone first. Then crochet the waist disc and work the wings and spokes straight off it without fastening off. Finish with a four-row hem across the spoke tips, then assemble, add the loop and block.
Finished Size and Construction
- Finished size: 3.5 in (8.9 cm) wide × 3.75 in (9.5 cm) tall, plus a 1.25 in (3.2 cm) loop
- Skill level: Advanced beginner / easy intermediate
- Terminology: US crochet terms
- Yarn weight: Sport / fine (#2) cotton, mercerized preferred
- Hook: 2.75 mm (C-2)
- Number of pieces: 1 finished ornament (body frame, head and cone accent are sewn together)
- Layout: Single motif, worn as a hanging ornament
- Waist disc: 0.5 in (1.3 cm) across
- Head: 0.8 in (2.0 cm) across
- Size before hem: spokes 1.85 in (4.7 cm) long
- Hem depth: 0.6 in (1.5 cm)
Materials
Pick a smooth, tightly plied cotton. Fuzzy or splitty yarn blurs the corded spokes and makes the wings floppy. The sample yarn runs about 3 m per gram.
- Peach (main color): 8 g, about 24 m
- Cream (cone accent): 1 g, about 3 m
These quantities include a safety margin. One angel uses slightly less.
Tools:
– 2.75 mm (C-2) crochet hook
– Tapestry needle
– A pinch of polyester fiberfill
– Stitch marker
– Rustproof pins and a foam blocking mat
– Spray bottle with water
– Optional: fabric stiffener or starch spray
Abbreviations (US Terms)
- ch – chain
- sl st – slip stitch
- sc – single crochet
- dc – double crochet
- inc – 2 sc in the same stitch
- dec – single crochet 2 together (invisible decrease recommended)
- MR – magic ring
- st(s) – stitch(es)
Special stitch – Corded spoke: Ch 13, sc in 2nd ch from hook and in each ch back to the start (12 sc). This makes a firm, two-strand-looking cord. The free end is called the tip.
Gauge and Checkpoints
Gauge: 13 sc and 14 rows = 2 in (5.1 cm) in sc worked flat.
The ornament is small, so test a section before you make everything. Work the waist disc and one wing, then measure:
- Waist disc: 0.5 in (1.3 cm) across
- One wing: about 1.4 in (3.6 cm) long from the disc to the wing tip
Further checkpoints:
- Head after stuffing: 0.8 in (2.0 cm) across
- Each spoke: 1.85 in (4.7 cm) long
- Hem Row 2: 2.9 in (7.4 cm) along the curve
- Hem Row 4: 3.5 in (8.9 cm) along the curve
If your sample is too big, go down to a 2.5 mm hook. If it is too small, or the wings are stiff and cupping, go up to a 3.0 mm hook. Don’t change stitch counts. All the proportions come from the counts.
Head
Use peach. Work in continuous rounds and mark the first stitch of each round.
Rnd 1: 6 sc in MR. (6 sts)
Rnd 2: Inc in each st around. (12 sts)
Rnd 3: Sc in next st, inc in next st 6 times. (18 sts)
Rnds 4–5: Sc in each st around. (18 sts each round)
Rnd 6: Sc in next st, dec 6 times. (12 sts)
Stuff the head firmly with a small pinch of fiberfill. Shape it into a smooth ball.
Rnd 7: Dec 6 times. (6 sts)
Fasten off and leave a 6 in (15.2 cm) tail. Thread the tail through the front loops of the last 6 sts and pull it closed. Keep the tail for sewing.
Checkpoint: 0.8 in (2.0 cm) across.
Cone Accent
Use cream.
Rnd 1: 4 sc in MR. (4 sts)
Rnd 2: Sc in next st, inc in next st 2 times. (6 sts)
Rnd 3: Sc in each st around. (6 sts)
Fasten off and leave a 6 in (15.2 cm) tail. Don’t stuff it. Pinch the open end flat. The finished cone is about 0.25 in (0.6 cm) tall.
Waist Disc
Use peach. Leave a 6 in (15.2 cm) starting tail.
Rnd 1: 12 sc in MR, sl st to first sc. (12 sts)
Pull the ring fully closed. Number the stitches 1 to 12 going around, with st 1 at the top center, where the head will sit. Stitch 7 is then at the bottom center.
The stitches are used like this:
- Sts 4 and 10: wings
- Sts 5, 6, 8 and 9: skirt spokes
- Sts 12, 1 and 2: under the head
- Sts 3, 7 and 11: left plain as spacers
Don’t fasten off. Sl st into each st until you reach st 4.
Checkpoint: 0.5 in (1.3 cm) across.
Wings
Right wing: In st 4, ch 24, sl st into the same st 4 to make a loop. Work 32 sc into the loop, going over the chain into the ring space. Spread the sts evenly as you go, about 4 sc for every 3 ch. Sl st into st 4 to finish. (32 sc)
Push the sc together lightly so the chain is fully covered. The wing should open into a teardrop with a clear oval gap in the middle.
The left wing is worked later, after the spokes, so you can keep moving around the disc without cutting the yarn.
Checkpoint: about 1.4 in (3.6 cm) long and 0.75 in (1.9 cm) wide at the widest point.
Skirt Spokes
Keep working around the disc.
Spoke A: Sl st into st 5. Work 1 corded spoke (ch 13, 12 sc back toward the disc), then sl st into st 5. (12 sc)
Spoke B: Sl st into st 6. Work 1 corded spoke, sl st into st 6. (12 sc)
Gap: Sl st into st 7. No spoke here. This leaves the middle opening.
Spoke C: Sl st into st 8. Work 1 corded spoke, sl st into st 8. (12 sc)
Spoke D: Sl st into st 9. Work 1 corded spoke, sl st into st 9. (12 sc)
Left wing: Sl st into st 10. Ch 24, sl st into st 10, work 32 sc into the loop, sl st into st 10. (32 sc)
Sl st into sts 11, 12 and 1. Fasten off and weave in the end on the back.
All four spokes are the same length on purpose. When you fan them out from one center, their tips sit on an arc, and that arc is what gives the hem its gentle curve.
Checkpoint: each spoke 1.85 in (4.7 cm). Lay the piece flat and check that the four tips line up on a smooth curve.
Assembly and Hanging Loop
Sew the head’s closed bottom to the top of the disc over sts 12, 1 and 2, using the head tail. Go through the disc twice so the head doesn’t wobble. Sew the cone to the upper left side of the head with its point slanting up and out, then hide the tails inside the head.
Hanging loop: Join peach in the center top of the head (Rnd 1 area). Ch 18 and sl st into the same spot. Then sl st into each ch around the loop to give it a firm, corded look. Sl st into the head and fasten off. Hide the tail inside the head.
Checkpoint: the loop stands about 1.25 in (3.2 cm) tall.
Border: Hem Band
The hem works like a border. It ties the spoke tips together and gives the skirt a solid edge.
Border gauge: same as the main gauge, 6.5 sc per 1 in (2.5 cm). Each section between spokes holds 5 sts, about 0.75 in (1.9 cm).
Hold the angel right side facing, with the skirt pointing up and spoke D on the right. You will work across the tips.
Row 1 (foundation): Join peach with sc into the tip of spoke D (into the free loop of the first ch). Ch 5, sc in tip of spoke C. Ch 5, sc in tip of spoke B. Ch 5, sc in tip of spoke A.
Count: 4 sc + 15 ch = 19 sts. Each section has 5 ch, with 1 sc at each tip.
Row 2: Ch 1, turn. Sc in each sc and each ch across. (19 sc)
Breakdown: 1 + 5 + 1 + 5 + 1 + 5 + 1 = 19.
Row 3 (conversion/growth row): Ch 3 and turn (the ch 3 counts as a dc). Dc in next st, 2 dc in next st, dc in next 4 sts, 2 dc in next st, dc in next 3 sts, 2 dc in next st, dc in next 4 sts, 2 dc in next st, dc in last 2 sts.
Count: (19 sts worked 1-per-st) + 4 extra = 23 dc.
Row 4 (edge): Ch 1, turn. Sc in each st across, including the top of the turning ch. (23 sc)
Fasten off and weave in all ends along the hem.
Why the math works: Row 2 sits on the spoke tips, so it has to match their arc. That arc is 19 sts ÷ 6.5 = 2.9 in (7.4 cm). The bottom edge sits farther from the waist, so its arc has to be longer. Adding 23 sts ÷ 6.5 = 3.5 in (8.9 cm) gives it that length. The 4 increases are placed symmetrically at sts 3, 8, 12 and 17, so both sides of the hem flare the same amount and it lies flat. Adding more would ruffle the edge, and adding fewer would cup it.
Checkpoint: hem depth 0.6 in (1.5 cm). Bottom edge 3.5 in (8.9 cm), the same as the wingspan.
Final Blocking
- Lightly mist the whole angel with water until it is damp but not soaked.
- Pin the waist disc to the mat first, with the head straight above it.
- Fan the spokes out evenly. The outer spokes should sit at about 35° from vertical and the inner spokes at about 12°. This leaves a narrow center triangle and two wider side openings.
- Pin the hem into a smooth curve that measures 3.5 in (8.9 cm) across the bottom.
- Shape each wing into a teardrop and pin it at the tip. The total wingspan should be 3.5 in (8.9 cm).
- If you want a crisper ornament, spray lightly with starch or fabric stiffener.
- Let it dry fully, at least 4 hours, before you unpin it.
- Pinch the hanging loop straight up and let it dry in that position.
Final Quality-Control Checklist
- The head is round, firm, and sewn on tightly with no wobble
- The cone sits on the upper left side of the head, pointing outward
- Both wings have 32 sc and match in size, and no chain shows through
- All four spokes are 1.85 in (4.7 cm) long and evenly fanned
- The hem has 19 sts in Row 2 and 23 sts in Row 4
- The hem curve is smooth, with no ruffles or cupping
- The wingspan and hem both measure 3.5 in (8.9 cm)
- The overall height is 3.75 in (9.5 cm), plus a 1.25 in (3.2 cm) loop
- All ends are hidden, with none showing through the open skirt
Troubleshooting
The wings twist or flop: You probably packed too few sc into the loop. Rework with all 32, or starch the wings during blocking.
The wings ruffle: You crowded too many sts in. Check that you have 32 and that you worked into the ring space, not into the chains.
The spokes look uneven: One chain was miscounted. Each spoke must be exactly ch 13 / 12 sc.
The hem cups upward: You missed increases in Row 3. Count again for 23 sts.
The hem waves: Your tension is loose, or you added extra sts. Go down half a hook size for Rows 3–4.
Stuffing shows through the head: Go down to a 2.5 mm hook for the head only.
The head leans forward: Sew through all three disc sts (12, 1, 2) twice and anchor the tail inside the head.
Care
Hand wash in cool water with mild soap and press out the water in a towel. Reshape and dry flat, then re-starch if needed.
Final Notes
The size of this angel comes from a short chain of measurements. Start with the gauge: 13 sc = 2 in (5.1 cm). That gives a 0.5 in (1.3 cm) disc, 1.4 in (3.6 cm) wings, and spokes 1.85 in (4.7 cm) long. The hem then grows from 19 to 23 sts, which carries the arc from 2.9 in (7.4 cm) to 3.5 in (8.9 cm). The finished angel is 3.5 in (8.9 cm) wide and 3.75 in (9.5 cm) tall. If you check each stage as you go, the last stage will fit without any guesswork.
Happy crocheting!