

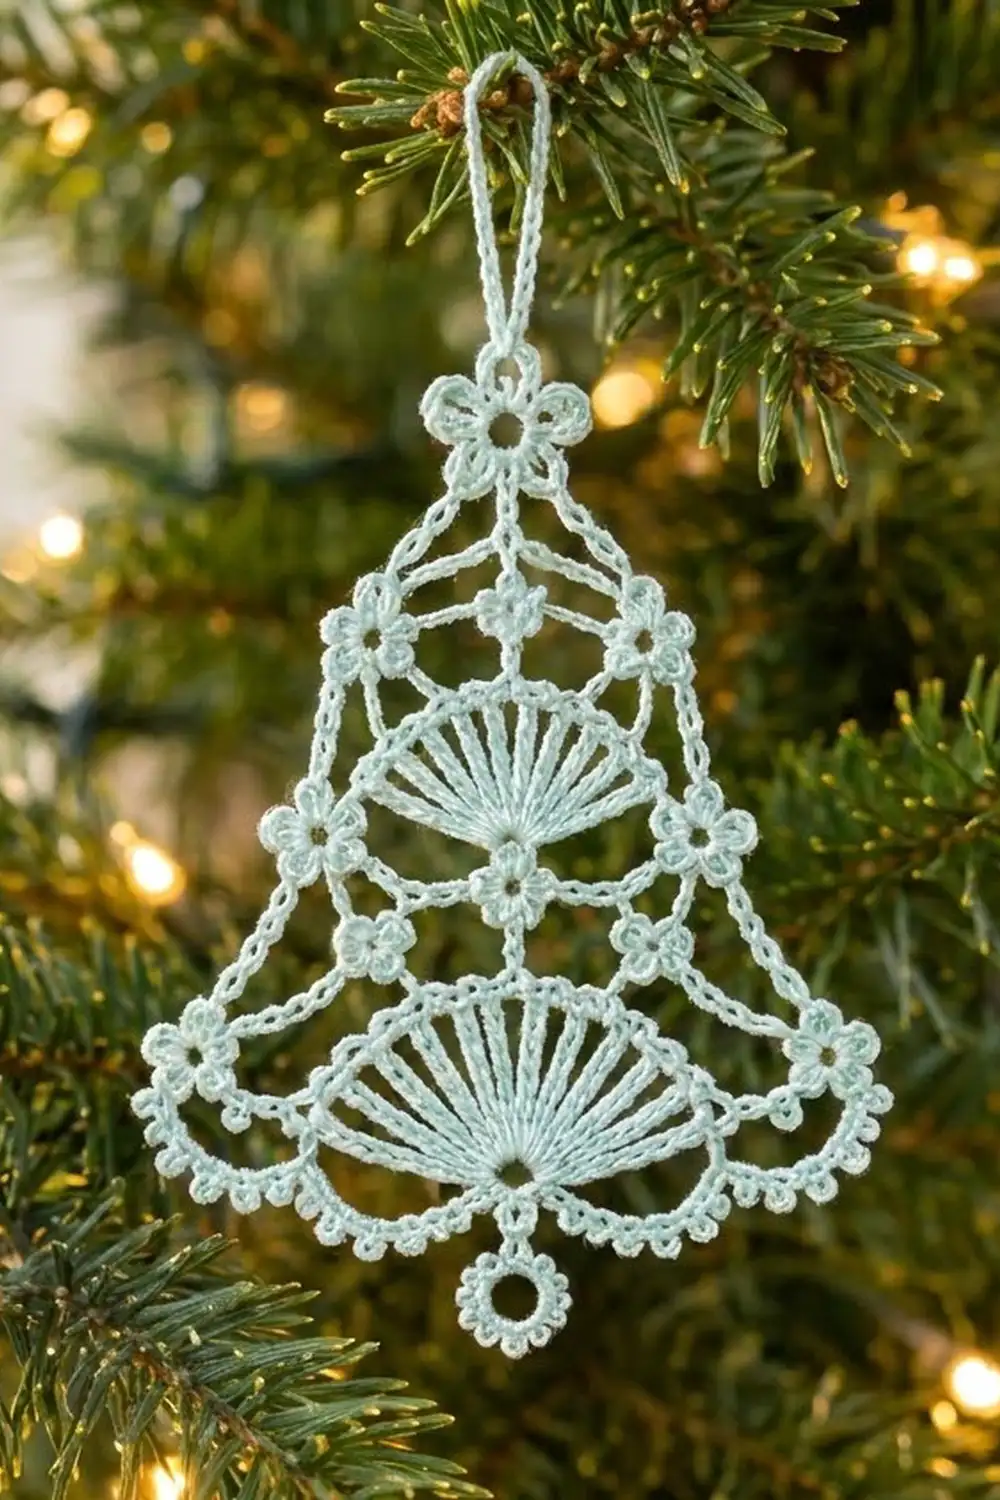
This little bell is a classic thread-lace Christmas ornament in a soft frosted mint. It is light and open, with chain lattice, tiny trefoil flowers, and two radiating fans that catch the light on the tree.
The design uses one color of size 10 crochet thread. The style is vintage doily lace: airy chain arches, picots, and spoke fans, stiffened so the bell holds its shape.
The pattern is written in US crochet terms. The finished bell measures 3.5 in (8.9 cm) wide and 4.75 in (12.1 cm) tall, including the clapper. The hanging loop adds 1.25 in (3.2 cm), for an overall length of 6 in (15.2 cm).
You work the bell bottom-up in turned rows. You start with the large lower fan, narrow through a lattice of arches and trefoils, add the smaller upper fan, then narrow again to the top flower. A border worked in two halves adds the flared corners, the picot scallops, and the clapper ring. A hanging loop finishes it.
Finished Size and Construction
- Finished size: 3.5 in (8.9 cm) wide x 4.75 in (12.1 cm) tall, plus a 1.25 in (3.2 cm) loop
- Skill level: Intermediate (thread lace)
- Terminology: US crochet terms
- Yarn weight: Size 10 crochet cotton thread (Lace, weight 0)
- Hook: 1.75 mm steel hook
- Number of pieces: 1 (single bell, worked in one piece)
- Layout: Single motif, no assembly
- Piece size before border: 2 in (5.1 cm) wide x 4 in (10.2 cm) tall
- Border depth: 0.75 in (1.9 cm) added at each lower corner; the clapper adds 0.75 in (1.9 cm) below the body
Materials
Use a mercerized cotton thread in size 10. Mercerized cotton has a crisp twist and a slight sheen, which keeps the picots defined and responds well to starch. Avoid fuzzy or acrylic thread, because it will not hold a stiffened shape.
- Pale mint size 10 crochet thread: 8 g, about 45 m (49 yd)
Tools:
- 1.75 mm steel crochet hook
- Fine tapestry needle for weaving in ends
- Small sharp scissors
- Fabric stiffener, starch, or a 1:1 mix of white craft glue and water
- Blocking board, or foam covered with plastic wrap
- Rustproof pins
- Ruler or measuring tape
The quantity above includes a margin of about 25 percent. One bell uses roughly 6 g (about 33 m / 36 yd).
Abbreviations (US Terms)
- ch: chain
- sl st: slip stitch
- sc: single crochet
- tr: treble crochet
- dtr: double treble crochet
- sk: skip
- sp(s): space(s)
- rep: repeat
Special stitches:
- Picot (p): Ch 3, sl st in 3rd ch from hook.
- Trefoil (tf): Ch 4, sl st in 4th ch from hook (first loop); ch 3, sl st in same ch (second loop); ch 3, sl st in same ch (third loop). The middle loop is the “top picot” of the trefoil.
Gauge and Checkpoints
Gauge is not critical for an ornament, but it controls the final shape. Make the lower fan (Rows 1–2) first as your test piece.
- Basic gauge: 14 sc = 1 in (2.5 cm); 12 ch = 1 in (2.5 cm), relaxed
- After Row 2: lower fan is 1.75 in (4.4 cm) wide x 0.9 in (2.3 cm) tall
- After Row 6: piece is 2 in (5.1 cm) tall from the bottom of the hub ring; widest point is 2 in (5.1 cm)
- After Row 8: upper fan is 1.25 in (3.2 cm) wide; piece is 2.6 in (6.6 cm) tall
- After Row 12: piece is 4 in (10.2 cm) tall to the top of the flower
- After border: 3.5 in (8.9 cm) wide x 4.75 in (12.1 cm) tall
If your lower fan is larger than 1.75 in (4.4 cm), change to a 1.5 mm hook. If it is smaller, change to a 2.0 mm hook. A difference of 0.125 in (0.3 cm) is fine, because blocking evens it out.
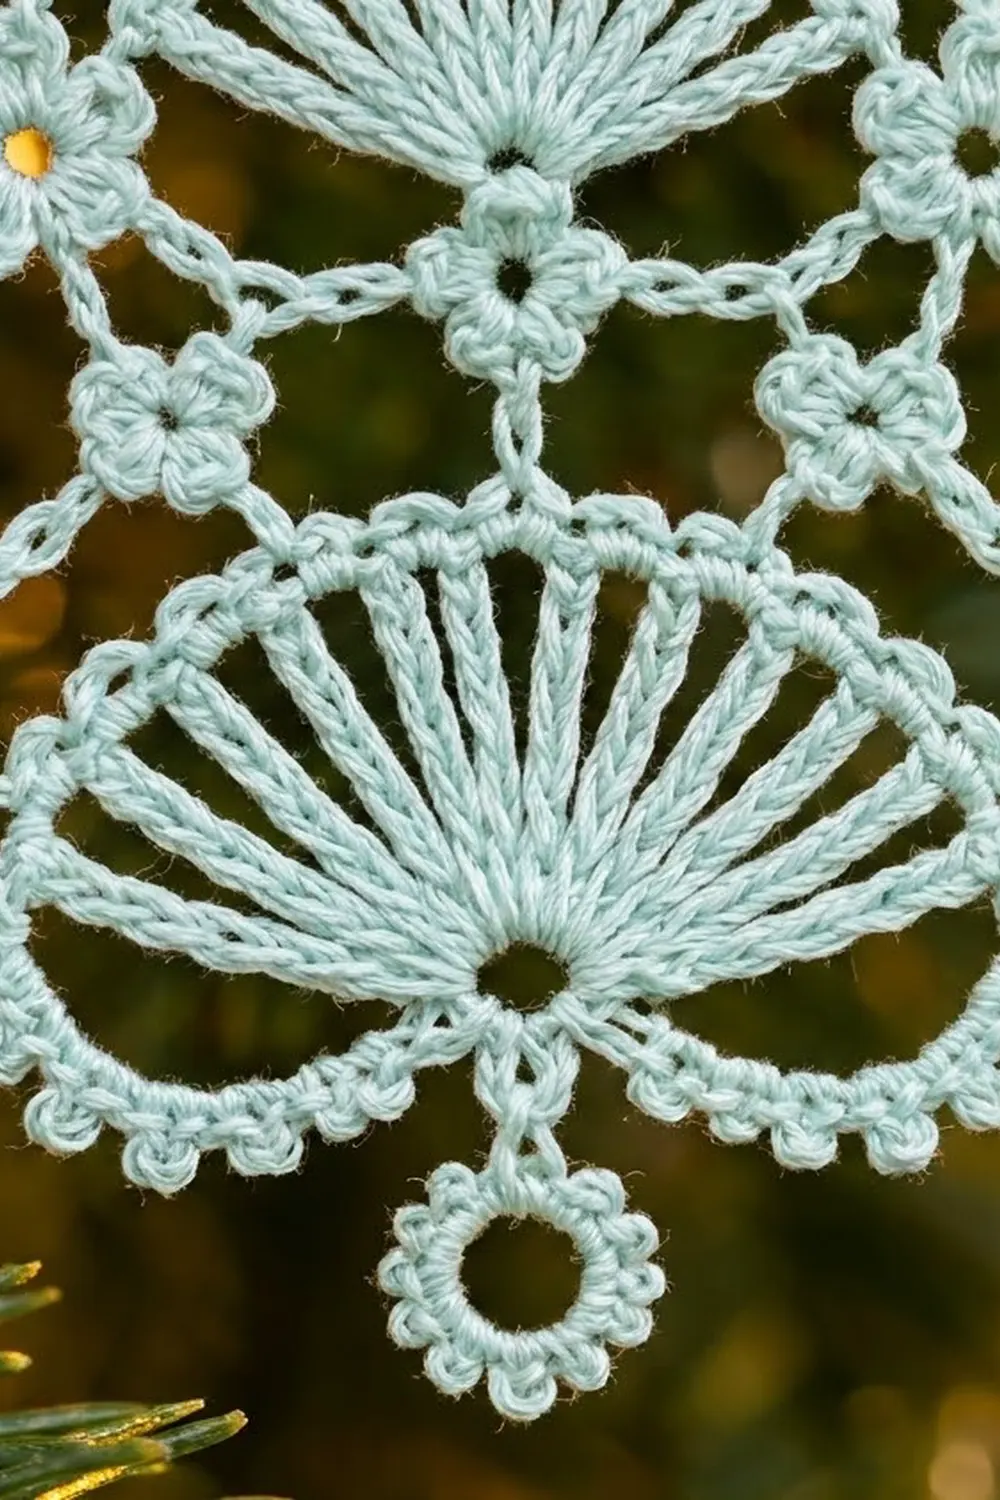
Lower Fan
Hub: Ch 8, sl st in first ch to form a ring.
Row 1: Ch 5 (counts as dtr), [ch 1, dtr in ring] 12 times, working only into the top half of the ring. Turn. (13 dtr, 12 ch-1 sps)
The spokes fan out from the hub like half a wheel. The lower edge of the ring stays bare. This is the bottom center point (P0), used later for the clapper and border.
Row 2: Ch 1, sc in first dtr, [2 sc in next ch-1 sp, sc in next dtr] 12 times, working the last sc in the top of the turning ch-5. Turn. (37 sc)
This forms the solid arc across the top of the fan. Check the 1.75 in (4.4 cm) width now.
Lower Lattice
Row 3: Ch 1, sc in first sc, [ch 6, sk 5 sc, sc in next sc] 6 times. Turn. (7 sc, 6 ch-6 arches)
Check: 1 + (6 x 6) = 37 stitches used, so the arches cover the whole arc with none left over.
Row 4: Sl st in each of next 3 ch, ch 1, sc in same arch, [ch 3, tf, ch 3, sc in next arch] 5 times. Turn. (6 sc, 5 tf)
Row 5: Sl st in each of next 3 ch and into the top picot of the first tf, ch 1, sc in same picot, [ch 7, sc in top picot of next tf] 4 times. Turn. (5 sc, 4 ch-7 arches)
Row 6: Sl st in each of next 4 ch, ch 1, sc in same arch, [ch 3, tf, ch 3, sc in next arch] 3 times. (4 sc, 3 tf) Fasten off.
The lattice now narrows from 6 arches to 3 trefoils. The center trefoil sits directly above the lower fan hub.
Upper Fan
Row 7: Join thread with a sl st in the top picot of the center tf of Row 6. Ch 6, sl st in first of these 6 ch to form a small hub ring. Ch 4 (counts as tr), [ch 1, tr in ring] 8 times, working into the top half of the ring. Turn. (9 tr, 8 ch-1 sps)
Row 8: Ch 1, sc in first tr, [2 sc in next ch-1 sp, sc in next tr] 8 times, working the last sc in the top of the turning ch-4. (25 sc)
Side tie: Ch 4, sl st in top picot of the outer tf of Row 6 on this side, ch 4, sl st in last sc of Row 8. Turn.
The tie anchors the fan to the lattice so the upper fan does not flop.
Upper Lattice and Top Flower
Row 9: Ch 1, sc in first sc, [ch 6, sk 5 sc, sc in next sc] 4 times. (5 sc, 4 ch-6 arches)
Check: 1 + (4 x 6) = 25 stitches used.
Side tie: Ch 4, sl st in top picot of the outer tf of Row 6 on this side, ch 4, sl st in last sc of Row 9. Turn.
Row 10: Sl st in each of next 3 ch, ch 1, sc in same arch, [ch 3, tf, ch 3, sc in next arch] 3 times. Turn. (4 sc, 3 tf)
Row 11: Sl st in each of next 3 ch and into the top picot of the first tf, ch 1, sc in same picot, [ch 7, sc in top picot of next tf] 2 times. Turn. (3 sc, 2 ch-7 arches)
Row 12 (top flower): Sl st in each of next 4 ch, ch 1, sc in same arch, ch 4 (left leg), ch 6, sl st in 6th ch from hook to form a ring.
- Flower Rnd 1: Ch 1, 10 sc in ring, sl st in first sc. (10 sc)
- Flower Rnd 2: [(sc, ch 3, sc) in next sc, sl st in next sc] 5 times. (5 petals)
Ch 4 (right leg), sc in next arch of Row 11. Fasten off.
Turn the flower so one petal points straight up and the two legs meet between the two lowest petals. The border uses the side petals at about 2–3 o’clock and 9–10 o’clock.
Check: the piece should now be 2 in (5.1 cm) wide x 4 in (10.2 cm) tall.
Border
The border adds the clapper, the flared corners, the picot scallops, and the outer side line with trefoils. You work it in two mirrored halves. Each half starts at P0 and ends at the top flower.
Border gauge: 12 ch = 1 in (2.5 cm). One [p, ch 4] repeat is about 0.375 in (1.0 cm).
Anchor points on each side (bottom to top):
- P0: bare lower edge of the lower fan hub ring
- P1: end sc of Row 2/Row 3
- P2: end sc of Row 4
- P3: end sc of Row 6
- P4: end sc of Row 8/Row 9
- P5: end sc of Row 10
- Side petal: petal tip of the top flower on that side
Clapper
Join thread with a sl st at P0. Ch 3 (stem), ch 10, sl st in 10th ch from hook to form a ring. Ch 1, [2 sc in ring, p] 8 times, sl st in first sc. (16 sc, 8 p) Sl st in each of the 3 stem ch to return to P0.
The clapper hangs 0.75 in (1.9 cm) below the body.
Border Half 1 (right side)
Starting at P0:
- Scallop: Ch 4, [p, ch 4] 6 times. (28 ch, 6 p)
- Corner: Tf.
- Ch 10, sc in P1.
- Ch 5, tf, ch 5, sc in P2.
- Ch 7, sc in P3.
- Ch 5, tf, ch 5, sc in P4.
- Ch 7, sc in P5.
- Ch 5, sl st in tip of side petal. Fasten off.
Per-side count: 77 ch (28 + 10 + 10 + 7 + 10 + 7 + 5), 6 p, 3 tf (1 corner + 2 side), 6 attachment points.
Border Half 2 (left side)
Join thread with a sl st at P0, on the other side of the clapper stem. Work steps 1–8 exactly as for Half 1, attaching to the left-side anchor points. Fasten off.
Per-side count: 77 ch, 6 p, 3 tf, 6 attachment points. This matches Half 1 exactly.
Why the Math Works
Both halves use the same counts, so the bell stays symmetrical. The scallop is 28 ch, about 2.3 in (5.8 cm) long. It spans a straight distance of about 2 in (5.1 cm) from P0 to the corner. That small extra length gives a gentle downward curve instead of a tight line.
The ch-10 from the corner to P1 sets the corner 0.75 in (1.9 cm) outside the body, so 2 in + 0.75 in + 0.75 in = 3.5 in (8.9 cm) finished width. The side chains with trefoils are slightly longer than the gaps they span. This makes the outer line bow outward, so the trefoils sit just outside the body. The height is 4 in (10.2 cm) of body plus 0.75 in (1.9 cm) of clapper, which gives 4.75 in (12.1 cm).
Hanging Loop
Join thread with a sl st in the tip of the top petal. Ch 30, sl st in same petal tip. Fasten off. Folded, the loop is about 1.25 in (3.2 cm) long.
Final Blocking
- Weave in all ends along chain lines, not through picots. Trim closely.
- Soak the bell in fabric stiffener or the glue-water mix for 1–2 minutes.
- Squeeze gently in a towel; do not wring. Make sure no stiffener is left filling the arches.
- Lay the bell right side up on the covered blocking board.
- Pin the top flower petals first, then P0 directly below them, keeping a straight center line.
- Pin the two corners out to a total width of 3.5 in (8.9 cm).
- Pin each scallop picot so the curve is smooth and even on both sides.
- Pin out every trefoil loop and each picot on the clapper ring.
- Spread the fan spokes evenly and pin the tips of the arcs.
- Check the 4.75 in (12.1 cm) height and adjust the pins.
- Let it dry fully, at least 12 hours, before unpinning.
Final Quality-Control Checklist
- Lower fan has 13 spokes and a 37-sc arc.
- Upper fan has 9 spokes and a 25-sc arc.
- Lower lattice reads 6 arches, 5 tf, 4 arches, 3 tf.
- Upper lattice reads 4 arches, 3 tf, 2 arches, flower.
- Top flower has 5 even petals, with one pointing up.
- Each border half has 77 ch, 6 p, and 3 tf.
- Clapper has 16 sc and 8 p and hangs centered.
- Width is 3.5 in (8.9 cm); height is 4.75 in (12.1 cm).
- All ends are hidden and the bell hangs straight from its loop.
Troubleshooting
Fan cups or ruffles: The spokes don’t match the arc. Recheck the count of 2 sc in each space, or change hook size for the fan rows only.
Lattice puckers: The arches are too tight. Chain more loosely, or add 1 ch to each arch in Rows 3, 5, 9, and 11.
Bell leans to one side: The border halves don’t match. Count the chains on both halves and redo the shorter side.
Scallops pull straight: Your chains are tight. Go up one hook size for the border only.
Trefoils twist: Work all three loops into the same chain, and pin each loop open during blocking.
Upper fan droops: A side tie was skipped or worked too loosely. Redo the tie with snug chains.
Care
Dust gently with a soft brush and store flat in tissue between seasons. If the bell goes soft, rinse it, stiffen it again, and re-block.
Final Notes
Here is the full measurement chain. The lower fan is 1.75 in (4.4 cm) wide. The lattice brings the body to 2 in (5.1 cm) wide and 2 in (5.1 cm) tall. The upper fan brings the height to 2.6 in (6.6 cm), and the top flower completes the body at 4 in (10.2 cm). The border adds 0.75 in (1.9 cm) at each corner, and the clapper adds 0.75 in (1.9 cm) below. The finished bell is 3.5 in (8.9 cm) x 4.75 in (12.1 cm). Check each stage, keep the two halves identical, and block carefully.
Happy crocheting!