

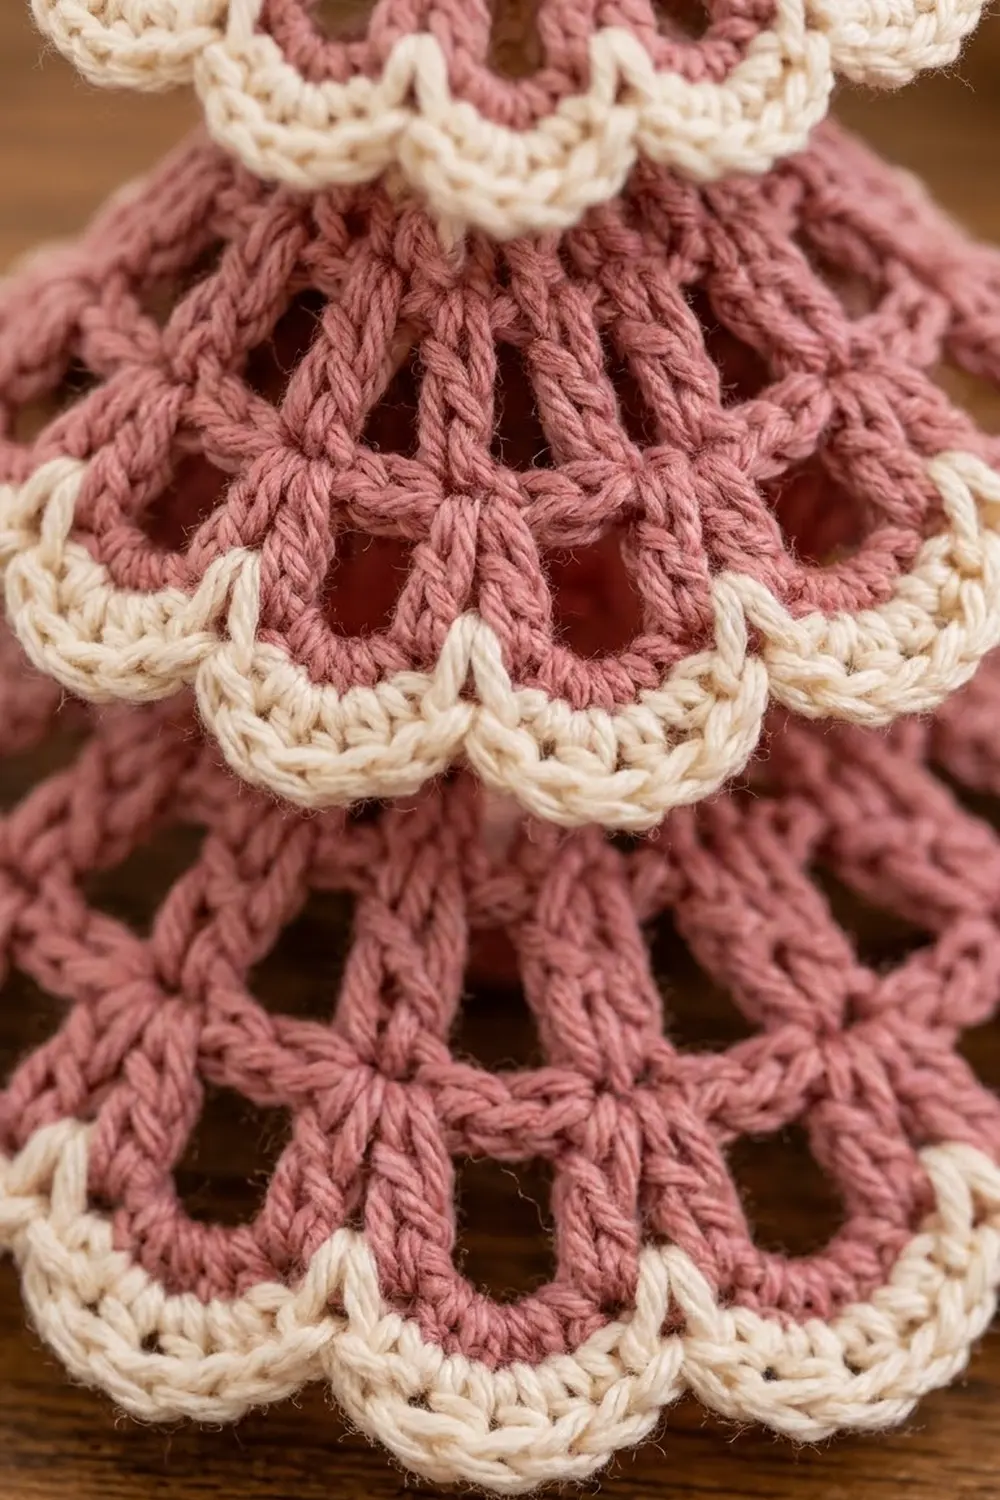
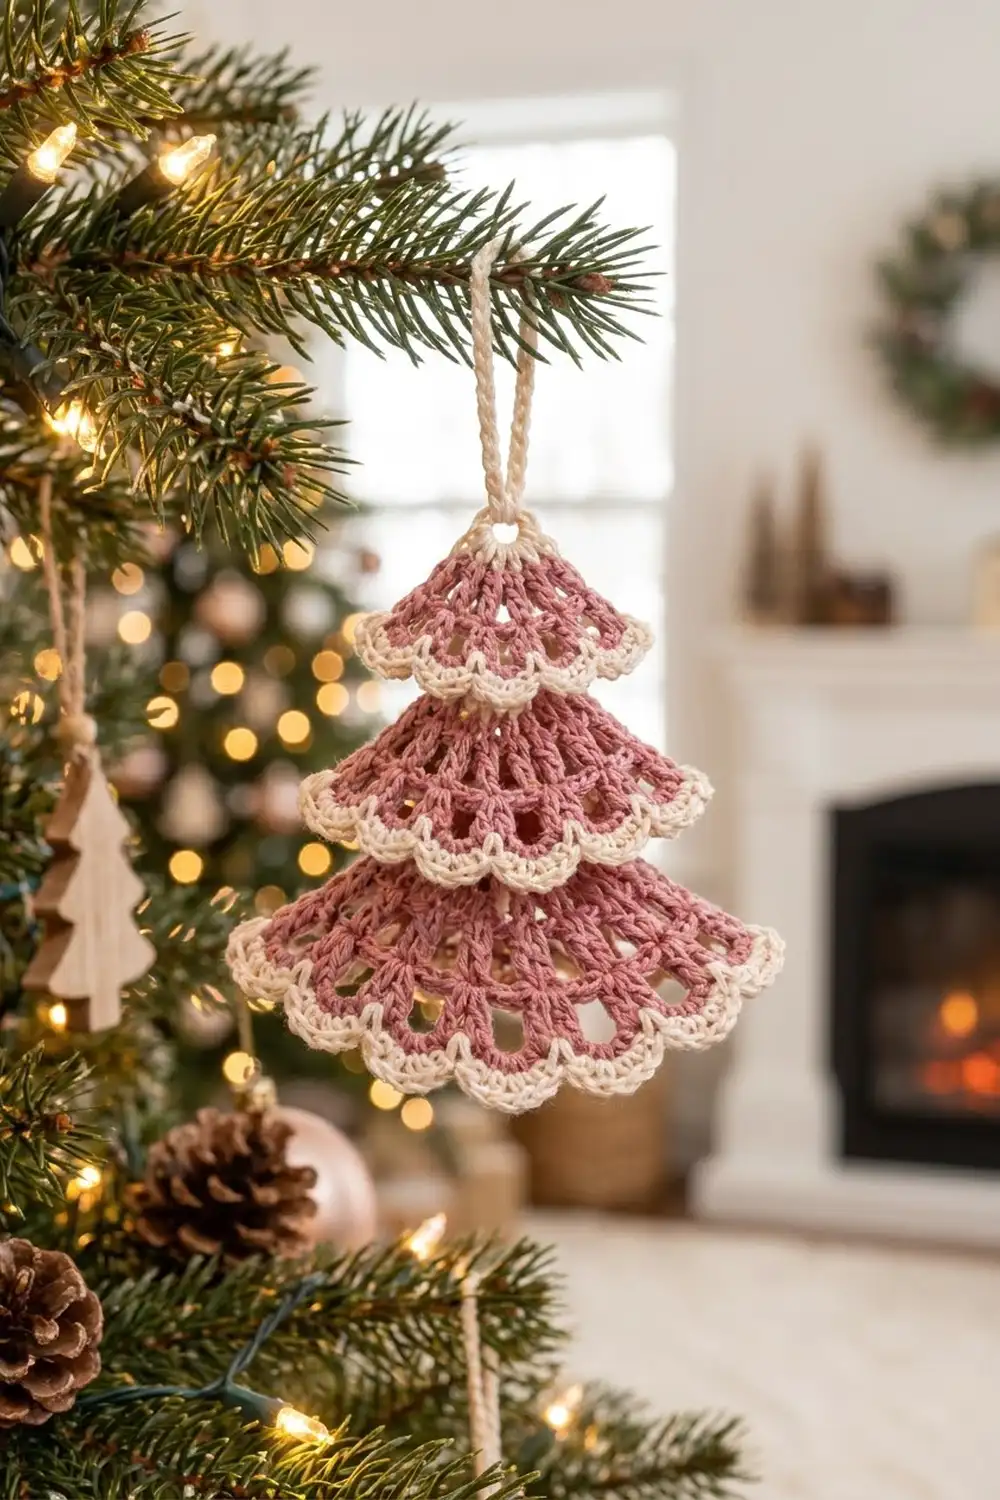
This ornament looks like a small lace Christmas tree. It has three dusty-rose fans stacked on a cream cord, and each fan ends in a soft cream scalloped hem. The open spokes let tree lights shine through, so it looks delicate on a branch even though it works up quickly.
Two colors do all the work. Dusty rose forms the lacy body of each tier, and cream adds the scallops, the cord and the hanging loop. The overall style is vintage and cottage-like, and it fits well with blush, gold and natural-wood decor.
All terms are US crochet terms. The finished ornament measures about 5.25 in (13.3 cm) wide at the bottom tier and 5.75 in (14.6 cm) tall, plus a 2 in (5.1 cm) hanging loop.
Construction is simple. You work three flat fans back and forth from a magic ring, each with more spokes and rows than the one before. You edge each fan with a single row of cream scallops, then sew the three tiers onto a chained cream cord that already has its hanging loop.
Finished Size and Construction
- Finished size: 5.25 in (13.3 cm) wide x 5.75 in (14.6 cm) tall, plus a 2 in (5.1 cm) loop
- Skill level: Easy / advanced beginner
- Terminology: US terms
- Yarn weight: DK (#3 light) cotton or cotton blend
- Hook: 3.5 mm (E-4)
- Number of pieces: 4 (small tier, medium tier, large tier, cord with loop)
- Layout: Vertical stack, with tier tops spaced 1.5 in (3.8 cm) apart on the cord
- Piece sizes (with edging):
- Small: 3.75 in (9.5 cm) wide x 2 in (5.1 cm) tall
- Medium: 4.5 in (11.4 cm) wide x 2.4 in (6.1 cm) tall
- Large: 5.25 in (13.3 cm) wide x 2.8 in (7.1 cm) tall
- Size before edging (fan radius): small 1.6 in (4.1 cm), medium 2 in (5.1 cm), large 2.4 in (6.1 cm)
- Edging depth: 0.4 in (1.0 cm)
Materials
Use a smooth, mercerized or matte DK cotton. Cotton holds the open spokes crisply and blocks flat. Avoid fuzzy or very stretchy yarn, because it blurs the lace and makes the fans droop.
- Dusty rose (main color): 10 g, about 21 m (23 yd)
- Cream (contrast color): 5 g, about 10 m (11 yd)
These quantities include a margin of about 20 percent for swatching and tails.
Tools:
- 3.5 mm (E-4) crochet hook
- Tapestry needle
- Scissors
- 3 locking stitch markers
- Blocking mat, rust-proof pins and a spray bottle
- Optional: diluted fabric stiffener or spray starch
Abbreviations (US Terms)
- ch – chain
- sl st – slip stitch
- sc – single crochet
- hdc – half double crochet
- dc – double crochet
- sp(s) – space(s)
- sk – skip
- st(s) – stitch(es)
- RS – right side
Special stitch – Scallop: (hdc, 3 dc, hdc) all worked into the same chain space. One scallop is 5 stitches.
Turning chain: Throughout this pattern, ch 3 at the start of a row counts as the first dc.
Gauge and Checkpoints
Gauge: 18 dc and 10 dc rows = 4 in (10.2 cm) with a 3.5 mm hook. That means each dc row adds about 0.4 in (1.0 cm) of fan radius.
Make the small tier first and use it as your test piece. Measure from the center of the ring to the outer edge of the current row:
- After Row 2: 0.8 in (2.0 cm)
- After Row 4: 1.6 in (4.1 cm)
- After the edging: 2 in (5.1 cm) tall, 3.75 in (9.5 cm) wide
If your tier is too big, go down to a 3.25 mm hook. If it is too small, go up to a 3.75 mm hook. Don’t change the stitch counts, because the scallop count depends on them. A difference of 0.125 in (0.3 cm) is fine and will block out.
Small Tier (Make 1)
With dusty rose:
Row 1: Make a magic ring. Ch 3 (counts as dc), then work 6 dc into the ring. Pull the ring partly closed, leaving a hole about 0.25 in (0.6 cm) across. Turn. (7 dc)
Row 2: Ch 3, dc in the same st, then 2 dc in each remaining st across, ending in the top of the turning ch. Turn. (14 dc)
Row 3: Ch 3, dc in next dc, ch 2, dc in each of next 2 dc; repeat from * 6 times. Turn. (14 dc in 7 pairs, 6 ch-2 sps)
Row 4: Ch 3, dc in next dc, ch 3, sk ch-2 sp, dc in each of next 2 dc; repeat from * 6 times. (14 dc in 7 pairs, 6 ch-3 sps)
Fasten off and leave an 8 in (20.3 cm) rose tail for sewing. Check that the radius is 1.6 in (4.1 cm).
Medium Tier (Make 1)
With dusty rose:
Row 1: Make a magic ring. Ch 3, then work 8 dc into the ring. Partly close the ring to a 0.25 in (0.6 cm) hole. Turn. (9 dc)
Row 2: Ch 3, dc in the same st, then 2 dc in each st across. Turn. (18 dc)
Row 3: Ch 3, dc in next dc, ch 1, dc in each of next 2 dc; repeat from * 8 times. Turn. (18 dc in 9 pairs, 8 ch-1 sps)
Row 4: Ch 3, dc in next dc, ch 2, sk ch-1 sp, dc in each of next 2 dc; repeat from * 8 times. Turn. (18 dc, 8 ch-2 sps)
Row 5: Ch 3, dc in next dc, ch 3, sk ch-2 sp, dc in each of next 2 dc; repeat from * 8 times. (18 dc, 8 ch-3 sps)
Fasten off and leave an 8 in (20.3 cm) tail. The radius should be 2 in (5.1 cm).
Large Tier (Make 1)
With dusty rose:
Row 1: Make a magic ring. Ch 3, then work 10 dc into the ring. Partly close the ring to a 0.25 in (0.6 cm) hole. Turn. (11 dc)
Row 2: Ch 3, dc in the same st, then 2 dc in each st across. Turn. (22 dc)
Row 3: Ch 3, dc in next dc, ch 1, dc in each of next 2 dc; repeat from * 10 times. Turn. (22 dc in 11 pairs, 10 ch-1 sps)
Row 4: Ch 3, dc in next dc, ch 2, sk ch-1 sp, dc in each of next 2 dc; repeat from * 10 times. Turn. (22 dc, 10 ch-2 sps)
Row 5: Ch 3, dc in next dc, ch 2, sk ch-2 sp, dc in each of next 2 dc; repeat from * 10 times. Turn. (22 dc, 10 ch-2 sps)
Row 6: Ch 3, dc in next dc, ch 3, sk ch-2 sp, dc in each of next 2 dc; repeat from * 10 times. (22 dc, 10 ch-3 sps)
Fasten off and leave an 8 in (20.3 cm) tail. The radius should be 2.4 in (6.1 cm).
Cord and Hanging Loop (Make 1)
With cream, ch 24 and sl st in the first ch to form the hanging loop. Laid flat, the loop is about 2 in (5.1 cm) tall.
Continue from the sl st: ch 22 for the stem. Fasten off and leave a 6 in (15.2 cm) tail.
Chain gauge is about 6 ch per inch (2.5 cm), so the 22-ch stem is about 3.7 in (9.4 cm) long.
Make All Pieces
Per ornament:
- Dusty rose: 3 tiers (small, medium, large)
- Cream: 3 scallop edgings (one per tier) and 1 cord with loop
Layout, top to bottom:
        ( loop )
           |
     [ SMALL  7 spokes ]   stem ch 2
           |
   [ MEDIUM   9 spokes ]   stem ch 11
           |
 [ LARGE     11 spokes  ]  stem ch 20
Edge all three tiers (see Border) before you join them.
Border: Cream Scallop Edging
Border gauge: One scallop over a ch-3 space plus the 2 sc between scallops measures about 0.5 in (1.3 cm) across. The edging adds 0.4 in (1.0 cm) of depth.
Work the edging along the curved hem of each tier only. Leave the two straight sides and the ring unedged.
Small tier: With the last-row side facing, join cream with sc in the first dc of Row 4, then sc in the next dc. Scallop in next ch-3 sp, sc in each of next 2 dc; repeat from * 6 times. Fasten off.
- Count: 14 sc + (6 scallops x 5) = 14 + 30 = 44 sts
Medium tier: Work the same way across Row 5, repeating from * 8 times.
- Count: 18 sc + (8 x 5) = 18 + 40 = 58 sts
Large tier: Work the same way across Row 6, repeating from * 10 times.
- Count: 22 sc + (10 x 5) = 22 + 50 = 72 sts
Why the math works: The edging is a conversion row. Every dc gets exactly 1 sc, so the sc count equals that tier’s dc count (14, 18, 22). Every ch-3 space gets exactly 1 scallop, so the scallop count equals that tier’s space count (6, 8, 10), which is always one less than its number of spokes (7, 9, 11).
No stitches are added at the ends. Each tier starts and finishes on a dc pair, so the scallops sit centered between spokes and both ends of the hem match.
Joining
Method: Sew each tier’s ring onto the cord stem with the tier’s rose tail, using small whipstitches.
Stitch-to-stitch logic: Count stem chains down from the sl st at the base of the loop.
- Place the small tier with its ring hole centered over stem ch 2. The cord runs down behind the tier. Whipstitch 3 times through the ring stitches and the back bump of ch 2, then 3 times through ch 3 to keep the tier from tipping.
- Place the medium tier’s ring at stem ch 11 (9 ch, or 1.5 in / 3.8 cm, below the small tier). Sew it the same way through ch 11 and ch 12.
- Place the large tier’s ring at stem ch 20. Sew it through ch 20 and ch 21.
- Weave the cream stem tail up into the back of the large tier. Weave each rose tail into its own tier.
Tension: Pull each whipstitch snug but don’t cinch it. Overtightening puckers the ring and pulls the spokes off center. The tier should hang straight down when you hold the loop.
Size checkpoint: Because the tier tops are 1.5 in (3.8 cm) apart, each hem overlaps the tier below. From the top of the small tier to the large tier’s hem, the ornament should measure 1.5 + 1.5 + 2.8 = about 5.75 in (14.6 cm). Width is set by the large tier: 5.25 in (13.3 cm).
Final Blocking
- Lightly mist the ornament until it is damp, not soaked.
- Lay it face down on the blocking mat.
- Pin the center spoke of each tier straight down along the cord.
- Fan the outer spokes evenly so every ch space opens to the same width.
- Pin the tip of every scallop to curve out cleanly.
- Check the widths: 3.75 in (9.5 cm), 4.5 in (11.4 cm) and 5.25 in (13.3 cm).
- For a crisper ornament, dab diluted stiffener on the tiers only, not the loop.
- Let it dry completely, then unpin.
Final Quality-Control Checklist
- Spoke counts are 7, 9 and 11 dc pairs.
- Scallop counts are 6, 8 and 10, with 2 sc between each pair of scallops.
- Ring holes are about 0.25 in (0.6 cm) and sit centered on the cord.
- Tier tops are 1.5 in (3.8 cm) apart.
- The ornament hangs straight, with no tier twisted.
- The loop is 2 in (5.1 cm) and its sl st join is secure.
- All tails are woven in invisibly.
Troubleshooting
- Fan cups or curls: Your dc are too tight, or a chain space is too short. Recount the chains in each space, or go up a hook size.
- Fan ruffles: Your chains are too loose. Chain more firmly, or go down a hook size.
- Edging lopsided: Check that you started in the first dc, not in the turning chain’s space.
- Ring hole closed: Undo Row 1 and pull the magic ring only partly closed.
- Tier tilts: Add one more whipstitch on the opposite side of the ring.
- Loop twisted: Untwist the chain before working the joining sl st.
Care
Hand wash in cool water, press out moisture in a towel and dry flat. Re-block, and re-stiffen if you used stiffener.
Final Notes
The measurement chain is easy to follow:
- Gauge sets each dc row at 0.4 in (1.0 cm).
- The fans reach radii of 1.6, 2 and 2.4 in (4.1, 5.1 and 6.1 cm).
- The edging adds 0.4 in (1.0 cm), giving tiers 2, 2.4 and 2.8 in (5.1, 6.1 and 7.1 cm) tall.
- Spacing the tiers 1.5 in (3.8 cm) apart on the cord gives a 5.75 in (14.6 cm) tree.
Check each stage and the finished ornament will match. Make a few for the tree or a gift box.
Happy crocheting!