

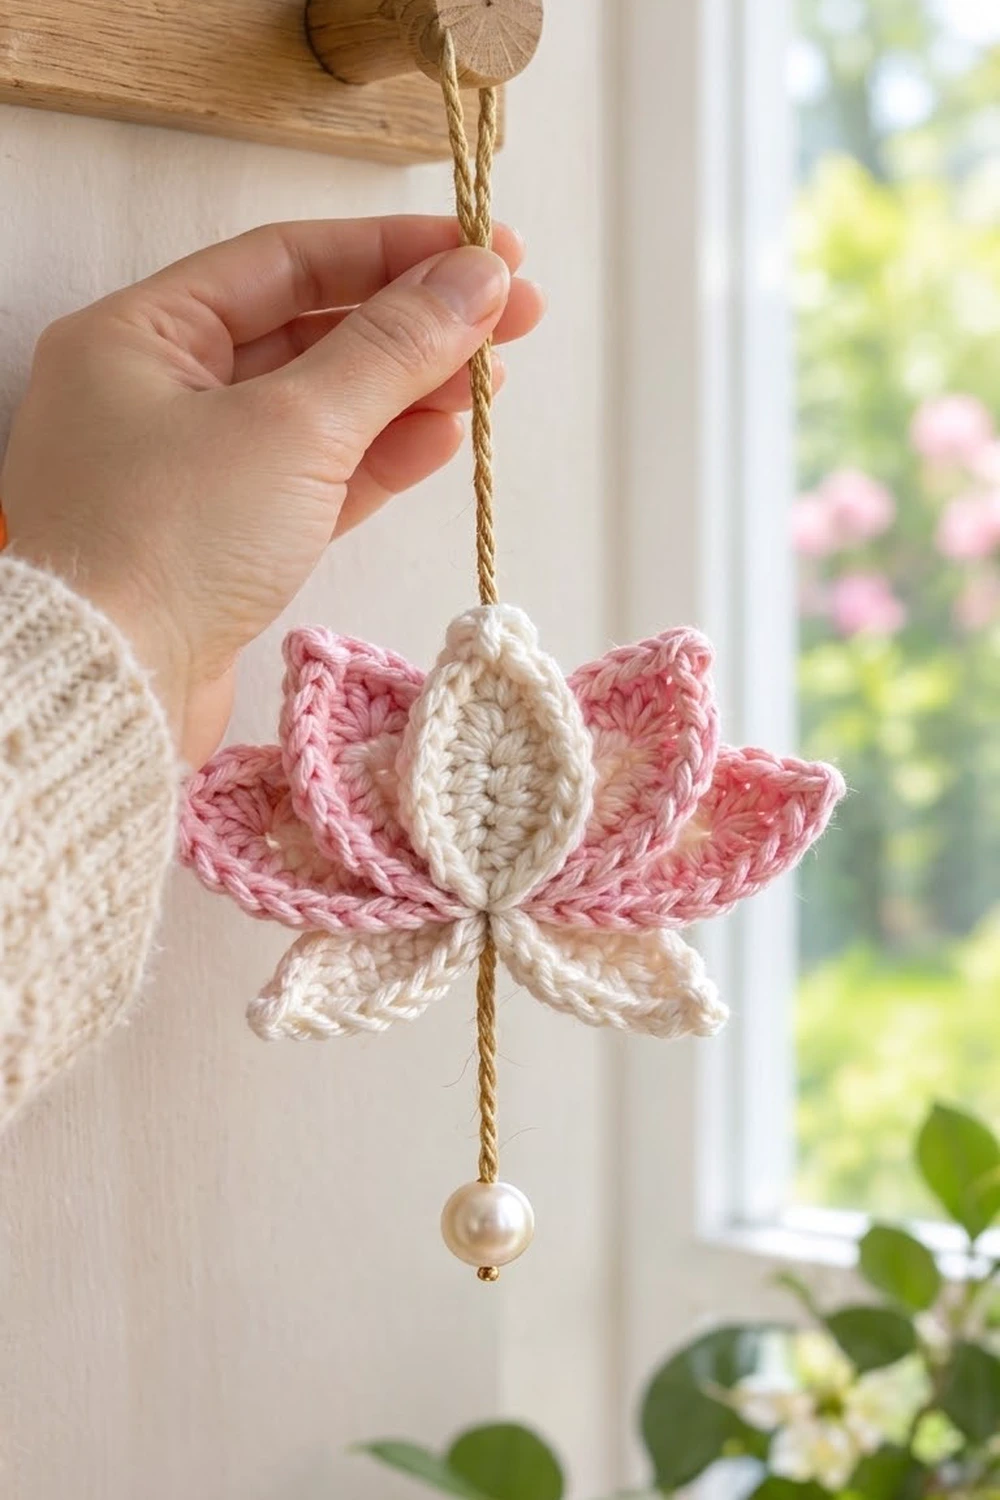
The Blush Lotus is a small, soft hanging ornament shaped like an open lotus flower. A tall cream petal stands in the center. Six blush-pink petals fan out behind it, and two short cream petals point downward like sepals. A gold cord runs through the middle and ends in a pearl drop.
Every petal has the same structure: a textured spine of taller stitches, a smooth single-crochet round, and a raised slip-stitch rim that looks like a tiny braid. The rim is what makes the petals look sculpted and layered rather than flat.
This pattern uses US crochet terms. The finished ornament measures about 4.5 in (11.4 cm) wide and 3.75 in (9.5 cm) tall, not counting the cord.
Construction is simple. You crochet nine petals in three sizes, each worked in rounds around a foundation chain. You stack and sew them at the base, then thread the cord through the center and add the bead.
Finished Size and Construction
- Finished size: about 4.5 in (11.4 cm) wide x 3.75 in (9.5 cm) tall
- Skill level: Easy / advanced beginner
- Terminology: US crochet terms
- Yarn weight: DK (#3), cotton or cotton blend
- Hook: 3.5 mm (E-4)
- Number of pieces: 9 petals (1 large, 6 medium, 2 small)
- Layout: center petal upright; 3 pink petals fanned on each side; 2 small petals angled down
- Petal sizes: Large 2.75 x 1.4 in (7.0 x 3.6 cm); Medium 2.25 x 1.3 in (5.7 x 3.3 cm); Small 1.9 x 1.1 in (4.8 x 2.8 cm)
- Size before rim (after Round 2): Large 2.6 x 1.3 in (6.6 x 3.3 cm); Medium 2.1 x 1.2 in (5.3 x 3.0 cm); Small 1.8 x 1.0 in (4.6 x 2.5 cm)
- Rim (border) depth: about 0.1 in (0.3 cm) per edge
Materials
Use a smooth, mercerized DK cotton. It gives crisp stitch definition and holds the petal points well. Acrylic works too, but the petals will be softer and curl less neatly. Choose a cream that is warm rather than stark white and a pale, dusty pink.
- Color A, Cream: 10 g, about 23 m (1 large petal + 2 small petals + sewing)
- Color B, Blush Pink: 15 g, about 35 m (6 medium petals + sewing)
These quantities include a generous margin. The actual use is roughly 5 g cream and 9 g pink.
Tools and notions:
- 3.5 mm (E-4) crochet hook
- Tapestry needle with a large eye
- 14 in (35.6 cm) of 2 mm twisted gold or tan cord
- One 12 mm cream pearl bead with a hole large enough for the cord
- Scissors
- Stitch marker
- Pins and a foam blocking mat
- Spray bottle of water
- Optional: fabric stiffener for crisper petals
Abbreviations (US Terms)
- ch – chain
- sl st – slip stitch
- sc – single crochet
- hdc – half double crochet
- dc – double crochet
- BLO – back loop only
- sp – space
- st(s) – stitch(es)
- rnd – round
Special technique – Rim slip stitch (BLO sl st): Insert the hook into the back loop only of the next stitch, yarn over and pull through the stitch and the loop on the hook. Worked all the way around, this leaves the front loops standing up as a raised, braid-like ridge on the right side.
Working the opposite side of the chain: After the far tip, rotate the petal. Work into the free loops on the underside of the foundation chain, using the same chains as the first side.
Gauge and Checkpoints
Gauge: 20 sc x 22 rows = 4 in (10.2 cm) in single crochet, so 1 sc is about 0.2 in (0.5 cm) wide. One dc is about 0.4 in (1.0 cm) tall.
Gauge matters here because the petals need to fit together. Make one Medium pink petal first and measure it at each stage:
- After Round 1: 2.0 in (5.1 cm) long x 0.9 in (2.3 cm) wide
- After Round 2: 2.1 in (5.3 cm) x 1.2 in (3.0 cm)
- After Round 3 (rim): 2.25 in (5.7 cm) x 1.3 in (3.3 cm)
If your petal is too big by more than 0.125 in (0.3 cm), go down to a 3.25 mm hook. If it is too small, go up to a 3.75 mm hook. Keep the same hook for all nine petals so the sizes stay in proportion.

Petal Pattern
All three petal sizes follow the same three rounds. Round 1 builds the spine around the chain, Round 2 smooths and widens it, and Round 3 adds the rim. The tip is the far end of the chain and the base is the starting end, which gets sewn to the center.
Large Center Petal (make 1 in Color A, Cream)
Ch 13.
Round 1: Sc in 2nd ch from hook, hdc in next 2 ch, dc in next 6 ch, hdc in next 2 ch (11 sts on first side). In the last ch work (sc, ch 2, sc) for the tip. Rotate and work along the opposite side of the chain: hdc in next 2 ch, dc in next 6 ch, hdc in next 2 ch, sc in last ch (11 sts on second side). Ch 2, sl st to first sc to form the base point.
(24 sts: 11 per side + 2 tip sc, plus 2 ch-2 sps)
Checkpoint: 2.4 in (6.1 cm) x 0.9 in (2.3 cm).
Round 2: Ch 1 (does not count as a st).
– First side: sc in first 3 sts, 2 sc in next st, sc in next 3 sts, 2 sc in next st, sc in next 3 sts (13 sc).
– Tip: sc in tip sc, (sc, ch 2, sc) in ch-2 sp, sc in next tip sc (4 sc).
– Second side: sc in next 3 sts, 2 sc in next st, sc in next 3 sts, 2 sc in next st, sc in next 3 sts (13 sc).
– Base: (sc, ch 2, sc) in base ch-2 sp (2 sc). Sl st to first sc.
(32 sc: 13 + 4 + 13 + 2, plus 2 ch-2 sps)
The two increases on each side sit over the dc section, the widest part of the petal. They keep the round flat and give the oval its full belly.
Checkpoint: 2.6 in (6.6 cm) x 1.3 in (3.3 cm).
Round 3 (rim): See the Border section below. Fasten off, leaving a 10 in (25.4 cm) tail for sewing.
Medium Petal (make 6 in Color B, Blush Pink)
Ch 11.
Round 1: Sc in 2nd ch from hook, hdc in next 2 ch, dc in next 4 ch, hdc in next 2 ch (9 sts). In the last ch work (sc, ch 2, sc). Rotate and work along the opposite side: hdc in next 2 ch, dc in next 4 ch, hdc in next 2 ch, sc in last ch (9 sts). Ch 2, sl st to first sc.
(20 sts: 9 per side + 2 tip sc, plus 2 ch-2 sps)
Round 2: Ch 1.
– First side: sc in first 3 sts, 2 sc in next st, sc in next st, 2 sc in next st, sc in next 3 sts (11 sc).
– Tip: sc in tip sc, (sc, ch 2, sc) in ch-2 sp, sc in next tip sc (4 sc).
– Second side: repeat first side (11 sc).
– Base: (sc, ch 2, sc) in base sp (2 sc). Sl st to first sc.
(28 sc: 11 + 4 + 11 + 2, plus 2 ch-2 sps)
Round 3 (rim): See Border. Fasten off, leaving an 8 in (20.3 cm) tail.
Small Lower Petal (make 2 in Color A, Cream)
Ch 9.
Round 1: Sc in 2nd ch from hook, hdc in next 2 ch, dc in next 2 ch, hdc in next 2 ch (7 sts). In the last ch work (sc, ch 2, sc). Rotate and work along the opposite side: hdc in next 2 ch, dc in next 2 ch, hdc in next 2 ch, sc in last ch (7 sts). Ch 2, sl st to first sc.
(16 sts: 7 per side + 2 tip sc, plus 2 ch-2 sps)
Checkpoint: 1.6 in (4.1 cm) x 0.8 in (2.0 cm).
Round 2: Ch 1.
– First side: sc in each of next 7 sts (7 sc).
– Tip: sc in tip sc, (sc, ch 2, sc) in ch-2 sp, sc in next tip sc (4 sc).
– Second side: sc in each of next 7 sts (7 sc).
– Base: (sc, ch 2, sc) in base sp (2 sc). Sl st to first sc.
(20 sc: 7 + 4 + 7 + 2, plus 2 ch-2 sps)
This round has no side increases, which keeps the lower petals slim and pointed.
Checkpoint: 1.8 in (4.6 cm) x 1.0 in (2.5 cm).
Round 3 (rim): See Border. Fasten off, leaving an 8 in (20.3 cm) tail.
Make All Pieces
| Petal | Color | Quantity | Starting chain | Final size |
|---|---|---|---|---|
| Large | Cream | 1 | Ch 13 | 2.75 x 1.4 in (7.0 x 3.6 cm) |
| Medium | Blush Pink | 6 | Ch 11 | 2.25 x 1.3 in (5.7 x 3.3 cm) |
| Small | Cream | 2 | Ch 9 | 1.9 x 1.1 in (4.8 x 2.8 cm) |
Layout (front view, all bases meeting at the center hub “X”):
                 [ L ]
        [M3]   [M2]  [M2]   [M3]
  [M1]          |  L  |          [M1]
     \          |     |          /
      ----------   X   ----------
                 /   \
              [S]     [S]
- L = Large cream petal, upright, frontmost layer
- M3 = inner pink pair, about 20° from vertical, directly behind L
- M2 = middle pink pair, about 45° from vertical
- M1 = outer pink pair, about 70° from vertical, backmost layer
- S = Small cream petals, about 40° below horizontal on each side, sewn behind the hub
Joining
Method: whipstitch through the base sections, using the petal tails and a tapestry needle.
Stitch-to-stitch logic: Each petal is joined only through its base area. That area is the base ch-2 point plus the 3 rim stitches on each side of it, about the bottom 0.4 in (1.0 cm) of the petal. The rest of every petal stays free so it can cup and layer.
- Back layer. Lay the two M1 petals right side up, base points touching, angled as shown. Sew their base ch-2 points together with 2 whipstitches.
- Middle layer. Place the two M2 petals on top, base points on the same hub. Sew through the M2 base points and the M1 layer below, matching each base ch-2 point and the 3 sts on each side.
- Inner layer. Add the two M3 petals the same way.
- Center. Place the Large petal on top, upright, with its base point over the hub. Whipstitch its 3 base sts on each side through all pink layers.
- Lower petals. Turn the flower over. Sew the two Small petals to the back of the hub, base points meeting, angled downward so their tips show below the front.
- Weave every tail into the hub area and trim.
Tension: Pull each whipstitch snug but not tight. If you over-tighten, the hub puckers and the petals tilt forward. Each petal should lie at its angle without being held.
Size checkpoint: The assembled flower should measure about 4.5 in (11.4 cm) from outer pink tip to outer pink tip, and 3.75 in (9.5 cm) from the Large petal tip to the bottom of the Small petal tips. If it is under 4.25 in (10.8 cm) wide, open the M1 petals a little flatter. If it is over 4.75 in (12.1 cm), angle them slightly upward.
Cord: Fold the 14 in (35.6 cm) cord in half to find the middle. Thread one end through the tapestry needle and pass it vertically through the hub, behind the Large petal. Knot the two ends together about 3 in (7.6 cm) above the Large petal tip to form the hanging loop. Thread the remaining long tail down below the hub, add the pearl bead about 2 in (5.1 cm) below the flower, and knot under it. Trim to 0.25 in (0.6 cm) and seal the cord end with a drop of glue.
Border
On this ornament, the border is the Round 3 rim, worked on each petal before assembly. Each petal gets its own rim, so no stitches carry across the joins and the rim count for every petal depends only on that petal’s own Round 2.
Border gauge: 1 BLO sl st per sc, about 5 sl st per 1 in (2.5 cm), the same as the sc gauge. Keep your sl sts loose. A tight rim makes the petal cup too much.
Round 3, all petals: Ch 1. Work BLO sl st in each sc around, and work (sl st, ch 1, sl st) into each ch-2 sp. At the end, join with an invisible join to the first sl st.
Exact counts:
- Large petal: 13 sl st on each long side; 6 sl st at the tip (4 over the tip sc + 2 in the sp); 4 sl st at the base (2 over the base sc + 2 in the sp). Total: 13 + 13 + 6 + 4 = 36 sl st plus 2 ch-1.
- Medium petal: 11 + 11 + 6 + 4 = 32 sl st plus 2 ch-1.
- Small petal: 7 + 7 + 6 + 4 = 24 sl st plus 2 ch-1.
Why the math works: Each rim count is the Round 2 sc count (32, 28 or 20) plus 2 extra sl sts in each of the 2 points. For example, the Large petal has 32 stitches worked 1-per-sc plus 4 added at the points, for 36. Working one stitch into each sc keeps the long sides flat. The extra stitch and ch-1 at each point turn the corner without pulling it round, so the tips stay sharp. Working in the back loop pushes the front loops up into the raised braid.
Final Blocking
- Lightly mist each petal with water before assembly, or mist the finished flower.
- Pin each petal flat on the foam mat to its final size. Put one pin in each point to sharpen it.
- With your fingers, gently curve the pink petals so the edges cup upward slightly.
- Let them dry completely, about 4 to 6 hours.
- Optional: brush on diluted fabric stiffener, shape again, and dry overnight.
- After assembly, hang the ornament and adjust the petal angles by hand.
Final Quality-Control Checklist
- [ ] 1 Large cream, 6 Medium pink and 2 Small cream petals
- [ ] Round 2 counts: 32 / 28 / 20 sc
- [ ] Rim counts: 36 / 32 / 24 sl st
- [ ] All tips are sharp and pointed
- [ ] The rim braid is on the right side of every petal
- [ ] Petals are symmetrical, 3 pink per side
- [ ] The hub is flat with no puckering
- [ ] Width is 4.5 in (11.4 cm) and height is 3.75 in (9.5 cm)
- [ ] The cord is centered, the loop is secure and the bead is knotted firmly
- [ ] All tails are woven in invisibly
Troubleshooting
The petal twists into an S-shape. Chain tension was too tight. Use a hook one size larger for the foundation chain only.
The petal edges ruffle. You have too many stitches in Round 2. Recount the increases on each side against the counts above.
The petal cups too deeply. The rim sl sts are too tight. Rework Round 3 loosely, or use a hook 0.5 mm larger for the rim.
The tips are rounded. Make sure the (sl st, ch 1, sl st) goes into the ch-2 sp itself, and pin the point firmly while blocking.
The hub is bulky. Sew only through the base 3 sts on each side, not deeper. Weave the tails in different directions.
The flower tilts on the cord. Re-thread the cord exactly through the hub center, behind the Large petal.
Care
Spot clean with cool water and mild soap, then reshape and dry flat. Keep the ornament out of strong direct sun so the pink doesn’t fade.
Final Notes
The measurement chain is short and easy to check. A gauge of 20 sc to 4 in (10.2 cm) gives Round 1 spines of 2.4, 2.0 and 1.6 in (6.1, 5.1 and 4.1 cm). Round 2 brings the petals to 32, 28 and 20 sc. The rim brings them to 36, 32 and 24 sl st, for finished petals of 2.75, 2.25 and 1.9 in (7.0, 5.7 and 4.8 cm). Nine petals layered at one hub make a lotus 4.5 in (11.4 cm) wide and 3.75 in (9.5 cm) tall, ready to hang from its gold cord with a pearl drop.
Happy crocheting!