

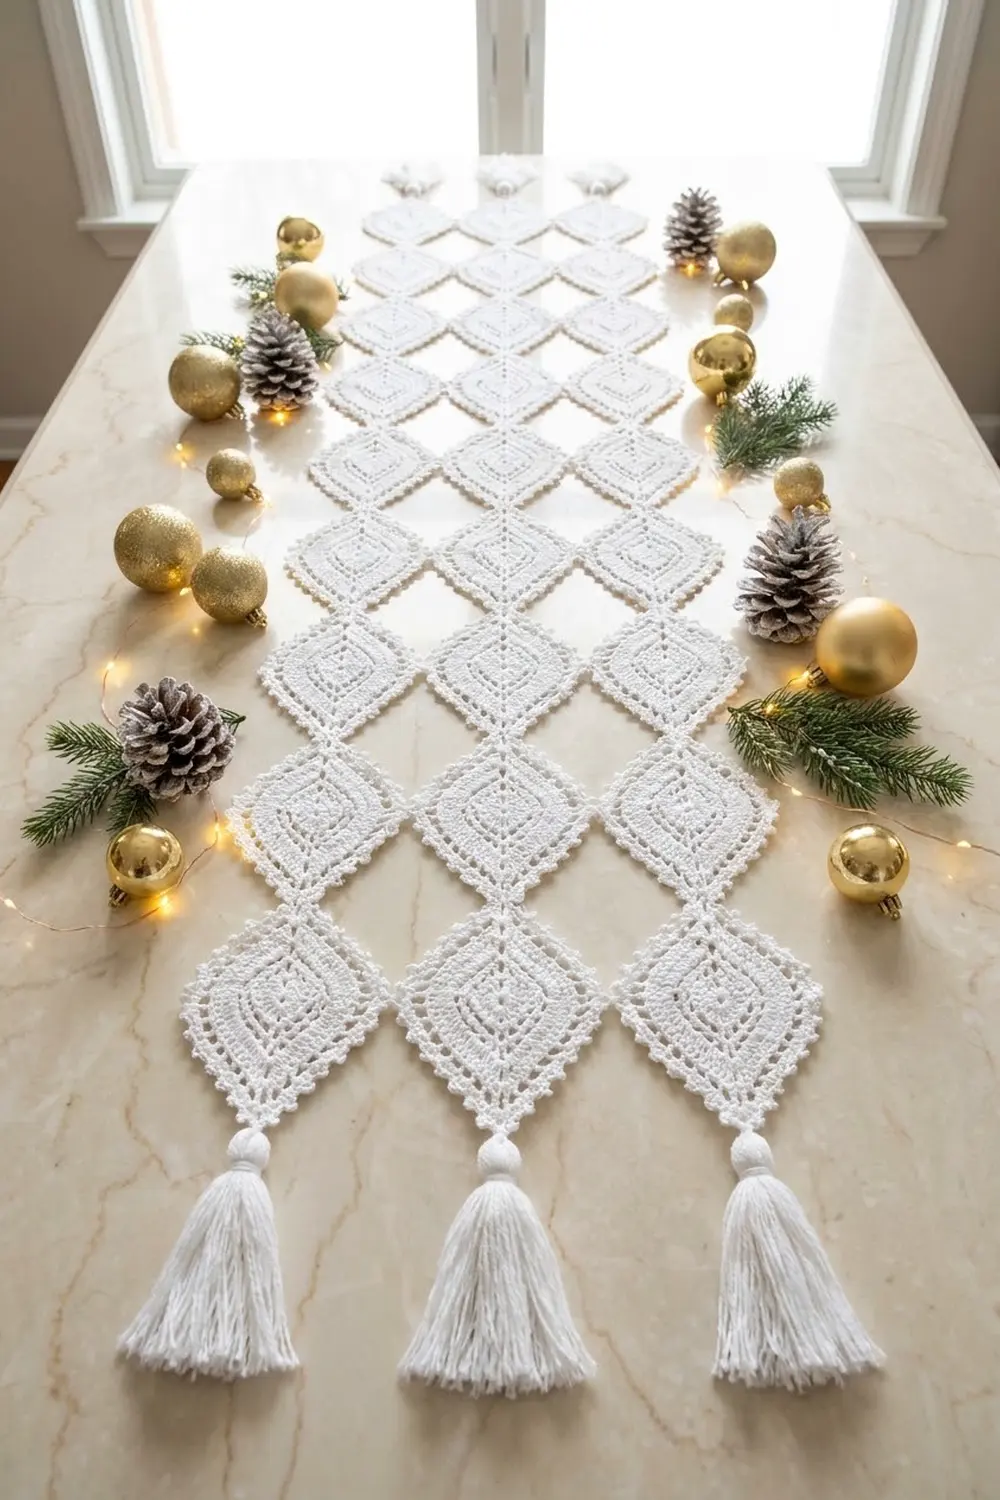
The Frosted Fern Table Runner is a slim, airy runner built from elongated diamond leaf motifs. Each leaf has a firm central spine with feather-like veins that branch out and get taller toward the middle. A ring of open chain loops and a picot scalloped edge surround the veins.
The runner is worked in one bright white cotton thread, so it suits holiday tables, wedding tables or a neutral everyday look. A small trefoil links each leaf to the next, and plain white tassels finish every column.
This pattern uses US crochet terms. The finished runner measures 10.5 in (26.7 cm) wide and 50.25 in (127.6 cm) long without tassels, or 58.25 in (148.0 cm) with the 4 in (10.2 cm) tassels on both ends.
Each motif is worked in 5 rounds around a foundation chain. You join each new motif to the ones already made during its last round (join-as-you-go). The motifs’ own picot edging forms the runner’s outer edge, and tassels finish the ends.
Finished Size and Construction
- Finished size: 10.5 in x 50.25 in (26.7 cm x 127.6 cm) without tassels
- Skill level: Intermediate
- Terminology: US crochet terms
- Yarn weight: Size 3 crochet thread (Super Fine / 1)
- Hook: 2.5 mm
- Number of pieces: 24 motifs + 6 tassels
- Layout: 3 columns x 8 motifs
- Motif size: 3.5 in x 5.5 in (8.9 cm x 14.0 cm), body only
- Tip extras: top ring 0.5 in (1.3 cm), bottom trefoil 0.5 in (1.3 cm)
- Size before border: same as finished size. The edging is built into Round 5.
- Border depth: 0.25 in (0.6 cm), the depth of the Round 5 picot scallops
Materials
Use a mercerized cotton thread in size 3, about 280 m per 100 g. Mercerized cotton gives crisp stitch definition and holds its shape well after blocking. Avoid fuzzy or very stretchy fibers, because they blur the vein pattern.
- White: 125 g, about 350 m (383 yd)
- Motifs: about 10 m (10.9 yd) each, 240 m (262 yd) total
- Tassels: about 9 m (9.8 yd) each, 54 m (59 yd) total
The quantities include a margin of roughly 15% for gauge swatching and differences in tension.
Tools:
– 2.5 mm crochet hook
– Tapestry needle
– Sharp scissors
– Stiff card, 4 in (10.2 cm) tall, for tassels
– Rust-proof pins and a blocking board
– Spray bottle; spray starch (optional)
– Ruler or tape measure
Abbreviations (US Terms)
- ch – chain
- sl st – slip stitch
- sc – single crochet
- hdc – half double crochet
- dc – double crochet
- tr – treble crochet
- sp(s) – space(s)
- st(s) – stitch(es)
- RS – right side
Special stitches:
- V-st: (st, ch 2, st) in the same space, using the stitch height given.
- Picot: ch 3, sl st in the 3rd ch from the hook.
- Joining picot: ch 1, sl st in the matching picot of the neighboring motif, ch 1, sl st in the base of the ch.
- Trefoil: [ch 5, sl st in the 5th ch from the hook] 3 times. This makes three small rings fanned around one point.
- Joining ring: ch 3, sl st in the center ring of the trefoil on the motif above, ch 3.
Gauge and Checkpoints
Always make one complete motif before starting the runner. Measure it unblocked, then pin it out and block it.
- Base gauge: 25 sc = 4 in (10.2 cm) along the Round 1 spine
- Round 1: 4 in (10.2 cm) long, about 0.3 in (0.8 cm) wide
- Round 2: 4.75 in x 1.25 in (12.1 cm x 3.2 cm)
- Round 3: 5 in x 2.5 in (12.7 cm x 6.4 cm)
- Round 4: 5.25 in x 3 in (13.3 cm x 7.6 cm)
- Round 5, blocked: 5.5 in x 3.5 in (14.0 cm x 8.9 cm), plus the ring and trefoil
If your motif is too big, go down to a 2.25 mm hook, or tighten your chains. Loose chains are the most common reason a motif grows.
If your motif is too small, go up to a 2.75 mm hook. Blocking will add only about 0.1 in (0.3 cm) in each direction, so don’t count on it to fix the size.
A 0.25 in (0.6 cm) error per motif adds up to 2 in (5.1 cm) over a column of 8, so get the size right first.

Motif (Make 24)
The rounds start at the top tip and travel down Side A, around the bottom tip and back up Side B. With the RS facing, Side A is on your left and Side B is on your right.
Foundation: Ch 26.
Round 1 (spine):
1. Sc in the 2nd ch from the hook and in each of the next 24 ch (25 sc). You are now at the bottom end.
2. Ch 3 for the bottom tip, then rotate to work along the opposite side of the foundation chain.
3. Sc in each of the 25 ch.
4. Ch 1, then hdc in the first sc. This forms the top tip space and leaves your hook in it.
Count: 50 sc (25 per side), 2 tip spaces.
Round 2 (spine frame):
1. Ch 3 (counts as dc). Ch 3, then dc in the same tip space.
2. Ch 2. Working down Side A, dc in the 1st sc, then [ch 2, skip 2 sc, dc in the next sc] 8 times.
3. Ch 2, then (dc, ch 3, dc) in the bottom tip space. Ch 2.
4. Working up Side B, dc in the 1st sc, then [ch 2, skip 2 sc, dc in the next sc] 8 times.
5. Ch 2, then join with a sl st to the top of the beginning ch-3.
Count: 22 dc (9 per side + 2 at each tip), 20 ch-2 sps (10 per side), 2 ch-3 tip sps.
The 25 sc on each side divide exactly into 1 + (8 x 3), so the last dc on each side lands in the 25th sc and the frame is symmetrical.
Round 3 (feather veins):
1. Sl st in the next ch-3 sp (the top tip). Ch 1, then (sc, ch 3, sc) in the same sp.
2. Work one V-st in each of the 10 ch-2 sps down Side A, skipping the dc between them. Use these heights, in order: sc, hdc, dc, dc, tr, tr, dc, dc, hdc, sc.
3. Work (sc, ch 3, sc) in the bottom tip sp.
4. Work 10 V-sts up Side B in the same order of heights.
5. Join with a sl st to the first sc.
Count: 44 sts (40 in V-sts + 4 tip sc), 20 V-st ch-2 sps, 2 ch-3 tip sps.
The stitches get taller toward the middle, which pushes out the widest point and gives the diamond its shape. The angled V-sts form the feather veins.
Round 4 (mesh):
1. Sl st in the next ch-3 sp. Ch 1, then sc in the same sp.
2. [Ch 5, sc in the next V-st sp] 10 times.
3. Ch 5, then sc in the bottom tip ch-3 sp.
4. [Ch 5, sc in the next V-st sp] 10 times.
5. Ch 5, then join with a sl st to the first sc.
Count: 22 sc, 22 ch-5 loops (11 per side).
Round 5 (picot edging):
1. Ch 1. Work (sc, ch 6, sc) in the same sc to make the top ring.
2. Work (3 sc, picot, 3 sc) in each of the next 11 ch-5 loops.
3. Work (sc, trefoil, sc) in the bottom tip sc.
4. Work (3 sc, picot, 3 sc) in each of the next 11 ch-5 loops.
5. Join with a sl st to the first sc. Fasten off and weave in the ends.
Count: 136 sc (66 per side + 2 at each tip), 22 picots (11 per side), 1 ring, 1 trefoil.
The 6th loop on each side sits over the tr V-sts, which is the motif’s widest point. These middle picots are the side join points.
Make All Pieces
You need 24 motifs, all in white. Make Motif 1 as written. Every other motif replaces some ordinary Round 5 elements with joining versions, as explained in the next section.
Layout grid (RS facing, Row 1 at the top):
Row 1:  [ 1] [ 2] [ 3]
Row 2:  [ 4] [ 5] [ 6]
Row 3:  [ 7] [ 8] [ 9]
Row 4:  [10] [11] [12]
Row 5:  [13] [14] [15]
Row 6:  [16] [17] [18]
Row 7:  [19] [20] [21]
Row 8:  [22] [23] [24]
Work left to right across each row, finishing a row before starting the next.
Joining
The motifs are joined as you go, during Round 5. There is no sewing, and no stitches are added at any seam.
Tip-to-tip joins (vertical): For any motif in Row 2 or below, replace the ch-6 top ring with a joining ring. The full sequence is (sc, joining ring, sc) in the top tip sc. This links the motif to the center trefoil ring of the motif directly above it.
Side joins (horizontal): The center column is joined on both sides, and the outer columns on one side only.
– Motifs 2, 5, 8 and so on (center column): on Side A, work loop 6 as (3 sc, joining picot, 3 sc), joining to loop 6 on Side B of the motif to the left.
– Motifs 3, 6, 9 and so on (right column): do the same on Side A, joining to the center motif.
Only one picot touches at each side join, so the diamonds meet point to point as shown.
Join count:
– 21 tip joins (7 per column)
– 16 side joins (2 per row)
– 37 joins in total
Tension advice: Keep the ch-1 on each side of a joining sl st the same size as your usual chain. If it’s too tight, the motifs pucker toward each other. If it’s too loose, the leaves sag apart.
Size checkpoint: After Row 2, the piece should measure 10.5 in (26.7 cm) across the widest points. From the top of the Row 1 rings to the tips of the Row 2 trefoils, it should be 12.75 in (32.4 cm): 2 bodies of 5.5 in, 1 connector of 0.75 in (1.9 cm), plus the top ring and bottom trefoil.
Border
This runner does not get a separate border. The Round 5 picot edging is the finished edge, and the tassels finish the ends. Because the edge is built in, there is no border round to count separately.
Border gauge: 11 picot scallops along each 3.25 in (8.3 cm) diagonal half-side, about 3.4 scallops per inch, and 0.25 in (0.6 cm) deep.
Edge counts per side:
– Long edges (left and right): 8 motifs x 22 outer picots each (11 per diagonal half-side) = 176 picots per long edge. Every one is free, because outer-column motifs join only on their inner side.
– Short ends: the top end has 3 free rings, one per column. The bottom end has 3 free trefoils.
Why the math works: Every motif has the same count, with 11 loops on each half-side and exactly one join point on each half-side at loop 6. Joining uses existing picots rather than adding stitches, so the edge count is simply the motif count times the per-motif count, with nothing added at the seams.
Tassels (make 6):
1. Wrap thread 40 times around the 4 in (10.2 cm) card.
2. Slide a 12 in (30.5 cm) tie strand under the wraps at the top and knot it tightly.
3. Cut the wraps at the bottom.
4. Wrap a separate 20 in (50.8 cm) strand 8 times around the bundle, 0.5 in (1.3 cm) below the top, to form the head. Knot it and bury the ends inside the tassel.
5. Trim the tassel to an even 4 in (10.2 cm).
6. Tie 3 tassels to the top rings of Motifs 1–3, and 3 tassels to the center trefoil rings of Motifs 22–24.
Final Blocking
- Soak the runner in cool water with a drop of mild soap for 10 minutes. Rinse it, then press out the water in a towel without wringing.
- Lay it RS up on blocking boards or a towel-covered surface at least 60 in (152.4 cm) long.
- Pin the top and bottom tips of each column into a straight line. Check that each column is 50.25 in (127.6 cm) long.
- Pin the widest point of each motif so the runner measures 10.5 in (26.7 cm) across.
- Pin out every picot along both long edges, and pin the trefoil rings open.
- Mist with starch if you want a crisp finish, then let it dry completely.
- Unpin the runner, then comb the tassels straight and trim them if needed.
Final Quality-Control Checklist
- [ ] All 24 motifs measure 3.5 in x 5.5 in (8.9 cm x 14.0 cm).
- [ ] Each motif has 22 picots, 1 ring or joining ring, and 1 trefoil.
- [ ] There are 21 tip joins and 16 side joins.
- [ ] All side joins are at loop 6.
- [ ] The columns are straight and parallel.
- [ ] The runner measures 10.5 in x 50.25 in (26.7 cm x 127.6 cm).
- [ ] All ends are woven in securely.
- [ ] The 6 tassels are even at 4 in (10.2 cm).
Troubleshooting
The leaf looks lopsided. Check the Round 3 stitch heights on both sides. The two tr V-sts must fall in the same position on each side.
The tips curl. Your Round 1 chain was probably tight. Work the foundation with a hook one size larger.
The mesh loops ruffle. Your ch-5 loops are too long for your gauge. Try ch 4 instead, and check the Round 4 size.
The columns drift apart. Make sure each side join uses loop 6, not loop 5 or 7.
The runner is too short. Make sure you used joining rings throughout. A loose standard ring adds length but sags.
The picots flatten. Pin each picot individually while blocking, and starch lightly.
Care
Hand wash in cool water with mild soap, and dry the runner flat, re-pinning it if needed. Store it rolled rather than folded so the leaves don’t crease.
Final Notes
The measurements build in a simple chain. Start with a 25-sc spine of 4 in (10.2 cm). That grows into a blocked motif of 3.5 in x 5.5 in (8.9 cm x 14.0 cm). Three motifs side by side give 10.5 in (26.7 cm) of width. Eight bodies plus seven 0.75 in (1.9 cm) connectors and the end ring and trefoil give 50.25 in (127.6 cm) of length. The tassels bring the total to 58.25 in (148.0 cm). If you match the first checkpoint, every later number follows.
Happy crocheting!