

This hanging organizer keeps six spare rolls of toilet paper neat and within reach. It has six round baskets in two rows of three, hung from a wooden dowel on three pink straps. The baskets are worked in firm single crochet, so they hold their shape even when they’re empty.
The main color is a soft dusty rose. Each basket has a cream rim, and the first cream round uses short spike stitches that dip into the pink to make a row of small V-points. The two colors look calm and a little vintage, which suits a bathroom.
This pattern uses US crochet terms. The finished organizer is about 15 in (38.1 cm) wide and 12 in (30.5 cm) tall, measured from the top of the rod to the bottom of the lower baskets. Each basket is about 5 in (12.7 cm) across and holds a standard roll up to 4.5 in (11.4 cm) wide.
You work each basket from the bottom up: first a flat spiral base, then a back-loop turning round, then straight pink walls, and last the cream spike rim. Next you make three straps and one crossbar in flat rows. To finish, you sew the baskets to the straps, sew neighboring baskets together where they touch, and fold the top of each strap into a hanging loop.
Finished Size and Construction
- Finished size: 15 in x 12 in (38.1 cm x 30.5 cm), about 5 in (12.7 cm) deep
- Skill level: Easy-intermediate
- Terminology: US
- Yarn weight: Bulky (#5) cotton or cotton-blend cord
- Hook: 6 mm (US J-10)
- Number of pieces: 10 (6 baskets, 3 straps, 1 crossbar)
- Layout: 3 baskets across x 2 rows
- Basket size: 5 in (12.7 cm) wide x 3.75 in (9.5 cm) tall, including the base
- Basket size before rim: 5 in (12.7 cm) wide, with 2.67 in (6.8 cm) of wall
- Rim (border) depth: 3 rounds = 1 in (2.5 cm)
- Strap size: 2 in x 15 in (5.1 cm x 38.1 cm)
- Crossbar size: 12 in x 1.33 in (30.5 cm x 3.4 cm)
Materials
Pick a firm, smooth bulky cotton or cotton-blend yarn with good stitch definition. Cotton keeps its shape in a humid bathroom and doesn’t shed. A very soft or loosely plied yarn will give you floppy walls, so choose one with some body.
- Color A, Dusty Rose: 300 g, about 360 m (394 yd)
- Color B, Cream: 80 g, about 96 m (105 yd)
These amounts assume a yarn of about 120 m per 100 g. Both include a margin of about 15 percent to cover your gauge swatch and differences in tension.
Tools:
- 6 mm (US J-10) crochet hook
- 4 stitch markers
- Tapestry needle
- Scissors
- Measuring tape
- Wooden dowel, 1 in (2.5 cm) thick and at least 18 in (45.7 cm) long, with wall brackets
- Pins or clips for assembly
Abbreviations (US Terms)
- ch: chain
- sc: single crochet
- inc: 2 sc in the same stitch
- sl st: slip stitch
- BLO: back loop only
- st(s): stitch(es)
- rnd: round
- rep: repeat
Special stitch: spike single crochet (spike sc). Insert your hook into the stitch two rounds below the next stitch, in the same column. When you’re working Rnd 17, that’s Rnd 15. Yarn over and pull up a loop, gently stretching it up to the height of the current round. Yarn over and pull through both loops. Skip the stitch of the current round that sits in front of the spike. Each spike sc counts as one stitch.
Gauge and Checkpoints
Gauge: 12 sc and 12 rounds (or rows) = 4 in (10.2 cm), worked firmly.
Make one complete basket before you start anything else. It serves as your real gauge swatch. Check these measurements as you go:
- After Rnd 8 (base): 5 to 5.25 in (12.7 to 13.3 cm) across, lying flat
- After Rnd 16 (pink walls): the wall stands 2.67 in (6.8 cm) above the turning ridge
- After Rnd 19 (rim): the basket is 3.75 in (9.5 cm) tall, and a roll drops in without stretching the walls
If the base is too big: switch to a 5.5 mm hook. Oversized baskets will make the organizer wider than 15 in (38.1 cm).
If the base is too small or a roll fits tightly: switch to a 6.5 mm hook. Don’t add stitches. The rim math and the strap placement both depend on 48 stitches.
If the walls are floppy: use a smaller hook and keep the same stitch counts.
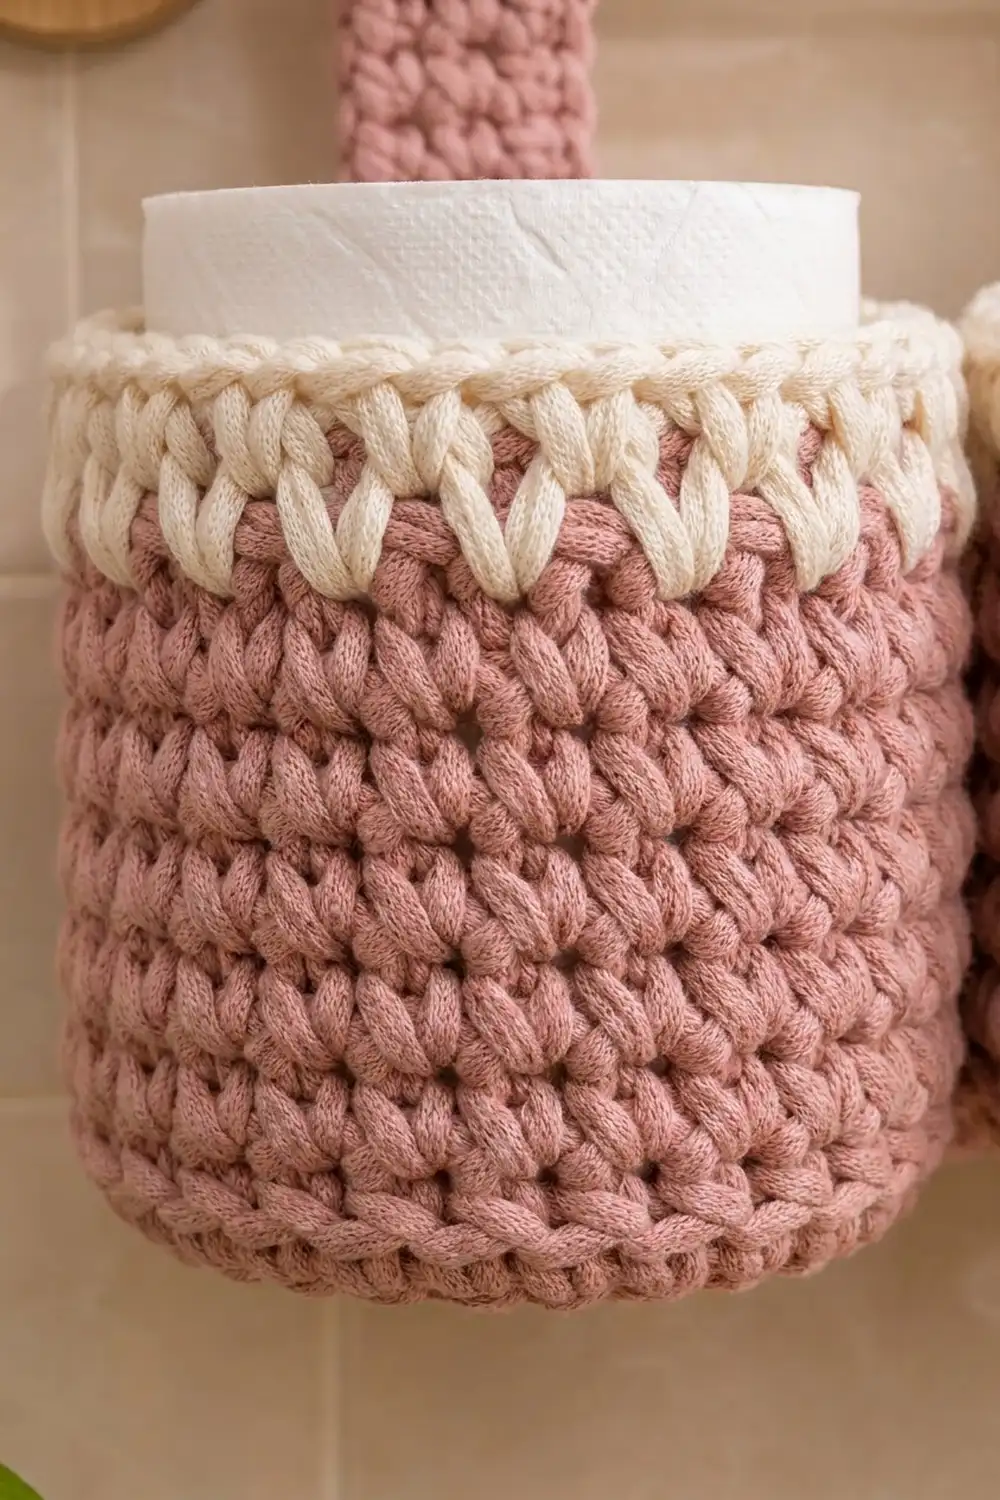
Basket (Make 6)
Work in a continuous spiral without joining. Move the marker to the first stitch of each new round.
Base (Color A)
- Rnd 1: Make a magic ring and work 6 sc into it. Pull it closed. (6 sts)
- Rnd 2: Inc in each st around. (12 sts)
- Rnd 3: Sc 1, inc rep 6 times. (18 sts)
- Rnd 4: Sc 2, inc rep 6 times. (24 sts)
- Rnd 5: Sc 3, inc rep 6 times. (30 sts)
- Rnd 6: Sc 4, inc rep 6 times. (36 sts)
- Rnd 7: Sc 5, inc rep 6 times. (42 sts)
- Rnd 8: Sc 6, inc rep 6 times. (48 sts)
Checkpoint: the base is 5 to 5.25 in (12.7 to 13.3 cm) across and lies flat.
Walls (Color A)
- Rnd 9 (turning round): Sc in BLO of each st around. (48 sts) The unused front loops form a crisp ridge, and the walls start to turn upward.
- Rnds 10–16: Sc in each st around. (48 sts per round)
Sl st into the next st to smooth the step at the end of the round. Cut Color A, leaving a 6 in (15.2 cm) tail.
Checkpoint: the walls are straight, not flared, and 2.67 in (6.8 cm) high.
Place the markers now. Count from the step at the end of the round, which is the back of the basket. Mark st 12 and st 36 as the sides, and st 24 as the center front. The back center falls between st 48 and st 1.
Rim Border (Color B)
The cream rim is the border of each basket. Work it at the same gauge as the walls: 12 sts = 4 in (10.2 cm), and 3 rounds = 1 in (2.5 cm).
Join Color B with a sl st in any st of Rnd 16, near the back center.
- Rnd 17 (spike round): Ch 1. Sc in next st, spike sc into Rnd 15 below the next st rep 24 times. Join with a sl st to the first sc. (48 sts: 24 sc + 24 spike sc)
- Rnd 18: Ch 1, sc in each st around, join. (48 sts)
- Rnd 19: Ch 1, sc in each st around. Fasten off with an invisible join. (48 sts)
Count per quarter: The markers divide the round into four sections. Each section has 12 sts in every rim round. In Rnd 17, that’s 6 sc and 6 spikes per section.
Why the math works: The spike pattern repeats every 2 stitches, and 48 divides evenly by 2. That gives you 24 complete repeats, with no partial repeat at the join. Each spike takes the place of a stitch rather than adding one, so the round stays at 48 stitches and the rim doesn’t ruffle or pull in. Each quarter has 12 stitches, which is even, so every quarter gets exactly 6 V-points.
Weave in all the tails on the inside.
Straps (Make 3)
Use Color A and work in flat rows.
- Row 1: Ch 7, sc in the second ch from the hook and in each ch across. (6 sts)
- Rows 2–45: Ch 1, turn, sc in each st across. (6 sts per row)
Fasten off, leaving a 24 in (61.0 cm) tail.
Checkpoint: the strap measures 2 in x 15 in (5.1 cm x 38.1 cm).
Strap zones (counting from Row 1):
- Rows 1–11: bottom basket, 3.67 in (9.3 cm)
- Rows 12–16: gap between baskets, 1.67 in (4.2 cm)
- Rows 17–27: top basket, 3.67 in (9.3 cm)
- Rows 28–36: front of the hanging tab, 3 in (7.6 cm)
- Rows 37–45: back fold, 3 in (7.6 cm)
Crossbar (Make 1)
Use Color A and work in flat rows.
- Row 1: Ch 37, sc in the second ch from the hook and in each ch across. (36 sts)
- Rows 2–4: Ch 1, turn, sc in each st across. (36 sts per row)
Fasten off, leaving a 12 in (30.5 cm) tail.
Checkpoint: the crossbar measures 12 in x 1.33 in (30.5 cm x 3.4 cm).
Make All Pieces
| Piece | Quantity | Color A | Color B |
|---|---|---|---|
| Basket | 6 | Rnds 1–16 | Rnds 17–19 |
| Strap | 3 | All rows | – |
| Crossbar | 1 | All rows | – |
Layout (front view):
 [Strap 1]   [Strap 2]   [Strap 3]
     |           |           |
 [Basket 1]  [Basket 2]  [Basket 3]    <- top row
 =========== crossbar =============
 [Basket 4]  [Basket 5]  [Basket 6]    <- bottom row
Joining
Method: Whipstitch with Color A, going through both loops of each edge stitch.
Step 1: Sew the baskets to the straps. Lay a strap face down. Center a basket’s back on the strap, so the six back stitches (sts 46–48 and 1–3) sit over the 6 strap stitches. Line up the bottom basket’s Rnd 9 with strap Row 1, and its Rnd 19 with Row 11.
Both pieces have 3 rows (or rounds) per 1 in (2.5 cm), so one strap row matches one basket round. That’s 11 rows to 11 rounds along each long edge of the strap. Whipstitch both long edges to the basket wall. Attach the top basket to Rows 17–27 the same way. Repeat for all three columns.
Step 2: Add the crossbar. Center the crossbar across the backs of the straps, over Rows 12–16. It’s 4 rows tall, so it fits inside the 5-row gap with room to spare. The straps are 5 in (12.7 cm) apart, center to center. The crossbar’s 36 sts (12 in, 30.5 cm) reach from the outer edge of Strap 1 to the outer edge of Strap 3. Whipstitch the crossbar to each strap edge, 4 stitches per edge.
Step 3: Join neighboring baskets. Where two baskets touch, the st 12 column of one meets the st 36 column of the next. Whipstitch these together through Rnds 12–16. That’s 5 stitches per seam, with 4 seams in total. These seams stop the baskets from twisting.
Step 4: Make the hanging loops. Fold Rows 37–45 of each strap to the back, along the top of Row 36. Whipstitch Row 45 to the back of Row 28, across all 6 stitches. This makes a loop with a 6 in (15.2 cm) circumference that fits over a 1 in (2.5 cm) dowel.
Tension: Make your stitches snug but not tight, so the seams lie flat without puckering.
Size checkpoint: Lay the organizer flat. It should measure about 15 in (38.1 cm) wide and 12 in (30.5 cm) tall.
Final Blocking
- Lightly mist each basket with water until it’s damp.
- Fill each basket with a roll wrapped in a plastic bag, so the walls dry straight and round.
- Pinch the Rnd 9 ridge to sharpen the edge of the base.
- Smooth the cream rim upright so the spikes sit evenly.
- Pat the straps and crossbar flat.
- Let everything dry for about 24 hours before you hang it.
Final Quality-Control Checklist
- Each basket has 48 sts in Rnds 8–19
- Each rim has 24 even V-points
- Each basket is 5 in (12.7 cm) wide and 3.75 in (9.5 cm) tall
- Each strap has 45 rows and measures 2 in x 15 in (5.1 cm x 38.1 cm)
- The baskets sit on Rows 1–11 and 17–27 of each strap
- The crossbar is centered in the gap
- All four neighbor seams are closed
- All tails are woven in
- The organizer hangs level
Troubleshooting
The base cups upward. Your stitches are too tight. Go up one hook size for Rnds 1–8.
The base ruffles. You’ve gained stitches. Take it back to the last round with the right count.
The walls flare out. Count every round and keep it at 48.
The spikes look loopy. Pull each spike up gently to the height of the round. Don’t yank it.
The spikes are off at the join. Rnd 16 must have exactly 48 sts.
The organizer tilts. Check that each loop folds exactly at Row 36.
The baskets sag forward. Sew the strap edges more firmly, and make sure all the neighbor seams are done.
Care
Hand wash in cool water with mild soap. Press out the water with a towel, then dry flat, shaped over a roll. Don’t tumble dry.

Final Notes
Here’s how the measurements fit together. A gauge of 12 sts and 12 rounds per 4 in (10.2 cm) gives a 48-stitch basket 5 in (12.7 cm) across. Eight pink wall rounds plus the 3-round rim make the basket 3.75 in (9.5 cm) tall. The 45-row straps match the baskets one row to one round. Three columns set 5 in (12.7 cm) apart give you a 15 in x 12 in (38.1 cm x 30.5 cm) organizer. If your first basket hits every checkpoint, the rest will fit.
Happy crocheting!