

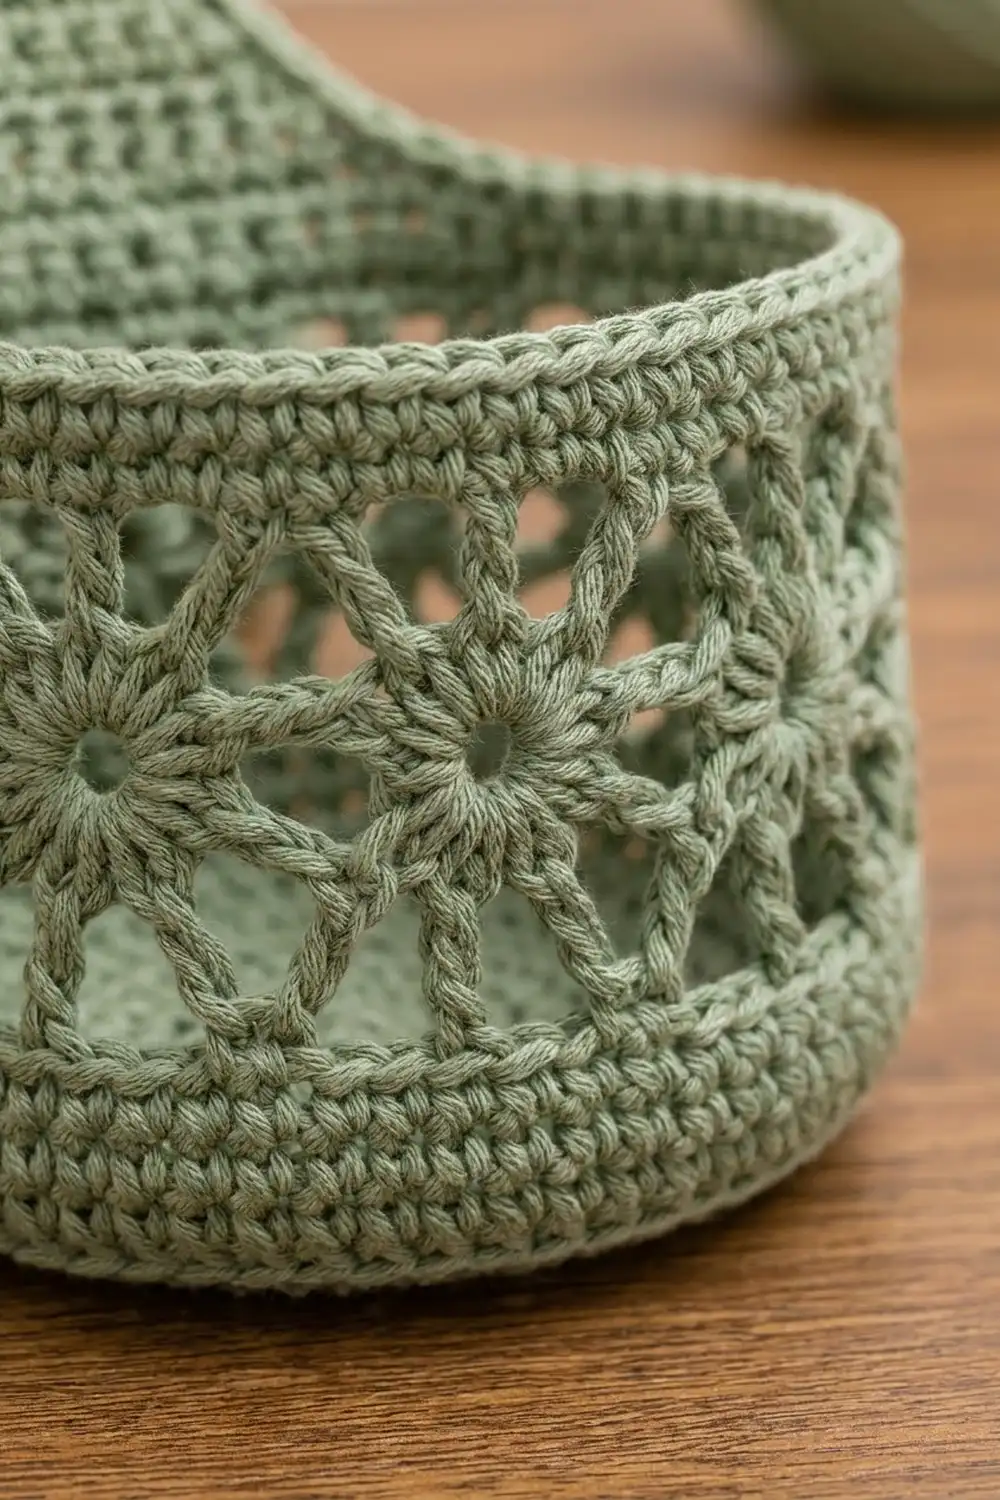
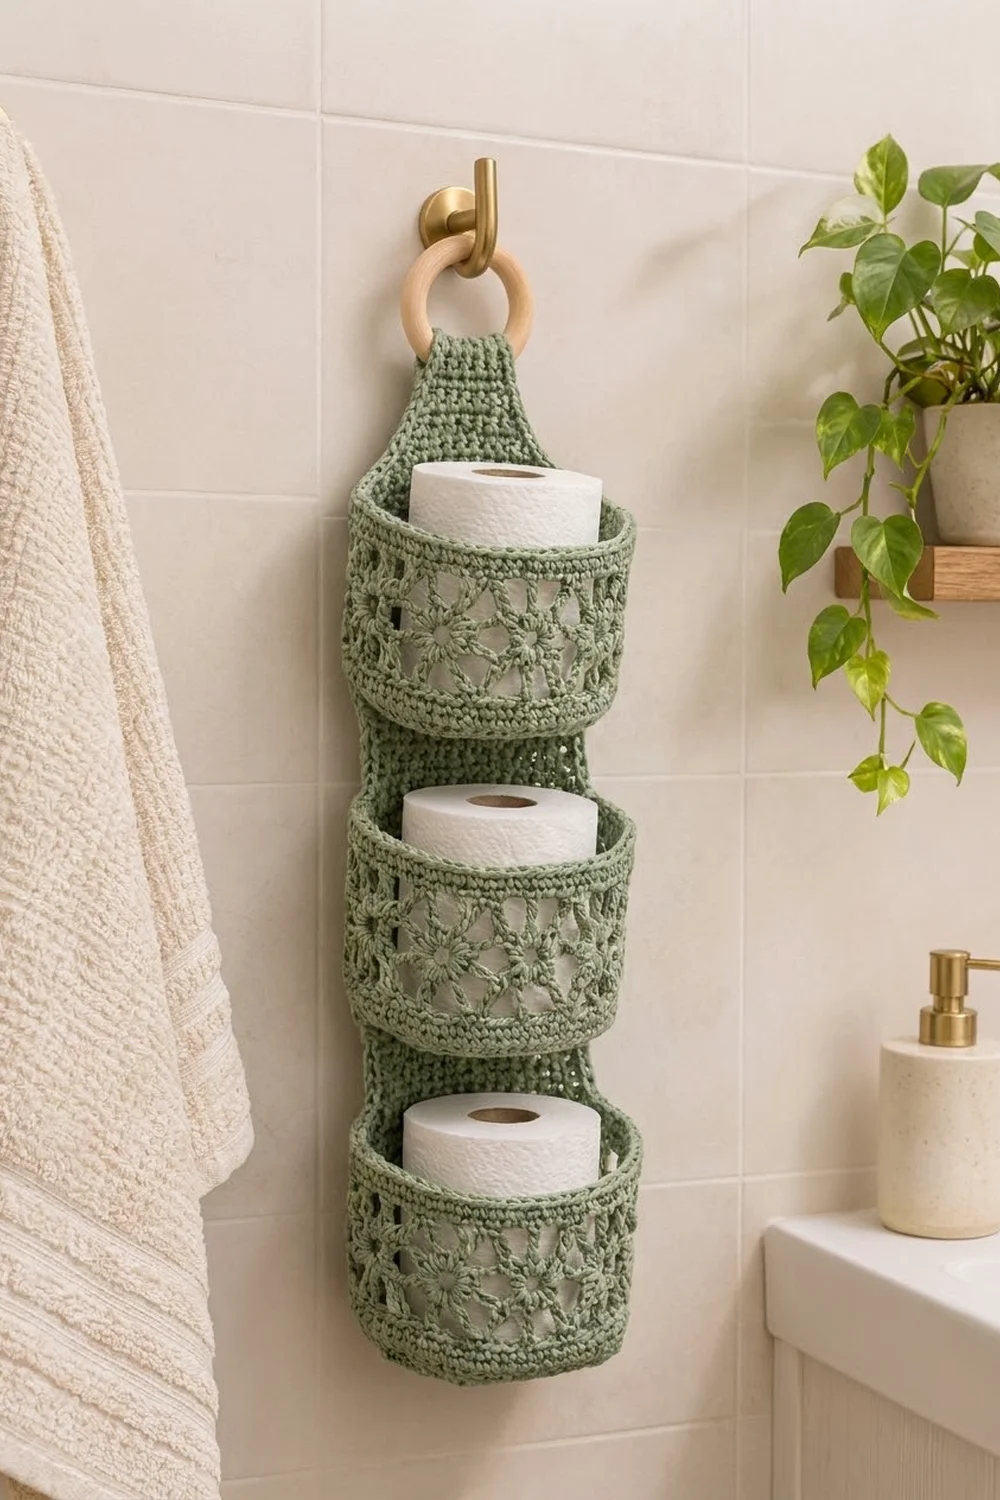
This hanging toilet paper holder has three round pockets stacked down one back panel, and the whole thing hangs from a natural wooden ring. Each pocket has a solid single crochet base, a band of open starburst lace and a firm solid rim. The rolls stay visible but supported, and the holder fits on a narrow bathroom wall.
The sample uses one color, a soft sage green worsted cotton. Against cream tile and white rolls it looks calm and slightly vintage. Cotton is the right fiber here because it holds its shape and copes with bathroom humidity.
This pattern uses US crochet terms. The panel is 5.5 in (14.0 cm) wide and about 15 in (38.1 cm) long below the strap. Measured from the top of a 3 in (7.6 cm) ring, the holder is about 18 in (45.7 cm) long. Each pocket holds a standard roll up to 4.5 in (11.4 cm) across.
You’ll start with three identical pockets, worked in the round. Each one begins as a flat circle and then turns up into straight sides. Next you’ll work the back panel in rows and add a one-row border. Finally you’ll sew each pocket to the panel along its base ridge and its rim, and fold the strap at the top of the panel over the wooden ring.
Finished Size and Construction
- Finished size: 5.5 in (14.0 cm) wide x about 15 in (38.1 cm) long, plus strap and ring. About 18 in (45.7 cm) long overall when hanging.
- Skill level: Intermediate
- Terminology: US crochet terms
- Yarn weight: Worsted (#4) cotton
- Hook: US H-8 (5.0 mm)
- Number of pieces: 4 (1 back panel + 3 pockets), joined into one holder
- Layout: 3 pockets stacked in one vertical column
- Pocket size: base 4.75 in (12.1 cm) across, sides 4 in (10.2 cm) high
- Panel size before border: body 5 in (12.7 cm) wide x 12 in (30.5 cm) long, plus a 2.7 in (6.9 cm) taper
- Border depth: 1 row of sc, about 0.25 in (0.6 cm)
Materials
Yarn: Use a smooth worsted weight cotton or cotton blend. Mercerized or tightly plied cotton shows the lace best. Avoid acrylic, because the pockets will stretch and sag under the weight of the rolls.
- Sage green: 160 g, about 272 m (297 yd)
The holder itself uses about 145 g. The quantity above adds a margin of roughly 10 percent for your gauge swatch and sewing tails.
Tools:
- US H-8 (5.0 mm) crochet hook
- 1 wooden ring, 3 in (7.6 cm) outer diameter
- 6 locking stitch markers
- Tapestry needle
- Scissors
- Tape measure
- Rust-proof pins
- 1 toilet roll, for test fitting and shaping
Abbreviations (US Terms)
- ch: chain
- sl st: slip stitch
- sc: single crochet
- tr: treble crochet
- sc2tog: single crochet 2 together
- BLO: back loop only
- yo: yarn over
- st(s): stitch(es)
- sp: space
- rep: repeat
Special stitches:
Cluster (cl): *Yo twice, insert hook in indicated st or sp, pull up a loop, (yo, draw through 2 loops) twice; rep from * once more in the same place (3 loops on hook), yo, draw through all 3 loops.
Spoke cluster (spcl): *Yo twice, insert hook in indicated st, pull up a loop, (yo, draw through 2 loops) twice; rep from * in each of the next 2 indicated sts (4 loops on hook), yo, draw through all 4 loops. The three legs pull together into one point, which becomes the center of a starburst.
Gauge and Checkpoints
Gauge: 16 sc and 18 rows = 4 in (10.2 cm), in sc worked in rows or rounds.
Make one pocket before you start the panel. A pocket uses every stitch in the pattern, so if its base and sides come out right, the panel will too. It also gives you a real test of how well your yarn holds a roll.
Checkpoints:
- Pocket after Round 5: 30 sts, about 2.4 in (6.1 cm) across.
- Pocket after Round 10: 60 sts, 4.75 in (12.1 cm) across, lying flat.
- Pocket after Round 23: sides are 3.75–4 in (9.5–10.2 cm) high, and a roll drops in with a little room to spare.
- Panel after Row 18: 5 in (12.7 cm) wide x 4 in (10.2 cm) long.
- Panel after Row 54: 12 in (30.5 cm) long.
If your piece is too big, go down to a 4.5 mm hook. If it’s too small, or the roll won’t fit, go up to a 5.5 mm hook. Don’t add stitches to fix the size, because the 10-stitch lace repeat needs exactly 60 sts.
Pocket (Make 3)
Base
Start with a magic ring. Work in joined rounds: finish each round with a sl st into the first sc, then ch 1 to start the next round. The ch 1 never counts as a stitch.
Round 1: 6 sc in ring, join. (6 sts)
Round 2: 2 sc in each st around, join. (12 sts)
Round 3: *Sc in next st, 2 sc in next st; rep from * around, join. (18 sts)
Round 4: *Sc in next 2 sts, 2 sc in next st; rep from * around, join. (24 sts)
Round 5: *Sc in next 3 sts, 2 sc in next st; rep from * around, join. (30 sts)
Rounds 6–10: Increase 6 sts evenly in each round, working 1 more sc between increases than in the round before. The totals are 36 sts in Round 6, 42 in Round 7, 48 in Round 8, 54 in Round 9 and 60 in Round 10.
Sides
Round 11 (turning round): Ch 1, sc in BLO of each st around, join. (60 sts) The front loops of Round 10 are left unworked and form a ridge around the base. You’ll sew through this ridge later.
Rounds 12–14: Ch 1, sc in each st around, join. (60 sts)
Starburst Lace Band
Round 15 (lower spokes): Ch 1, *sc in next st, ch 4, skip 2 sts, work spcl with first leg in next st, skip 1 st, second leg in next st, skip 1 st, third leg in next st, ch 4, skip next 2 sts; rep from * 5 more times, join to first sc. (6 sc, 6 spcl, 12 ch-4 sps)
Each repeat uses exactly 10 sts: 1 sc, 2 skipped, 1 leg, 1 skipped, 1 leg, 1 skipped, 1 leg and 2 skipped.
Round 16 (upper spokes): Ch 4 (counts as tr), ch 2, (cl, ch 3, cl, ch 3, cl) in top of next spcl, ch 2, tr in next sc, ch 2; rep from * around, ending last rep at *, join to top of beginning ch-4. (6 tr, 18 cl, 12 ch-2 sps, 12 ch-3 sps)
Each spcl pulls three spokes together from below, and the fan of three clusters opens upward from the same point. Together they make a six-spoke starburst.
Round 17 (conversion round): Ch 1, *sc in next tr, sc in next ch-2 sp, sc in next cl, 2 sc in next ch-3 sp, sc in next cl, 2 sc in next ch-3 sp, sc in next cl, sc in next ch-2 sp; rep from * around, join.
The count is 24 sc (1 in each tr and each cl) + 36 sc (worked into the spaces) = 60 sts.
Rim
Rounds 18–23: Ch 1, sc in each st around, join. (60 sts)
Fasten off, leaving a 24 in (61.0 cm) tail for sewing. Weave in the starting tail.
Check that a roll fits. The lace band should be about 1.5 in (3.8 cm) high, with six starbursts evenly spaced around the pocket. About four of them face forward once the pocket is attached.
Back Panel
Foundation: Ch 21.
Row 1: Sc in 2nd ch from hook and in each ch across, turn. (20 sts)
Rows 2–54: Ch 1, sc in each st across, turn. (20 sts) The body now measures 5 in x 12 in (12.7 cm x 30.5 cm).
Taper
Row 55: Ch 1, sc2tog, sc in next 14 sts, sc2tog, turn. (18 sts)
Row 56 and every even row through Row 64: Ch 1, sc in each st across, turn. (Same count as the row before.)
Row 57: Ch 1, sc2tog, sc in next 12 sts, sc2tog, turn. (16 sts)
Row 59: Ch 1, sc2tog, sc in next 10 sts, sc2tog, turn. (14 sts)
Row 61: Ch 1, sc2tog, sc in next 8 sts, sc2tog, turn. (12 sts)
Row 63: Ch 1, sc2tog, sc in next 6 sts, sc2tog, turn. (10 sts)
Row 65: Ch 1, sc2tog, sc in next 4 sts, sc2tog, turn. (8 sts)
Row 66: Ch 1, sc in each st across, turn. (8 sts)
The taper is 12 rows, about 2.7 in (6.9 cm) tall. It narrows from 5 in (12.7 cm) to 2 in (5.1 cm).
Strap
Rows 67–80: Ch 1, sc in each st across, turn. (8 sts)
The strap is 2 in (5.1 cm) wide and 3.1 in (7.9 cm) long. Fasten off, leaving a 12 in (30.5 cm) tail.
Make All Pieces
Make these pieces from the sage green yarn:
- Back panel: 1, about 40 g
- Pockets: 3, about 35 g each (105 g total)
Layout, viewed from the front:
      [ wooden ring ]
          [strap]
         / taper \
   [ Pocket 3: rows 37–54 ]
   [ Pocket 2: rows 19–36 ]
   [ Pocket 1: rows 1–18  ]
Each pocket takes exactly 18 panel rows, or 4 in (10.2 cm). Three pockets x 18 rows = 54 rows, which is the full panel body.
Border
Work the border on the panel before you sew on the pockets.
Border gauge: 4 sc per 1 in (2.5 cm) along every edge, the same as the stitch gauge.
Border row: With the right side facing, join yarn at the left edge of Row 66, at the base of the strap. Ch 1, then work:
- Left taper edge: 12 sc, 1 in each row end (Rows 66–55).
- Left body edge: 48 sc spread evenly over 54 row ends (skip 1 row end after every 8 sc).
- Bottom edge: 3 sc in first foundation st, sc in next 18 sts, 3 sc in last st. (24 sc)
- Right body edge: 48 sc spread evenly over 54 row ends.
- Right taper edge: 12 sc, 1 in each row end.
Total: 12 + 48 + 24 + 48 + 12 = 144 sc. Fasten off.
Why the math works: Each body edge is 12 in (30.5 cm) long. At 4 sc per inch, that edge needs 48 sc, and working 8 sc over every 9 rows keeps the sides from rippling. The taper edges run on a diagonal about 3 in (7.6 cm) long, so 12 sc fit them at the same gauge. Along the bottom, each of the 20 foundation sts gets 1 sc, and the two corner sts get 2 extra sc each (20 + 4 = 24), which lets the corners lie flat. The border adds 0.25 in (0.6 cm) on each side, so the panel grows from 5 in (12.7 cm) to 5.5 in (14.0 cm) wide.
Joining
Method: Whipstitch with each pocket’s long tail, working 1 stitch into 1 stitch.
- Turn the pocket so the join of its rounds is at the back. Mark the 20 back sts of Round 23, then mark the 20 Round 10 front loops directly below them.
- Pocket 1: Whipstitch the 20 marked base loops to the 20 sts of panel Row 1, one loop to each stitch. Then whipstitch the 20 marked rim sts to the 20 sts of Row 18.
- Pocket 2: Sew the base to Row 19 and the rim to Row 36 in the same way.
- Pocket 3: Sew the base to Row 37 and the rim to Row 54.
- On each pocket, tack the first and last marked sts of Round 17 to the panel edge so the lace band lies flat against the panel.
Tension: Pull each whipstitch snug, but not so tight that the panel puckers. The pocket front should curve forward about 4 in (10.2 cm) from the panel.
Size checkpoint: Once all three pockets are attached, measure from the bottom border to the top rim. It should be 12.25 in (31.1 cm).
Ring: Fold the strap over the wooden ring from front to back. Whipstitch Row 80 to the back of the taper at about Row 62, sewing through both layers so the strap can’t slip. Weave in all ends on the back.
Final Blocking
- Soak the holder in cool water for 10 minutes.
- Roll it in a towel and press out the extra water.
- Lay the panel flat and pin it to 5.5 in (14.0 cm) wide.
- Put a toilet roll in each pocket so the sides dry round and upright.
- Use your fingers to open each starburst so the spokes lie straight.
- Let it dry completely, then remove the rolls and pins.
Final Quality-Control Checklist
- Each pocket has 60 sts in Rounds 10–23.
- Each pocket has six evenly spaced starbursts.
- The panel body is 20 sts wide and 54 rows long.
- The taper ends at 8 sts.
- The border totals 144 sc.
- Each pocket’s base and rim are sewn 1-to-1 across 20 sts.
- The strap is secure and the ring doesn’t slip.
- All ends are woven in on the back.
Troubleshooting
The base ruffles: Your increases are stacking up or your tension is loose. Stagger the increase positions, or go down a hook size.
The base cups before Round 11: Your tension is too tight. Go up a hook size.
The starbursts lean: You’ve skipped the wrong number of sts. Recount each repeat as 1 + 2 + 1 + 1 + 1 + 1 + 1 + 2 = 10.
Round 17 doesn’t come to 60: You’ve missed a ch-2 sp. Check that each repeat has 10 sc.
The roll won’t fit: The base is too small. Remake the pocket with a 5.5 mm hook.
The pockets sag: Either the yarn is too stretchy or the rim is only tacked in places. Sew all 20 rim sts.
The panel edges wave: The border has too many sts. Keep it to 48 sc on each body edge.
Care
Hand wash in cool water with mild soap, then reshape around rolls to dry. Don’t tumble dry, because heat can shrink the cotton and pull the lace out of shape.
Final Notes
Every measurement in this pattern follows from the gauge. At 16 sc = 4 in (10.2 cm), a 60-stitch pocket is 4.75 in (12.1 cm) across, big enough for a 4.5 in (11.4 cm) roll. Each pocket’s sides are 4 in (10.2 cm) high, which matches 18 panel rows. Three pockets fill the 54-row body, which is 12 in (30.5 cm) long. The border brings the panel to 5.5 in (14.0 cm) wide, and the taper and strap carry it up to the 3 in (7.6 cm) ring. Check each of these measurements as you go and the finished holder will hang straight and stay neat.
Happy crocheting!