

The Blush Scallop Bow is a small, soft motif. Two fan-shaped wings meet point to point across a short chain bridge. Each wing opens like a seashell, with double-crochet spokes spreading out from a narrow tip and five rounded scallops along the outer edge.
The sample uses a single color, a pale blush pink, in a smooth worsted-weight yarn. The look is gentle and a little vintage. It works well as seasonal decor, as a gift-wrap topper, or on a hanging strand.
This pattern uses US crochet terms. After blocking, the bow measures 5.5 in (14.0 cm) wide and 3 in (7.6 cm) tall.
The construction is simple. You crochet two identical wing bodies in rows, each one fanning out from a single chain. Then you work a border round on each wing: a sc outline down the straight sides and five dc scallops across the curve. You crochet the bridge during the second wing’s border, so the bow comes off the hook as one finished piece.
Finished Size and Construction
- Finished size: 5.5 in (14.0 cm) wide x 3 in (7.6 cm) tall
- Skill level: Easy
- Terminology: US crochet terms
- Yarn weight: Worsted (#4)
- Hook: 5.0 mm (H-8)
- Number of pieces: 1 finished bow (2 wings joined by a crocheted bridge)
- Layout: Wing A, bridge, Wing B in a straight line, with the points facing each other
- Piece size (one wing, bordered): 2 in (5.1 cm) deep from point to scallop tips x 3 in (7.6 cm) tall
- Size before border (one wing body): 1.5 in (3.8 cm) deep x 2.5 in (6.4 cm) tall
- Border depth: 0.5 in (1.3 cm) at the scallops; 0.25 in (0.6 cm) along the straight sides
- Bridge length: 1.5 in (3.8 cm)
Materials
Choose a smooth worsted-weight yarn with good stitch definition. Cotton or a cotton blend gives crisp scallops and holds its shape when hung. Soft acrylic also works and is easier on the hands. Avoid fuzzy or textured yarns, because they blur the dc spokes that give the wings their shell look.
Yarn:
- Blush Pink: 10 g (about 20 m / 22 yd)
One bow uses about 6 g. The amount above includes extra for a test wing and for weaving in ends. If you plan to make several bows, use the same yarn and dye lot for all of them.
Tools:
- 5.0 mm (H-8) crochet hook
- 2 locking stitch markers
- Yarn needle
- Scissors
- Ruler or tape measure
- Blocking mat and rust-proof pins
- Spray bottle or steam iron
Abbreviations (US Terms)
- ch: chain
- sl st: slip stitch
- sc: single crochet
- dc: double crochet
- sk: skip
- st(s): stitch(es)
- RS: right side
- [ ]: repeat the steps inside the brackets as many times as stated
Special stitch: Scallop. Sk 1 st, 5 dc in next st, sk 1 st, sc in next st. One scallop uses 4 stitches of the row below and makes 5 dc + 1 sc.
Point sc: a sc worked into the free loops of the foundation chain at the very tip of a wing, where all of Row 1’s dc meet.
Gauge and Checkpoints
Exact gauge is not critical for a decorative motif. Size does matter if you plan to make several bows that should match. Make one wing body first and measure it before you go on.
Approximate gauge: 14 sc and 16 rows = 4 in (10.2 cm) with a 5.0 mm hook.
Checkpoints for one wing:
- After Row 1: the fan measures 0.75 in (1.9 cm) from the tip to the tops of the dc.
- After Row 2: 1.5 in (3.8 cm) deep from the tip, and 2.5 in (6.4 cm) tall measured across the open ends of the fan.
- After the border: 2 in (5.1 cm) deep to the scallop tips, and 3 in (7.6 cm) tall.
- Bridge: 1.5 in (3.8 cm) from point sc to point sc.
- Finished bow: 5.5 in (14.0 cm) wide x 3 in (7.6 cm) tall.
Measure on a flat surface without stretching the piece. A fan shape can look smaller before blocking because the spokes pull together a little. Small differences of 0.125 in (0.3 cm) will block out.
If your wing is too big: go down to a 4.5 mm hook, or check that you are not pulling up tall loops on the dc.
If your wing is too small: go up to a 5.5 mm hook. If only the scallops look tight, keep the same hook and loosen your tension on the border round.
If your bridge is off: add or remove 1 ch. Each ch is about 0.2 in (0.5 cm).
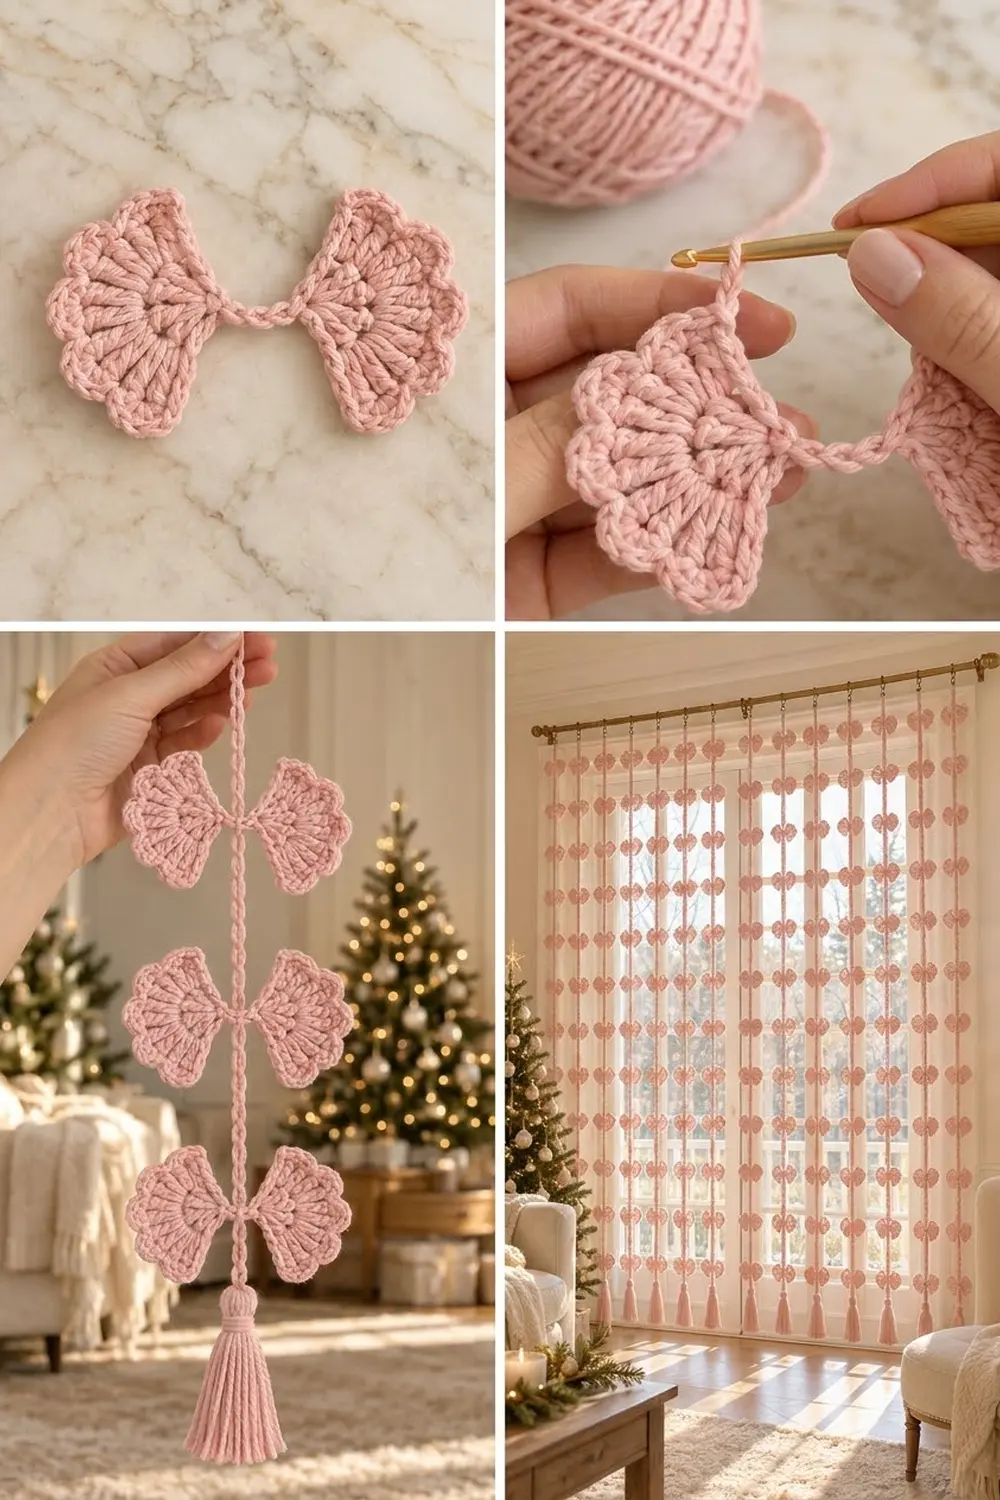
Wing Body (Make 2)
Both wing bodies are made exactly the same way. Use this section to make Wing A and Wing B, then move on to the border.
Foundation: Ch 4.
Row 1: 6 dc in 4th ch from hook. The 3 skipped ch count as the first dc. Turn. (7 dc)
The 7 dc spread into a half-circle fan from a single point. The base chain at the tip is where the point sc goes later, so keep it neat. Tug the starting tail gently to close any gap at the tip.
Row 2: Ch 3 (counts as dc), 2 dc in same st, 3 dc in each of next 5 dc, 3 dc in top of turning ch. Do not turn. (21 dc)
Check: 3 + (5 x 3) + 3 = 21 dc. Row 2 has seven 3-dc groups, one for each spoke of Row 1. Small gaps open between the groups, which gives the wing its ribbed, shell-like texture.
Number the Row 2 stitches 1 to 21 in the order you worked them. Stitch 1 is the beginning ch-3 and stitch 21 is the last dc. Your hook is now at stitch 21.
Don’t fasten off. Put a stitch marker in the live loop and set the wing aside. Then make the second wing the same way.
Checkpoint: each wing body measures 1.5 in (3.8 cm) deep x 2.5 in (6.4 cm) tall. Lay the two bodies side by side and compare them before adding the border.
Border
The border is one round on each wing, worked from the live loop. It has four parts: the first straight side, the point, the second straight side, and the scalloped curve.
Border gauge: 2 sc per dc row-end on the straight sides, and 1 scallop for every 4 Row 2 stitches on the curve.
Wing A Border
Take out the marker and put the live loop back on your hook. Hold the wing with the RS (the side that faced you during Row 2) toward you. Do not turn.
Border Round:
- First side: Ch 1. Rotate the wing so you work down the straight edge next to stitch 21. Work 2 sc in the side of Row 2 and 2 sc in the side of Row 1. (4 sc)
- Point: 1 sc in the free loops of the foundation chain at the tip. Mark this point sc. (1 sc)
- Second side: Work 2 sc in the side of Row 1 and 2 sc in the side of Row 2. (4 sc)
- Curve: Sc in stitch 1 (top of the beginning ch-3). [Sk 1, 5 dc in next st, sk 1, sc in next st] 5 times. The last sc lands in stitch 21. (6 sc + 25 dc = 31 sts)
- Sl st in the first sc of the round to join.
Wing A border total: 4 + 1 + 4 + 31 = 40 sts (15 sc + 25 dc).
Fasten off, leaving a 6 in (15.2 cm) tail. Leave the marker in the point sc.
Wing B Border with Bridge
Put Wing B’s live loop on your hook with the RS facing you. Lay Wing A next to it, RS up, so the two points face each other.
Border Round:
- First side: Ch 1. Work 4 sc down the side, as for Wing A. (4 sc)
- Point: 1 sc in the free loops of the foundation chain at the tip. (1 sc)
- Bridge: Ch 7. Sl st in Wing A’s marked point sc. Sl st in each of the 7 ch, working back toward Wing B. Do not twist the chain. (7 ch + 1 joining sl st + 7 sl st = 15 sts)
- Second side: Work 4 sc up the second side of Wing B. (4 sc)
- Curve: Sc in stitch 1. [Sk 1, 5 dc in next st, sk 1, sc in next st] 5 times, ending with sc in stitch 21. (31 sts)
- Sl st in the first sc of the round to join.
Wing B border total: 40 sts, the same as Wing A, plus the separate 15-stitch bridge.
Fasten off and weave in all ends. Remove the marker.
Why the Math Works
The scallop repeat uses 4 stitches, and the curve needs 1 more stitch for the opening sc. Row 2 has 21 stitches, and 21 = 1 + (4 x 5). That gives exactly 5 scallops with a sc at both corners, so the curve starts and ends cleanly on the first and last dc of Row 2.
On the straight sides, a dc row-end is about twice as tall as a sc. Two sc per row-end keeps the sides flat: 2 rows x 2 sc = 4 sc per side. The single point sc rounds off the tip and gives the bridge a firm anchor.
The sl st return along the bridge stiffens the chain so the wings keep their spacing. The return also stretches the 7 ch slightly, so they span 1.5 in (3.8 cm). Add 2 wings at 2 in (5.1 cm) each, and the bow measures 5.5 in (14.0 cm) wide.
Final Blocking
- Weave any remaining tails along the sc sides, not across the dc spokes.
- Mist the bow lightly until it is damp, or hold a steam iron 1 in (2.5 cm) above it. Never press the iron onto the stitches.
- Lay the bow RS up on a blocking mat.
- Pin the two point sc first, 1.5 in (3.8 cm) apart, so the bridge lies straight.
- Pin the outer edge of each wing so the total width is 5.5 in (14.0 cm).
- Pin the top and bottom corners of each wing so the height is 3 in (7.6 cm).
- Pin the tip of each of the 5 scallops on each wing, easing the curve into an even arc.
- Use a fingertip to gently open the gaps between the Row 2 dc groups so the spokes look even.
- Let the bow dry completely, at least 4 hours, before you unpin it.
Final Quality-Control Checklist
- Each wing has 7 dc in Row 1 and 21 dc in Row 2.
- Each wing has 5 scallops of 5 dc, with a sc between them and at both corners.
- Each straight side has 4 sc, with 1 point sc at the tip.
- Each border round totals 40 sts.
- The bridge is 7 ch with a sl st return, and it is not twisted.
- Both wings lie RS up, facing the same way.
- The bow measures 5.5 in (14.0 cm) x 3 in (7.6 cm).
- All ends are woven in securely and out of sight.
Troubleshooting
The wing cups or curls up. Row 2 is too tight. Go up a hook size or loosen your dc. Blocking will also flatten mild cupping.
The wing ruffles. Your dc are too loose, or you added extra stitches. Recount Row 2: it must have 21 dc.
The scallops are uneven. You probably skipped the wrong stitch. The sc should land on stitches 1, 5, 9, 13, 17, and 21, and the 5-dc groups on stitches 3, 7, 11, 15, and 19.
The straight sides pucker. You worked fewer than 2 sc per row-end. If the sides flare, you worked more. Keep exactly 4 sc per side.
The bridge sags or twists. Make sure the sl st return goes into every ch, and that the chain was flat before you joined it to Wing A.
There is a hole at the tip. Work the point sc into both free loops of the foundation chain, then tug the starting tail to close the base.
One wing is bigger than the other. You may have made them at different times with different tension. Block both to the same measurements, or remake the larger wing.
The spokes lean to one side. Row 2 groups may be off by one stitch. Make sure the first 3-dc group starts in the same stitch as the ch-3.
Care
Hand wash in cool water with mild soap, gently squeeze out the water, and dry flat, reshaping and re-pinning the scallops if needed. Do not tumble dry.
Final Notes
The measurements are easy to check as you go. Each wing grows from 0.75 in (1.9 cm) after Row 1 to 1.5 in (3.8 cm) deep and 2.5 in (6.4 cm) tall after Row 2. The border brings each wing to 2 in (5.1 cm) deep and 3 in (7.6 cm) tall. Two wings plus a 1.5 in (3.8 cm) bridge make a bow 5.5 in (14.0 cm) wide and 3 in (7.6 cm) tall.
The stitch counts are just as simple. Row 1 has 7 dc, Row 2 has 21 dc, and each wing gets a 40-stitch border. A 7-ch bridge links the two points.
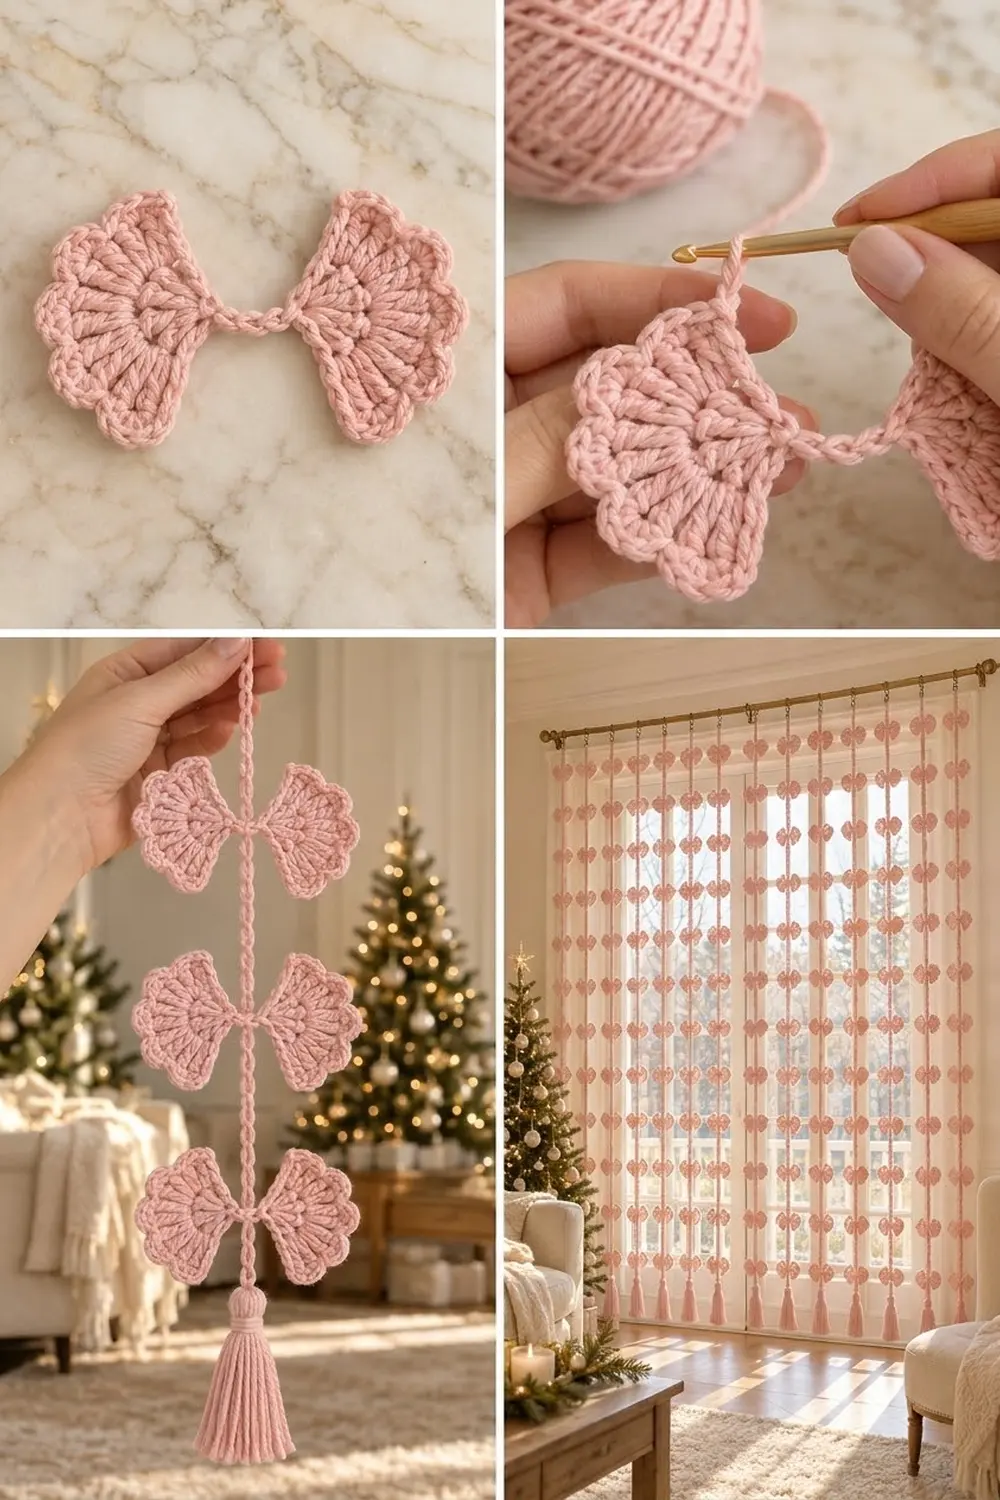
The photo set also shows these bows hanging on a cord. To display yours that way, slip the bridge onto a long chain cord and tack it in place with a few stitches, then finish the cord with a matching tassel. The bow pattern itself doesn’t change.
Happy crocheting!