

The Sage Grace Angel is a small, flat angel motif with a soft, lacy look. It has an open ring for a head, two fan-shaped wings and a triangular skirt full of little granny-style windows. A single crochet edge runs all the way around so the outline stays crisp.
This sample is worked in one color, a muted sage green, which gives it a calm, Scandinavian holiday feel. Use it as a tree ornament or a gift tag, or stitch a few to hang on their own. The pattern uses US crochet terms throughout.
The finished angel measures 4 in (10.2 cm) across the wings and 4 in (10.2 cm) from the top of the head to the bottom edge of the skirt.
It is made as one piece. You start with a small dc ring at the neck, add the head ring at the top, work each wing in three short rows, work the skirt downward in four rows, and finish with one round of single crochet around the outline.
Finished Size and Construction
- Finished size: 4 in (10.2 cm) wide × 4 in (10.2 cm) tall
- Skill level: Advanced beginner
- Terminology: US crochet terms
- Yarn weight: Sport weight (#2), cotton or cotton blend
- Hook: 3.25 mm (US D/3)
- Number of pieces: 1 (one single motif)
- Layout: Single standalone motif, no joining
- Piece size: 4 in × 4 in (10.2 cm × 10.2 cm)
- Size before border: 3.5 in (8.9 cm) wide × 3.75 in (9.5 cm) tall
- Border depth: 0.25 in (0.6 cm), one round of sc
Materials
Yarn advice: Choose a smooth, mercerized or combed cotton in sport weight. Cotton gives clear stitches and holds a flat shape well, which matters for the lacy skirt windows. Avoid fuzzy or very stretchy yarns. They blur the openwork and make the wings curl.
- Sage green: 8 g, about 25 m (27 yd)
These quantities include a margin for your gauge swatch and weaving in ends. One angel uses about 15 m (16 yd) of yarn.
Tools:
- 3.25 mm (US D/3) crochet hook
- Tapestry needle
- Scissors
- 4 locking stitch markers
- Blocking mat and rust-proof pins
- Spray bottle with water
- Optional: fabric stiffener for ornament use
Abbreviations (US Terms)
- ch – chain
- sl st – slip stitch
- sc – single crochet
- dc – double crochet
- st(s) – stitch(es)
- sp – space
- tch – turning chain
- sk – skip
- [ ] – repeat the instructions inside the brackets as directed
Special stitch – 3-dc group: Work 3 dc into the same stitch or space. In the skirt, the groups are separated by ch-1 spaces, which form the open windows.
Gauge and Checkpoints
Gauge matters for an ornament because the head, wings and skirt have to stay in proportion. Make one test angel before you make a batch.
Base gauge: Round 1 of the center ring measures 1 in (2.5 cm) across. In the skirt, one 3-dc group plus its ch-1 space measures about 0.75 in (1.9 cm) wide.
Checkpoints:
- After center ring Round 1: 1 in (2.5 cm) diameter
- After the head: the head ring measures 1 in (2.5 cm) across the outside, with an opening of about 0.5 in (1.3 cm)
- After each wing: the wing reaches 1.25 in (3.2 cm) out from the edge of the center ring
- Wingspan before border: 3.5 in (8.9 cm)
- After skirt Row 4: the bottom edge is 3.75 in (9.5 cm) wide, and the skirt is 1.75 in (4.4 cm) tall below the center ring
- Height before border: 3.75 in (9.5 cm)
- After the border: 4 in × 4 in (10.2 cm × 10.2 cm)
If your angel is too big, go down to a 2.75 mm or 3.0 mm hook. If it is too small, go up to a 3.5 mm (US E/4) hook. Change the hook, not the stitch counts, because every round depends on the counts staying fixed.
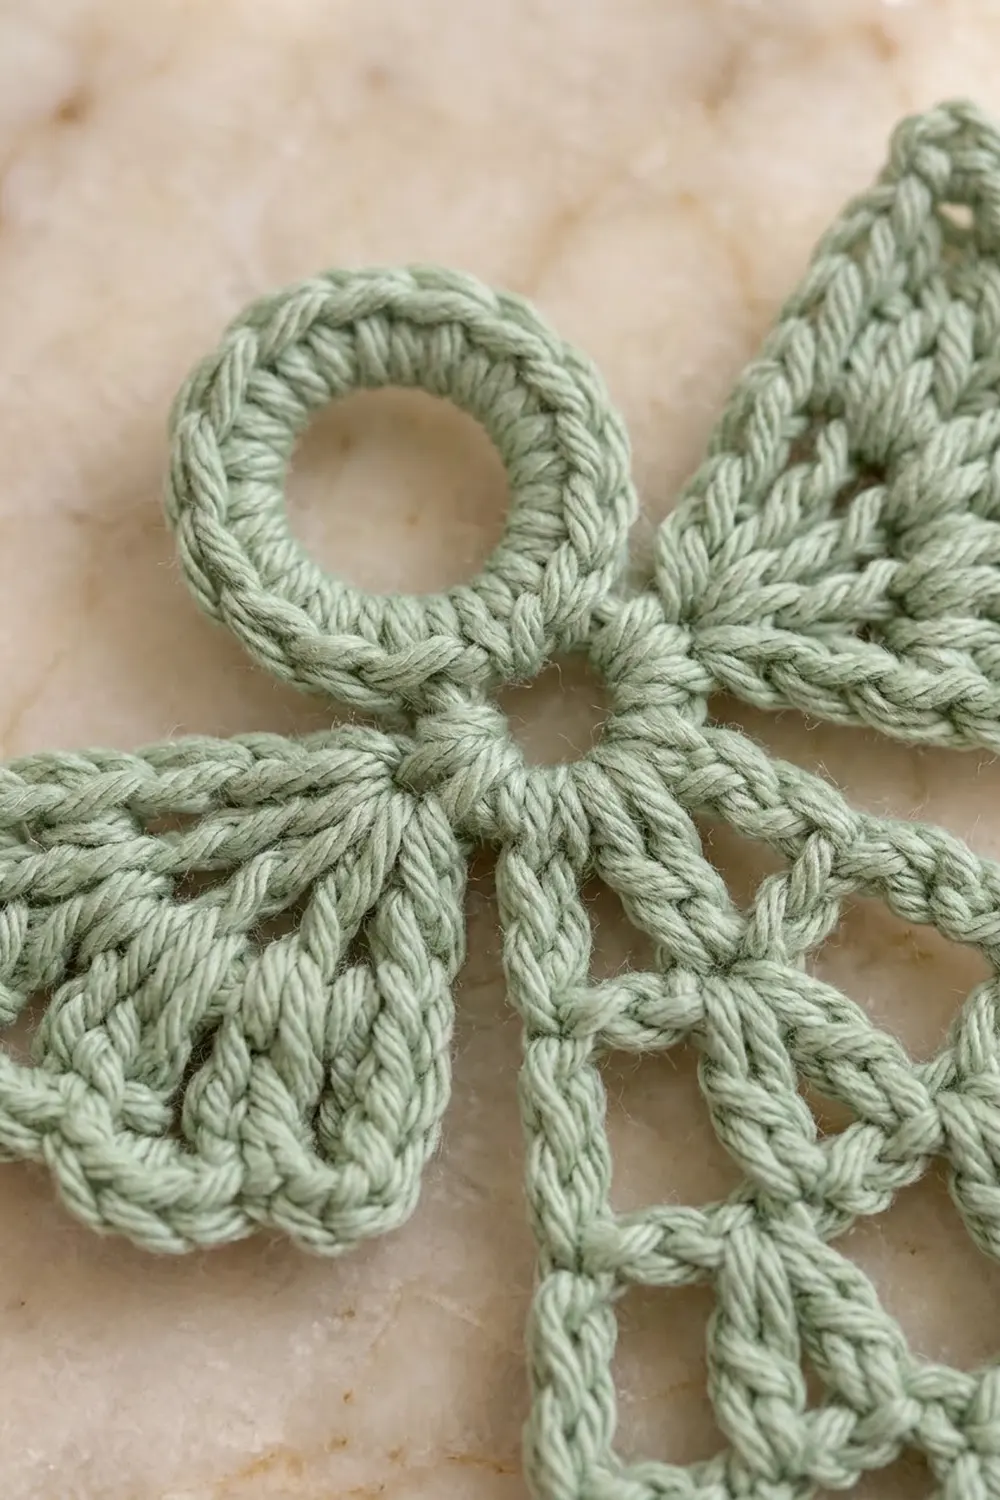
Center Ring (Neck)
Ch 6, sl st in the first ch to form a ring.
Round 1: Ch 3 (counts as dc), 15 dc in the ring. Sl st in the top of the beginning ch-3 to join. (16 dc)
Number the stitches 1 to 16 clockwise. Stitch 1 is the beginning ch-3, and it is at the top of the angel. Place markers so the sections are easy to find:
- Sts 1–2: head
- Sts 3–6: right wing
- Sts 7–12: skirt
- Sts 13–16: left wing
That is 2 + 4 + 6 + 4 = 16 stitches, so every stitch of Round 1 is used.
Checkpoint: the ring lies flat and measures 1 in (2.5 cm) across.
Head Ring
Your loop is on the hook at the top of st 1.
Step 1: Ch 14, sl st in the top of st 2. This makes a chain loop above the center ring.
Step 2: Ch 1, then work 24 sc into the ch-14 loop. Work over the chain into the loop itself, not into the individual chains. Push the stitches together so they cover the chain completely.
Step 3: Sl st in the top of st 2 to close. Fasten off and leave a 4 in (10.2 cm) tail.
Head count: 24 sc over a ch-14 loop. Twenty-four sc over 14 chains packs the stitches tightly, so the head becomes a firm, round ring with an open center instead of a floppy loop.
Checkpoint: outside diameter 1 in (2.5 cm), opening about 0.5 in (1.3 cm).
Wings (Make 2)
Both wings are worked in turned rows directly off the center ring. The rows spread out quickly, which makes the fan shape.
Right wing: Join yarn with a sl st in st 3.
Row 1: Ch 3 (counts as dc), dc in the same st, 2 dc in each of sts 4, 5 and 6. Turn. (8 dc)
Row 2: Ch 4 (counts as dc + ch 1), [dc in next dc, ch 1] 6 times, dc in the top of the tch. Turn. (8 dc, 7 ch-1 sps)
Row 3: Ch 3 (counts as dc), dc in the same st, [2 dc in next ch-1 sp, dc in next dc] 6 times, 2 dc in the last ch-1 sp, 2 dc in the 3rd ch of the tch. Fasten off. (24 dc)
Check Row 3: 2 dc in the first st, plus 6 × 3 = 18 for the repeat, plus 2 in the last space, plus 2 in the tch, equals 24. This is the same as (8 dc worked into, with 2 extra at each end) + (7 spaces × 2) = 10 + 14 = 24.
The pairs of dc in the spaces make the outer edge ripple slightly, which gives the wing its feathered look.
Left wing: Join yarn with a sl st in st 13 and repeat Rows 1–3 over sts 13, 14, 15 and 16. Fasten off.
Checkpoint: each wing reaches 1.25 in (3.2 cm) beyond the center ring. Wingspan: 1 in + 1.25 in + 1.25 in = 3.5 in (8.9 cm).
Skirt
The skirt is a granny triangle worked downward from sts 7–12. Each row adds one 3-dc group.
Join yarn with a sl st in st 7.
Row 1: Ch 3 (counts as dc), dc in sts 8 and 9, ch 1, dc in sts 10, 11 and 12. Turn. (6 dc in 2 groups, 1 ch-1 sp)
Row 2: Ch 3 (counts as dc), 2 dc in the same st, ch 1, 3 dc in the ch-1 sp, ch 1, 3 dc in the top of the tch. Turn. (9 dc in 3 groups, 2 ch-1 sps)
Row 3: Ch 3 (counts as dc), 2 dc in the same st, ch 1, [3 dc in next ch-1 sp, ch 1] 2 times, 3 dc in the top of the tch. Turn. (12 dc in 4 groups, 3 ch-1 sps)
Row 4: Ch 3 (counts as dc), 2 dc in the same st, ch 1, [3 dc in next ch-1 sp, ch 1] 3 times, 3 dc in the top of the tch. (15 dc in 5 groups, 4 ch-1 sps)
Do not fasten off. Turn and go straight into the border.
The open windows are the spaces between groups, stacked like little triangles. Each group sits over a ch-1 space from the row before, so the skirt widens evenly and stays flat.
Checkpoints: the bottom edge measures 3.75 in (9.5 cm), and the skirt is 1.75 in (4.4 cm) tall below the center ring. Total height before the border: head 1 in + center ring 1 in + skirt 1.75 in = 3.75 in (9.5 cm).
Border
Border gauge: about 5 sc per 1 in (2.5 cm) along the edges. Work 2 sc around each dc row-end post, 1 sc in each stitch and each ch-1 space, and 3 sc in each corner stitch.
Border Round 1: Ch 1. Work in this order:
- Skirt bottom: 3 sc in the first dc, sc in the next 2 dc, [sc in next ch-1 sp, sc in next 3 dc] 3 times, sc in the last ch-1 sp, sc in the next 2 dc, 3 sc in the top of the tch. (23 sc)
- First skirt side: 2 sc around each of the 4 row-end posts. (8 sc)
- Wing, lower side: 2 sc around each of the 3 wing row-end posts. (6 sc)
- Wing, outer edge: 3 sc in the first dc of Row 3, sc in the next 22 dc, 3 sc in the last dc. (28 sc)
- Wing, upper side: 2 sc around each of the 3 row-end posts. (6 sc)
- Neck: sl st in st 1 and in st 2 of the center ring, working behind the base of the head ring. (2 sl st)
- Second wing, upper side: (6 sc)
- Second wing, outer edge: worked as in step 4. (28 sc)
- Second wing, lower side: (6 sc)
- Second skirt side: (8 sc)
Sl st in the first sc to join. Fasten off.
Total: 119 sc + 2 sl st.
That is 23 + 8 + (6 + 28 + 6) + (6 + 28 + 6) + 8 = 119.
Why the math works:
- Skirt bottom: 15 dc + 4 ch-1 spaces = 19 sc worked one per stitch or space, plus 2 extra at each of the 2 corners. That gives 19 + 4 = 23.
- Wing outer edge: 24 dc worked one per stitch, plus 2 extra at each wing tip. That gives 24 + 4 = 28.
- Sides: a dc row is about twice as tall as an sc is wide, so 2 sc per row end keeps the sides flat without ruffling or pulling in.
- Neck: the sl sts there add no height, so the head stays tight against the wings.
The border adds 0.25 in (0.6 cm) on each side, at the bottom and at each wingtip. Width: 3.5 in + 0.25 in + 0.25 in = 4 in (10.2 cm). Height: 3.75 in + 0.25 in at the bottom = 4 in (10.2 cm). The head ring has no border.
Optional hanging loop: Join yarn at the top of the head ring, ch 15, sl st in the same st, fasten off. The loop is about 1.5 in (3.8 cm) long.
Final Blocking
- Weave in all ends along the back of the stitches. One angel has 5 tails: center ring, two wings, skirt, and border. Hide each tail along stitches of the same color for at least 1 in (2.5 cm).
- Spray the angel evenly with water until it is damp but not dripping.
- Lay it face up on the blocking mat.
- Pin the two bottom skirt corners 4 in (10.2 cm) apart.
- Pin the two wingtips 4 in (10.2 cm) apart, angled slightly upward.
- Pin the top of the head ring so the total height is 4 in (10.2 cm).
- Put a pin through each skirt window and each head opening to open them up.
- Optional for ornaments: brush on a light coat of fabric stiffener.
- Leave it to dry completely, at least 6 hours, before unpinning.
Final Quality-Control Checklist
- Round 1 has exactly 16 dc and lies flat.
- The head ring has 24 sc and an even, round opening.
- Each wing has 8 / 8 + 7 sps / 24 dc in Rows 1–3.
- Skirt Rows 1–4 have 6 / 9 / 12 / 15 dc.
- The border has 119 sc and 2 sl st.
- The bottom corners and wingtips are sharp and symmetrical.
- The angel measures 4 in × 4 in (10.2 cm × 10.2 cm) after blocking.
- No tails are visible from the front.
Troubleshooting
The wings curl like cups: Your Row 3 tension is too tight. Loosen up, or go up half a hook size for the wings only, then block firmly.
The skirt ripples: You may have worked 3 dc into the ch-1 spaces of Row 1 as well as the groups. Recount: Row 1 has only 6 dc. Also check that you used ch-1 spaces, not ch-2.
The skirt is lopsided: Each row must start with 2 dc in the same stitch as the ch-3 and end with 3 dc in the top of the tch. Missing either one shifts the triangle.
The head ring looks lumpy: Push the 24 sc together as you go so the chain loop is completely covered.
The border sides pull in: Use 2 sc around each row-end post, not 1.
The angel is smaller than 4 in (10.2 cm): Check your center ring. If it is under 1 in (2.5 cm), go up a hook size and start again.
Care
Hand wash in cool water with mild soap, press out the water in a towel, and dry flat, pinned to shape. If you used stiffener, re-stiffen after washing.
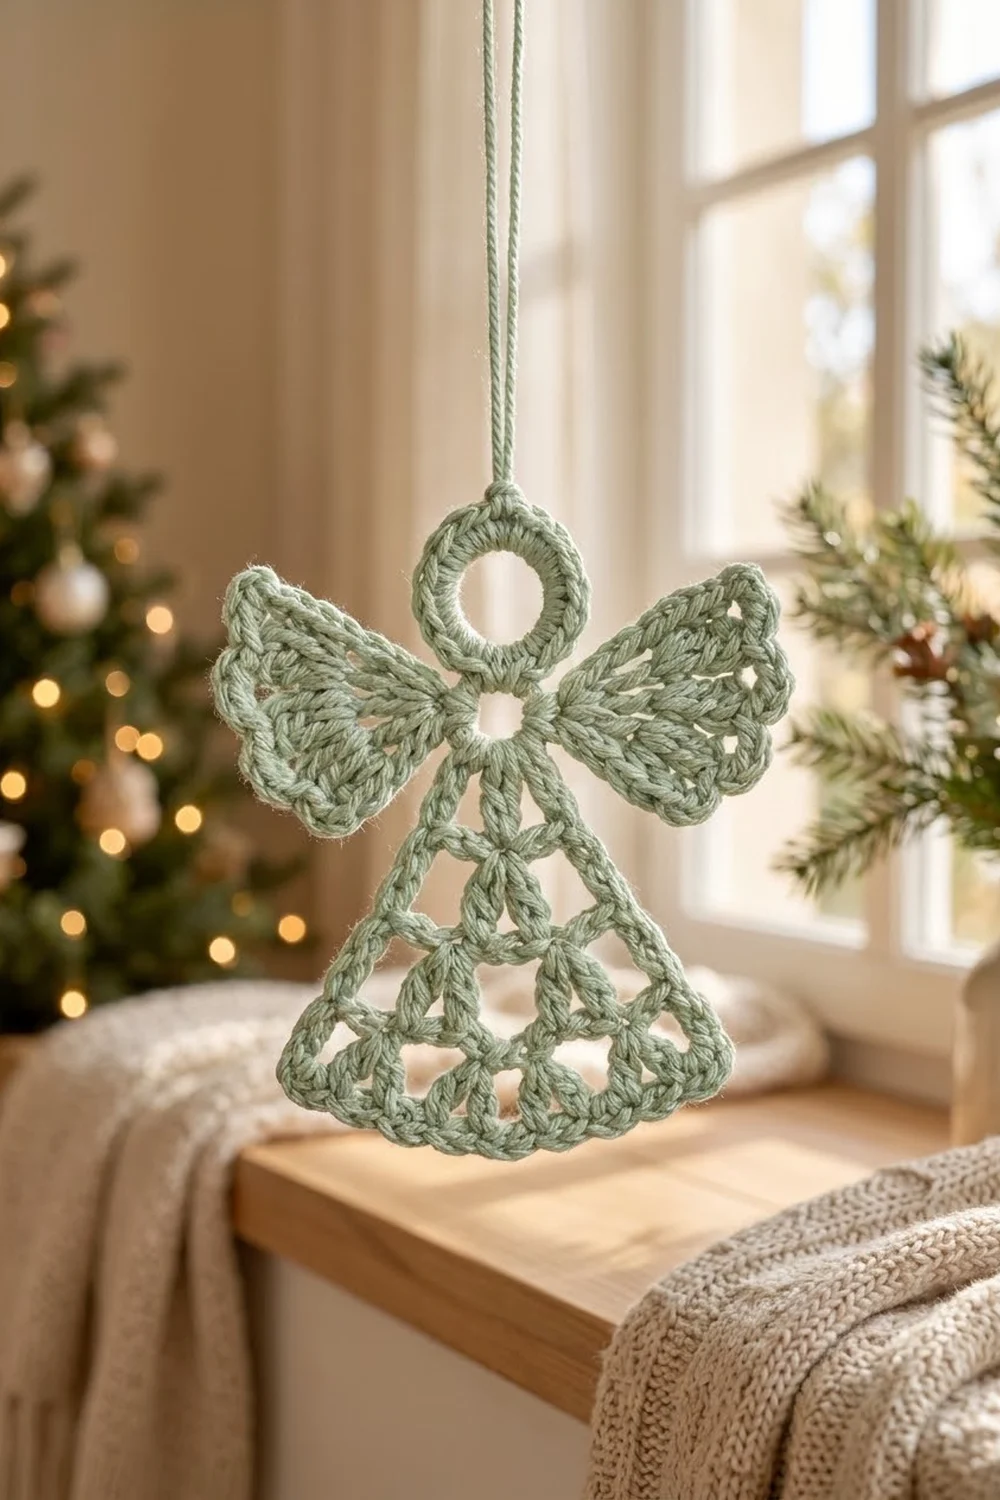
Final Notes
The size of the Sage Grace Angel builds up one measured stage at a time:
- Center ring: 1 in (2.5 cm)
- Head ring: another 1 in (2.5 cm) of height
- Wings: 1.25 in (3.2 cm) each, for a 3.5 in (8.9 cm) span
- Skirt: 1.75 in (4.4 cm) tall and 3.75 in (9.5 cm) wide
- Border: 0.25 in (0.6 cm), bringing everything to 4 in × 4 in (10.2 cm × 10.2 cm)
If each checkpoint matches, the finished angel will too. Make your first angel slowly, count at every row, and the second one will feel easy.
Happy crocheting!