

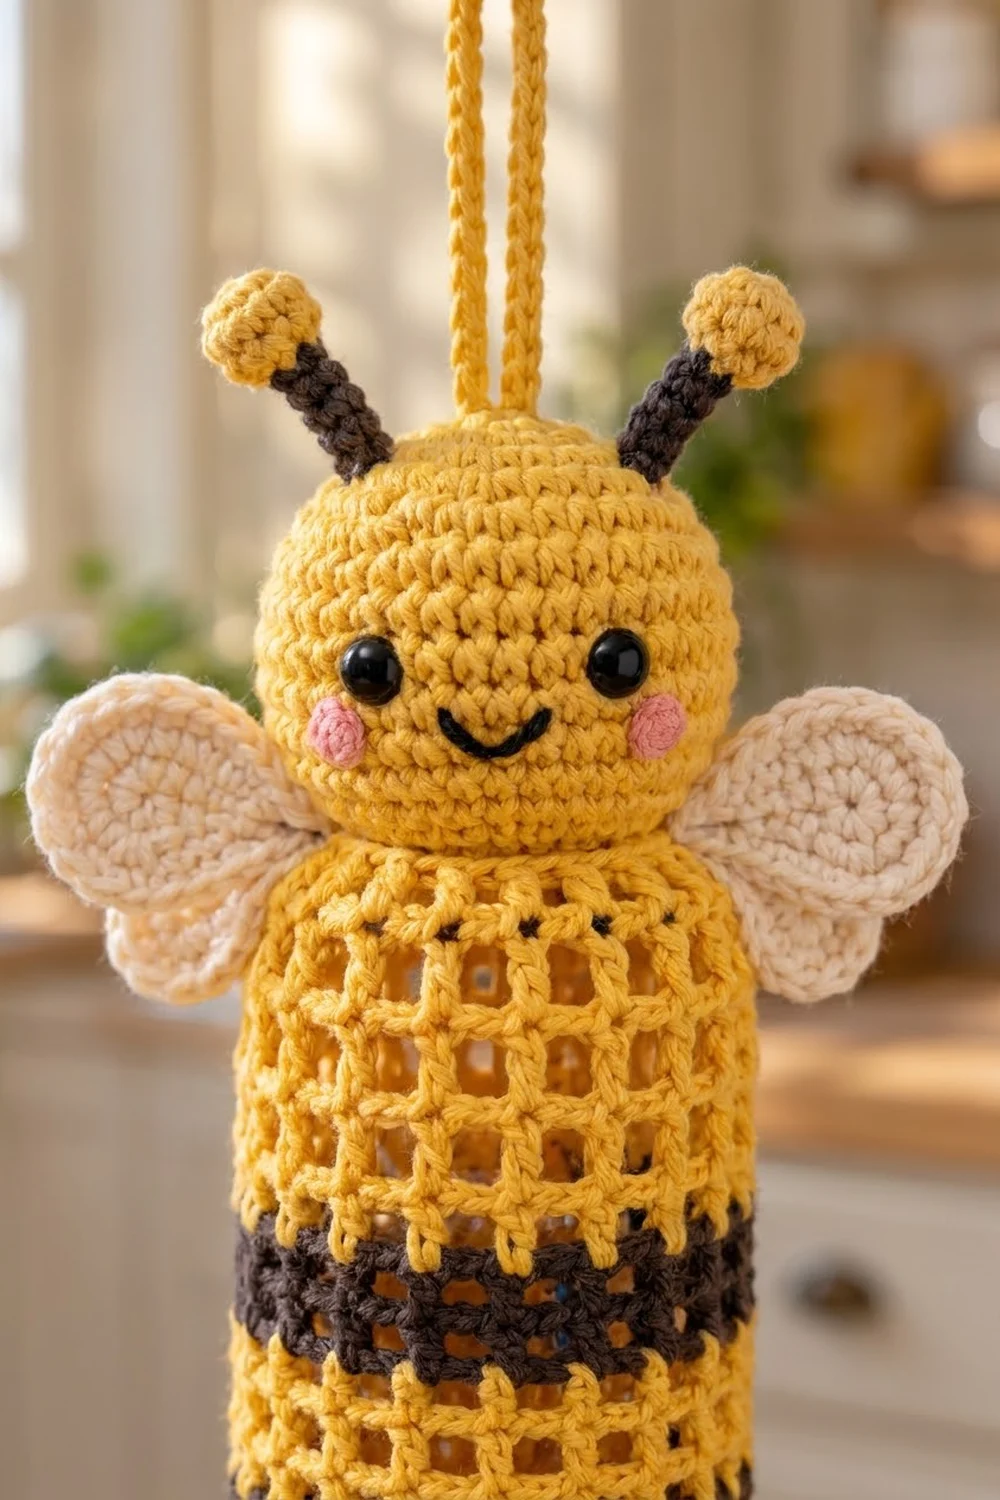
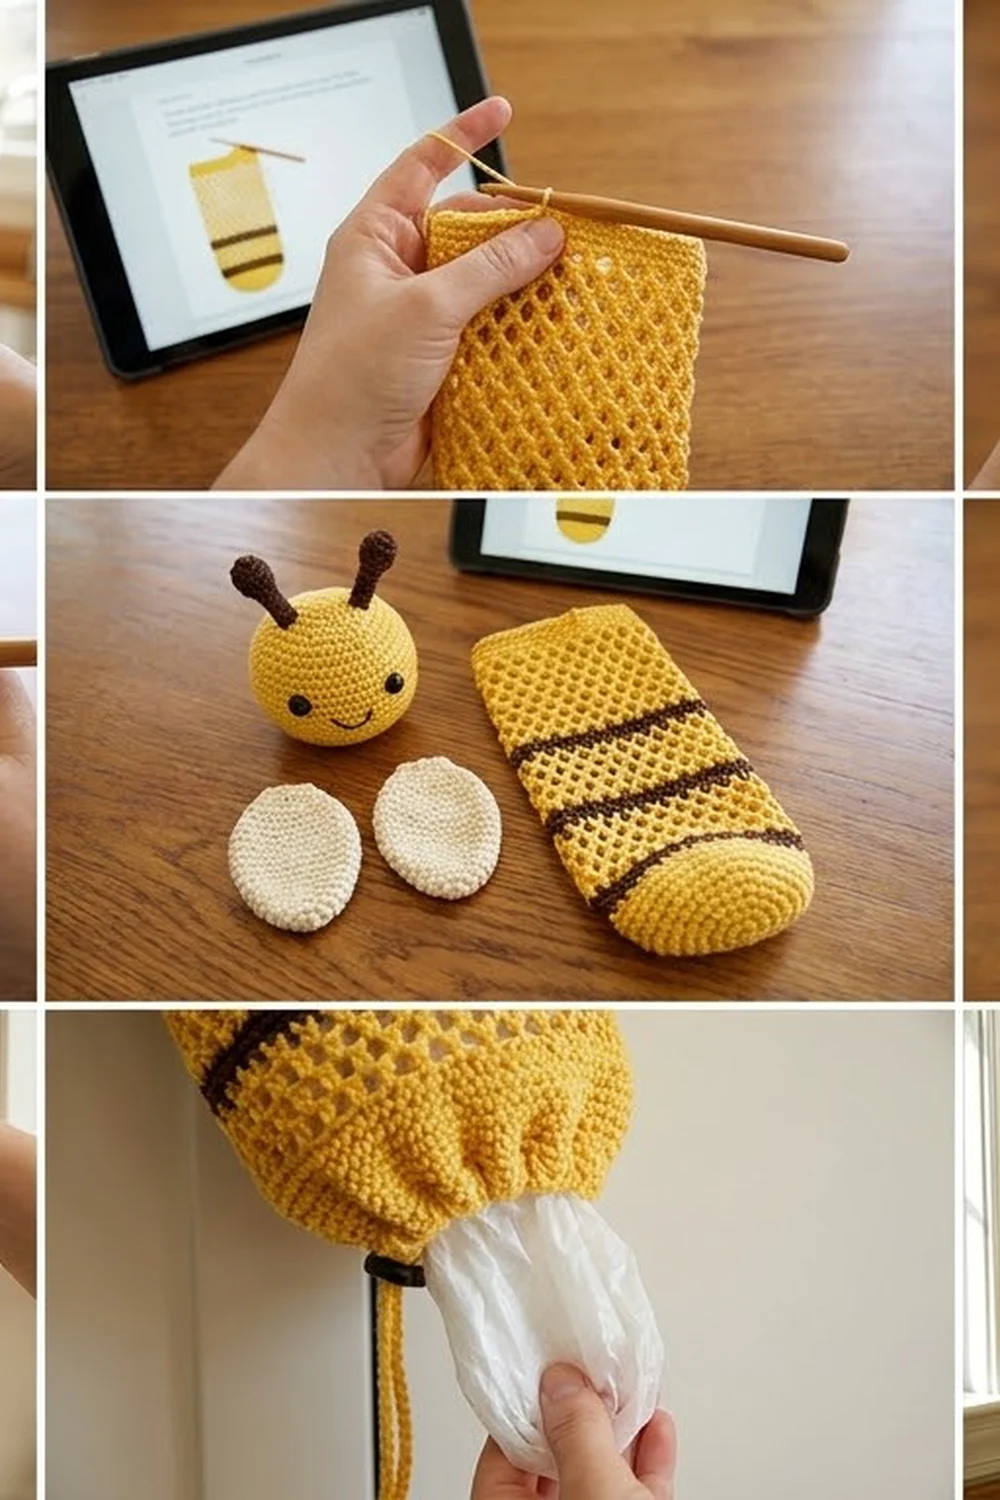
This cheerful bee keeps grocery bags tidy and in sight. The body is an open yellow filet-mesh tube with two dark brown stripes. A round, smiling amigurumi head sits on top, with two cream wings and two antennae tipped with little yellow balls. You push bags in at the top, in front of the head, and pull them out through a gathered drawstring opening at the bottom.
The colors are classic bee: sunny yellow, dark chocolate brown, and soft cream, with small touches of black and pink for the face. Everything is worked in cotton, which gives crisp stitch definition and washes easily.
This pattern uses US crochet terms. The finished holder is about 19 in (48.3 cm) tall from the top of the head to the bottom trim, not counting the hanging loop. The mesh body is 16 in (40.6 cm) long and 6 in (15.2 cm) wide when flat, which is 12 in (30.5 cm) around.
You crochet the body from the top down as one seamless tube: a firm single crochet rim, mesh rounds with color stripes, then a single crochet trim. The head, wings, antennae, loop, and drawstring are made separately and sewn on.
Finished Size and Construction
- Finished size: about 19 in (48.3 cm) tall; body 6 in (15.2 cm) wide flat
- Skill level: Easy+ (basic stitches, working in the round, simple amigurumi)
- Terminology: US crochet terms
- Yarn weight: worsted (#4) cotton
- Hooks: 5 mm (H-8) for the body, loop, and drawstring; 4 mm (G-6) for the head, wings, and antennae
- Number of pieces: 1 body tube, 1 head, 2 wings, 2 antenna stems, 4 small balls, 1 hanging loop, 1 drawstring
- Layout: stacked vertically, with the head on the back half of the top rim and a wing at each side
- Body size: 12 in (30.5 cm) around x 16 in (40.6 cm) long
- Head size: about 3.75 in (9.5 cm) across, stuffed
- Body before border: 15.5 in (39.4 cm) long after Rnd 27
- Border depth: 0.5 in (1.3 cm) bottom trim
Materials
Choose a smooth worsted-weight cotton or cotton blend. Cotton keeps the mesh squares crisp and won’t stretch out under the weight of the bags. The amounts below assume about 190 m per 100 g.
- Yellow: 150 g / 285 m (body, head, loop, drawstring, all balls)
- Dark brown: 20 g / 38 m (stripes, antenna stems)
- Cream: 15 g / 29 m (wings)
- Black: 2 g / 4 m (smile)
- Pink: 2 g / 4 m (cheeks)
These amounts include about 15% extra in case your gauge runs a little loose.
Tools:
- 5 mm (H-8) and 4 mm (G-6) hooks
- Two 10 mm black safety eyes
- Polyester fiberfill, about 30 g
- Tapestry needle, stitch markers, pins
- Scissors and tape measure
Abbreviations (US Terms)
- ch – chain
- sl st – slip stitch
- sc – single crochet
- hdc – half double crochet
- dc – double crochet
- sc2tog – single crochet 2 together
- inc – 2 sc in same stitch
- sk – skip
- sp – space
- MR – magic ring
- st(s) – stitch(es)
- Rnd – round
Mesh stitch: dc in the next st, ch 1, sk the next st. One dc plus its ch-1 sp makes one open square and counts as 2 sts. On later mesh rounds, work each dc into the dc below and each ch-1 over the ch-1 sp below.
Gauge and Checkpoints
Body (5 mm hook):
- Mesh: 4 squares (8 sts) = 2 in (5.1 cm). 5 mesh rounds = 3 in (7.6 cm), so each mesh round is 0.6 in (1.5 cm) tall.
- Sc: 4 sts and 4 rounds = 1 in (2.5 cm).
Small pieces (4 mm hook):
- Sc: 5 sts and 5 rounds = 1 in (2.5 cm).
Check your gauge on the body first. Work Rnds 1–7, then lay the tube flat and measure:
- After Rnd 2: 12 in (30.5 cm) around, or 6 in (15.2 cm) flat
- After Rnd 7: 3.5 in (8.9 cm) long
- After Rnd 14: 7.7 in (19.6 cm) long
- After Rnd 27: 15.5 in (39.4 cm) long
- After the border: 16 in (40.6 cm) long
If the tube is too big, go down a hook size. If it’s too small, go up one. If only the length is off, add or remove rounds in the last yellow section (Rnds 15–27). Each round you add or remove changes the length by 0.6 in (1.5 cm).
Body
Work from the top down in joined rounds with the 5 mm hook. Don’t turn. Keep the join at the center back, where the head will cover it.
Rnd 1 (yellow): Ch 48 and join with a sl st to the first ch to make a ring, taking care not to twist the chain. Ch 1, sc in each ch around, then sl st to the first sc. (48 sts)
Rnd 2: Ch 1, sc in each st around, then sl st to the first sc. (48 sts)
The rim is now 0.5 in (1.3 cm) deep and 12 in (30.5 cm) around.
Rnd 3 (conversion round): Ch 4 (counts as dc and ch 1), sk next st, dc in next st, ch 1, sk next st. Repeat from * 22 more times. Sl st to the 3rd ch of the beginning ch-4. (24 dc + 24 ch-1 sps = 48 sts; 24 squares)
Rnds 4–7: Ch 4 (counts as dc and ch 1), dc in next dc, ch 1. Repeat from * 22 more times. Sl st to the 3rd ch of the beginning ch-4. (48 sts; 24 squares in each round)
Checkpoint: 3.5 in (8.9 cm) long.
Rnds 8–9 (dark brown): Change to brown during the last sl st of Rnd 7. Work 2 mesh rounds the same way as Rnd 4. (48 sts in each round) Don’t cut the yellow. Carry it loosely up the inside at the join.
Rnds 10–12 (yellow): Change to yellow during the last sl st of Rnd 9. Work 3 mesh rounds. (48 sts in each round)
Rnds 13–14 (dark brown): Work 2 mesh rounds. (48 sts in each round) Cut the brown, leaving a 6 in (15.2 cm) tail.
Checkpoint: 7.7 in (19.6 cm) long.
Rnds 15–27 (yellow): Work 13 mesh rounds. (48 sts in each round)
Checkpoint: 15.5 in (39.4 cm) long. Keep the yellow attached for the border.
Small Pieces
Use the 4 mm hook unless the instructions say otherwise. Work in continuous spirals and mark the first st of each round.
Head (yellow)
- Rnd 1: 6 sc in MR. (6)
- Rnd 2: Inc in each st. (12)
- Rnd 3: (Sc 1, inc) 6 times. (18)
- Rnd 4: (Sc 2, inc) 6 times. (24)
- Rnd 5: (Sc 3, inc) 6 times. (30)
- Rnd 6: (Sc 4, inc) 6 times. (36)
- Rnd 7: (Sc 5, inc) 6 times. (42)
- Rnd 8: (Sc 6, inc) 6 times. (48)
- Rnd 9: (Sc 7, inc) 6 times. (54)
- Rnd 10: (Sc 8, inc) 6 times. (60)
- Rnds 11–20: Sc in each st. (60 sts in each round)
Insert the safety eyes between Rnds 16 and 17, centered on the front with 8 sts between them.
- Rnd 21: (Sc 8, sc2tog) 6 times. (54)
- Rnd 22: (Sc 7, sc2tog) 6 times. (48)
- Rnd 23: (Sc 6, sc2tog) 6 times. (42)
- Rnd 24: (Sc 5, sc2tog) 6 times. (36)
- Rnd 25: (Sc 4, sc2tog) 6 times. (30)
Stuff the head firmly, then keep adding stuffing as you go.
- Rnd 26: (Sc 3, sc2tog) 6 times. (24)
- Rnd 27: (Sc 2, sc2tog) 6 times. (18)
- Rnd 28: (Sc 1, sc2tog) 6 times. (12)
- Rnd 29: Sc2tog 6 times. (6)
Fasten off. Weave the tail through the front loops of the last 6 sts and pull it closed. The head is about 3.75 in (9.5 cm) across.
Face: With black yarn, back-stitch a U-shaped smile across 4 sts on Rnd 19, centered between the eyes. With pink yarn, make 3 or 4 short straight stitches over 2 sts on Rnds 18–19, just below and outside each eye.
Wings (make 2, cream)
Ch 9.
- Rnd 1: Sc in the 2nd ch from the hook and in the next 6 ch, then 3 sc in the last ch. Turn the piece and work along the other side of the chain: sc in the next 6 ch, then 2 sc in the last ch (the same ch as the first sc). (7 + 3 + 6 + 2 = 18 sts)
- Rnd 2: Inc in next st, sc in next 6 sts, inc in each of next 3 sts, sc in next 6 sts, inc in each of last 2 sts. (18 + 6 increases = 24 sts)
- Rnd 3: Sc in next 8 sts, (2 hdc in next st, hdc in next st) 3 times, sc in next 6 sts, (inc, sc 1) 2 times. (8 + 9 + 6 + 6 = 29 sts)
Sl st in the next st, then fasten off, leaving a 10 in (25.4 cm) tail. The hdc end becomes the broad, rounded tip. Each wing is about 2.75 in (7.0 cm) long and 1.5 in (3.8 cm) wide.
Antenna Stems (make 2, dark brown)
- Rnd 1: 5 sc in MR. (5)
- Rnds 2–6: Sc in each st. (5 sts in each round)
Fasten off, leaving a long tail. Each stem is 1.2 in (3.0 cm) long. No stuffing is needed because the narrow tube stands upright on its own.
Balls (make 4, yellow)
- Rnd 1: 6 sc in MR. (6)
- Rnd 2: Inc in each st. (12)
- Rnds 3–4: Sc in each st. (12 sts in each round)
- Rnd 5: Sc2tog 6 times. (6)
Stuff lightly and close the same way as the head. Each ball is about 0.75 in (1.9 cm) across.
Hanging Loop (yellow, 5 mm hook)
Ch 30. Starting in the 2nd ch from the hook, sl st in the back bump of each ch across. (29 sl sts) The cord is about 7 in (17.8 cm) long. Fold it in half to make a 3.5 in (8.9 cm) loop.
Drawstring (yellow, 5 mm hook)
Ch 60. Starting in the 2nd ch from the hook, sl st in the back bump of each ch across. (59 sl sts) The cord is about 14 in (35.6 cm) long.
Make All Pieces
This holder is a single item, so there’s no grid of repeated pieces. Make sure you have every component:
- Yellow: 1 striped body tube, 1 head, 4 balls, 1 loop, 1 drawstring
- Dark brown: 2 antenna stems
- Cream: 2 wings
Layout, top to bottom:
        [ loop ]
   [ball/stem] [ball/stem]
  [wing]  [ HEAD ]  [wing]
      [ yellow rim ]
      [ mesh + 2 brown bands ]
      [ drawstring ]
      [ bottom trim ]
Assembly
Antennae: Sew a ball to the top of each stem. Then sew the stems to the head on Rnds 6–7, about 8 sts to each side of the top center, tilted slightly outward.
Loop: Sew both ends of the loop together at the top center of the head, between the antennae. Go over the seam several times so it can carry a full holder.
Head to body: Lay the body flat with the join at the center back. Pin the lower back of the head (around Rnds 22–26) to the center 14 sts on the back half of the rim (Rnds 1–2). Whipstitch through both layers, one rim stitch at a time, then tack the head at each side. Leave the front 24 rim sts free; this is where the bags go in.
Wings: Pin each wing at a side where the head meets the rim, narrow end in and broad tip angled up and out. Sew around the narrow end only, catching both the head and the rim.
Sew firmly but don’t pull tight, because tight stitches pucker the mesh. Checkpoint: the head should rise about 3 in (7.6 cm) above the rim, for a total height of 19 in (48.3 cm).
Border
The bottom trim uses the sc gauge of 4 sts and 4 rounds = 1 in (2.5 cm). Keep working with the yellow and the 5 mm hook straight from Rnd 27.
Rnd 28 (conversion round): Ch 1, sc in each dc and in each ch-1 sp around, then sl st to the first sc. (24 sc in dc + 24 sc in ch-1 sps = 48 sts; 24 on the front half, 24 on the back half)
Rnd 29: Ch 1, sc in each st around, then sl st to the first sc. (48 sts; 24 per half)
Rnd 30: Sl st loosely in each st around. (48 sl sts) Fasten off and weave in all ends.
Why the math works: Each mesh square is 2 sts wide, so 24 squares equal 48 sts. That matches the 48-st rim, and at 4 sts per inch it gives 12 in (30.5 cm) around. Rnd 28 places one sc in each of those 48 positions, so the trim lies flat without flaring or pulling in. The two sc rounds are 0.25 in (0.6 cm) each and add 0.5 in (1.3 cm), which takes the body from 15.5 in (39.4 cm) to 16 in (40.6 cm).
Drawstring: Start at the center front and weave the drawstring over and under the dc posts of Rnd 26 all the way around, so both ends come out of neighboring squares. Sew a ball to each end. Pull the drawstring until the opening is about 1.25 in (3.2 cm) across. Rnd 27 and the trim below it make a small flared collar under the gather.
Final Blocking
- Take out the drawstring and dampen the body with a spray bottle.
- Slide a rolled towel inside, about 12 in (30.5 cm) around.
- Straighten each round so the squares sit square and the stripes run level.
- Pat the body to 16 in (40.6 cm) long and let it dry completely.
- Pin the wings flat at 2.75 x 1.5 in (7.0 x 3.8 cm), spray them, and let them dry.
- Don’t wet the stuffed head. Shape it by hand instead.
- Thread the drawstring back in.
Final Quality-Control Checklist
- Body is 12 in (30.5 cm) around and 16 in (40.6 cm) long
- Every mesh round has 24 squares, and the columns line up
- Both brown stripes are level and 2 rounds deep
- Head is firm, about 3.75 in (9.5 cm) across, and closed neatly
- Eyes are locked in place and the face is symmetrical
- Wings match and are securely attached
- Loop holds when you tug it firmly
- Drawstring gathers to about 1.25 in (3.2 cm)
- All ends are woven in at least 2 in (5.1 cm)
Troubleshooting
- Squares slant: You’re working the dc into the ch-1 sp instead of into the dc below. Check the placement on every round.
- Tube flares: Your chains are too loose. Tighten your ch-1s or switch to a 4.5 mm hook.
- Stripes look jagged at the join: Change colors during the final sl st of the round.
- Head looks lumpy: Add stuffing in small pieces and shape it as you go.
- Wings cup: Loosen the hdc increases on Rnd 3, then block the wings flat.
Care
Hand wash in cool water with mild soap. Take out the drawstring first, reshape the mesh while it’s damp, and dry it flat. Don’t machine dry it, because the heat can damage the safety eyes.
Final Notes
Here’s how the measurements build. At 8 sts = 2 in (5.1 cm), 48 sts make 12 in (30.5 cm) around. Twenty-five mesh rounds at 0.6 in (1.5 cm) each give 15 in (38.1 cm) of length. Adding the 0.5 in (1.3 cm) rim and the 0.5 in (1.3 cm) trim brings the body to 16 in (40.6 cm), and the head on top makes the holder 19 in (48.3 cm) tall. Check your gauge early and count your 24 squares every round so your bee hangs straight and holds plenty of bags.
Happy crocheting!