

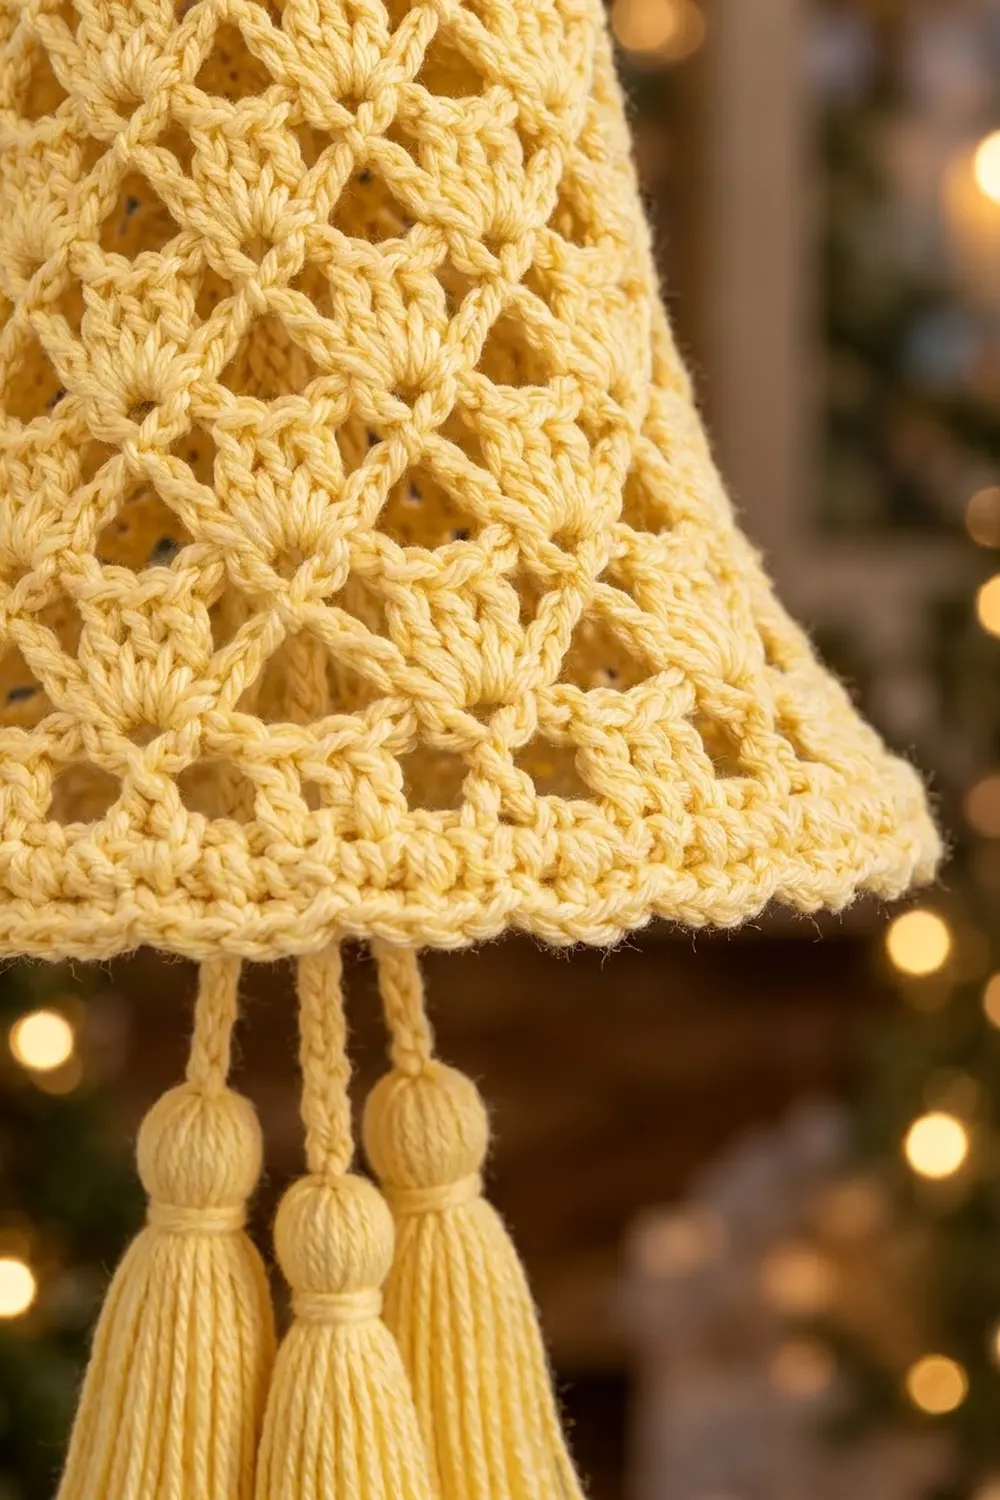
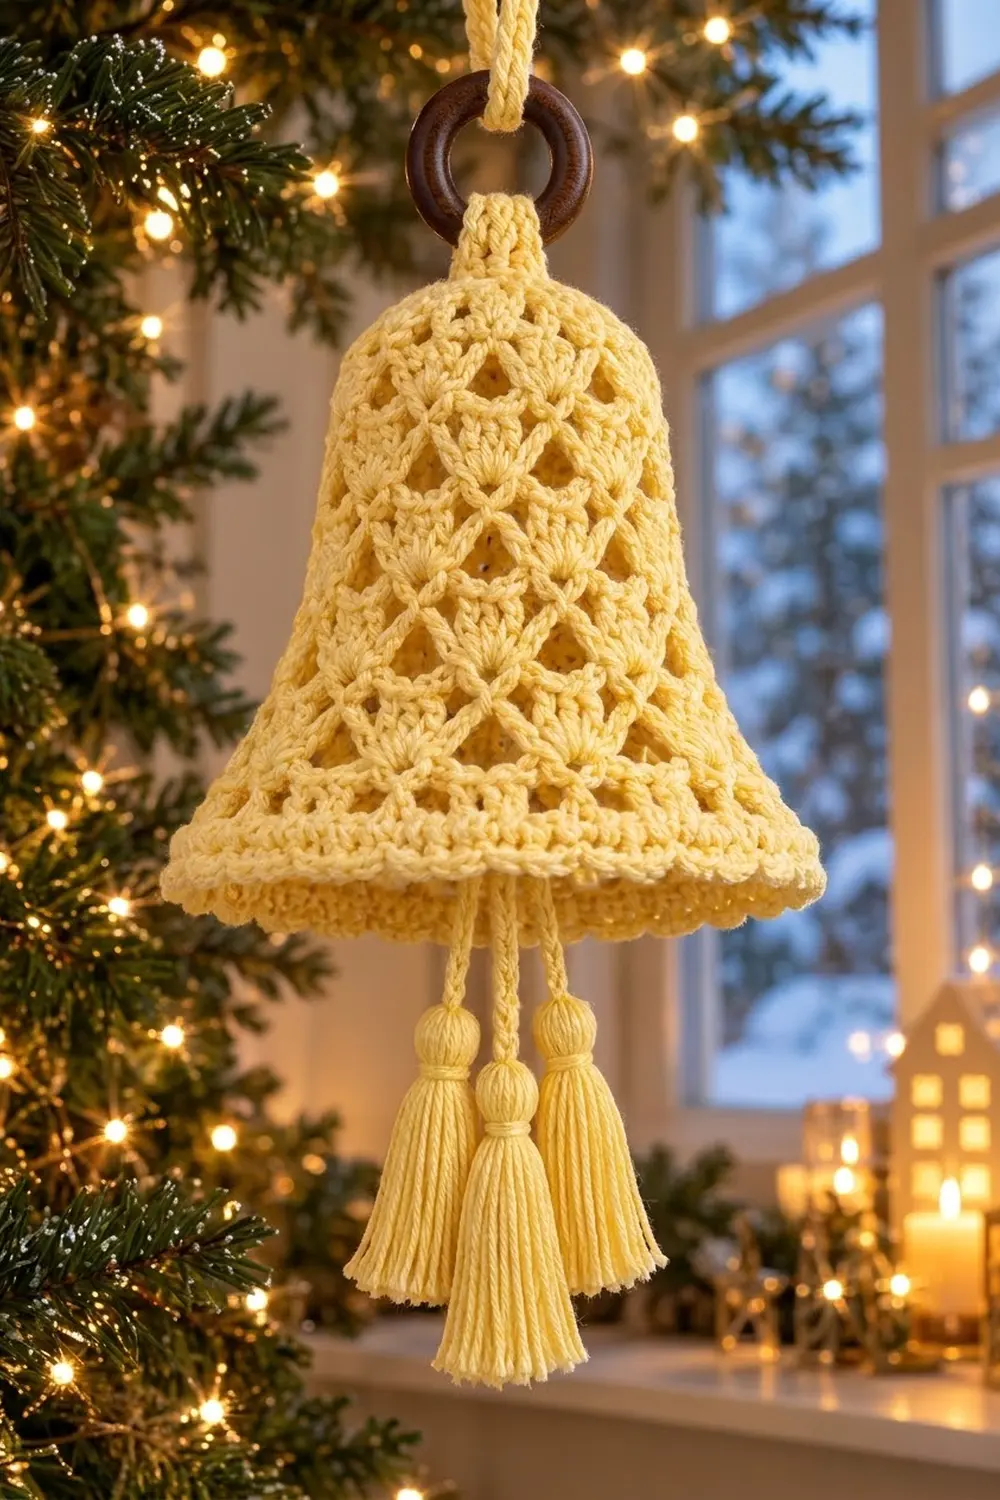
This lacy Christmas bell is a single crocheted piece. It has a solid little crown, a body of shell-and-net diamonds that flares into a classic bell shape, and a firm rolled brim. Three tasseled cords hang inside like a clapper, and a wooden ring with a crocheted loop sits on top for hanging.
The sample uses one soft butter-yellow cotton that glows against tree lights. A light stiffened finish keeps the open lattice crisp on a branch, window latch, or door handle.
The pattern uses US crochet terms. The finished bell is about 5.5 in (14.0 cm) tall from crown to brim and about 6.5 in (16.5 cm) across the brim. The tassels hang about 3.5 in (8.9 cm) below the brim.
Construction is seamless. You work the crown in joined rounds of single crochet, then alternate net rounds and shell rounds that stack into diamonds. The last lace rounds widen to make the flare, and a solid brim finishes the edge. The tassels, cords, ring, and hanging loop go on at the end.
Finished Size and Construction
- Finished size: 5.5 in (14.0 cm) tall, 6.5 in (16.5 cm) across the brim
- Skill level: Intermediate (comfortable with joined rounds and stitch counts)
- Terminology: US crochet terms
- Yarn weight: DK (category 3) cotton or cotton blend
- Hook: 3.5 mm (E/4)
- Number of pieces: 1 bell body, plus 3 tassels on chain cords and 1 hanging loop as attachments
- Layout: Single item, worked top-down in joined rounds; no motifs to join
- Piece size: Crown about 1.75 in (4.4 cm) across; lace body about 4.75 in (12.1 cm) tall from the top
- Size before border (brim): About 5 in (12.7 cm) across the opening after Rnd 15
- Border (brim) depth: About 0.75 in (1.9 cm), 4 rounds
Materials
Choose a smooth mercerized or combed cotton in DK weight. Cotton shows the shells clearly and takes stiffener well. Avoid fuzzy or very stretchy yarns, because the diamonds will blur and the bell will sag.
- Butter Yellow: 50 g (about 115 m / 126 yd). The bell uses about 25 g, the three tassels about 15 g, and the cords and hanging loop about 2 g.
These quantities include a margin of about 15 to 20 percent, so one standard 50 g ball is enough.
Tools:
- 3.5 mm (E/4) crochet hook
- 1 wooden ring, 1.25 in (3.2 cm) outer diameter
- Stitch marker
- Tapestry needle
- Scissors
- Piece of cardboard 3 in (7.6 cm) tall, for the tassels
- Fabric stiffener, or 1 part white glue mixed with 2 parts water
- Blocking form: a small balloon, or a plastic cup or bowl about 6 in (15.2 cm) across at the rim
- Plastic wrap and rustproof pins
Abbreviations (US Terms)
- ch: chain
- sl st: slip stitch
- sc: single crochet
- hdc: half double crochet
- dc: double crochet
- rev sc: reverse single crochet (crab stitch)
- sk: skip
- sp(s): space(s)
- st(s): stitch(es)
- rep: repeat
- Rnd: round
Special stitches:
- 5-dc shell: Work 5 dc into the same stitch. The 3rd dc is the center dc.
- 7-dc shell: Work 7 dc into the same stitch. The 4th dc is the center dc.
- Rev sc: Work from left to right (if you’re right-handed). Insert the hook into the next stitch to the right, yarn over, pull up a loop, then yarn over and draw through both loops.
Counting note: Every chain counts as one stitch in the round totals. For example, a ch-3 space adds 3 to the count.
Gauge and Checkpoints
Gauge: 22 sc and 22 rows = 4 in (10.2 cm), worked in sc rows.
Work the crown (Rnds 1–5) first as your test piece. It only takes a few minutes and shows whether your tension matches.
Checkpoints:
- After Rnd 4: Flat circle about 1.75 in (4.4 cm) across.
- After Rnd 5: The edge starts to turn down into a shallow cap.
- After Rnd 11: About 3 in (7.6 cm) from the top of the crown, and about 3.5 in (8.9 cm) across the opening.
- After Rnd 15: About 4.75 in (12.1 cm) tall, and about 5 in (12.7 cm) across the opening.
- After Rnd 19: About 5.5 in (14.0 cm) tall, and about 6.5 in (16.5 cm) across the brim after blocking.
If your crown is too big: go down to a 3.25 mm hook. If it is too small or cups heavily: go up to a 3.75 mm hook. A small error at the crown can grow to about 1 in (2.5 cm) at the brim, so fix it early.
Pattern
Work the bell top-down in joined rounds with the right side facing. Do not turn. Mark the first stitch of each round if that helps.
Leave an 8 in (20.3 cm) tail at the start. You’ll use it to fasten the wooden ring.
Crown
Rnd 1: Make a magic ring, ch 1, 8 sc in ring, sl st to first sc. Pull the ring tightly closed. (8 sts)
Rnd 2: Ch 1, 2 sc in each st around, sl st to first sc. (16 sts)
Rnd 3: Ch 1, sc in next st, 2 sc in next st; rep from * 8 times total, sl st to first sc. (24 sts)*
Rnd 4: Ch 1, sc in next 2 sts, 2 sc in next st; rep from * 8 times total, sl st to first sc. (32 sts)*
Rnd 5: Ch 1, sc in each st around, sl st to first sc. (32 sts) This round has no increases, so the edge turns down and the top becomes rounded.
Lace Body
Every lace round has 8 repeats. Net rounds put an sc over each sc and each shell center of the round below. The next shell round then puts shells over those old-sc positions and sc over the old shell centers. This swap builds the diamond lattice.
Rnd 6 (foundation net): Ch 1, sc in first st, ch 2, sk next st, sc in next st, ch 2, sk next st; rep from * 15 more times, sl st to first sc. (16 sc + 16 ch-2 sps = 48 sts)*
Rnd 7 (Shell Rnd A): Ch 1, sc in first sc, ch 1, sk ch-2 sp, 5-dc shell in next sc, ch 1, sk ch-2 sp, sc in next sc, ch 1, sk ch-2 sp, 5-dc shell in next sc, ch 1, sk ch-2 sp; rep from * 7 more times, sl st to first sc. (8 sc + 8 shells of 5 dc + 16 ch-1 sps = 64 sts)*
Rnd 8 (Net, ch 3): Ch 1, sc in first sc, ch 3, sc in center dc of next shell, ch 3, sc in next sc, ch 3, sc in center dc of next shell, ch 3; rep from * 7 more times, sl st to first sc. (16 sc + 16 ch-3 sps = 64 sts)*
Rnd 9 (Shell Rnd B): Ch 3 (counts as dc), 4 dc in same sc, ch 1, sk ch-3 sp, sc in next sc, ch 1, sk ch-3 sp, 5-dc shell in next sc, ch 1, sk ch-3 sp, sc in next sc, ch 1, sk ch-3 sp; rep from * 7 more times, sl st to top of beginning ch-3. (8 shells of 5 dc + 8 sc + 16 ch-1 sps = 64 sts)* The shells now sit above the sc of Rnd 7.
Rnd 10 (Net, ch 3): Sl st in next 2 dc to reach the center dc, ch 1, sc in same st, ch 3, sc in next sc, ch 3, sc in center dc of next shell, ch 3, sc in next sc, ch 3; rep from * 7 more times, sl st to first sc. (16 sc + 16 ch-3 sps = 64 sts)*
Rnd 11 (Shell Rnd A): Work as Rnd 7, but skip the ch-3 spaces instead of ch-2 spaces. (8 sc + 8 shells of 5 dc + 16 ch-1 sps = 64 sts)
Checkpoint: about 3 in (7.6 cm) from the top.
Flare
The next four rounds keep the 8 repeats. Longer chains and bigger shells widen the bell without breaking the diamond pattern.
Rnd 12 (Net, ch 4): Ch 1, sc in first sc, ch 4, sc in center dc of next shell, ch 4, sc in next sc, ch 4, sc in center dc of next shell, ch 4; rep from * 7 more times, sl st to first sc. (16 sc + 16 ch-4 sps = 80 sts)*
Rnd 13 (Shell Rnd B, large): Ch 3 (counts as dc), 6 dc in same sc, ch 1, sk ch-4 sp, sc in next sc, ch 1, sk ch-4 sp, 7-dc shell in next sc, ch 1, sk ch-4 sp, sc in next sc, ch 1, sk ch-4 sp; rep from * 7 more times, sl st to top of beginning ch-3. (8 shells of 7 dc + 8 sc + 16 ch-1 sps = 80 sts)*
Rnd 14 (Net, ch 5): Sl st in next 3 dc to reach the center dc, ch 1, sc in same st, ch 5, sc in next sc, ch 5, sc in center dc of next shell, ch 5, sc in next sc, ch 5; rep from * 7 more times, sl st to first sc. (16 sc + 16 ch-5 sps = 96 sts)*
Rnd 15 (Shell Rnd A, large): Ch 1, sc in first sc, ch 2, sk ch-5 sp, 7-dc shell in next sc, ch 2, sk ch-5 sp, sc in next sc, ch 2, sk ch-5 sp, 7-dc shell in next sc, ch 2, sk ch-5 sp; rep from * 7 more times, sl st to first sc. (8 sc + 8 shells of 7 dc + 16 ch-2 sps = 96 sts)*
Checkpoint: about 4.75 in (12.1 cm) tall and 5 in (12.7 cm) across the opening.
Border (Brim)
Border gauge: 22 sts = 4 in (10.2 cm) in sc. At this gauge, 112 sts give a circumference of about 20.4 in (51.8 cm), so the brim is about 6.5 in (16.5 cm) across.
Rnd 16 (conversion): Ch 1, sc in each sc and each dc, and work 2 sc in each ch-2 sp around, sl st to first sc. Each repeat has 1 sc + 7 dc + 4 ch = 12 sts. (96 sts worked 1 per existing stitch + 0 extra = 96 sts)
Rnd 17 (flare): Ch 1, hdc in next 5 sts, 2 hdc in next st; rep from * 16 times total, sl st to first hdc. (112 sts)* That’s 14 sts per lace repeat.
Rnd 18: Ch 1, sc in each st around, sl st to first sc. (112 sts)
Rnd 19: Ch 1, rev sc in each st around, sl st to first st. (112 sts) Fasten off and weave in the end.
Why the math works: Rnd 15 has exactly 12 sts per repeat × 8 repeats = 96, so the conversion round lands on 96 without fudging. Rnd 17 increases once in every 6 sts: 96 ÷ 6 = 16 increases, which makes 112. 16 divides evenly by 8, so each lace repeat gets exactly 2 increases and the brim flares evenly. The rev sc round keeps the count at 112 and rolls the edge into a firm cord.
Tassels, Cords, and Hanging Loop
Tassels (make 3)
- Wrap yarn 30 times around the 3 in (7.6 cm) cardboard.
- Slide a 10 in (25.4 cm) strand under the wraps at the top and tie it tightly. Leave both ends long.
- Cut the wraps at the bottom.
- To make the rounded head, wrap a separate strand firmly around the bundle about 8 times, 0.5 in (1.3 cm) below the top. Knot it and hide the ends inside the tassel.
- Trim the bottom evenly so the tassel is about 3 in (7.6 cm) long.
Cords (make 3)
- Outer cords (make 2): Ch 20, fasten off. Each is about 3.5 in (8.9 cm) long.
- Center cord (make 1): Ch 26, fasten off. It’s about 4.5 in (11.4 cm) long.
Use each tassel’s long top ends to tie it to one end of a cord. From inside the bell, thread the free ends of all three cords up through the center of the magic ring. Knot them together securely on the inside of the crown. The center tassel should hang a little lower than the outer two.
Ring and Hanging Loop
- Thread the 8 in (20.3 cm) starting tail onto the needle. Pass it up through the center of the crown, around the wooden ring, and back down. Do this 4 to 5 times so the ring sits snugly on the crown. Wrap the base twice to form a small neck, then secure the tail inside.
- For the hanging loop, ch 40 (about 7 in / 17.8 cm). Pass the chain through the ring and sl st the last ch to the first ch. Fasten off and weave in the ends. The loop stands about 3.5 in (8.9 cm) above the ring.
Final Blocking
- Weave in every end before you stiffen. The stiffener locks them in place.
- Inflate a balloon, or wrap a cup or bowl in plastic wrap. The form should be about 5 in (12.7 cm) across at the lace, with room for the brim to flare toward 6.5 in (16.5 cm).
- Tie the tassels loosely inside a small plastic bag so they stay soft.
- Dip the bell in stiffener or brush it on. Squeeze out the excess and blot with a towel.
- Ease the bell onto the form. Center the crown, line up the diamond columns vertically, and open each shell into a fan.
- Pin or ease the brim so it flares evenly. Measure it with a ruler: it should be about 6.5 in (16.5 cm) across.
- Clear any holes that filled with stiffener using a pin or toothpick.
- Let it dry completely, usually 12 to 24 hours. Remove the form and untie the tassels.
Final Quality-Control Checklist
- The crown is closed at the center with no gap.
- Every round has 8 repeats, and the diamonds line up in straight vertical columns.
- Shells and sc alternate from round to round, forming clear diamonds.
- Stitch counts are 32 at Rnd 5, 64 at Rnds 7–11, 80 at Rnds 12–13, 96 at Rnds 14–16, and 112 at Rnds 17–19.
- The bell is about 5.5 in (14.0 cm) tall and 6.5 in (16.5 cm) across the brim.
- The brim edge is a smooth rolled cord with no gaps.
- The tassels are even and have rounded heads, and the center tassel hangs lowest.
- The ring is snug and the hanging loop is secure.
- All ends are woven in and can’t be seen from outside.
Troubleshooting
The diamonds slant into a spiral. A round started in the wrong stitch. Shell Rnd B must start with a shell in the first sc, and the net round after it must start at a shell’s center dc.
The bell is narrow and tube-like. Your chains are too tight. Chain more loosely, or use a hook 0.25 mm larger for the net rounds only.
The brim ruffles. Your hdc tension is loose. Redo Rnd 17 with a 3.25 mm hook.
The brim cups inward. Work Rnd 17 more loosely, or block on a slightly wider form.
The shells look flat. Make sure all the dc of a shell go into the same stitch, and open them with your fingers while blocking.
The tassels look uneven. Hold all three together, straighten them, and trim them in one pass.
Care
Spot clean with a damp cloth. Washing softens the bell, so afterward reshape it over its form and add fresh stiffener before it dries.
Final Notes
Here’s the measurement chain. The 1.75 in (4.4 cm) crown leads to 64 stitches of steady lace, about 3 in (7.6 cm) down. The flare rounds grow to 96 stitches at about 4.75 in (12.1 cm). The brim ends at 112 stitches, about 6.5 in (16.5 cm) across, and the bell is 5.5 in (14.0 cm) tall. Check each stage and keep the 8 repeats lined up, and your bell will ring true.
Happy crocheting!