

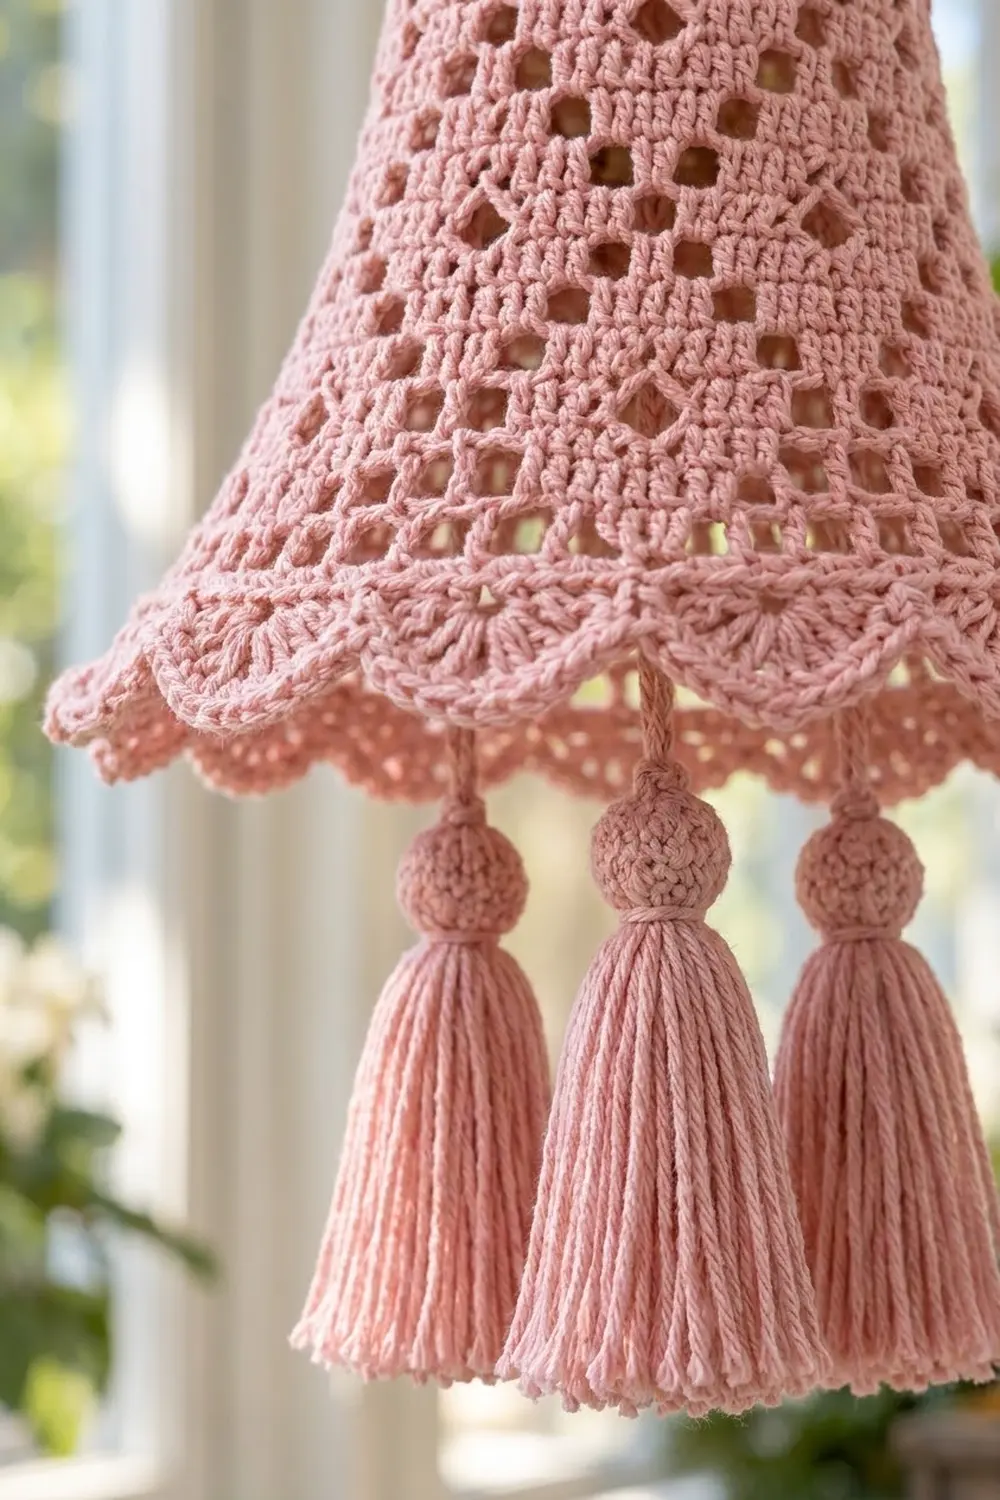
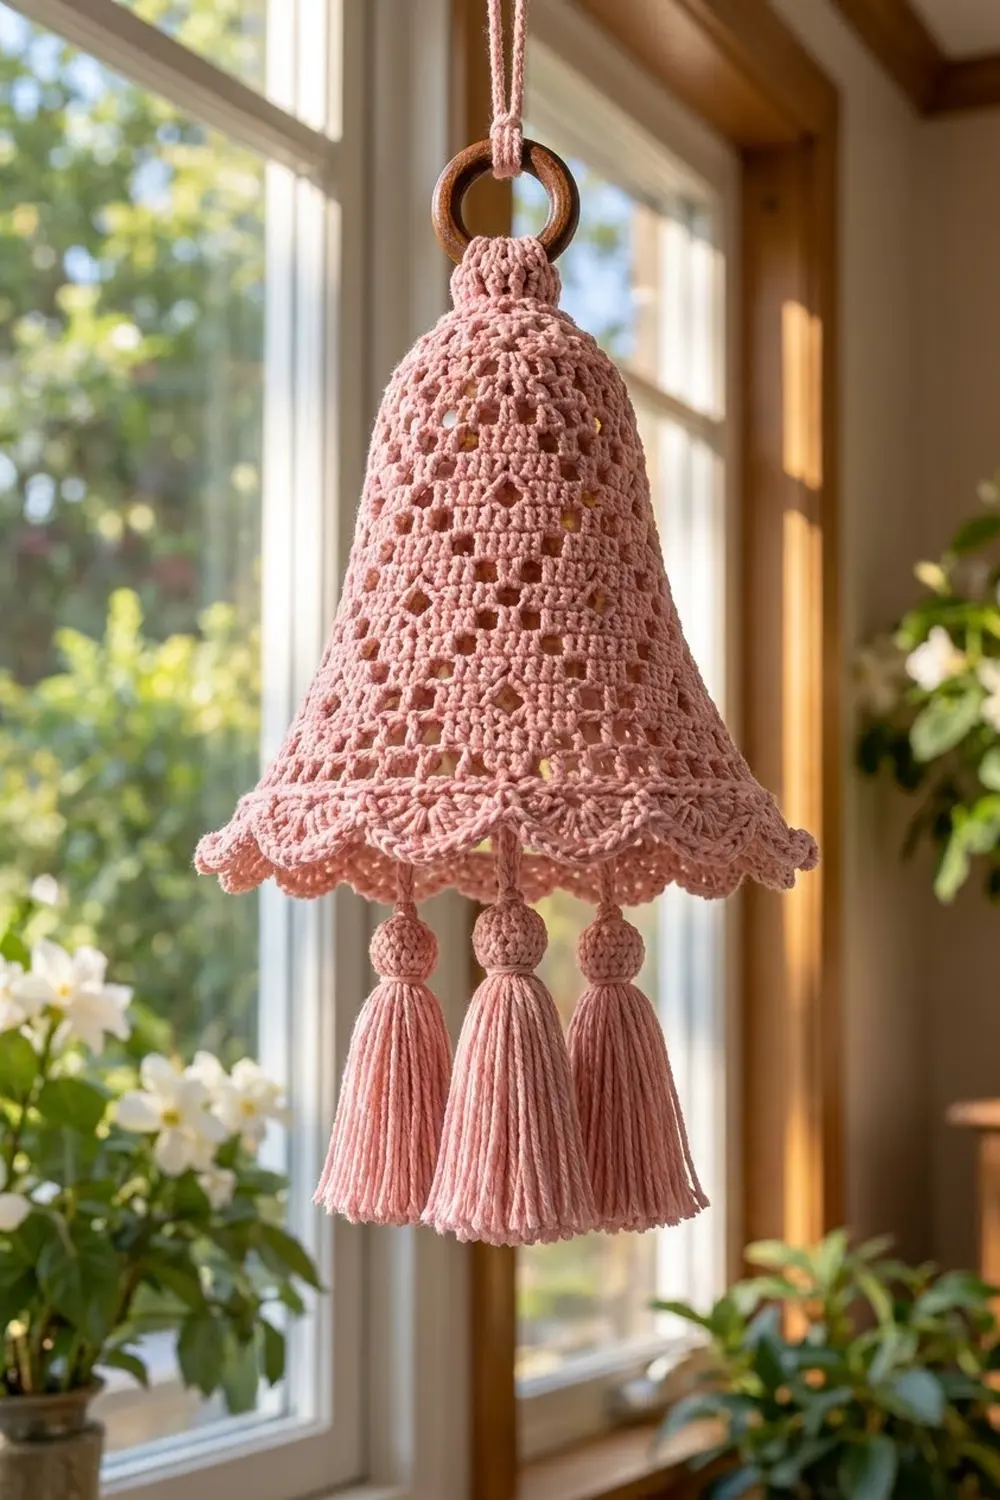
The Rosewood Lace Bell is a soft, romantic hanging bell in dusty rose cotton. The body is solid double crochet with small square eyelets set in diamonds. The diamonds grow larger as the bell widens, so the lace looks like it opens up toward the hem.
The hem has two tiers of scallops. A neat row of shells sits on top, and a fuller lacy ruffle with deeper scallops hangs underneath. Inside the bell, three tassels with round ball caps hang on crocheted cords and swing just below the edge. A wooden ring at the top makes it easy to hang in a window, on a door, or on a mantel.
The pattern uses US crochet terms. The finished bell is about 8.25 in (21.0 cm) tall from crown to scallop tips. The hem is 19.2 in (48.8 cm) around, which makes it about 6.1 in (15.5 cm) across as a standing bell or 9.6 in (24.4 cm) wide laid flat.
You work the bell top-down in joined rounds. You start with a small dome, then work three diamond-eyelet sections with increase rounds between them. Next comes an open mesh round, then the two-tier scalloped border. The tassels, ball caps, and hanger are made separately and attached after blocking.
Finished Size and Construction
- Finished size: 8.25 in (21.0 cm) tall; hem circumference 19.2 in (48.8 cm)
- Skill level: Intermediate
- Terminology: US crochet terms
- Yarn weight: DK (#3) cotton
- Hook: 3.5 mm (E-4)
- Number of pieces: 1 bell, plus 3 tassels with ball caps attached inside
- Layout: Single piece worked in the round; no joining
- Bell size before border (after Rnd 20): 6.75 in (17.1 cm) deep, 19.2 in (48.8 cm) around
- Border depth (Rnd 21 + lower ruffle): 1.5 in (3.8 cm)
Materials
Use a smooth, mercerized or combed DK cotton. Cotton holds its shape well after stiffening, and it shows off the eyelets clearly. Acrylic can work, but it will need firmer starching.
- Dusty Rose Pink: 75 g (about 180 m)
- Bell body and border: about 40 g
- Three tassels: about 12 g
- Ball caps, cords, and hanger: about 6 g
These quantities include a margin of roughly 25%.
Tools:
– 3.5 mm (E-4) crochet hook
– Wooden ring, 1.5 in (3.8 cm) across
– Small amount of polyester fiberfill
– Cardboard for tassels, 4 in (10.2 cm) tall
– Tapestry needle and scissors
– Stitch marker
– Fabric stiffener or starch, plus a bell-shaped form (a funnel, plastic cup, or small bowl)
Abbreviations (US Terms)
- ch – chain
- sl st – slip stitch
- sc – single crochet
- dc – double crochet
- sk – skip
- st(s) – stitch(es)
- sp – space
- FLO / BLO – front loop only / back loop only
- inc – 2 sc in the same st
- dec – sc2tog
- MR – magic ring
Special terms:
– Cell: Every pattern round is built from 2-st cells, and each cell sits directly on top of the cell below it.
– S (solid cell): Dc in each of the next 2 sts.
– O (open cell): Dc in the next st, ch 1, sk the next st.
– Counting: Each ch-1 sp counts as 1 st in all counts.
– Round starts: A beginning ch 3 counts as the first dc. When a round starts with an O, ch 4 instead (counts as dc + ch 1), then sk the next st.
– Joining rounds: Join every round with a sl st to the top of the beginning chain. Do not turn.
Gauge and Checkpoints
Gauge: 20 dc and 10 rounds = 4 in (10.2 cm). That is 5 dc and 2.5 rounds per inch, so 1 dc round is about 0.4 in (1.0 cm) tall.
The bell itself is your gauge test. Work through Rnd 5 and measure before going any further.
Checkpoints:
– After Rnd 2 (24 sts): a flat circle about 1.75 in (4.4 cm) across.
– After Rnd 5 (48 sts): circumference 9.6 in (24.4 cm), dome depth about 0.75 in (1.9 cm).
– After Rnd 13 (80 sts): circumference 16 in (40.6 cm), depth from crown about 4 in (10.2 cm).
– After Rnd 21 (96 sts): circumference 19.2 in (48.8 cm), depth about 7 in (17.8 cm).
If your bell is too big, go down to a 3.25 mm hook. If it is too small, go up to a 3.75 mm hook. Don’t change the stitch counts. Every pattern section depends on multiples of 8 repeats.
Crown (Dome)
Rnd 1: MR, ch 3, 11 dc in ring, join. (12 sts)
Rnd 2: Ch 3, dc in the same st, 2 dc in each st around, join. 12 worked twice = 24 sts.
Rnd 3: Ch 3, dc in the next st, 2 dc in the next st, dc in each of the next 2 sts, 2 dc in the next st 7 times, join. (24 worked 1-per-st) + 8 = 32 sts.
Rnd 4: Ch 3, dc in each of the next 2 sts, 2 dc in the next st, dc in each of the next 3 sts, 2 dc in the next st 7 times, join. (32) + 8 = 40 sts.
Rnd 5: Ch 3, dc in each of the next 3 sts, 2 dc in the next st, dc in each of the next 4 sts, 2 dc in the next st 7 times, join. (40) + 8 = 48 sts.
Because you add only 8 sts per round, the circle stops lying flat and curves into a dome. Check the Rnd 5 measurement now.
Section 1: Small Diamonds (48 sts, 24 cells)
Each round below has 8 repeats of 3 cells.
Rnd 6: (S, O, S) 8 times, join. (48 sts: 16 S, 8 O)
Rnd 7: (O, S, O) 8 times, join. (48 sts)
Rnd 8: (S, O, S) 8 times, join. (48 sts)
The eyelets in Rnds 6–8 form 8 small four-eyelet diamonds around the bell.
First Widening
Rnd 9: Ch 3, dc in the next st, 2 dc in the next st, dc in each of the next 2 sts, 2 dc in the next st 15 times, join. (48 worked 1-per-st) + 16 = 64 sts (32 cells).
Section 2: Diamonds with Solid Spines (64 sts)
Each round below has 8 repeats of 4 cells.
Rnd 10: (S, O, S, S) 8 times, join. (64 sts)
Rnd 11: (O, S, O, S) 8 times, join. (64 sts)
Rnd 12: (S, O, S, S) 8 times, join. (64 sts)
Second Widening
Rnd 13: Ch 3, dc in each of the next 2 sts, 2 dc in the next st, dc in each of the next 3 sts, 2 dc in the next st 15 times, join. (64) + 16 = 80 sts (40 cells).
Check: circumference 16 in (40.6 cm).
Section 3: Large Diamonds (80 sts)
Each round below has 8 repeats of 5 cells.
Rnd 14: (S, S, O, S, S) 8 times. (80 sts)
Rnd 15: (S, O, S, O, S) 8 times. (80 sts)
Rnd 16: (O, S, S, S, O) 8 times. (80 sts)
Rnd 17: (S, O, S, O, S) 8 times. (80 sts)
Rnd 18: (S, S, O, S, S) 8 times. (80 sts)
This gives 8 large diamond outlines. In Rnd 16, the open cells of neighboring repeats sit side by side and make a small eyelet pair between the diamonds.
Flare and Mesh
Rnd 19: Ch 3, dc in each of the next 3 sts, 2 dc in the next st, dc in each of the next 4 sts, 2 dc in the next st 15 times, join. (80) + 16 = 96 sts.
Rnd 20 (open mesh): Ch 4, sk the next st, dc in the next st, ch 1, sk the next st 47 times, join to the 3rd ch of the ch-4. (48 dc + 48 ch-1 sps = 96 sts)
The bell now measures 6.75 in (17.1 cm) deep. This is the size before the border.
Tassels, Ball Caps, and Cords (make 3 of each)
Tassel:
1. Wrap yarn 40 times around the 4 in (10.2 cm) card.
2. Slide a 12 in (30.5 cm) tie under the wraps at the top edge and knot it tightly.
3. Cut the wraps open along the bottom edge.
Ball cap:
– Rnd 1: 6 sc in MR. (6)
– Rnd 2: Inc in each st. (12)
– Rnd 3: Sc, inc 6 times. (18)
– Rnds 4–5: Sc in each st. (18)
– Rnd 6: Sc, dec 6 times. (12)
– Stuff lightly, leaving a channel through the center.
– Rnd 7: Dec 6 times. (6)
– Fasten off with a 10 in (25.4 cm) tail.
The ball is about 1.1 in (2.8 cm) across.
Assemble each tassel:
1. With the tapestry needle, thread the tassel tie up through the center of the ball. The top of the tassel should be hidden inside the ball.
2. Use the ball’s tail to wrap 4 times tightly around the tassel just below the ball, then hide the tail inside the skirt.
3. Trim the skirt to 3.5 in (8.9 cm).
Cords: Chain one cord 7 in (17.8 cm) long for the center tassel and two cords 6.5 in (16.5 cm) long for the side tassels. Knot each tassel tie to the end of a cord.
Border: Two-Tier Scalloped Hem
Rnd 21 (base): Ch 1, sc in each dc and each ch-1 sp around, join. (96 sc)
Border gauge: One scallop repeat uses 6 base sts, which is 1.2 in (3.0 cm). 16 repeats × 1.2 in = 19.2 in (48.8 cm), which matches the hem exactly. A round edge has no corners and no sides, so all counts below are per repeat and per round. This is why the math works: 96 ÷ 6 = 16 scallops in both tiers. No extra stitches are added anywhere, so the hem stays flat and doesn’t ruffle out of shape.
Tier 1 (upper shells, worked in the FLO of Rnd 21):
1. Ch 1, sc in the first st.
2. Repeat sk 2 sts, 7 dc in the next st, sk 2 sts, sc in the next st 15 times.
3. Sk 2 sts, 7 dc in the next st, sk 2 sts, join to the first sc.
4. Fasten off.
You now have 16 shells (16 sc + 112 dc). Each repeat uses 1 + 2 + 1 + 2 = 6 base sts. The shells are about 0.5 in (1.3 cm) deep.
Tier 2 (lower ruffle, worked in the free BLO of Rnd 21): Join the yarn in the BLO of the first st, directly behind the first Tier 1 sc.
Rnd T2-1: Ch 4, dc in the next BLO, ch 1 95 times, join to the 3rd ch. (96 dc + 96 ch-1 sps)
This round doubles the edge length, and that is what makes the ruffle flare.
Rnd T2-2: Sl st into the first ch-1 sp, ch 1, sc in the same sp, ch 3, sk the next ch-1 sp, sc in the next ch-1 sp 47 times, ch 3, sk the last sp, join. (48 sc + 48 ch-3 loops)
Rnd T2-3: Ch 1, sc in the first loop, 9 dc in the next loop, sc in the next loop, sc in the next loop, 9 dc in the next loop, sc in the next loop 15 times, join. Fasten off.
You now have 16 scallops (176 sts): 48 loops ÷ 3 = 16. Each 9-dc scallop sits in loop 2 of its repeat, which lines up under a Tier 1 shell. The ruffle hangs about 1.25 in (3.2 cm) below Rnd 21.
Final Blocking
- Weave in all ends along solid dc columns, not through the eyelets.
- Soak the bell in fabric stiffener (or a starch solution) until fully wet, then gently squeeze out the excess.
- Slip the bell over the form. Center the dome on top and pull the body down evenly.
- Line up the eyelet diamonds vertically and open each eyelet with a fingertip.
- Pin the Tier 1 shells flat against the body. Fan the Tier 2 scallops outward and pin each scallop tip.
- Check that the hem is 19.2 in (48.8 cm) around and the bell is 8.25 in (21.0 cm) tall.
- Let it dry completely, which takes 24–48 hours.
- Attach the tassels: Sew the top ends of the three cords to the underside of Rnd 1. Put the center cord at the middle and the two side cords 0.5 in (1.3 cm) to each side of it.
- Make the hanger:
- Join yarn at Rnd 1 and ch 6.
- Sl st around the wooden ring, ch 6, then sl st into the opposite side of Rnd 1.
- Repeat once more for strength.
- Tie a 6 in (15.2 cm) chain loop to the top of the ring.
Final Quality-Control Checklist
- Stitch counts were 12, 24, 32, 40, 48, 64, 80, and 96 at the increase rounds.
- All 8 diamonds line up straight in each section.
- The open mesh round has 48 even eyelets.
- There are 16 shells in Tier 1 and 16 scallops in Tier 2, aligned with each other.
- The hem measures 19.2 in (48.8 cm).
- The tassels hang evenly, with the center one slightly lower.
- The ring is secure and the bell hangs straight.
Troubleshooting
- Diamonds drift sideways: You placed the beginning chain in the wrong st. Always join into the top of the beginning chain and start the next round in that same st.
- Dome is too flat: Your tension is loose. Go down a hook size for Rnds 1–5 only.
- Hem ripples: Recount Rnd 21; you need exactly 96 sc.
- Ruffle doesn’t flare: Your ch-1 sps in T2-1 are too tight. Loosen the chains.
- Tassel shows through the ball: Stuff the ball more firmly around the channel.
- Bell sags over time: Re-stiffen it and dry it again on the form.
Care
Dust gently or spot clean. If you wash it, hand rinse in cool water, then re-stiffen and reshape it on the form.
Final Notes
Here is the full measurement chain:
1. Gauge is 20 dc = 4 in (10.2 cm).
2. The dome reaches 9.6 in (24.4 cm) around at Rnd 5.
3. Three diamond sections widen the bell to 16 in (40.6 cm) and then 19.2 in (48.8 cm).
4. The 96-stitch hem divides evenly into 16 scallops of 1.2 in (3.0 cm) in both tiers.
5. The finished bell is 8.25 in (21.0 cm) tall.
Check each stage as you go and your bell will hang straight, even, and beautifully lacy.
Happy crocheting!