

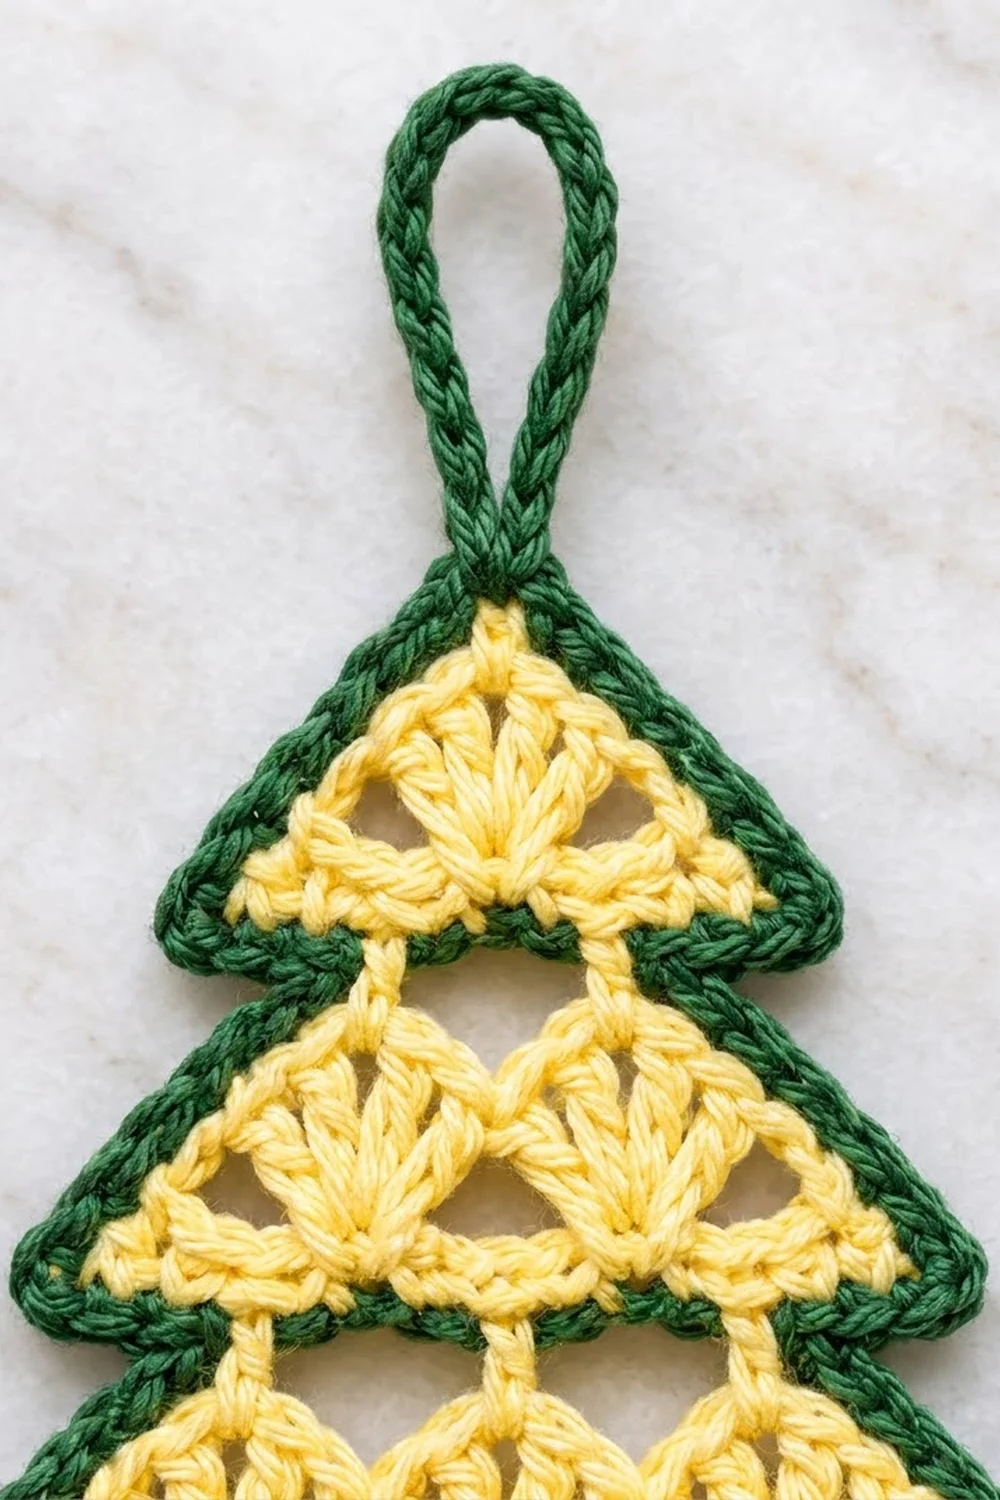
The Butter Pine is a small, flat Christmas tree ornament with a lacy body and a bold outline. The tree is butter yellow, with open fan stitches stacked in three tiers: one fan at the top, two in the middle and three at the bottom. Small triangular gaps between the fans let light through, so the ornament looks lovely against the lights on a real tree.
A deep forest-green border follows the stepped outline of the tree and finishes in a twisted, rope-like edge of reverse single crochet. You sew on a short green trunk and a green hanging loop at the end. The look is classic and a little vintage, and it works in any two colors with strong contrast.
This pattern uses US crochet terms. The finished ornament is about 4.5 in (11.4 cm) wide and 3.5 in (8.9 cm) tall across the bordered tree. With the trunk and loop it is about 5.8 in (14.7 cm) tall overall.
The construction is simple. You work the yellow body flat in five rows from the top point down, alternating fan rows and chain-arch rows. Next comes one round of green single crochet with shaped tier points, then one round of reverse single crochet. Last, you make a small single-crochet trunk and a slip-stitch loop and sew both in place.
Finished Size and Construction
- Finished size (bordered tree): 4.5 in (11.4 cm) wide x 3.5 in (8.9 cm) tall
- Overall height with trunk and loop: about 5.8 in (14.7 cm)
- Skill level: Easy / advanced beginner (you need treble crochet and reverse single crochet)
- Terminology: US crochet terms
- Yarn weight: Sport weight (#2 fine) cotton
- Hook: 3.25 mm (US D-3)
- Number of pieces: 1 ornament: a tree body plus a sewn-on trunk and loop
- Layout: Single tree with three tiers of fans (1, 2, 3)
- Tree body size before border: 4 in (10.2 cm) wide x 3 in (7.6 cm) tall
- Border depth: 0.25 in (0.6 cm) on every side
- Trunk: about 1.1 in (2.8 cm) wide x 0.8 in (2.0 cm) tall
- Hanging loop: about 1.5 in (3.8 cm) tall when folded
Materials
Choose a smooth, mercerized or soft cotton in sport weight. Cotton holds the fan shapes crisply, blocks flat and won’t fuzz on the tree. Acrylic also works, but it can curl more at the points, so plan to block firmly.
- Color A, butter yellow: 8 g, about 24 m (26 yd)
- Color B, forest green: 8 g, about 24 m (26 yd)
Both amounts include a comfortable margin for your test rows, joining tails and sewing. One ornament actually uses about 5 g of each color.
Tools:
- 3.25 mm (US D-3) crochet hook
- Tapestry needle
- Scissors
- 2 stitch markers
- Ruler or tape measure
- Blocking mat and rustproof pins
- Spray bottle with water
Abbreviations (US Terms)
- ch – chain
- sc – single crochet
- tr – treble crochet
- sl st – slip stitch
- sk – skip
- sp – space
- st(s) – stitch(es)
- sc2tog – single crochet 2 together
- rev sc – reverse single crochet (crab stitch)
- tch – turning chain
- RS / WS – right side / wrong side
Special stitches:
- Fan: 7 tr worked into the same stitch or space.
- Reverse single crochet (rev sc): Work from left to right (if you crochet right-handed). Insert the hook into the next stitch to the right, yarn over and pull up a loop, then yarn over and pull through both loops. This twists each stitch into a rope-like edge.
- Standing sc: With a slip knot on your hook, insert the hook into the stitch, yarn over, pull up a loop, then yarn over and pull through both loops.
Gauge and Checkpoints
Gauge: 25 sc and 25 sc rows = 4 in (10.2 cm) in Color B with a 3.25 mm hook. That is about 6.25 stitches per inch.
Gauge matters here because the border stitch counts are matched to the height of the fan rows. If your fans are much taller or shorter than stated, the border will ripple or pull.
Test the piece first. Work Rows 1–3 of the body and check the measurements below before you go on. This is your real gauge test.
Checkpoints (measured flat, lightly smoothed):
- After Row 1: about 1.1 in (2.8 cm) wide x 0.75 in (1.9 cm) tall
- After Row 3: about 2.7 in (6.9 cm) wide x 1.9 in (4.8 cm) tall
- After Row 5: 4 in (10.2 cm) wide x 3 in (7.6 cm) tall
- After the border: 4.5 in (11.4 cm) wide x 3.5 in (8.9 cm) tall
If your piece is too big, go down to a 3 mm hook. If it is too small, go up to a 3.5 mm (US E-4) hook. If only the height is off, the problem is the height of your treble crochet. Change how high you pull up the first loop rather than changing hooks.
Tree Body (Color A, Butter Yellow)
You work the body flat in rows from the top point down. Each fan row is one tier of the tree. Each chain-arch row sets up the anchors for the next, wider tier.
Row 1 (RS): Ch 5, 6 tr in 5th ch from hook (the skipped 4 ch count as the first tr). Turn. [1 fan, 7 tr]
The base of this fan is the top point of the tree, and the fan opens downward.
Row 2 (WS): Ch 1 (does not count as a st), sc in first tr, ch 4, sk 2 tr, sc in next tr (center tr of fan), ch 4, sk 2 tr, sc in top of tch. Turn. [3 sc, 2 ch-4 sps]
Row 3 (RS): Ch 1, sc in first sc, [fan in next ch-4 sp, sc in next sc] twice. Turn. [2 fans; 3 sc + 14 tr = 17 sts]
Check your measurements now. The piece should be about 2.7 in (6.9 cm) across the bottom of Row 3 and 1.9 in (4.8 cm) tall from the top point.
Row 4 (WS): Ch 1, sc in first sc, ch 4, sk next 5 tr, sc in next tr (6th tr of first fan), ch 4, sk next 3 sts (last tr of first fan, center sc, first tr of second fan), sc in next tr (2nd tr of second fan), ch 4, sk next 5 tr, sc in last sc. Turn. [4 sc, 3 ch-4 sps]
The middle ch-4 arch crosses over the point where the two fans meet. This creates the open triangular gap at the center of the lower tier.
Row 5 (RS): Ch 1, sc in first sc, [fan in next ch-4 sp, sc in next sc] 3 times. Do not turn. [3 fans; 4 sc + 21 tr = 25 sts]
Fasten off Color A and weave in the tails on the WS. The body should now measure 4 in (10.2 cm) wide x 3 in (7.6 cm) tall.
Trunk (Color B, Forest Green)
Row 1: Ch 8, sc in 2nd ch from hook and in each ch across. Turn. [7 sc]
Rows 2–5: Ch 1, sc in each st across. Turn. [7 sc]
Fasten off, leaving a 10 in (25.4 cm) tail for sewing. The trunk measures about 1.1 in (2.8 cm) wide x 0.8 in (2.0 cm) tall.
Hanging Loop (Color B, Forest Green)
Ch 22, sl st in the back bump of the 2nd ch from hook and in the back bump of each ch across. [21 sl st]
Fasten off, leaving a 6 in (15.2 cm) tail. The strip is about 3.5 in (8.9 cm) long and looks neatly braided on both faces.
Border (Color B, Forest Green)
Border gauge: The sc round follows the main gauge of 6.25 sts per inch. Along the bottom, the 25 sts of Row 5 already span 4 in (10.2 cm), so each takes one sc. Along the sides, each fan row is about 0.75 in (1.9 cm) tall and takes 5 sts. Each chain-arch row is narrow at the edge and takes 2 sc with a ch-2 point between them.
Round 1: With the RS facing and Row 5 at the bottom, join Color B with a standing sc in the first st of Row 5. Work 2 more sc in the same st to make the first bottom corner.
- Bottom edge: Sc in each of next 23 sts, 3 sc in last st (second bottom corner). [Bottom edge: 25 sts worked 1 per st + 4 extra corner sc = 29 sc]
- First side, working up toward the top:
- Row 5 edge: 4 sc evenly, sc2tog over the top of the Row 5 edge. [5 sts]
- Row 4 edge: (sc, ch 2, sc) in the end sc of Row 4. [2 sc + ch-2 point]
- Row 3 edge: 4 sc evenly, sc2tog over the top of the Row 3 edge. [5 sts]
- Row 2 edge: (sc, ch 2, sc) in the end sc of Row 2. [2 sc + ch-2 point]
- Row 1 edge: 5 sc evenly up the side of the first fan. [5 sts]
- [Side total: 19 sts + 2 ch-2 points]
- Top point: 3 sc in the free loop of the foundation ch at the base of Row 1. [3 sc]
- Second side, working down:
- Row 1 edge: 5 sc evenly. [5 sts]
- Row 2 edge: (sc, ch 2, sc) in the end sc of Row 2. [2 sc + ch-2 point]
- Row 3 edge: sc2tog over the top of the Row 3 edge, 4 sc evenly. [5 sts]
- Row 4 edge: (sc, ch 2, sc) in the end sc of Row 4. [2 sc + ch-2 point]
- Row 5 edge: sc2tog over the top of the Row 5 edge, 4 sc evenly. [5 sts]
- [Side total: 19 sts + 2 ch-2 points]
Sl st to the first sc to join. [29 + 19 + 3 + 19 = 70 sts + 4 ch-2 points]
Round 2: Ch 1, rev sc in each st around, working 2 rev sc in each ch-2 point. Sl st to the first rev sc and fasten off. [70 sts worked 1 per st + 8 rev sc in the points = 78 rev sc]
Why the math works:
- The bottom edge takes exactly 1 sc per Row 5 st, so it matches the 4 in (10.2 cm) width without ruffling. The 2 extra sc at each corner let the edge turn without pulling.
- Each corner is counted once, in its 3-sc group. The side counts start after the corner group, so no corner stitch is counted twice.
- The (sc, ch 2, sc) groups at the ends of Rows 2 and 4 push the lower corners of the upper tiers outward. The sc2tog just below each point pulls in the top of the next tier. Together they create the stepped, three-tier outline.
- Round 1 adds about 0.16 in (0.4 cm) per side, and the rev sc round adds about 0.09 in (0.2 cm), so the border is 0.25 in (0.6 cm) deep. On two sides that adds 0.5 in (1.3 cm), so the 4 in x 3 in (10.2 cm x 7.6 cm) body becomes 4.5 in x 3.5 in (11.4 cm x 8.9 cm).
Attaching the Trunk and Loop
Trunk: Find the 29 sc of the bottom edge from Round 1. Count 11 sts in from each end and place markers on sts 12 and 18. Hold the last row of the trunk against the WS of the border, just behind the rev sc round, so the trunk covers sts 12–18. Whipstitch the 7 trunk sts to those 7 border sts, one to one. The trunk hangs 0.8 in (2.0 cm) below the border.
Loop: Fold the slip-stitch strip in half. On the WS, behind the center sc of the 3-sc top point, overlap both ends by about 0.25 in (0.6 cm). Sew securely through both layers with several stitches. The loop stands about 1.5 in (3.8 cm) above the tree.
Weave in all ends on the WS, through stitches of the same color.
Final Blocking
- Spray the ornament lightly with water until it is damp but not dripping.
- Lay it flat, RS up, on a blocking mat.
- Pin the top point and both bottom corners first, so the tree measures 4.5 in (11.4 cm) wide and 3.5 in (8.9 cm) tall.
- Pin the four ch-2 points outward to sharpen the stepped tiers.
- Use your fingertips to open each fan into an even semicircle and to open the triangular gaps.
- Straighten the trunk into a neat rectangle and lay the loop flat.
- Let it dry completely, at least 6 hours, before you unpin it.
Final Quality-Control Checklist
- Row 5 has 25 sts: 3 fans of 7 tr and 4 sc.
- Every fan has exactly 7 tr.
- Border Round 1 has 70 sts plus 4 ch-2 points.
- Border Round 2 has 78 rev sc.
- The bordered tree measures 4.5 in (11.4 cm) x 3.5 in (8.9 cm).
- The trunk is centered under the tree, with 11 border sts on each side.
- The loop is centered over the top point and sewn through both layers.
- All ends are woven in on the WS and can’t be seen from the front.
Troubleshooting
Fans look crowded or cupped: Your ch-4 arches are too tight. Chain more loosely, or work the ch-4 with a hook one size larger.
Gaps look like slits instead of triangles: Block more firmly, and stretch each fan open while it is damp.
Border ripples along the sides: You are working too many sc per fan row. Keep exactly 5 sts per fan-row edge.
Border pulls and the tree curls: Your sc tension is tight. Loosen up, or work the border with a 3.5 mm (US E-4) hook.
Tier points look soft: Make sure each (sc, ch 2, sc) goes into the end sc of Row 2 or Row 4, with the sc2tog directly below it.
Rev sc edge looks flat: Angle the hook slightly downward as you pull up each loop, and keep the stitches snug.
Trunk sits off-center: Count the 29 bottom sts again and move the markers back to sts 12 and 18.
Care
Hand wash in cool water with mild soap, roll in a towel and dry flat. Re-pin the points if needed, and store the ornament flat between seasons.

Final Notes
The measurement chain is short and easy to check. Row 1 is about 1.1 in (2.8 cm) wide, Row 3 is about 2.7 in (6.9 cm) wide, and Row 5 is 4 in (10.2 cm) wide x 3 in (7.6 cm) tall. The 0.25 in (0.6 cm) border brings the tree to 4.5 in (11.4 cm) x 3.5 in (8.9 cm). The 0.8 in (2.0 cm) trunk and 1.5 in (3.8 cm) loop bring the overall height to about 5.8 in (14.7 cm).
Once your first tree checks out at every stage, the rest go quickly. Make a set in matching colors for your own tree, or tie one onto a gift.
Happy crocheting!