

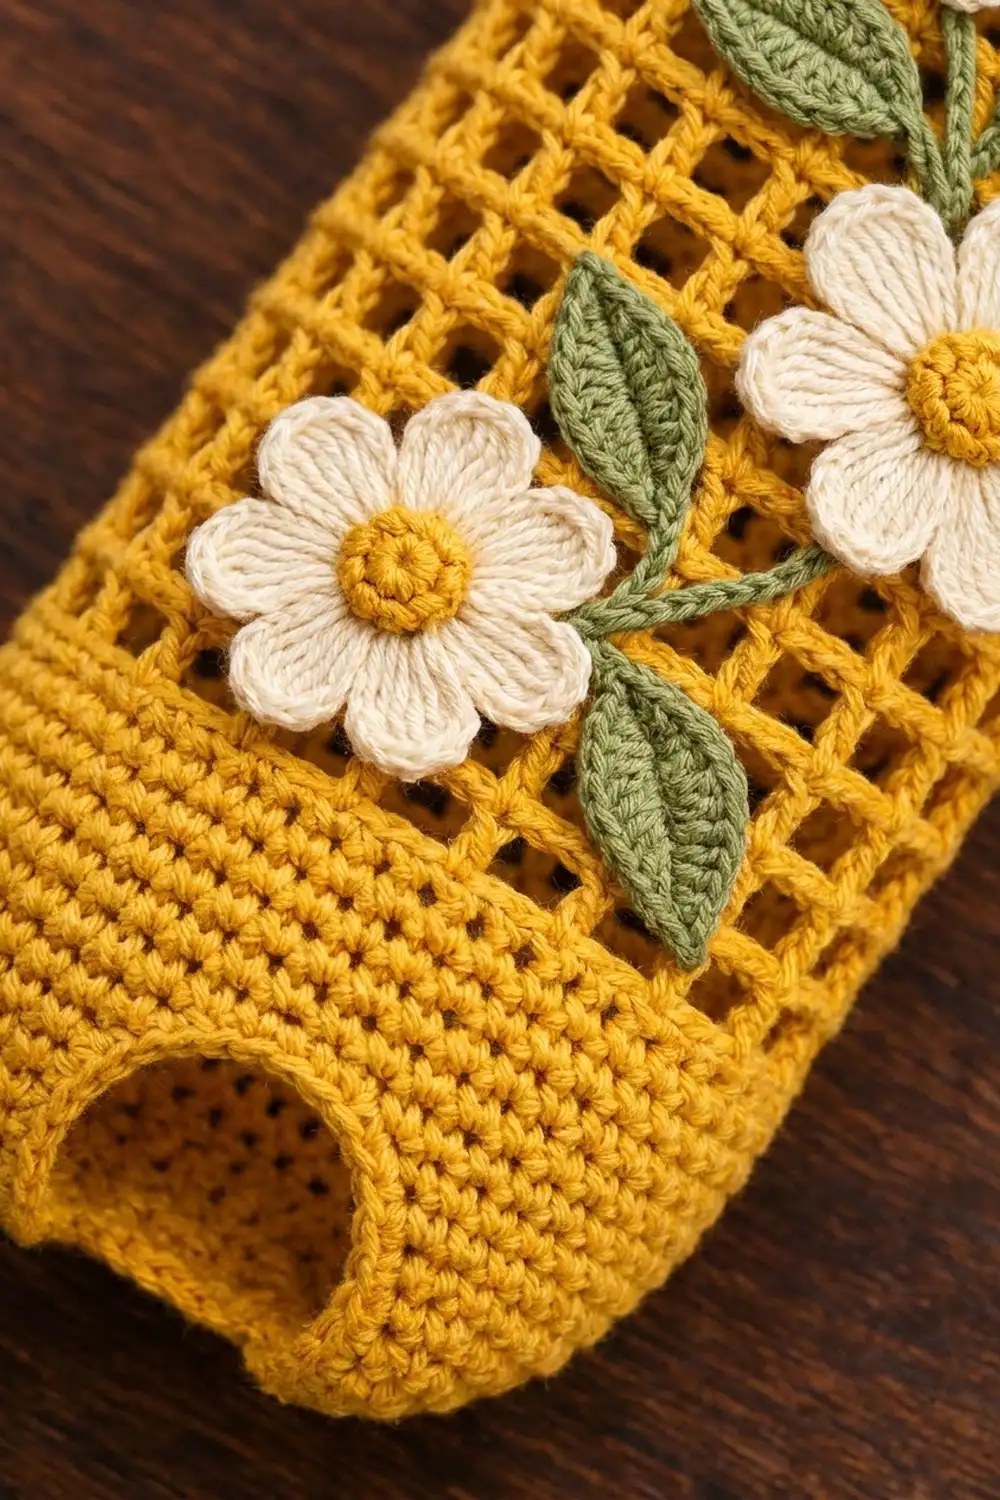
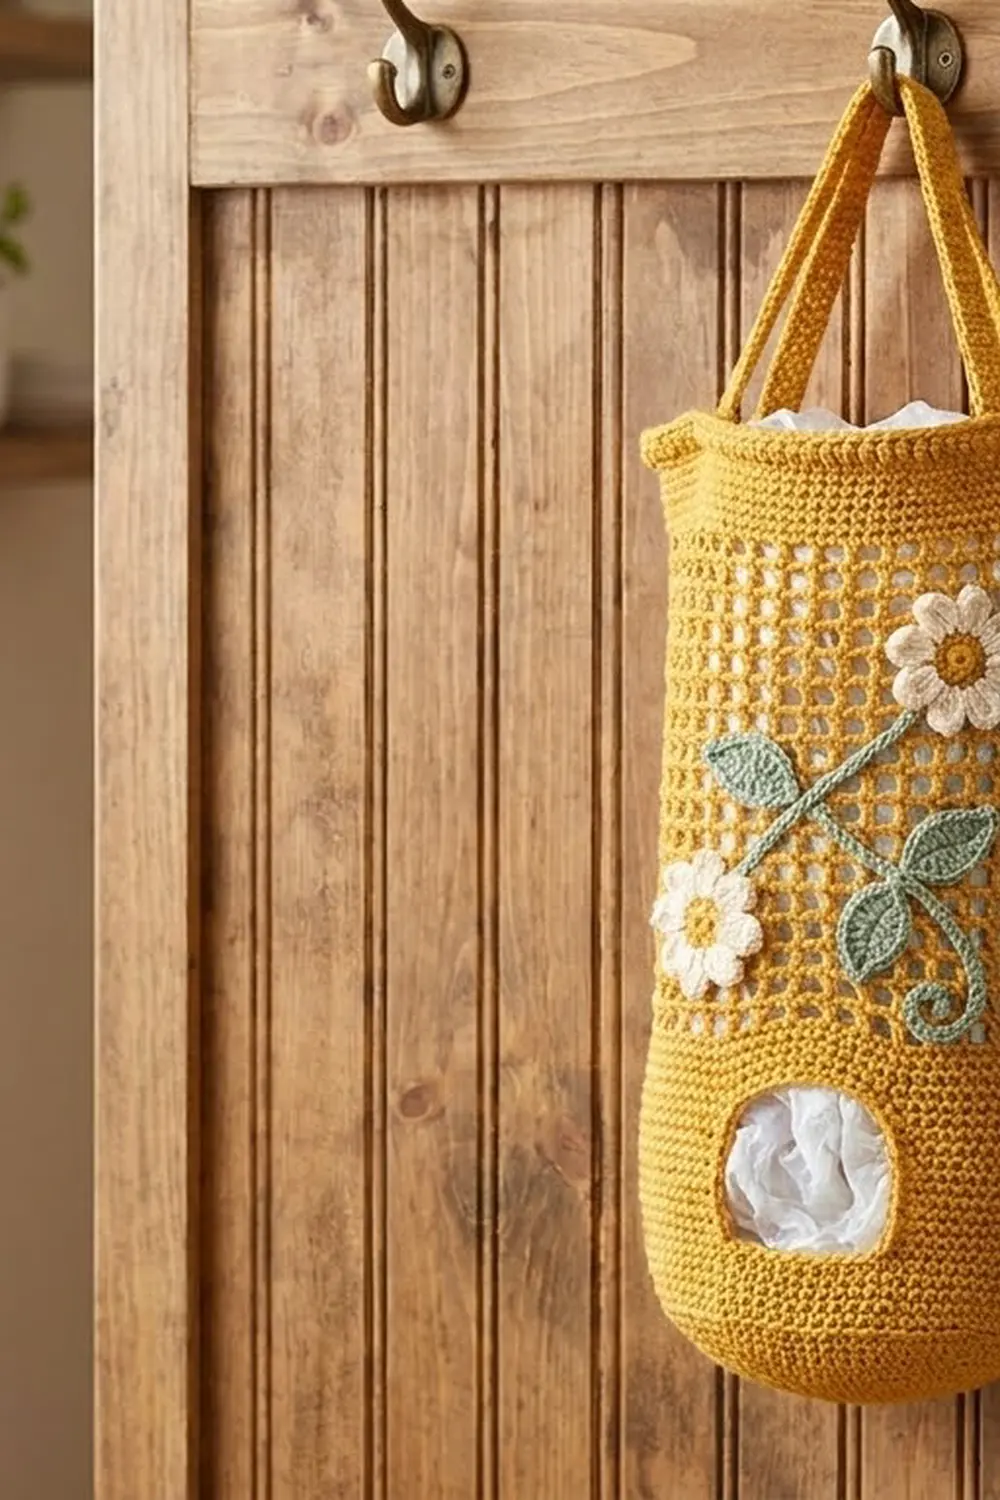
This cheerful bag holder hangs on a hook and keeps your plastic grocery bags tidy. You stuff bags in through the top and pull them out one at a time through the round opening in the base. The body is mustard yellow with a solid base, an open mesh middle and a solid top band. Three cream daisies on a green leafy vine finish the front.
The style is cottage-kitchen. The mesh windows show the bags inside, and the solid base and top band give the tube some structure. The daisies, leaves and tendril are small appliqués made separately and sewn on, so you can switch colors easily. A royal blue body with the same flowers looks just as good.
The pattern uses US crochet terms. Finished, the body measures 5 in (12.7 cm) wide laid flat and 10.5 in (26.7 cm) tall. The handle loop adds about 5 in (12.7 cm), for a hanging length of about 15.5 in (39.4 cm).
To make it, you crochet one seamless tube from the bottom up: a rounded base, a filet mesh section and a solid top band that works as the border. Then you make a flat strap handle, three daisies, a stem and five leaves, and sew everything on.
Finished Size and Construction
- Finished size: 5 in (12.7 cm) wide flat x 10.5 in (26.7 cm) tall, plus a 5 in (12.7 cm) handle loop
- Skill level: Easy-intermediate
- Terminology: US terms
- Yarn weight: Worsted (#4)
- Hook: 4.5 mm (US 7)
- Number of pieces: 1 body, 1 handle, 3 daisies, 1 stem with tendril, 5 leaves
- Layout: One tube, with the appliqués placed in a zigzag on the front
- Body circumference: 40 stitches = 10 in (25.4 cm), so 5 in (12.7 cm) flat
- Size before border: 5 in (12.7 cm) x 9 in (22.9 cm)
- Border (top band) depth: 1.5 in (3.8 cm)
Materials
Use a smooth worsted-weight cotton or cotton blend. Cotton holds its shape, shows the mesh clearly and stands up to frequent washing. Acrylic also works, but the tube will be a little softer.
- Mustard yellow (main color): 70 g / 120 m
- Cream (petals): 10 g / 18 m
- Golden yellow (daisy centers): 3 g / 5 m
- Sage green (stem and leaves): 8 g / 14 m
Tools:
– 4.5 mm (US 7) crochet hook
– Tapestry needle
– Stitch marker
– Scissors
– Measuring tape
– Rustproof pins
– Spray bottle and blocking mat
All quantities include a margin of about 15% for your gauge swatch and tails.
Abbreviations (US Terms)
- ch – chain
- sl st – slip stitch
- sc – single crochet
- hdc – half double crochet
- dc – double crochet
- sp – space
- st(s) – stitch(es)
- MR – magic ring
- rnd – round
Special stitch – crab stitch (reverse sc): Work from left to right (right-handed). Insert the hook into the next stitch to the right, yarn over, pull up a loop, yarn over, then draw through both loops on the hook. This makes a corded, slightly rolled edge.
Gauge and Checkpoints
Gauge: 16 sc x 18 rnds = 4 in (10.2 cm) in sc worked in the round. For the mesh, 2 squares (4 sts) x 2 rnds = 1 in (2.5 cm) square, so every square measures 0.5 in (1.3 cm) each way.
Before making anything else, work the base (Rnds 1–9) and check it. The base is your gauge test.
Checkpoints:
– After Rnd 9: the tube measures 5 in (12.7 cm) flat, and the base is 2 in (5.1 cm) tall from the opening edge along the side.
– After the mesh (Rnd 23): the piece is 9 in (22.9 cm) tall and still 5 in (12.7 cm) flat.
– After the border: the piece is 10.5 in (26.7 cm) tall.
Too big? If the flat width is more than 5.25 in (13.3 cm), go down to a 4 mm hook. Too small? If it’s under 4.75 in (12.1 cm), go up to a 5 mm hook. If only the mesh rounds come out too tall, keep the same hook and pull each dc a little shorter instead.
Body
Make the whole body in mustard yellow. Work in joined rounds and do not turn. The ch 1 at the start of each sc round does not count as a stitch.
Base
Rnd 1: Ch 20 and sl st to the first ch to make a ring, taking care not to twist it. Ch 1, then sc in each ch around and sl st to the first sc. (20 sc)
This ring is the dispensing opening. It is 5 in (12.7 cm) around, or about 1.6 in (4.1 cm) across.
Rnd 2: Ch 1, sc in next st, 2 sc in next st; repeat from * 9 more times, then join. (30 sc)
Rnd 3: Ch 1, sc in each st around, then join. (30 sc)
Rnd 4: Ch 1, sc in next 2 sts, 2 sc in next st; repeat from * 9 more times, then join. (40 sc)
Rnds 5–9: Ch 1, sc in each st around, then join. (40 sc in each round)
The increase rounds curve the base into a shallow cup. When you lay it flat, the ring looks like an arch at the bottom. Check the first checkpoint now.
Mesh Section
Rnd 10: Ch 4 (counts as dc + ch 1), skip next st, dc in next st, ch 1, skip next st; repeat from * 18 more times, then sl st to the 3rd ch of the beginning ch-4. (20 dc + 20 ch-1 sps = 40 sts, 20 squares)
Rnds 11–23: Ch 4 (counts as dc + ch 1), dc in next dc, ch 1; repeat from * 18 more times, then sl st to the 3rd ch of the beginning ch-4. (20 dc + 20 ch-1 sps in each round)
That makes 14 mesh rounds in total, adding 7 in (17.8 cm) of height. Each dc sits directly on the dc below it, so the windows line up in straight columns. Ten squares show across the front and ten across the back. Check the second checkpoint.
Handle
With mustard yellow, ch 51.
Row 1: Sc in the 2nd ch from the hook and in each ch across. (50 sc)
Rows 2–3: Ch 1, turn, then sc in each st across. (50 sc)
Fasten off and leave a 12 in (30.5 cm) tail. The strap measures 12.5 in (31.8 cm) long and about 0.7 in (1.8 cm) wide.
Daisies (make 3)
Rnd 1: With golden yellow, make an MR. Ch 1, work 5 sc in the ring, then join. (5 sc)
Rnd 2: Ch 1, work 2 sc in each st, then join. (10 sc) Fasten off. The center measures about 0.75 in (1.9 cm). Its two short rounds make the slightly domed, nubbly center.
Rnd 3: Join cream in any st. In the next st work (hdc, 3 dc, hdc), then sl st in the next st; repeat from * 4 more times. (5 petals; 25 petal sts + 5 sl sts = 30 sts)
Fasten off with a 10 in (25.4 cm) tail. Each daisy measures 2 in (5.1 cm) across.
Stem and Leaves
Stem with Tendril
With sage green, ch 31. Sl st in the 2nd ch from the hook and in each ch across. (30 sl sts)
The stem measures 7.5 in (19.1 cm).
Tendril: Without turning, ch 12. Work 2 sc in the 2nd ch from the hook and in each remaining ch, then sl st into the end of the stem. (22 sc)
The doubled stitches make the tendril spiral. Coil it into a curl about 1 in (2.5 cm) across. Fasten off.
Leaves (make 5)
With sage green, ch 7. Work along one side of the chain, starting in the 2nd ch from the hook: sl st, sc, hdc, dc, hdc, then 3 sc in the last ch. Rotate and work along the other side of the chain: hdc, dc, hdc, sc, sl st. (13 sts) Ch 1 and sl st to the first sl st to make a pointed tip.
Fasten off and leave a tail at the base. Each leaf measures 1.5 in (3.8 cm) long.
Appliqué Placement and Sewing
Pieces per color: mustard yellow, 1 body + 1 handle; cream with golden yellow, 3 daisies; sage green, 1 stem + 5 leaves.
Lay the body flat with the beginning-of-round seam at the center back. Count the front squares as columns 1–10 from left to right and the mesh rounds as 1–14 from bottom to top.
Mesh rnds   Front columns 1-10
 11-14      L [A: cols 2-5] L . . . .
  7-10      . . . L [B: cols 5-8] . .
  2-5       L [C: cols 2-5] L . . . .
  1         . . tendril curl . . . . .
- Pin the stem in a gentle S curve. It starts at column 3 on mesh rnd 1, swings right behind daisy B, and ends at column 4 on mesh rnd 13. The tendril curls just above the solid base.
- Pin daisy A over columns 2–5 at mesh rnds 11–14. Pin daisy B over columns 5–8 at mesh rnds 7–10, and daisy C over columns 2–5 at mesh rnds 2–5.
- Tuck the leaves under the edges of the daisies, pointing outward: one each to the left and right of daisy A, one to the left of daisy B, and one each to the left and right of daisy C.
- Sew the stem down with small stitches through the dc posts and solid areas. Sew each leaf at its base and tip. Sew each daisy around the center and at each petal tip.
- Sew through the front layer only. Slide a piece of cardboard inside the tube so you don’t catch the back.
Border
The top band is the border. It turns the mesh back into solid fabric, firms up the opening where you stuff bags in, and gives the handle a sturdy place to attach.
Border gauge: the same as the body, 16 sc x 18 rnds = 4 in (10.2 cm). Lay the tube flat with the seam at center back. There are 20 sts on the front half and 20 on the back half.
Border Rnd 1 (conversion): Ch 1. Work 1 sc in each dc and 1 sc in each ch-1 sp around, then join. (20 sc in the dc + 20 sc in the sps = 40 sc; 20 per side)
Border Rnds 2–6: Ch 1, sc in each st around, then join. (40 sc; 20 per side)
Border Rnd 7: Ch 1, then crab stitch in each st around and join. (40 crab sts; 20 per side) Fasten off.
Opening edge: Join mustard yellow at the opening in a free loop of the foundation chain. Ch 1, then work 20 crab sts in the free loops around and join. (20 sts) Fasten off.
Why the math works: Each mesh round has 20 dc + 20 ch-1 sps. Working one sc into each gives exactly 40 sc, with no increases or decreases. At 4 sts per inch, 20 sts per side is 5 in (12.7 cm), the same width as the base and the mesh. The 7 border rounds add 1.5 in (3.8 cm), taking the body from 9 in (22.9 cm) to 10.5 in (26.7 cm).
Attach the handle: Lay the tube flat and mark the two side folds. With the strap untwisted, set 0.75 in (1.9 cm) of each end inside the band at a side fold. Whipstitch all around each overlap with the tail. The strap rises about 5 in (12.7 cm) above the rim.
Final Blocking
- Weave in all ends, running each tail back through solid stitches.
- Spritz the whole piece with water until it is damp, not soaked.
- Roll up a towel, or cut a 5 in (12.7 cm) wide piece of cardboard, and slide it into the tube to hold the shape.
- Pin the tube to 5 in (12.7 cm) wide and 10.5 in (26.7 cm) tall. Line up the mesh columns straight.
- Gently shape each daisy petal and leaf tip with your fingers.
- Let it dry completely before removing the form.
Final Quality-Control Checklist
- The base has 40 sts and the opening has 20 sts with a neat crab-stitch edge.
- There are 14 mesh rounds of 20 squares, and the columns are straight.
- The border has 40 sts in every round and the rim lies smooth.
- The body is 5 in (12.7 cm) x 10.5 in (26.7 cm).
- The handle is secure at both side folds and not twisted.
- The three daisies sit in a zigzag (left, right, left) with five leaves and the tendril visible.
- No appliqué stitches go through the back layer.
Troubleshooting
- Mesh columns lean in a spiral: You probably skipped the join, or worked the joining dc in the wrong chain. Always sl st into the 3rd ch of the beginning ch-4.
- Rim ruffles: Your crab stitch is too loose. Redo Border Rnd 7 with a 4 mm hook.
- Rim pulls in: Count Border Rnd 1. You need exactly 40 sc.
- Opening too tight for bags: Start Rnd 1 with ch 24 (24 sc). In Rnd 2, work sc in next st, 2 sc in next st 12 times (36 sc). Work Rnd 3 even. In Rnd 4, work sc in next 8 sts, 2 sc in next st 4 times (40 sc). Continue as written.
- Daisy cups: Your petal stitches are too tight. Block the daisy flat, or use a 5 mm hook for Rnd 3.
- Tendril won’t curl: Work 3 sc in each ch instead of 2.
Care
Hand wash in cool water and lay flat to dry, reshaping the tube over a rolled towel. Don’t tumble dry, as heat can distort the mesh and the appliqués.
Final Notes
The measurement chain is simple. The 16-sc gauge gives 40 sts around, which is 5 in (12.7 cm) flat. The base adds 2 in (5.1 cm) and the 14 mesh rounds add 7 in (17.8 cm), for 9 in (22.9 cm) before the border. The 1.5 in (3.8 cm) top band brings it to 10.5 in (26.7 cm). Check your width after the base and the rest falls into place. Then hang it by the door, fill it with bags, and enjoy the daisies every time you pull one out.
Happy crocheting!