
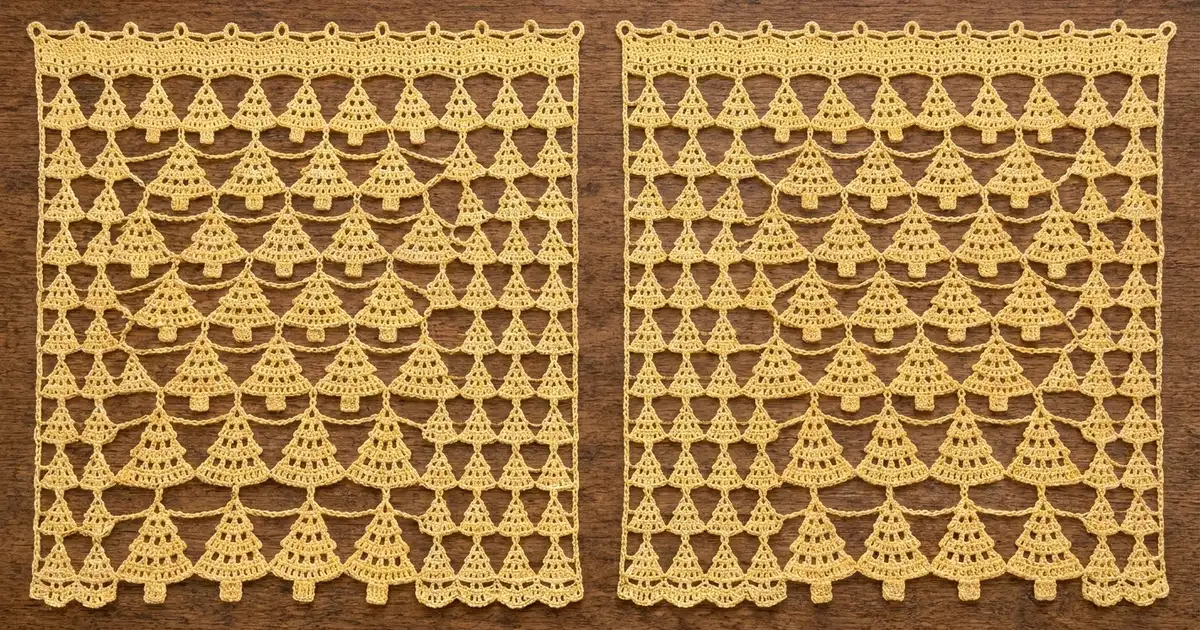
These lace curtain panels are made from small triangular tree motifs. Each tree has a tiny hanging loop at the tip, rows of eyelet holes and a short trunk. The trees hang in offset rows and are tied together with soft chain swags. When the sun comes through, the trees cast a pattern of little pines across the room.
The sample uses a single pale butter-yellow cotton. That warm, low-contrast shade keeps the lace light and makes the eyelets and swags stand out against the glass. Any light solid color works, but avoid heavy variegation because it hides the tree shapes.
This pattern uses US crochet terms. Each finished panel measures about 15 in (38.1 cm) wide by 74.5 in (189.2 cm) long, not counting the rod loops. Hung flat, the pair covers about 30 in (76.2 cm) of rod. Gathered, it fits a narrower window.
Construction is simple and repetitive. You make 120 identical trees and join them row by row with chain lines that also form the swags. Then you work a header band across the top row of trees.
Finished Size and Construction
- Finished panel size: 15 in (38.1 cm) wide x 74.5 in (189.2 cm) long
- Skill level: Easy intermediate
- Terminology: US terms
- Yarn weight: DK (light worsted, #3), cotton or cotton blend
- Hook: 4.0 mm (G-6)
- Number of pieces: 120 tree motifs (60 per panel), plus 2 header bands
- Layout per panel: 17 tree rows, alternating 4 trees and 3 trees, beginning and ending with a 4-tree row
- Single tree size: 3.75 in (9.5 cm) wide x 5.25 in (13.3 cm) tall, loop to trunk
- Row pitch: 4.25 in (10.8 cm) per tree row
- Panel size before header: 15 in (38.1 cm) x 73.25 in (186.1 cm)
- Header depth: 1.25 in (3.2 cm), plus rod loops
Materials
Choose a smooth DK cotton, either mercerized or matte. Cotton holds the eyelets open and blocks crisply. Acrylic will work, but it drapes more and may stretch over time on a long panel.
- Pale butter yellow DK cotton: 400 g (about 880 m / 962 yd), or eight 50 g balls of about 110 m (120 yd) each
This amount is for the pair. It includes a margin of roughly 15 percent for gauge swatches, weaving in tails and differences in tension. One tree uses about 2.5 g (5.5 m / 6 yd).
Tools:
- 4.0 mm (G-6) crochet hook
- Tapestry needle
- Scissors
- Rust-proof pins and a large blocking surface (foam mats or a bed with towels)
- Spray bottle
- Tape measure
- Removable stitch markers
Abbreviations (US Terms)
- ch – chain
- sl st – slip stitch
- sc – single crochet
- dc – double crochet
- sk – skip
- st(s) – stitch(es)
- sp – space
- tch – turning chain
- RS / WS – right side / wrong side
Triple join (special stitch): This is one slip stitch worked through three layers:
- Insert your hook through the corner sc of the left upper tree.
- Insert it through the corner sc of the right upper tree.
- Insert it through the hanging loop of the lower tree.
- Yarn over and pull through all three layers and the loop on your hook.
Gauge and Checkpoints
Gauge: 18 dc and 8 dc rows = 4 in (10.2 cm). In sc, 18 sts = 4 in (10.2 cm). Chains average 5 ch per 1 in (2.5 cm).
Make one complete tree before anything else and measure it. It is your gauge swatch.
Checkpoints for one tree:
- After Row 3 (9 sts): about 2 in (5.1 cm) wide.
- After Row 7 (17 sts): about 3.75 in (9.5 cm) wide. Rows 1–7 measure about 3.5 in (8.9 cm) tall.
- Finished tree: 3.75 in (9.5 cm) wide x 5.25 in (13.3 cm) tall. That includes a 0.5 in (1.3 cm) loop and a 1 in (2.5 cm) trunk.
If your tree is too big, go down half a hook size. If it is too small, go up half a size. An error of only 0.25 in (0.6 cm) per tree adds up to 1 in (2.5 cm) across a 4-tree row and more than 4 in (10.2 cm) over 17 rows, so get this right before you continue.
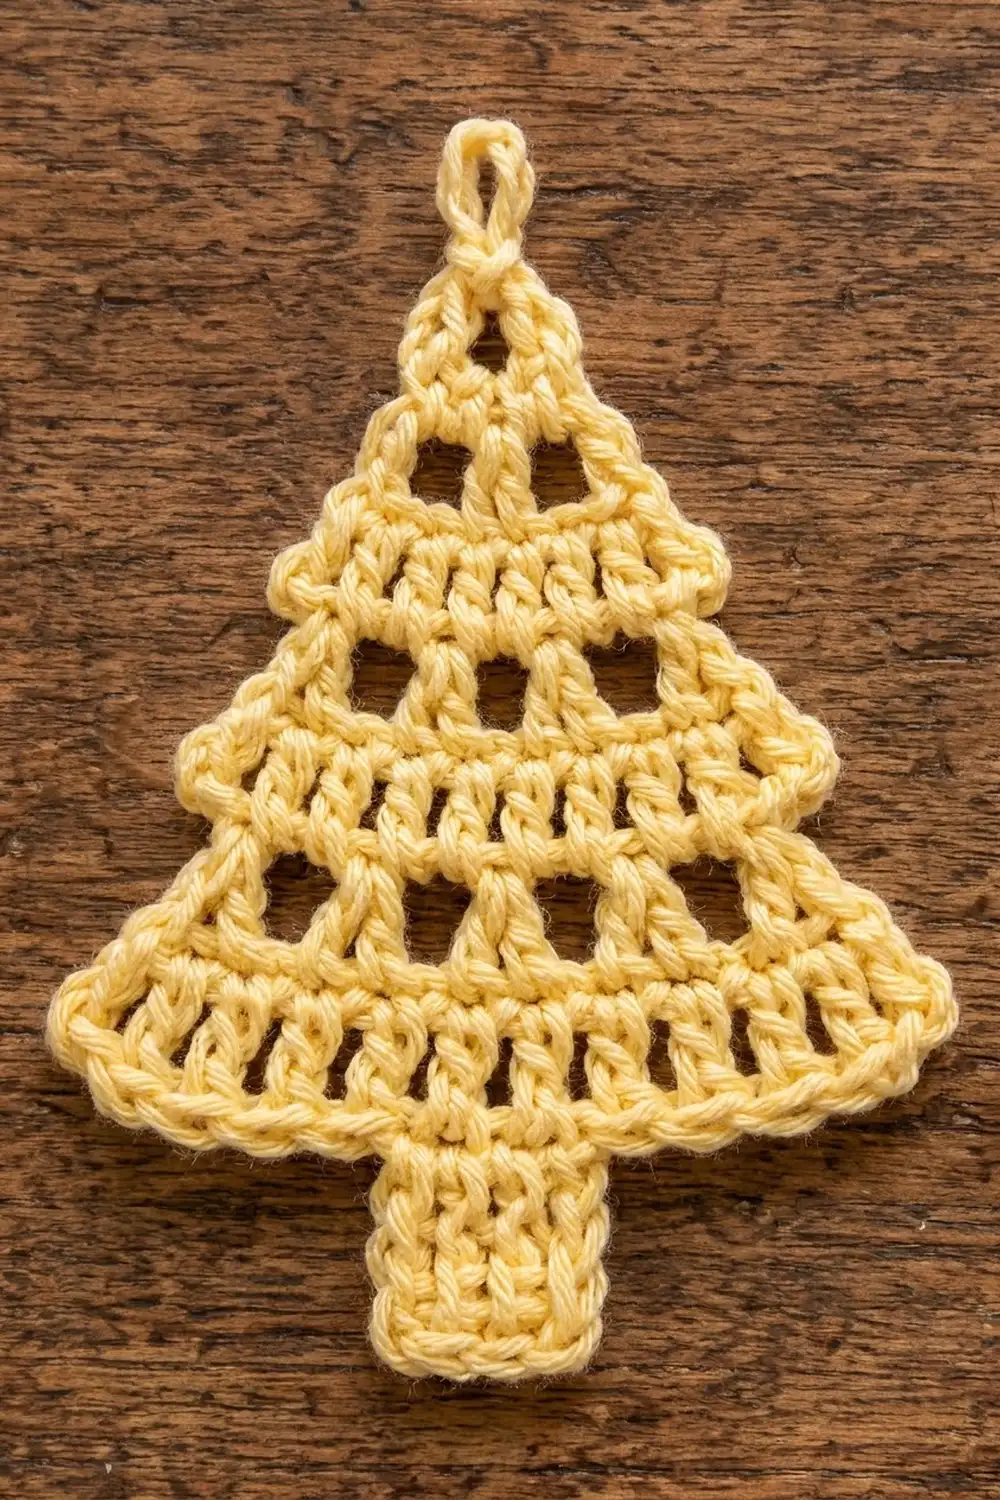
Tree Motif (make 120)
Every tree is worked flat from the tip down, turning at the end of each row. Each dc row adds 2 sts because you work 2 dc into the first and last st.
Hanging loop: Ch 6, sl st in first ch to form a ring.
Row 1: Ch 3 (counts as dc), 4 dc in ring. Turn. (5 sts)
The dc fill the lower half of the ring. The upper half stays open as the hanging loop.
Row 2 (eyelet): Ch 3 (counts as dc), dc in first st, ch 1, sk next st, dc in next st, ch 1, sk next st, 2 dc in top of tch. Turn. (7 sts: 5 dc and 2 ch-1 sps)
Row 3 (solid): Ch 3 (counts as dc), dc in first st, dc in each st and ch-1 sp across to tch, 2 dc in top of tch. Turn. (9 sts)
Row 4 (eyelet): Ch 3 (counts as dc), dc in first st, [ch 1, sk next st, dc in next st] 3 times, ch 1, sk next st, 2 dc in top of tch. Turn. (11 sts: 7 dc and 4 ch-1 sps)
Row 5 (solid): Repeat Row 3. (13 sts)
Row 6 (eyelet): Ch 3 (counts as dc), dc in first st, [ch 1, sk next st, dc in next st] 5 times, ch 1, sk next st, 2 dc in top of tch. Turn. (15 sts: 9 dc and 6 ch-1 sps)
Row 7 (solid): Repeat Row 3. (17 sts)
Row 8 (bottom edge): Ch 1 (does not count), sc in each st across, working the last sc in top of tch. Turn. (17 sc)
The first and last sc of Row 8 are the tree’s bottom corners. Mark them if it helps.
Trunk
Row 9: Sl st in first 6 sts, ch 1 (does not count), sc in next 5 sts (sts 7–11). Turn, leaving last 6 sts unworked. (5 sc)
Rows 10–12: Ch 1, sc in each st across. Turn. (5 sc)
Fasten off and weave in both tails. The trunk is 4 rows, about 1 in (2.5 cm) long and 1.1 in (2.8 cm) wide. It is centered under st 9 of Row 8.
Make the side with the slip-stitch ridge the WS. Keep it the same on every tree so the finished panel looks uniform.
Make All Pieces
All 120 trees are identical and use the same color.
- Per panel: 9 rows of 4 trees (36) + 8 rows of 3 trees (24) = 60 trees
- For the pair: 120 trees, about 300 g (660 m / 722 yd)
Layout grid (one panel, tree tips at top):
Row 1:   T   T   T   T
Row 2:     T   T   T
Row 3:   T   T   T   T
Row 4:     T   T   T
 ...     (continue alternating)
Row 15:  T   T   T   T
Row 16:    T   T   T
Row 17:  T   T   T   T
In 4-tree rows, the trees sit side by side with their bottom corners touching and span the full 15 in (38.1 cm). In 3-tree rows, each tree hangs from a point where two upper trees meet. The 3 trees span 11.25 in (28.6 cm), centered, with 1.875 in (4.8 cm) of open lace at each side.
Joining
Join the trees with one chain line for each gap between tree rows, working from left to right with RS facing. Each chain line makes the joins and the swags at the same time. Each panel has 16 chain lines.
Line A (4-tree row above, 3-tree row below): Use this for row gaps 1–2, 3–4, 5–6 and so on to 15–16 (8 lines).
- Join yarn with a sl st in the outer bottom corner sc of the leftmost upper tree.
- Ch 13.
- Triple join at the meeting point of upper trees 1 and 2, catching the loop of lower tree 1.
- Ch 25, triple join at upper trees 2 and 3 with lower tree 2.
- Ch 25, triple join at upper trees 3 and 4 with lower tree 3.
- Ch 13, sl st in the outer bottom corner sc of upper tree 4. Fasten off.
Line B (3-tree row above, 4-tree row below): Use this for row gaps 2–3, 4–5 and so on to 16–17 (8 lines).
- Join yarn by working a sl st through the left outer corner sc of upper tree 1 and the loop of lower tree 1 together.
- Ch 25, triple join at upper trees 1 and 2 with lower tree 2.
- Ch 25, triple join at upper trees 2 and 3 with lower tree 3.
- Ch 25, sl st through the right outer corner sc of upper tree 3 and the loop of lower tree 4. Fasten off.
Why it fits: Neighboring join points are always one tree width apart, 3.75 in (9.5 cm). A 25-ch swag is about 5 in (12.7 cm) long, so it hangs about 1.3 in (3.3 cm) below the joins, just under the upper trunk. The 13-ch half swags cover 1.875 in (4.8 cm) with the same share of slack. Every lower loop sits exactly at the bottom edge of the row above, so rows step down by a steady 4.25 in (10.8 cm).
Tension: Chain loosely and evenly. Tight swags pucker the corners. Very loose swags droop below the next row’s eyelets.
Size checkpoint: After joining all 17 rows, the panel should measure 15 in (38.1 cm) wide at any 4-tree row. It should measure 73.25 in (186.1 cm) from the top tree tips to the bottom trunks (17 x 4.25 in + 1 in).
Border (Header Band)
The panel has a border on the top edge only. The sides and bottom stay open so the tree outline and the scalloped hem show, as in the sample.
Border gauge: 18 sc = 4 in (10.2 cm). That makes 68 sts about 15.1 in (38.4 cm), which matches the 15 in (38.1 cm) width of the top tree row.
Each top-row tree contributes one 17-st unit: 7 ch, 3 sc into its loop, then 7 ch. Four trees x 17 sts = 68 sts. Between neighboring trees, the two 7-ch halves combine into one 14-ch span.
Row 1 (RS): Ch 7. Work 3 sc into the loop of tree 1, [ch 14, 3 sc into the loop of the next tree] 3 times, ch 7. Turn. (68 sts: 7 + 4 x 3 + 3 x 14 + 7)
Row 2: Ch 1 (does not count), sc in each ch and sc across. Turn. (68 sc)
Row 3: Ch 3 (counts as dc), dc in each st across. Turn. (68 sts)
Row 4: Ch 1, sc in each st across. Turn. (68 sc)
Row 5 (rod loops): Ch 1, sc in first st, [sc in next st, ch 12, sl st in top of the sc just made, sc in next 12 sts] 5 times, sc in next st, ch 12, sl st in top of the sc just made, sc in last st. (68 sc and 6 loops)
Check the math: 1 + 5 x 13 + 1 + 1 = 68. The loops sit on sts 2, 15, 28, 41, 54 and 67, about 2.9 in (7.4 cm) apart, with 1 st outside each end loop. Rows 1–4 together make the 1.25 in (3.2 cm) header. Fasten off and weave in ends.
Panel length: 1.25 in + 73.25 in = 74.5 in (189.2 cm).
Final Blocking
- Weave in any remaining tails along a solid dc or sc row, never across an eyelet or a swag.
- Lay the panel flat on a large surface, in two or three sections if needed.
- Pin the header straight to 15 in (38.1 cm).
- Pin each 4-tree row to 15 in (38.1 cm), with a pin at every bottom corner.
- Pin each tree tip straight below its join so the rows line up vertically, 4.25 in (10.8 cm) apart.
- Let the swags hang in even curves. Don’t stretch them straight.
- Spray until damp, then leave until fully dry.
- Repeat for the second panel. Compare the two side by side and adjust either one if needed.
Final Quality-Control Checklist
- Each panel has 60 trees: 9 rows of 4 and 8 rows of 3.
- Every tree has 17 sts in Row 7 and a centered 5-st trunk.
- All trees face RS out.
- Every 4-tree row measures 15 in (38.1 cm).
- All swags are 25 ch, and half swags are 13 ch.
- The header has 68 sts in Rows 1–5 and 6 rod loops.
- Both panels measure 74.5 in (189.2 cm) long.
- All tails are woven in and trimmed.
Troubleshooting
Tree leans to one side: You probably missed the 2 dc at one end of a row. Count each row against the stitch totals.
Eyelets close up: Make sure you skip a st under every ch-1. On eyelet rows, do not work into the ch-1 sps.
Trunk is off-center: Row 9 must start after exactly 6 sl sts. Count them.
Panel is narrower at 3-tree rows: This is correct. Those rows are 11.25 in (28.6 cm) wide by design.
Header ripples: The chains in Row 1 are too loose. Go down half a hook size for Row 1 only.
Panel stretches longer when hung: Re-block it. Consider adding a rod at the hem or switching to a firmer cotton.
Care
Hand wash in cool water and lay flat to dry, re-pinning the tree rows if needed. Do not wring the panels or hang them wet, because the weight of wet lace will stretch them.

Final Notes
The whole curtain depends on one chain of measurements. A 17-st tree is 3.75 in (9.5 cm) wide. Four trees make 15 in (38.1 cm), and the 68-st header matches that width exactly. Each tree row adds 4.25 in (10.8 cm), and 17 rows plus the trunks make 73.25 in (186.1 cm). With the 1.25 in (3.2 cm) header, each panel is 74.5 in (189.2 cm) long. Check your first tree and the rest will follow.
Happy crocheting!