

This little angel is made in soft butter-yellow cotton. She has a round stuffed head, a ruffled halo, two open fan wings and a lacy skirt that flares into three tiers of shells. A row of small picot loops finishes the hem.
The style is classic heirloom lace on a small scale. One color gives a calm, vintage look that suits a tree full of gold and warm lights. The eyes are two tiny black beads or 4 mm safety eyes.
This pattern uses US crochet terms. The finished angel is about 3.75 in (9.5 cm) tall from the top of the halo to the hem, 4 in (10.2 cm) wide across the wings, and 3.25 in (8.3 cm) wide at the hem. The hanging loop adds about 1.5 in (3.8 cm).
You crochet six small parts. The body is worked flat in rows from the neck down to the hem, and the hem edging doubles as the border. The head is worked in amigurumi spiral rounds, and the wings are worked flat as fans. Then you sew the parts together into one ornament.
Finished Size and Construction
- Finished size: 3.75 in (9.5 cm) tall without the loop; 4 in (10.2 cm) wingspan
- Skill level: Intermediate
- Terminology: US
- Yarn weight: Fingering (size 3 crochet thread / super fine cotton)
- Hook: 2.25 mm (B-1)
- Number of pieces: 1 ornament made from 6 parts (body, head, halo, 2 wings, loop)
- Layout: Head on top of the bodice, halo around the crown, wings sewn behind the shoulders, loop at the top of the head
- Body size before edging: 2.6 in (6.6 cm) long × 3 in (7.6 cm) wide at the hem
- Hem edging depth: 0.2 in (0.5 cm)
- Body size after edging: 2.8 in (7.1 cm) long × 3.25 in (8.3 cm) wide at the hem
Materials
Use a smooth mercerized cotton in fingering weight. Mercerized cotton shows the lace clearly and holds its shape after starching. Avoid fuzzy or very soft acrylic, because the shells will lose their crisp outline.
- Pale butter yellow: 12 g / 50 m (55 yd)
- Black: two 4 mm black beads or safety eyes, or 1 m (1.1 yd) black embroidery floss
Tools:
– 2.25 mm (B-1) crochet hook
– Tapestry needle
– Stitch marker
– A pinch (about 1 g) of polyester fiberfill
– Rust-proof pins and a blocking board
– Fabric stiffener or starch (optional)
Yarn quantities include a margin of about 25% for swatching and sewing.
Abbreviations (US Terms)
- ch – chain
- sl st – slip stitch
- sc – single crochet
- hdc – half double crochet
- dc – double crochet
- tr – treble crochet
- inc – 2 sc in the same stitch
- dec – single crochet 2 together (invisible dec recommended)
- MR – magic ring
- sk – skip
- sp – space
- st(s) – stitch(es)
Special stitches
– V-st: (dc, ch 1, dc) in the same stitch. In Rows 8 and 10 of the body, the ch-1 is replaced by ch-3, as written there.
– Shell: the stated number of dc worked in one space.
– Bump: (hdc, dc, hdc) in one stitch or loop.
Gauge and Checkpoints
Gauge: 16 sc and 18 sc rows = 2 in (5.1 cm). One dc row is about 0.3 in (0.8 cm) tall and one tr row is about 0.45 in (1.1 cm) tall.
Make the head first and use it as your test piece. After Round 4 it should be about 1 in (2.5 cm) across when laid flat. The stuffed head should also measure about 1 in (2.5 cm) across.
Body checkpoints (measured flat from the neck edge):
– After Row 5: 0.5 in (1.3 cm) long, 1.1 in (2.8 cm) wide
– After Row 7: 1.1 in (2.8 cm) long, 1.6 in (4.1 cm) wide
– After Row 9: 1.75 in (4.4 cm) long, 2.25 in (5.7 cm) wide
– After Row 11: 2.6 in (6.6 cm) long, 3 in (7.6 cm) wide
If your piece comes out too big, go down to a 2.0 mm hook. If it comes out too small, go up to a 2.5 mm hook. If only the shell rows are too wide, work them more firmly and leave the hook size as it is.
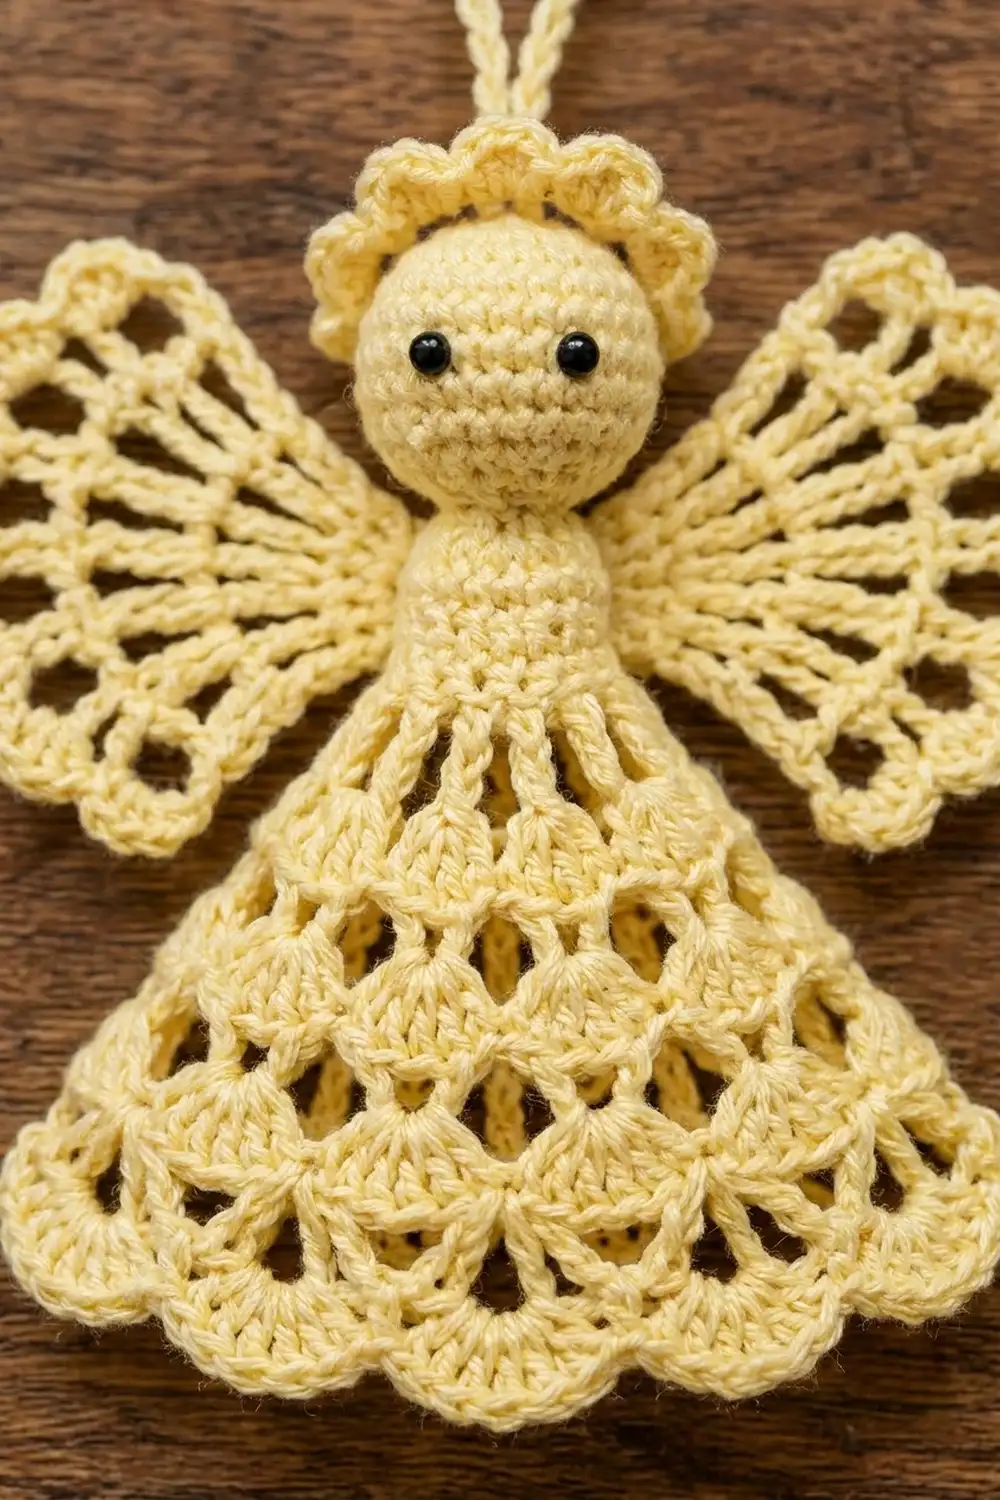
Part 1: Body (make 1)
You work the body flat in rows, starting at the neck. Turn at the end of every row.
Bodice
Row 1: Ch 6, sc in 2nd ch from hook and in each ch across. (5 sc)
Row 2: Ch 1, turn, 2 sc in first st, sc in next 3 sts, 2 sc in last st. (7 sc)
Row 3: Ch 1, turn, sc in each st across. (7 sc)
Row 4: Ch 1, turn, 2 sc in first st, sc in next 5 sts, 2 sc in last st. (9 sc)
Row 5: Ch 1, turn, sc in each st across. (9 sc)
Checkpoint: 1.1 in (2.8 cm) wide and 0.5 in (1.3 cm) long.
Skirt
Row 6 (V row): Ch 4 (counts as dc + ch 1), turn, dc in first st (V-st made). Ch 1, sk 1 st, V-st in next st. Repeat from * 3 more times. (5 V-sts: 10 dc, 5 V-sps, 4 ch-1 sps between them)
The V-sts sit on sts 1, 3, 5, 7 and 9, so all 9 bodice stitches are used.
Row 7 (Tier 1, 5-dc shells): Ch 1, turn, sc in first dc. 5 dc in next V-sp, sc in next ch-1 sp. Repeat from * 3 more times. Then work 5 dc in the last V-sp and sc in the 3rd ch of the beginning ch-4. (5 shells, 25 dc + 6 sc = 31 sts)
Row 8 (arch row): Ch 5 (counts as dc + ch 2), turn, sk next 2 dc, (dc, ch 3, dc) in center (3rd) dc of the shell. Ch 2, dc in next sc, ch 2, (dc, ch 3, dc) in center dc of next shell. Repeat from * 3 more times. Ch 2, dc in last sc. (16 dc: 10 in V-sts + 6 single spokes; 5 ch-3 sps; 10 ch-2 sps)
Row 9 (Tier 2, 7-dc shells): Ch 1, turn, sc in first dc. 7 dc in next ch-3 sp, sk ch-2 sp, sc in next single dc. Repeat from * 4 more times. The last sc goes into the 3rd ch of the beginning ch-5. (5 shells, 35 dc + 6 sc = 41 sts)
Row 10 (tall arch row): Ch 7 (counts as tr + ch 3), turn, sk next 3 dc, (tr, ch 3, tr) in center (4th) dc of the shell. Ch 3, tr in next sc, ch 3, (tr, ch 3, tr) in center dc of next shell. Repeat from * 3 more times. Ch 3, tr in last sc. (16 tr; 5 V ch-3 sps; 10 ch-3 bridge sps)
Row 11 (Tier 3, 9-dc shells): Ch 1, turn, sc in first tr. 9 dc in next V ch-3 sp, sk bridge sp, sc in next single tr. Repeat from * 4 more times. The last sc goes into the 4th ch of the beginning ch-7. (5 shells, 45 dc + 6 sc = 51 sts)
Checkpoint: 2.6 in (6.6 cm) long and 3 in (7.6 cm) wide. Do not fasten off. Continue with the Border section below.
Part 2: Head (make 1)
Work in continuous spiral rounds. Mark the first stitch of each round.
Rnd 1: 6 sc in MR. (6)
Rnd 2: Inc in each st around. (12)
Rnd 3: Sc 1, inc. Repeat 6 times. (18)
Rnd 4: Sc 2, inc. Repeat 6 times. (24)
Rnds 5–8: Sc in each st around. (24 each round)
Place the eyes between Rnds 6 and 7, with 4 sts between them. If you are using floss, embroider small French knots there instead.
Rnd 9: Sc 2, dec. Repeat 6 times. (18)
Stuff the head firmly.
Rnd 10: Sc 1, dec. Repeat 6 times. (12)
Rnd 11: Dec 6 times. (6)
Fasten off and leave a 12 in (30.5 cm) tail. Close the hole and keep the tail for sewing. The head should measure 1 in (2.5 cm) across.
Part 3: Halo (make 1)
Foundation: Ch 12 and join with a sl st to form a ring.
Rnd 1: Ch 1, work 20 sc into the ring, around the chain (not into the chains). Join to the first sc. (20 sc)
Rnd 2: Sl st in next sc, bump in next sc. Repeat 10 times. Join. (10 bumps: 10 sl st + 30 sts)
Fasten off and leave a 10 in (25.4 cm) tail. The halo is 1 in (2.5 cm) across on the outside, with a 0.5 in (1.3 cm) opening.
Part 4: Wings (make 2)
Row 1: Ch 4, 5 dc in 4th ch from hook. (6 dc; the skipped 3 ch count as the first dc)
Row 2: Ch 5 (counts as dc + ch 2), turn. Dc in next dc, ch 2. Repeat 4 times. Dc in top of the turning ch. (6 dc, 5 ch-2 sps)
Row 3: Ch 6 (counts as tr + ch 2), turn, tr in next ch-2 sp. Ch 2, tr in next dc, ch 2, tr in next ch-2 sp. Repeat 4 times. Ch 2, tr in 3rd ch of the turning ch. (11 tr, 10 ch-2 sps)
Row 4: Ch 1, turn, sc in first tr. Ch 3, sc in next tr. Repeat 10 times. (11 sc, 10 ch-3 loops)
Row 5 (scallops): Ch 1, turn, sc in first sc. Bump in next ch-3 loop, sc in next sc. Repeat 10 times. (10 bumps; 11 sc + 30 sts = 41 sts)
Fasten off and leave a 10 in (25.4 cm) tail. Each wing is 1.5 in (3.8 cm) from the base point to the edge and 1.75 in (4.4 cm) wide along the curve.
Part 5: Hanging Loop (make 1)
Ch 26, sc in 2nd ch from hook and in each ch across. (25 sc, about 3.1 in / 7.9 cm)
Fasten off. Fold the cord in half to make a loop about 1.5 in (3.8 cm) tall.
Border: Hem Edging and Side Edges
Border gauge: 4 sc plus 4 ch-3 loops span one 9-dc shell, which is about 0.6 in (1.5 cm). Each side edge takes 10 sc over 2.6 in (6.6 cm).
Row 12 (hem edging): Ch 1, turn, sc in first sc. Sc in first dc of the shell, (ch 3, sk 1 dc, sc in next dc) 4 times, sc in next sc. Repeat from * 4 more times.
- Per shell: 5 sc + 4 ch-3 loops
- Total: 25 sc on the shells + 6 sc between them = 31 sc, plus 20 ch-3 loops
Side edge 1: Do not turn. Ch 1, rotate the piece and work along the row ends toward the neck:
- Row 11 end: 1 sc
- Row 10 end: 3 sc
- Row 9 end: 1 sc
- Row 8 end: 2 sc
- Row 7 end: 1 sc
- Row 6 end: 2 sc
That makes 10 sc. Sl st into the end of Row 5 and fasten off.
Side edge 2: Join the yarn at the end of Row 5 on the other side. Work down to the hem in the same order but reversed: 2, 1, 2, 1, 3, 1 sc, for 10 sc. Sl st into the first sc of Row 12 and fasten off.
Why the math works: Each 9-dc shell has 9 dc. The edging uses dc 1, 3, 5, 7 and 9 for its 5 sc and skips the 4 even dc under the loops, so every shell ends evenly with no leftover stitches. Every row is the same height at both ends, so both sides get the same 10 sc. That is 2 sc per dc row end (0.3 in / 0.8 cm), 3 sc per tr row end (0.45 in / 1.1 cm) and 1 sc per shell row end. This is a little fewer than the sc gauge would call for, which keeps the sides from rippling.
After the border, the body is 2.8 in (7.1 cm) long and 3.25 in (8.3 cm) wide at the hem.
Assembly
- Head: Set the head on the neck (Row 1) so it overlaps the bodice by 0.2 in (0.5 cm). Sew around the base of the head through Rows 1–2 with the head tail.
- Halo: Slide the halo over the top of the head so it sits around the crown above the eyes. Tack the inner ring to the head at 6 evenly spaced points.
- Wings: Place each wing behind the bodice with the base point at Row 3, angled up and out. Sew the base and the first 0.4 in (1 cm) of the inner straight edge to the back of the bodice. Check that both wings sit at the same height.
- Loop: Bring both ends of the cord through the center of the halo and sew them firmly to the top of the head.
- Weave in all ends inside the head or along the back of the bodice.
Final Blocking
- Wet the angel in cool water. If you want a firmer ornament, use diluted fabric stiffener.
- Press out the extra water in a towel. Do not wring it.
- Lay the angel face up on the blocking board.
- Pin the hem to 3.25 in (8.3 cm) wide, with one pin in each ch-3 picot loop.
- Pin each wing open to 1.75 in (4.4 cm) across, with one pin in the tip of each scallop.
- Check that the angel measures 3.75 in (9.5 cm) from the top of the halo to the hem.
- Shape the halo bumps with your fingers.
- Let it dry completely before unpinning.
Final Quality-Control Checklist
- [ ] Body is 2.8 in (7.1 cm) long and 3.25 in (8.3 cm) wide at the hem
- [ ] Each skirt tier has 5 shells: 5, 7 and 9 dc from the top tier down
- [ ] Hem has 20 even picot loops
- [ ] Both side edges have 10 sc
- [ ] Head is 1 in (2.5 cm) across and round, with eyes level
- [ ] Halo has 10 bumps and sits evenly
- [ ] Each wing has 10 scallops and both wings match
- [ ] Wingspan is 4 in (10.2 cm)
- [ ] Loop is centered and firmly attached
- [ ] No loose ends show on the front
Troubleshooting
- Skirt cups or curls: Your tension is too tight on the shell rows. Loosen up or go up a hook size, then block firmly.
- Skirt ruffles: Your shells are too loose. Work the dc more firmly.
- Shells lean to one side: Check that each V-st sits in the center dc of the shell (3rd, 4th or 5th dc for the 5-, 7- and 9-dc shells).
- Head looks lumpy: Add stuffing a little at a time and shape it as you close it.
- Wings flop forward: Sew more of the inner edge to the bodice, or starch the wings.
- Halo slips off: Add more tacking stitches at the back of the head.
- Side edges wave: Remove 1 sc from each tr row end.
Care
Hand wash cool, press dry in a towel and re-block flat. Store the angel flat in tissue paper so the wings and hem keep their shape.
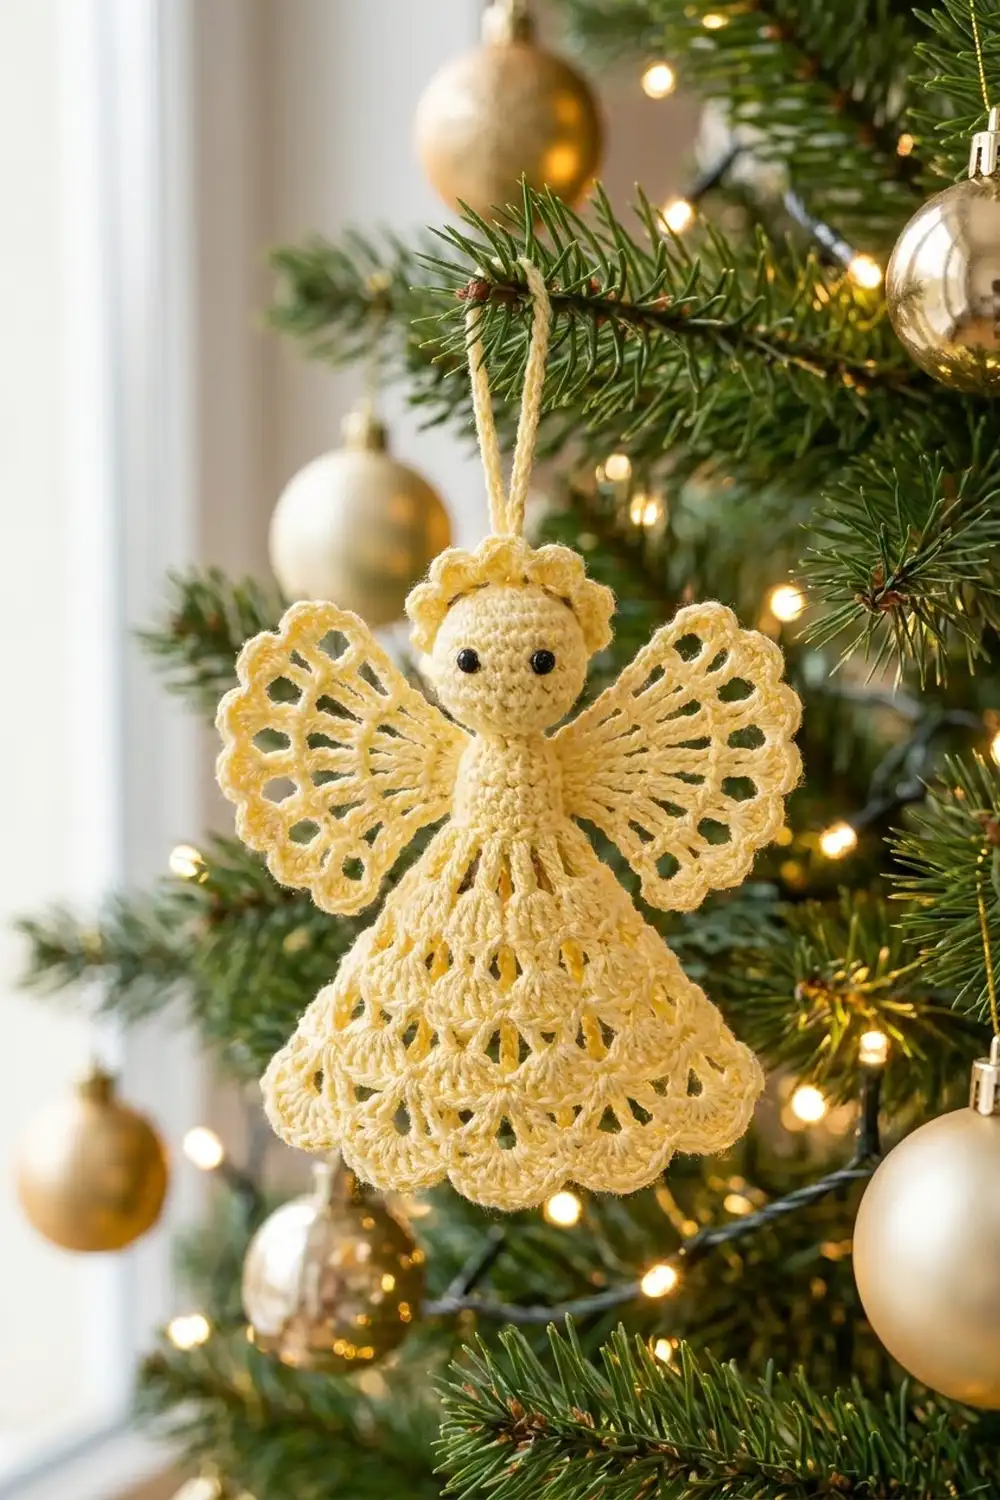
Final Notes
The measurements build on each other. The bodice is 1.1 in (2.8 cm) wide. The skirt reaches 1.6 in (4.1 cm), then 2.25 in (5.7 cm), then 3 in (7.6 cm) wide across its three tiers. The hem edging brings it to 3.25 in (8.3 cm) wide and 2.8 in (7.1 cm) long. Add the 1 in (2.5 cm) head and the halo and the angel is 3.75 in (9.5 cm) tall. The wings bring the width to 4 in (10.2 cm). If you check each stage, the finished angel will match the size given here.
Happy crocheting!