

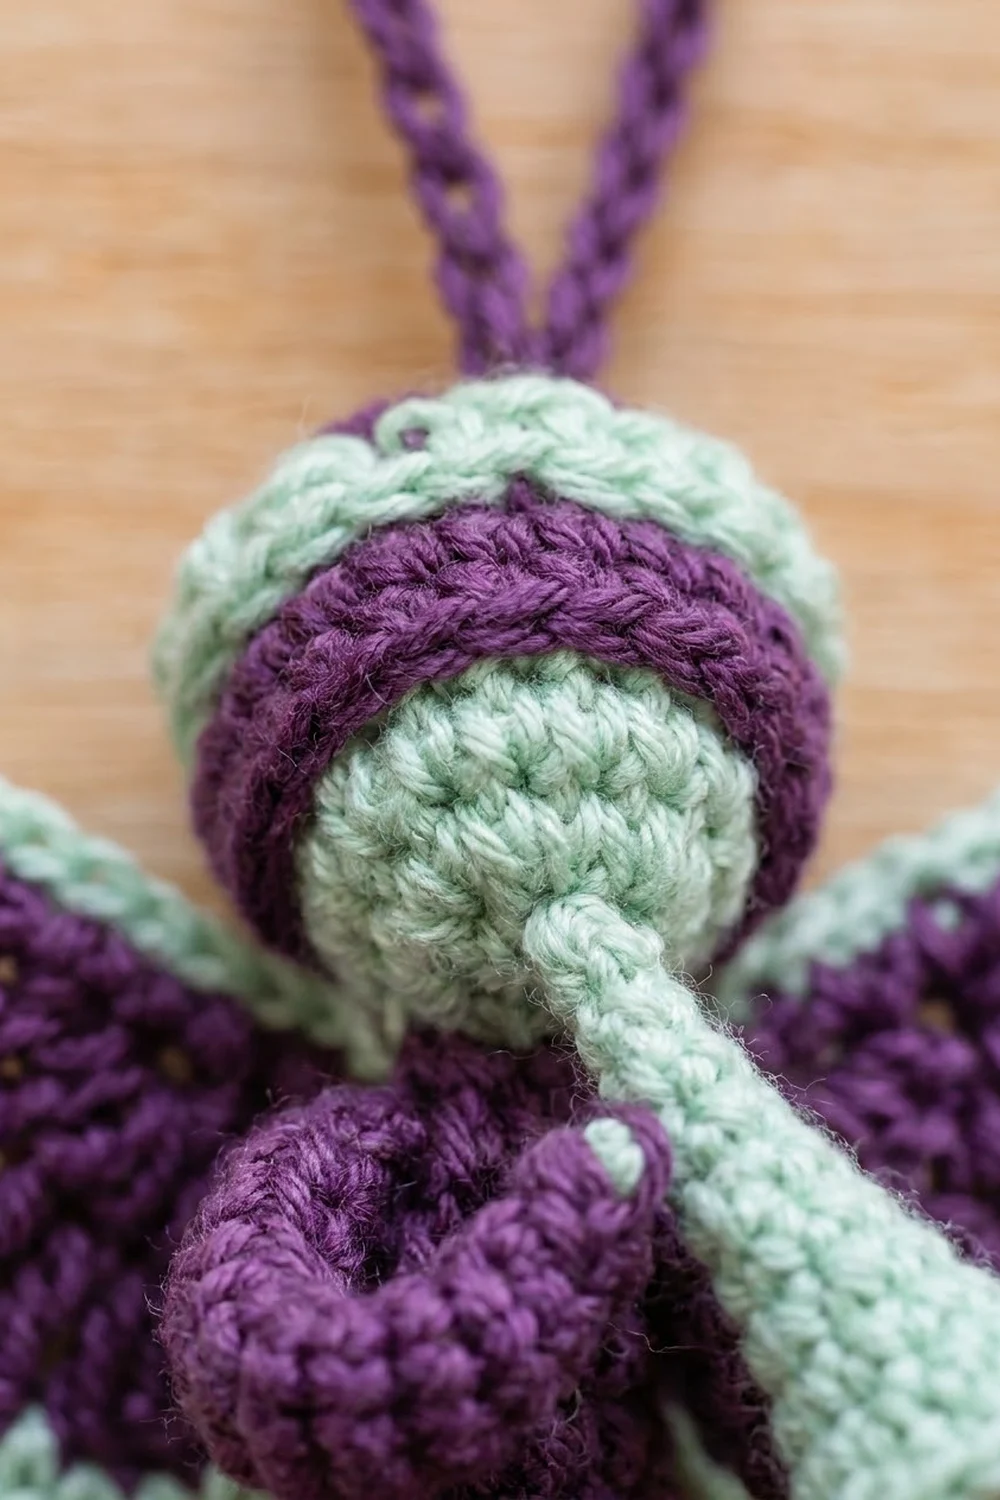
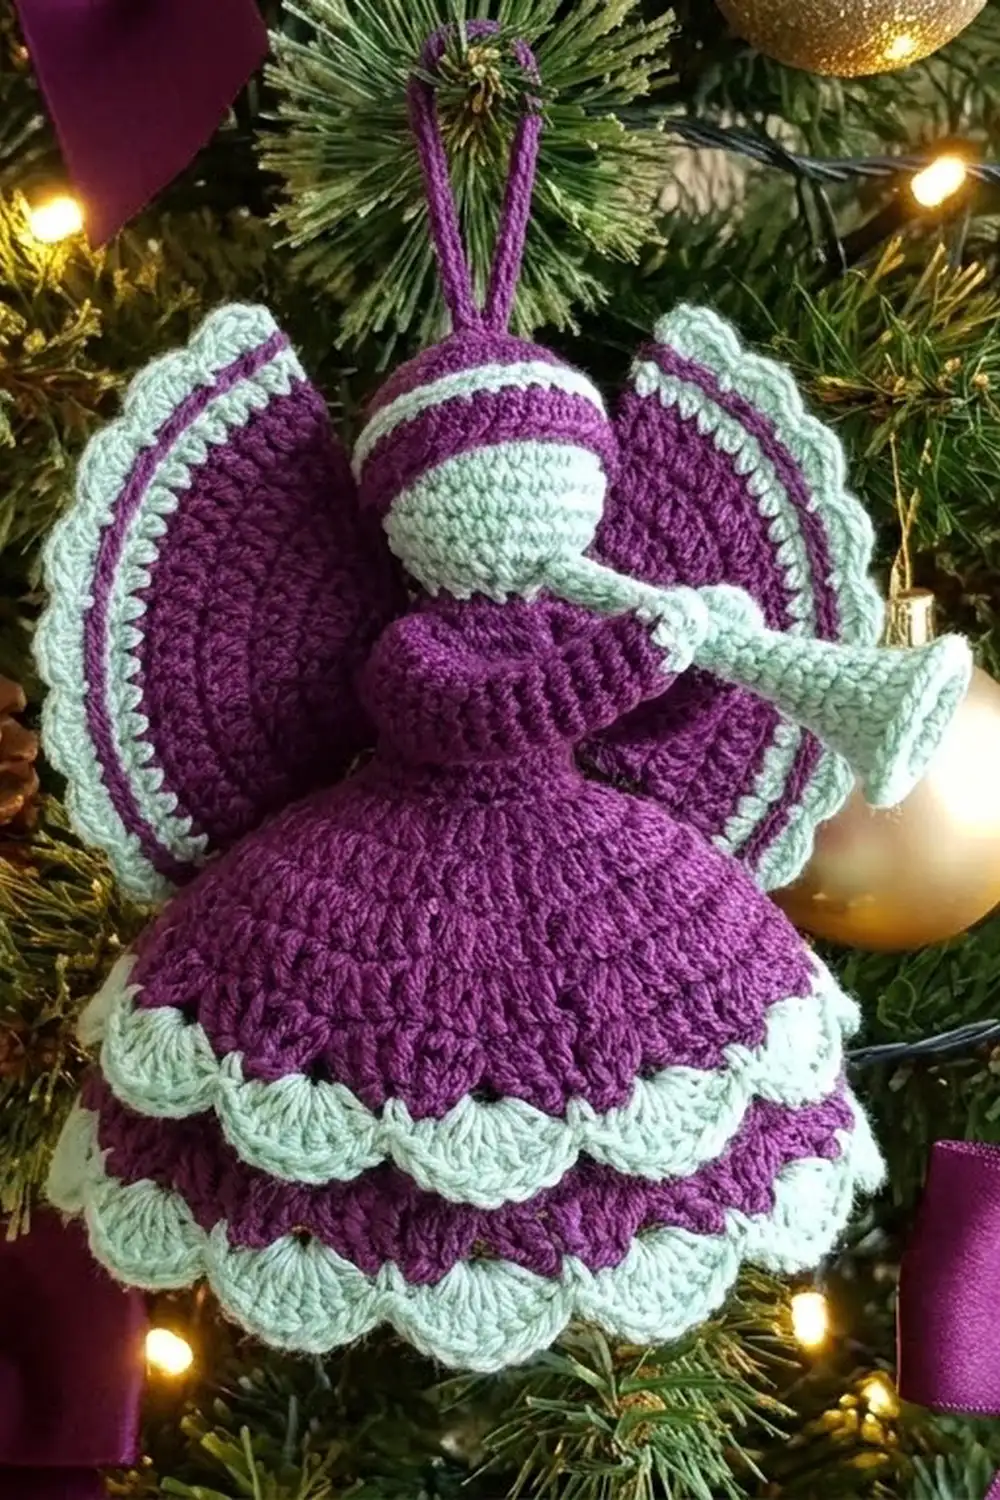
This little angel plays her trumpet in deep purple and soft mint. She has fan-shaped wings, a tiny capped head, and a skirt with two layers of shell fans, each finished with a mint scalloped edge. She is small enough to hang on a branch and sturdy enough to sit on a shelf.
The pattern uses US crochet terms throughout. The finished angel is about 3.5 in (8.9 cm) tall without the hanging loop and about 3.5 in (8.9 cm) across the wings. The skirt hem measures about 3 in (7.6 cm) in diameter.
You crochet the skirt top-down as one cone. The underskirt is worked into the back loops of the waist round, and the overskirt into the front loops of the same round, so both layers hang from one shared waistline. The head, wings, arm tube, trumpet, and hanging loop are made separately. You add the mint edgings, stiffen the skirt, and then sew everything together.
This is one ornament. Every count below is for one angel.
Finished Size and Construction
- Finished height: 3.5 in (8.9 cm), loop not included
- Hanging loop: 1.75 in (4.4 cm) above the head
- Wingspan: 3.5 in (8.9 cm)
- Skill level: Intermediate
- Terminology: US
- Yarn weight: Sport (#2), cotton or cotton blend
- Hook: 2.75 mm
- Number of pieces: 7 (skirt, head, 2 wings, arm tube, trumpet, loop)
- Layout: One 3D figure. The wings are sewn to the back, and the arms and trumpet to the front.
- Skirt hem before border: 2.5 in (6.4 cm) across
- Border depth: 0.25 in (0.6 cm), two mint rounds
Materials
Use a smooth, tightly plied cotton. It shows the shell fans clearly and holds its shape after starching. Avoid fuzzy or very stretchy yarns, because the skirt will slump.
- Purple (main color): 10 g / 30 m
- Mint (contrast): 5 g / 15 m
Both quantities include a margin of about 20% for your gauge swatch and tails.
Tools:
– 2.75 mm crochet hook
– Tapestry needle
– 2 stitch markers
– A small amount of fiberfill
– Fabric stiffener or heavy spray starch
– A cone form to dry the skirt on, about 3 in (7.6 cm) tall (rolled cardstock covered in plastic wrap works)
– Rustproof pins
Abbreviations (US Terms)
- ch: chain
- sl st: slip stitch
- sc: single crochet
- hdc: half double crochet
- dc: double crochet
- inc: 2 sc in the same stitch
- dec: sc2tog
- MR: magic ring
- BLO / FLO: back loop only / front loop only
- sp: space
- st(s): stitch(es)
Special stitches:
– V-st: (dc, ch 1, dc) in the same stitch or space.
– Shell: (2 dc, ch 1, 2 dc) in the same space.
– Large shell: (3 dc, ch 1, 3 dc) in the same space.
– Reverse sc (crab stitch): Work sc from left to right (right-handed). Insert the hook into the next stitch to the right, pull up a loop, then yarn over and pull through both loops.
Gauge and Checkpoints
Gauge: 12 sc and 13 rounds = 2 in (5.1 cm) in sc rounds. One round of dc is about 0.3 in (0.8 cm) tall.
Make the head first and use it as your gauge test. It is quick, and its size tells you whether the rest will match.
Checkpoints:
– Head after Round 10, stuffed: about 1 in (2.5 cm) tall
– Skirt Round 1: circumference 2 in (5.1 cm)
– Skirt Round 5: circumference 4 in (10.2 cm), unstretched
– Skirt after Round 10: hem about 2.5 in (6.4 cm) across when flattened into a circle, and 2.25 in (5.7 cm) tall from Round 1
– Wing after Row 4: radius 1.2 in (3.0 cm)
If your pieces are too big, go down to a 2.5 mm hook. If they are too small, go up to a 3 mm hook. The skirt must be wide enough at the waist for the head to sit on top, and the wings must stay in proportion to it. Check the head before you continue.
Skirt (Purple)
The skirt is worked top-down in joined rounds with the right side facing. Do not turn.
Bodice
Round 1: Ch 12 and sl st to the first ch to form a ring, taking care not to twist. Ch 1, sc in each ch around, then join with a sl st to the first sc. (12 sc)
Round 2: Ch 1, sc in each st around, join. (12 sc)
Round 3: Ch 1, sc in the next st, inc in the next st, repeat 6 times, join. (18 sc)
Round 4: Ch 1, sc in each st around, join. (18 sc)
Round 5: Ch 1, sc in the next 2 sts, inc in the next st, repeat 6 times, join. (24 sc)
Checkpoint: the bodice is 0.75 in (1.9 cm) tall. Every st of Round 5 has an unused front loop and back loop. Both skirt layers come from this round.
Underskirt (Worked in the BLO of Round 5)
Round 6: Working in the BLO only, ch 4 (counts as dc + ch 1), dc in the same st. Skip 1 st, V-st in the next st, repeat 11 times. Skip the last st and join to the 3rd ch of the ch-4. (12 V-sts: 24 dc, 12 ch-1 sps)
Round 7: Sl st into the first ch-1 sp. Ch 3 (counts as dc), then (dc, ch 1, 2 dc) in the same sp. Work a shell in each remaining V-st sp around (11 shells) and join to the top of the ch-3. (12 shells: 48 dc, 12 ch-1 sps)
Round 8: Sl st in the next dc and into the ch-1 sp. Ch 3, then (2 dc, ch 1, 3 dc) in the same sp. Work a large shell in each remaining shell sp around (11 shells) and join. (12 large shells: 72 dc, 12 ch-1 sps)
Round 9: Sl st in the next 2 dc and into the ch-1 sp. Ch 3, then (2 dc, ch 1, 3 dc) in the same sp, ch 1. Large shell in the next shell sp, ch 1, repeat 11 times, and join. (72 dc + 24 ch-1 sps = 96 sts)
The ch 1 between shells is what makes the hem flare.
Round 10 (scallops): Sl st in the next 2 dc and into the center ch-1 sp. Ch 3, then 6 dc in the same sp. Sc in the next ch-1 sp between shells. 7 dc in the next center sp, sc in the next ch-1 sp between shells, repeat 11 times. Join to the top of the ch-3. (84 dc + 12 sc = 96 sts; 12 scallops of 8 sts each)
Fasten off. Checkpoint: the hem is 2.5 in (6.4 cm) across and the skirt is 2.25 in (5.7 cm) tall.
Overskirt (Worked in the FLO of Round 5)
Hold the skirt upside down so the free front loops of Round 5 face you.
Round A1: Join purple with a sl st in the FLO of any Round 5 st. Ch 4 (counts as dc + ch 1), dc in the same st. Skip 1 st, V-st in the next FLO, repeat 11 times, and join to the 3rd ch. (12 V-sts: 24 dc, 12 ch-1 sps)
Round A2: Sl st into the first ch-1 sp. Ch 3, then (dc, ch 1, 2 dc) in the same sp. Work a shell in each remaining V-st sp around and join. (12 shells: 48 dc, 12 ch-1 sps)
Round A3 (scallops): Sl st in the next dc and into the ch-1 sp. Ch 3, then 4 dc in the same sp. Sc in the gap between this shell and the next. 5 dc in the next shell sp, sc in the next gap between shells, repeat 11 times, and join. (60 dc + 12 sc = 72 sts; 12 scallops of 6 sts each)
Fasten off. The overskirt covers Rounds 6–8 of the underskirt, leaving the Round 9–10 fans showing below it.
Head (Mint and Purple)
Work in continuous spiral rounds and mark the first st of each round.
Round 1 (mint): MR, 6 sc. (6)
Round 2: Inc in each st. (12)
Round 3: Sc 1, inc, repeat 6 times. (18)
Rounds 4–6: Sc in each st. (18)
Rounds 7–8 (purple): Sc in each st. (18) This is the band.
Round 9 (mint): Sc 1, dec, repeat 6 times. (12) Stuff the head firmly.
Round 10: Dec 6 times. (6)
Fasten off and close the hole. The MR end is the chin, and Rounds 9–10 form the mint cap.
Wings (Make 2, Purple)
Work flat in rows, turning at the end of each row.
Row 1: MR. Ch 3 (counts as dc), then 6 dc in the ring. Pull the ring tight and turn. (7 dc)
Row 2: Ch 3, dc in the same st, then 2 dc in each st across. (14 dc)
Row 3: Ch 3, dc in the same st, dc in the next st. 2 dc in the next st, dc in the next st, repeat 6 times. (21 dc)
Row 4: Ch 3, then dc in each of the remaining 20 sts. (21 dc)
Fasten off. Each wing is a half circle with a 1.2 in (3.0 cm) radius. The ring corner is where you will sew it on.
Arm Tube (Purple)
Round 1: MR, 6 sc. (6)
Round 2: Sc 1, inc, repeat 3 times. (9)
Rounds 3–14: Sc in each st. (9)
Fasten off and leave a 12 in (30.5 cm) tail. The tube is about 2.2 in (5.6 cm) long. Stuff it lightly so it can still bend.
Trumpet (Mint)
Round 1: MR, 6 sc. (6) This is the mouthpiece.
Rounds 2–7: Sc in each st. (6)
Round 8: Sc 2, inc, repeat 2 times. (8)
Round 9: Sc 1, inc, repeat 4 times. (12)
Round 10: Inc in each st. (24) Doubling the count makes the bell flare.
Round 11: Sc in the FLO of each st. (24)
Round 12: Sl st in each st. (24)
Fasten off. The trumpet is 1.8 in (4.6 cm) long, and the bell is 0.75 in (1.9 cm) across. Do not stuff it.
Hanging Loop (Purple)
Ch 26. Starting in the 2nd ch from the hook, sl st in the back bump of each ch. (25 sl st)
The strip is about 4 in (10.2 cm) long. Leave 8 in (20.3 cm) tails at both ends.
Assembly
Work the mint edgings in the Border section first, then starch the skirt as described in Final Blocking. Assemble once everything is dry.
- Push a small wad of fiberfill into the bodice (Rounds 1–4) so the head has support.
- Set the chin of the head into the Round 1 opening and whipstitch all 12 sts of Round 1 to the head.
- Fold the loop in half and pull both tails through the center of the mint cap so 1.75 in (4.4 cm) stays above the head. Knot the tails inside the head.
- Sew the ring corner of each wing to the back of the bodice at Rounds 2–4, 0.35 in (0.9 cm) on each side of center. The curved edges should point up and out.
- Bend the arm tube into a shallow U across the chest at Rounds 3–5 and sew the middle in place.
- Place the trumpet so its mouthpiece touches the face just below the band and the bell points down to the angel’s left. Bring both arm ends around the trumpet and sew them to it.
Border
Border gauge: All mint edgings are worked 1 stitch per stitch: 1 sc into each existing stitch, then 1 reverse sc into each sc. Nothing is added or skipped, so each edge keeps the scallop shape underneath it.
Underskirt Hem
Round 11: Join mint in any sc of Round 10. Ch 1, sc in each st around, and join. (96 sts worked 1-per-existing-stitch + 0 added = 96 sc)
That is 8 sc per scallop: 7 over the dc and 1 over the sc between scallops.
Round 12: Ch 1, reverse sc in each st around, and join. (96 + 0 = 96)
Fasten off. The hem is now 3 in (7.6 cm) across.
Overskirt Edge
Round A4: Join mint in any sc of Round A3. Ch 1, sc in each st around, and join. (72 + 0 = 72 sc; 6 per scallop)
Round A5: Ch 1, reverse sc in each st around, and join. (72 + 0 = 72)
Wing Edges (Each Wing)
Row 5: Join mint at the first dc of Row 4. Ch 1, sc in each st across the curved edge. (21 + 0 = 21 sc) Turn.
Row 6: Ch 1, sc in the first st. Skip 1 st, 5 dc in the next st, skip 1 st, sc in the next st, repeat 5 times. (1 sc + 5 × 6 sts = 31 sts; 5 scallops)
Each repeat uses 4 sts and the first sc uses 1, so 1 + 20 = 21 sts are worked. That is exactly Row 5’s count. The wing radius is now 1.4 in (3.6 cm).
Why the math works: Rounds 11, 12, A4, and A5 match the scallop rounds stitch for stitch, so each mint band follows the purple scallops exactly. Wing Row 6 uses all 21 sts with no leftovers, so the scallops sit evenly from one end of the wing to the other.
Final Blocking
- Weave in all ends except the arm-tube tail and the loop tails.
- Mix fabric stiffener according to the bottle, or use heavy starch.
- Soak the skirt, then press out the excess liquid in a towel.
- Slide the skirt onto the plastic-covered cone. Lift the overskirt so it does not stick to the underskirt.
- Pin each hem scallop so the hem dries as a 3 in (7.6 cm) circle. Shape each overskirt scallop with your fingers so it curls slightly outward.
- Dampen the wings, pin them flat as half circles with a 1.4 in (3.6 cm) radius, and open each scallop.
- Let everything dry for 24 hours, then assemble.
Final Quality-Control Checklist
- The skirt stands on its own and the hem is 3 in (7.6 cm) across.
- There are 12 scallops on the hem and 12 on the overskirt.
- Both mint edges lie flat, with no ruffling or cupping.
- Both wings match, with 5 scallops each.
- The head is firm, the purple band is level, and the head does not wobble.
- The trumpet bell flares open.
- The loop is centered so the angel hangs straight.
- The angel measures 3.5 in (8.9 cm) tall and 3.5 in (8.9 cm) across the wings.
Troubleshooting
The hem ruffles too much: Your dc are loose. Use a smaller hook for Rounds 9–10.
The skirt is too narrow to flare: Check that you worked the ch 1 between shells in Round 9.
The overskirt hides the underskirt fans: Your dc rounds are too tall. Use a smaller hook for A1–A3.
The wing scallops bunch together: Count Row 5 again. It must have exactly 21 sc.
The head tilts: Add more fiberfill to the bodice and sew around all 12 sts.
The angel hangs crooked: Move the loop tails to the exact center of the cap.
Care
Spot clean with a damp cloth only, because washing removes the stiffener. Store the angel flat or hanging, away from heat and crushing weight.
Final Notes
Each measurement leads to the next. The head at 1 in (2.5 cm) confirms your gauge. The waist at 4 in (10.2 cm) around sets the shell count, and the 12 shells give a hem of 2.5 in (6.4 cm), which becomes 3 in (7.6 cm) after the mint border. With wings at 1.4 in (3.6 cm) each, the finished angel stands 3.5 in (8.9 cm) tall and 3.5 in (8.9 cm) wide.
Happy crocheting!