

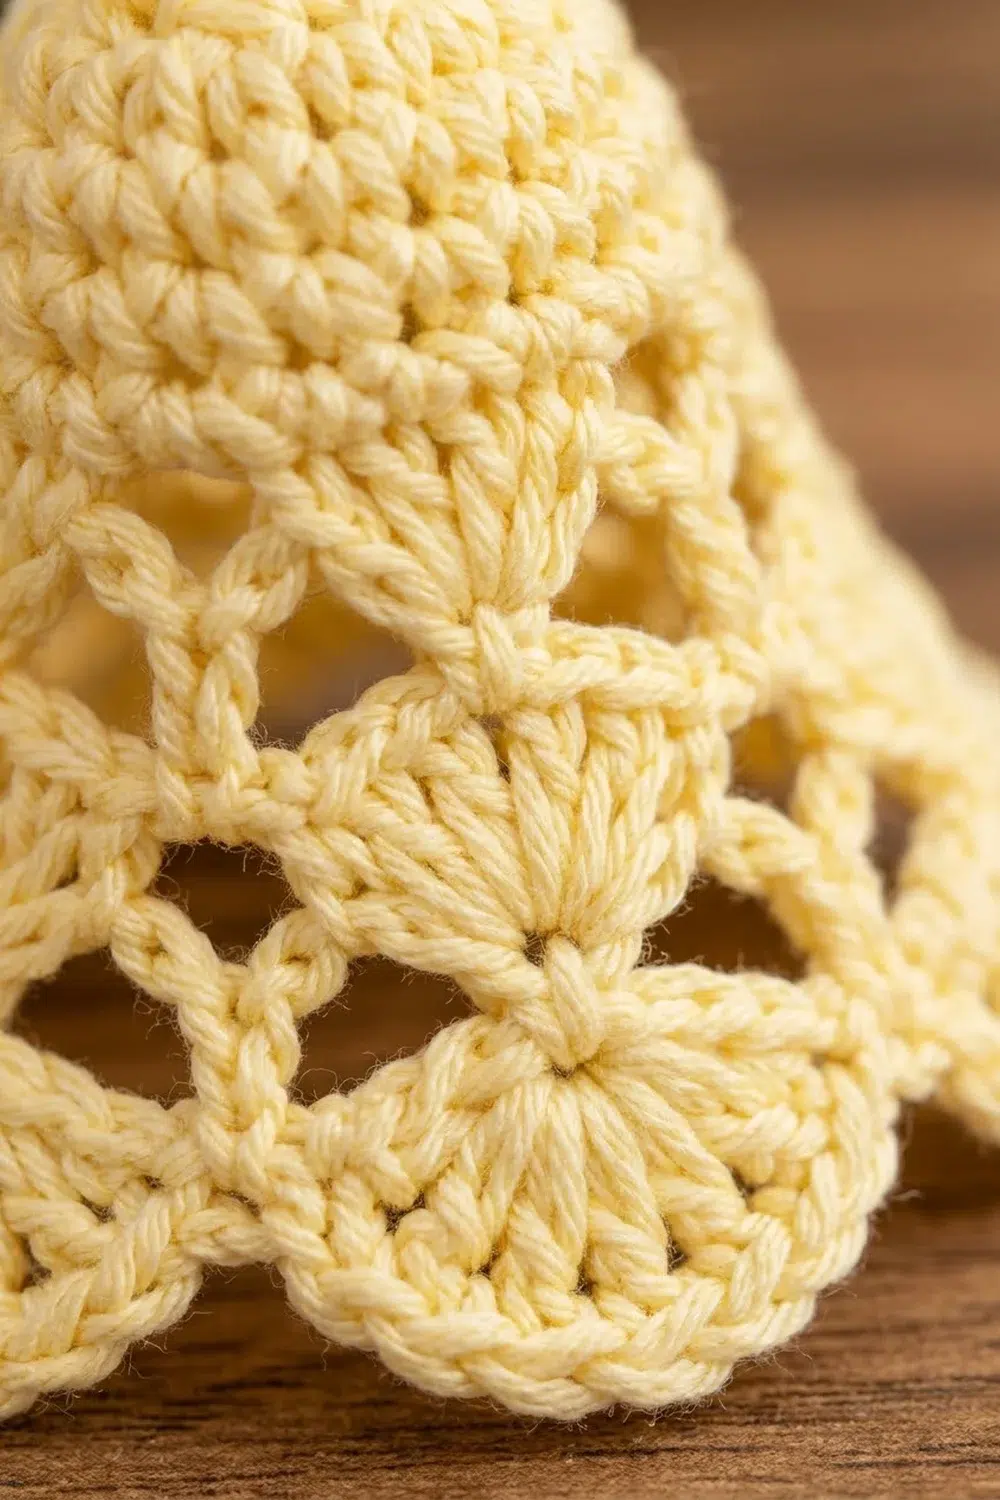
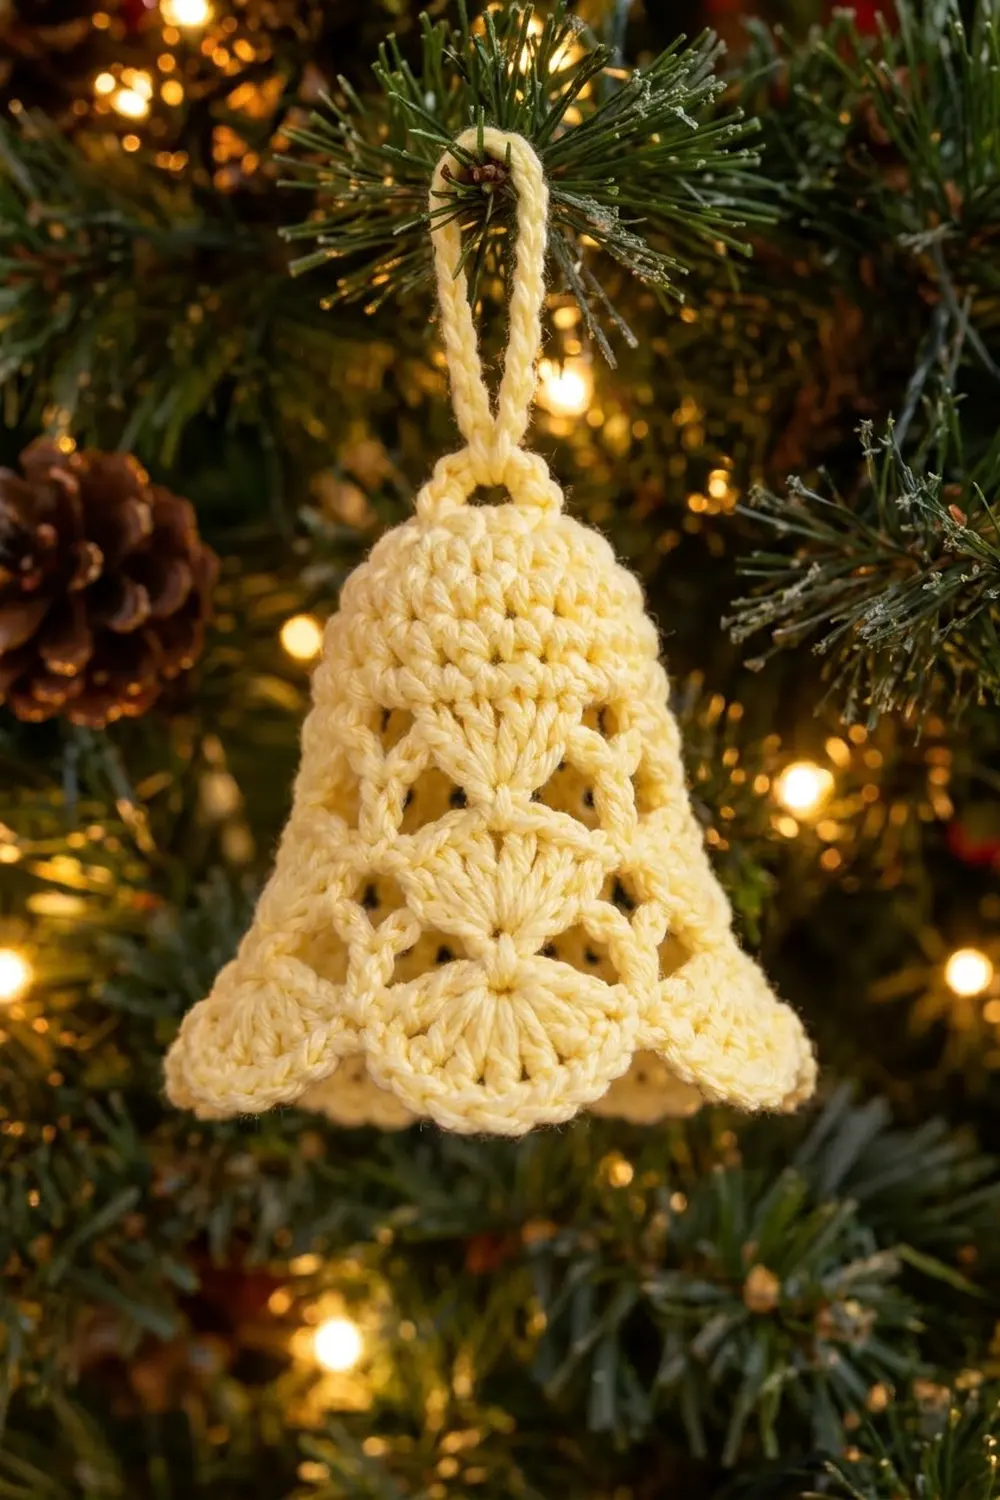
This little bell is a classic tree ornament with a soft, vintage feel. It has a rounded solid crown, two bands of lacy shell fans, and a gently flared hem of six rounded scallops. Hang it by its slim cord loop and the open lattice lets the tree lights glow through.
The sample is made in a single pale butter-yellow cotton. One color keeps the shell texture easy to see and gives the bell a creamy look that suits gold, green, or red decor. White, ivory, or metallic thread work just as well.
This pattern uses US crochet terms. The finished bell measures 3.25 in (8.3 cm) tall from top to hem, not counting the loop, and 3.75 in (9.5 cm) wide at the hem when laid flat.
The bell is worked top-down in joined rounds, without turning. You start with a magic ring and build a solid dome crown. Then you work alternating shell rounds and chain-lattice rounds that widen the bell, and finish with a scalloped single crochet edging. Last, you add a slip-stitch cord loop and stiffen the bell over a cone shape.
Finished Size and Construction
- Finished size: 3.25 in (8.3 cm) tall × 3.75 in (9.5 cm) wide at the hem, laid flat
- Skill level: Easy-intermediate
- Terminology: US crochet terms
- Yarn weight: Sport weight (#2) cotton
- Hook: US C/2 (2.75 mm)
- Number of pieces: 1 bell plus 1 hanging cord
- Layout: A single seamless cone worked in the round
- Piece size: 3.25 in (8.3 cm) × 3.75 in (9.5 cm)
- Size before border: 3 in (7.6 cm) tall × 3.5 in (8.9 cm) wide after Round 9
- Border depth: 0.25 in (0.6 cm), one round of scalloped edging
Materials
Yarn advice: Choose a smooth, tightly plied mercerized cotton. Cotton holds stiffener well, shows clear stitch definition, and keeps the shells crisp. Avoid fuzzy or very stretchy acrylics, which blur the lattice and droop on the branch.
- Pale butter yellow: 8 g, about 25 m (27 yd), for one bell including the loop
Tools:
- US C/2 (2.75 mm) crochet hook
- Tapestry needle
- Stitch marker
- Small scissors
- Fabric stiffener, or a starch solution of 1 part white glue to 1 part water
- A cone-shaped form about 3.5 in (8.9 cm) across at the base and 3.25 in (8.3 cm) tall (a rolled paper cone covered in plastic wrap works well)
- Rust-proof pins
The yarn amount includes a margin of about 25% for your gauge swatch and weaving in ends.
Abbreviations (US Terms)
- ch – chain
- sl st – slip stitch
- sc – single crochet
- dc – double crochet
- st(s) – stitch(es)
- sk – skip
- sp – space
- rep – repeat
- beg – beginning
Special stitches:
- Shell: the stated number of dc worked into one stitch, so they fan out from a single point. A 5-dc shell is 5 dc in the same st.
- Center dc: the middle dc of a shell. It is the 3rd dc of a 5-dc shell, the 4th of a 7-dc shell, and the 5th of a 9-dc shell.
Note: The beginning ch-3 counts as a dc in every round where it appears. The beginning ch-6 in Round 6 counts as 1 dc plus 1 ch-3 sp.
Gauge and Checkpoints
Gauge is not critical for an ornament, but it decides the final size and how well the lace holds its shape. Make one test bell before planning a batch.
Base gauge: Rounds 1–2 measure 1.25 in (3.2 cm) across, laid flat.
Checkpoints:
- After Round 1: 0.875 in (2.2 cm) across
- After Round 3: 1.5 in (3.8 cm) across, laid flat
- After Round 4: The crown cups naturally and stands 1 in (2.5 cm) tall
- After Round 7: The bell is 2 in (5.1 cm) tall and 2.75 in (7.0 cm) wide, laid flat
- After Round 9: 3 in (7.6 cm) tall and 3.5 in (8.9 cm) wide
- After Round 10: 3.25 in (8.3 cm) tall and 3.75 in (9.5 cm) wide
If your bell is too big: Go down to a 2.5 mm hook and work the chains more firmly.
If your bell is too small: Go up to a 3 mm hook. Also check that you aren’t pulling your chain spaces tight, because the lattice needs loose chains to flare.
If Round 2 ruffles or Round 3 cups too much: Your dc tension is uneven. Make the stitches the same height as your beginning ch-3.
Pattern: The Bell
Crown
Round 1: Make a magic ring. Ch 3 (counts as dc), then work 11 dc into the ring. Pull the ring closed and join with a sl st to the top of the beg ch-3. (12 dc)
Round 2: Ch 3, dc in the same st, dc in the next st. 2 dc in the next st, dc in the next st. Rep from * 5 more times. Join to the top of the beg ch-3. (18 dc)
Round 3: Ch 3, dc in the next st, 2 dc in the next st. Dc in each of the next 2 sts, 2 dc in the next st. Rep from * 5 more times. Join. (24 dc)
Round 4: Ch 3, dc in each st around. Join. (24 dc)
Because this round has no increases, the crown starts to curve down into its dome shape. Place a marker at the join.
Checkpoint: The crown is 1.5 in (3.8 cm) across and cups to 1 in (2.5 cm) tall.
First Lace Band
Round 5 (first shells): Ch 1, sc in the same st, sk 1 st, 5 dc in the next st, sk 1 st. Sc in the next st, sk 1 st, 5 dc in the next st, sk 1 st. Rep from * 4 more times. Join with a sl st to the first sc.
Count: 6 shells (30 dc) + 6 sc = 36 sts
Each repeat uses exactly 4 crown stitches, and 6 repeats × 4 = 24, so the shells spread evenly around the crown.
Round 6 (first lattice): Ch 6 (counts as dc + ch-3), sc in the center dc of the next shell, ch 3. Dc in the next sc, ch 3, sc in the center dc of the next shell, ch 3. Rep from * 4 more times. Join with a sl st to the 3rd ch of the beg ch-6.
Count: 6 dc + 6 sc + 12 ch-3 sps
The dc posts sit above the Round 5 sc. That is what offsets the next band of shells.
Second Lace Band
Round 7 (middle shells): Ch 3, 6 dc in the same st (this makes the first 7-dc shell). Sk the ch-3 sp, sc in the next sc, sk the ch-3 sp. 7 dc in the next dc, sk the ch-3 sp, sc in the next sc, sk the ch-3 sp. Rep from * 4 more times. Join to the top of the beg ch-3.
Count: 6 shells (42 dc) + 6 sc = 48 sts
Skipping the ch-3 spaces leaves the triangular holes between the fans.
Checkpoint: 2 in (5.1 cm) tall and 2.75 in (7.0 cm) wide, laid flat.
Round 8 (second lattice): Sl st in each of the next 3 dc, so you are now in the center (4th) dc of the shell. Ch 1, sc in the same st, ch 4, dc in the next sc, ch 4. Sc in the center dc of the next shell, ch 4, dc in the next sc, ch 4. Rep from * 4 more times. Join with a sl st to the first sc.
Count: 6 sc + 6 dc + 12 ch-4 sps
The longer ch-4 loops give the bell room to flare.
Hem Scallops
Round 9 (hem shells): Ch 3, 8 dc in the same st (this makes the first 9-dc shell). Sk the ch-4 sp, sc in the next dc, sk the ch-4 sp. 9 dc in the next sc, sk the ch-4 sp, sc in the next dc, sk the ch-4 sp. Rep from * 4 more times. Join to the top of the beg ch-3.
Count: 6 shells (54 dc) + 6 sc = 60 sts
These shells line up under the Round 5 shells, so the fans alternate down the bell: band 1, offset band 2, then the hem lined up with band 1.
Checkpoint: 3 in (7.6 cm) tall and 3.5 in (8.9 cm) wide. This is your size before the border.
Border: Scalloped Edging
Border gauge: 10 sc cover one hem scallop, which is about 1.25 in (3.2 cm) measured along the curved edge. The edging adds 0.25 in (0.6 cm) of height and 0.25 in (0.6 cm) of flat width.
Round 10: Ch 1, sc in the same st as the join. Sc in each of the next 3 dc, then (sc, ch 1, sc) in the next dc, which is the center (5th) dc. Sc in each of the next 4 dc, then sl st in the next sc.
Sc in each of the next 4 dc, (sc, ch 1, sc) in the next dc, sc in each of the next 4 dc, sl st in the next sc. Rep from * 4 more times. Join with a sl st to the first sc. Fasten off and weave in the end.
Count per scallop: 4 sc + (sc, ch 1, sc) + 4 sc = 10 sc and 1 ch-1 point, plus 1 sl st between scallops
Total: 6 × 10 = 60 sc, 6 ch-1 points, 6 sl sts
Why the math works: Round 10 works into each stitch of Round 9 once:
- Each scallop has 9 dc. You work 1 sc into each of 8 of them and 2 sc into the center dc, which gives 10 sc.
- Each Round 9 sc gets 1 sl st.
A 9-dc shell has an odd number of stitches, so there is always a true center dc for the small point. The sl st between scallops sinks into the dip and keeps the six scallops clearly separated.
Hanging Cord
Ch 26. Sl st in the 2nd ch from the hook and in each ch across. (25 sl sts)
The cord is about 3 in (7.6 cm) long. Fold it in half to make a 1.5 in (3.8 cm) loop. Thread both tails through the center of the magic ring from the outside to the inside of the bell. Knot them together inside the bell, then weave them into the Round 1 stitches.
Final Blocking
- Wrap your cone form in plastic wrap so the bell won’t stick to it.
- Soak the bell in fabric stiffener or the glue-and-water solution until it is fully wet.
- Gently squeeze out the excess liquid. Blot with a towel so no film is left in the lattice holes.
- Slide the bell onto the cone with the crown at the top, centered on the point.
- Pull the hem down evenly until the bell is 3.25 in (8.3 cm) tall and 3.75 in (9.5 cm) wide.
- Shape each shell into an even fan. Pin the 6 ch-1 points so they sit at the same height.
- Open every lattice hole with the tip of a tapestry needle.
- Let the bell dry completely for 24 hours. Then remove the pins and lift the bell off the form.
Final Quality-Control Checklist
- The crown is smooth and round, with the magic ring fully closed
- Round 4 has 24 dc, and Rounds 5, 7, and 9 each have 6 shells
- Shells alternate from band to band, with the hem shells lined up under the first-band shells
- All 12 lattice holes in each band are open and even
- The hem has 6 even scallops, each with 10 sc and a centered point
- The bell stands 3.25 in (8.3 cm) tall and measures 3.75 in (9.5 cm) at the hem
- The cord loop is centered and securely knotted inside
- No ends show on the outside
Troubleshooting
The crown is flat and won’t cup: You may have added extra increases. Check that Round 4 has exactly 24 dc with no increases.
The bell won’t flare: Your chains are too tight. Rework Rounds 6 and 8 with looser chains, or add 1 extra chain to each Round 8 loop.
The hem ruffles: Your shells are too loose. Go down a hook size for Round 9 only.
Shells line up instead of alternating: In Round 7 or Round 9 you worked into the wrong stitch. Shells go into the lattice dc in Round 7 and into the lattice sc in Round 9.
I can’t find the center dc: Count from the first dc of the shell: it is the 3rd, 4th, or 5th dc for a 5-, 7-, or 9-dc shell.
The bell softens over time: Spray it lightly with stiffener or starch and dry it on the form again.
Care
Spot clean only with a damp cloth, then reshape. If you wash the bell fully, you will need to stiffen it again on the form. Store it flat or stuffed with tissue in a box so it keeps its shape.
Final Notes
The size of this bell depends on a short chain of measurements:
- Rounds 1–2: 1.25 in (3.2 cm) across
- Round 3: 1.5 in (3.8 cm) across
- Round 4: cups to 1 in (2.5 cm) tall
- Round 7: 2 in (5.1 cm) tall by 2.75 in (7.0 cm) wide
- Round 9: 3 in (7.6 cm) tall by 3.5 in (8.9 cm) wide
- Round 10 edging: finishes the bell at 3.25 in (8.3 cm) tall by 3.75 in (9.5 cm) wide
Stitch counts to check:
- Crown: 12, 18, 24, then 24 dc
- Shell rounds: 36, 48, then 60 sts
- Edging: 60 sc
If each checkpoint matches, your bell will match too. Once you’re happy with your test bell, make as many as you like for a tree, a gift tag, or a wreath.
Happy crocheting!