
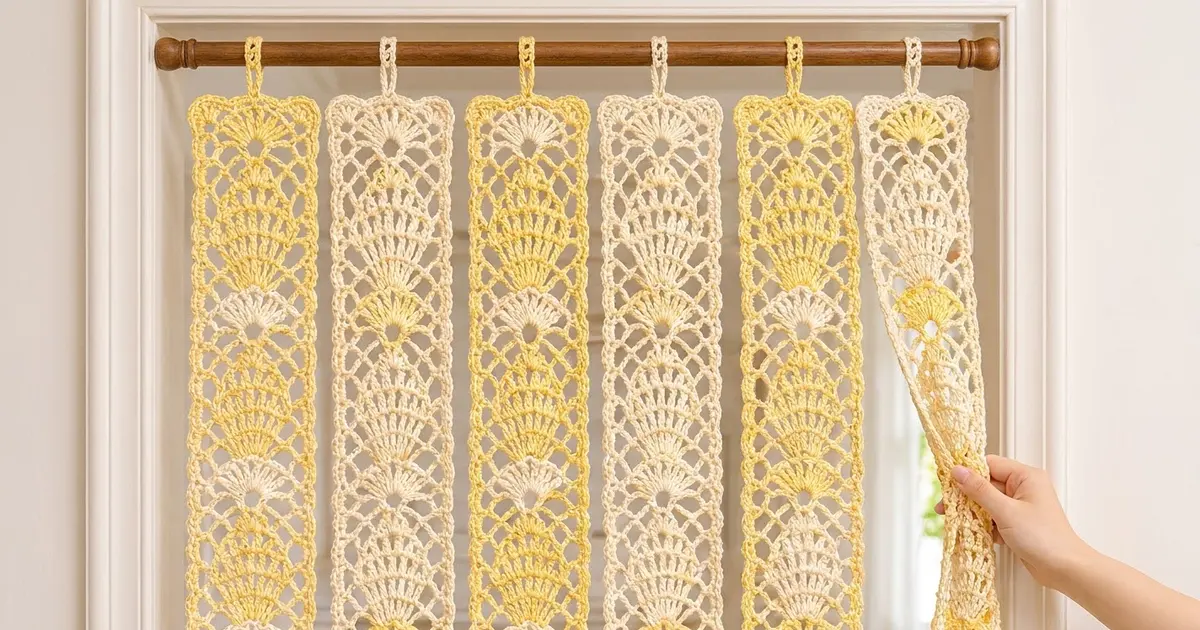
This door curtain is made of six long, narrow lace strips that hang side by side from a rod. Each strip has a column of stacked, fan-ribbed shells down its center. An open diamond lattice frames the column, and the strip is finished with a firm edge and small scallops at both ends.
The colors are soft and sunny: warm cream and pale butter yellow. Three strips are mostly cream with yellow shells, and three are mostly yellow with cream shells. Hung in alternating order, they look like gentle vertical stripes that let light and air through.
The pattern uses US crochet terms. Each finished strip measures 5.5 in (14.0 cm) wide and 69 in (175.3 cm) long, plus a 2 in (5.1 cm) hanging loop at the top center.
Each strip is made in two stages. First you crochet a narrow center column of shells in short rows. Then you work four rounds around the whole column: a single crochet base, two lattice rounds and an edging round. The strips are never joined to each other; each one hangs on its own loop.
Finished Size and Construction
- Finished strip size: 5.5 in x 69 in (14.0 cm x 175.3 cm), plus a 2 in (5.1 cm) loop
- Skill level: Intermediate
- Terminology: US crochet terms
- Yarn weight: Light (#3, DK/sport) cotton
- Hook: 3.5 mm (E-4)
- Number of pieces: 6 separate strips (3 of Strip A, 3 of Strip B)
- Layout: 6 strips hung in a single row, alternating B, A, B, A, B, A
- Center column size before border: 2.5 in x 66 in (6.4 cm x 167.6 cm)
- Border depth: 1.5 in (3.8 cm) on every side
- Curtain coverage: 33 in (83.8 cm) of fabric; about 38 in (96.5 cm) wide on the rod with gaps
Materials
Choose a smooth, mercerized cotton or cotton blend in light (#3) weight, about 125 m per 50 g. Cotton shows the stitches clearly, keeps the lattice open after blocking and hangs straight without stretching too much.
- Cream: 300 g (750 m)
- Pale butter yellow: 300 g (750 m)
Each strip uses about 50 g (125 m) of its main color and about 35 g (88 m) of its contrast color. The totals above include a margin of about 15% for your test piece, weaving in ends and differences in tension.
Tools:
- 3.5 mm (E-4) crochet hook
- Tapestry needle
- Scissors
- 4 locking stitch markers
- Measuring tape
- Blocking mats or a long towel, rustproof pins and a spray bottle
- A curtain rod up to 1.25 in (3.2 cm) thick
Abbreviations (US Terms)
- ch: chain
- sl st: slip stitch
- sc: single crochet
- hdc: half double crochet
- dc: double crochet
- sk: skip
- st(s): stitch(es)
- sp: space
- rep: repeat
- MC / CC: main color / contrast color
Special stitch – Fan: Work the stated number of dc into one stitch so that they spread out over the skipped stitches on both sides.
Color assignment:
- Strip A (mostly cream): MC = cream, CC = yellow
- Strip B (mostly yellow): MC = yellow, CC = cream
Gauge and Checkpoints
Gauge is measured in the pattern stitch:
- Center column width: 13 sts = 2.5 in (6.4 cm)
- Height: one 6-row repeat = 3 in (7.6 cm)
Before you start a full strip, work the foundation row plus 2 repeats as a test piece. It should measure 2.5 in x 6 in (6.4 cm x 15.2 cm). Lay it flat and pat it into shape without stretching.
Checkpoints:
- After the foundation row: 2.5 in (6.4 cm) wide
- After 4 repeats: 12 in (30.5 cm) tall
- After 11 repeats: 33 in (83.8 cm) tall
- After 22 repeats: 66 in (167.6 cm) tall
- After border Round 4: 5.5 in x 69 in (14.0 cm x 175.3 cm)
If your piece is too big, go down to a 3.25 mm (D-3) hook. If it is too small, go up to a 3.75 mm (F-5) hook. Change the hook, not the stitch counts, because the border math depends on the exact counts.
Center Column
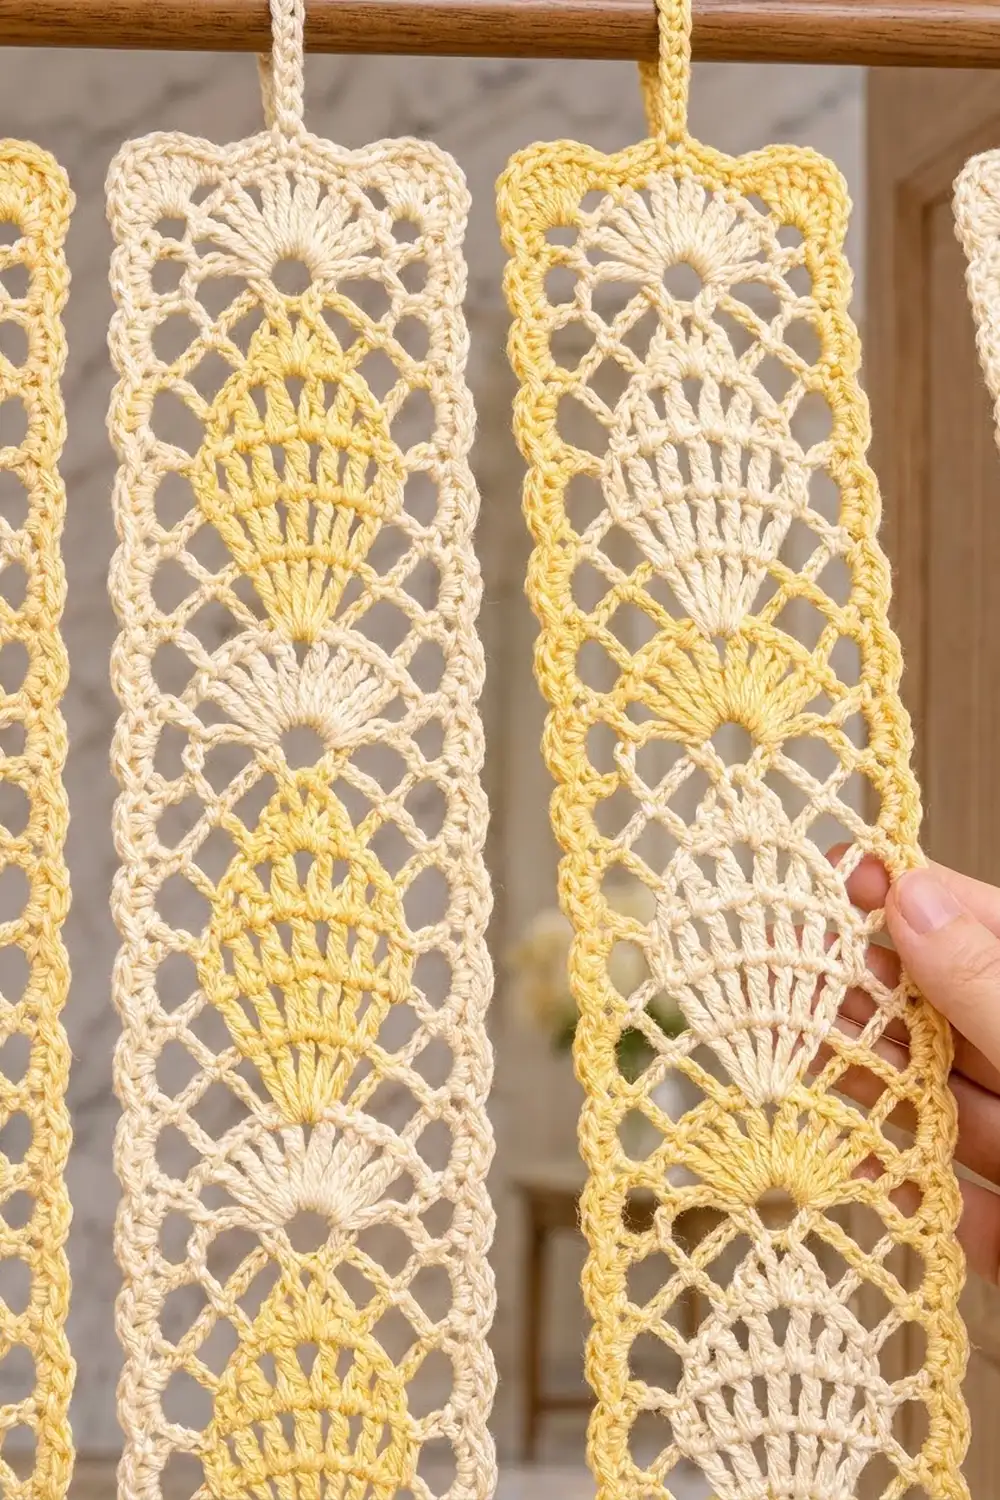
The column is worked in rows, and each repeat is 6 rows. Rows 1–4 are worked in CC and make the large ribbed shell. Rows 5–6 are worked in MC and make the small fan between shells.
Changing color: Work the last yarn over of a row’s final stitch in the new color. Don’t cut the color you aren’t using. Carry it loosely up the side edge, where border Round 1 will cover it.
Foundation (MC): Ch 14.
Row 0 (MC): Sc in 2nd ch from hook and in each ch across, changing to CC on the last sc. Turn. (13 sc)
Row 1 (CC, fan): Ch 1, sc in first st, sk 5 sts, 11 dc in next st, sk 5 sts, sc in last st. Turn. (13 sts: 2 sc + 11 dc)
The fan sits in the center (7th) stitch and fills the 10 skipped stitches, so the width stays at 13 sts.
Row 2 (CC, leveling): Ch 3 (counts as dc), hdc in next 2 sts, sc in next 7 sts, hdc in next 2 sts, dc in last st. Turn. (13 sts: 2 dc + 4 hdc + 7 sc)
The taller stitches at the edges fill the low corners beside the fan and make the top flat again.
Row 3 (CC, fan): Rep Row 1. (13 sts)
Row 4 (CC, leveling): Rep Row 2, changing to MC on the last dc. Turn. (13 sts)
Rows 1–4 make one long shell with two stacked, ribbed arcs.
Row 5 (MC, small fan): Ch 3 (counts as dc), ch 2, sk next 5 sts, 7 dc in next st, ch 2, sk next 5 sts, dc in last st. Turn. (9 dc + 2 ch-2 sps)
Row 6 (MC, closing): Ch 1, sc in first dc, 2 sc in ch-2 sp, sc in each of next 7 dc, 2 sc in ch-2 sp, sc in top of turning ch, changing to CC on the last sc. Turn. (13 sc)
Rows 1–6 make one repeat. Work Rows 1–6 a total of 22 times.
On the final repeat, don’t change to CC at the end of Row 6. Cut CC and keep MC attached for the border. The column now has 133 rows (Row 0 plus 132 pattern rows) and measures 2.5 in x 66 in (6.4 cm x 167.6 cm). The Row 6 edge is the top of the strip, and the foundation edge is the bottom.
Make All Strips
Make 6 strips in total:
- 3 x Strip A: cream small fans and border, yellow shells
- 3 x Strip B: yellow small fans and border, cream shells
Hanging layout (left to right, seen from inside the room):
| B | A | B | A | B | A |
Hanging the Strips (No Joining)
The strips are not sewn or crocheted together. Each one hangs from its own loop, so you can push one or two strips aside to walk through.
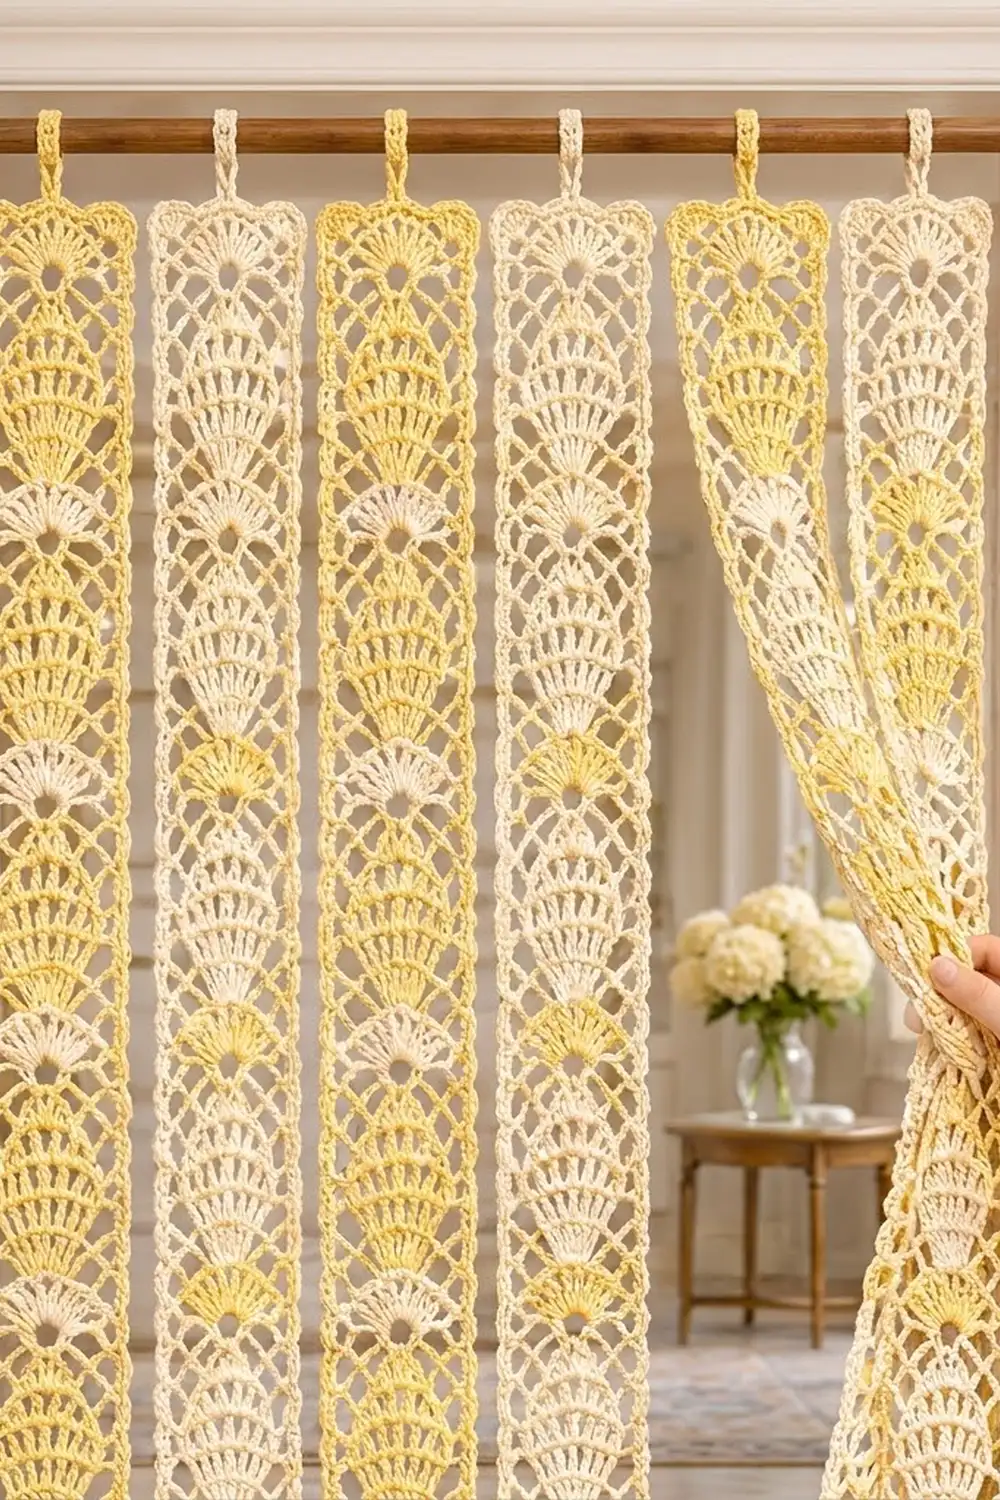
Slide the six loops onto the rod in B, A, B, A, B, A order and space them about 1 in (2.5 cm) apart. Six strips at 5.5 in (14.0 cm) each plus five 1 in (2.5 cm) gaps add up to 38 in (96.5 cm). That fits a standard interior doorway. For a wider opening, make more strips in the same alternating order.
Size check: Each hanging strip should measure 69 in (175.3 cm) from the base of its loop to the bottom scallops. If one strip hangs longer than the others, re-block it before changing anything else.
Border
The border is worked in rounds around the center column with MC. It forms the lattice, firms up the long edges and adds scallops to both ends.
Border gauge: about 4.7 sc per inch (2.5 cm) along the long sides and 5.2 sc per inch along the short sides, which matches the column. Each Round 2 loop spans 4 sts of Round 1, about 0.85 in (2.2 cm).
Round 1 (MC, sc base): Ch 1, turn.
- Top edge: 3 sc in first st, sc in next 4 sts, 2 sc in next st, sc in next st, 2 sc in next st, sc in next 4 sts, 3 sc in last st. (19 sc)
- First long side: For each repeat, work 14 sc into the row ends: 2 sc in each Row 1, 3, 5 and 6 end, and 3 sc in each Row 2 and 4 end. Then work 1 sc in the Row 0 end. (22 x 14 + 1 = 309 sc)
- Bottom edge: Working into the foundation chain, rep the top edge sequence. (19 sc)
- Second long side: Rep the first long side. (309 sc)
Join with sl st to first sc. Total: 656 sc.
Mark the center sc of each 3-sc corner group. Per side, including both corner sts: 17 sc on each short side and 313 sc on each long side. Between the corner centers, there are 15 sts on each short side and 311 sts on each long side.
Round 2 (lattice): Sl st in next sc (the corner center). Ch 1.
(Sc, ch 5, sc) in corner sc. [Ch 5, sk 3 sts, sc in next st] 3 times, ch 5, sk 3 sts. (Sc, ch 5, sc) in next corner sc. [Ch 5, sk 3 sts, sc in next st] 77 times, ch 5, sk 3 sts. Rep from * to * once more, then join with sl st to first sc.
Count: 4 loops on each short side, 78 loops on each long side and 4 corner loops. Total: 168 ch-5 loops.
Round 3 (lattice): Sl st in first 3 ch of the corner loop. Ch 1.
(Sc, ch 5, sc) in corner loop. [Ch 5, sc in next loop] 4 times, ch 5. (Sc, ch 5, sc) in next corner loop. [Ch 5, sc in next loop] 78 times, ch 5. Rep from * to * once more, then join with sl st to first sc.
Count: 5 loops on each short side, 79 loops on each long side and 4 corner loops. Total: 172 ch-5 loops.
Round 4 (edging): Sl st in first 2 ch of the corner loop. Ch 1.
(2 sc, ch 2, 2 sc) in corner loop. (Sc, 5 dc, sc) in each of the next 5 loops. (2 sc, ch 2, 2 sc) in next corner loop. 4 sc in each of the next 79 loops. Rep from * to * once more, then join with sl st to first sc.
Count: 35 sts on each short side (5 scallops), 316 sc on each long side, and 4 sc plus a ch-2 sp at each corner. Total: 718 sts + 4 ch-2 sps. Fasten off.
Hanging loop: Join MC with a sl st in the 3rd dc of the center (3rd) scallop on the top edge. Ch 24 and sl st in the same dc. Turn, work 32 sc into the loop, then sl st in the base dc. Fasten off. The loop is about 4.5 in (11.4 cm) around and fits a rod up to 1.25 in (3.2 cm) thick.
Why the math works: Each “ch 5, sk 3” loop moves 4 stitches along the edge, so the distance between corner centers on each side must be divisible by 4.
- Long sides: 311 sts between corners make 312 steps, which is 78 loops.
- Short sides: The two increases in the edge sequence raise 13 sts to 15 between corners. That makes 16 steps, which is 4 loops.
- Round 3: Each corner’s (sc, ch 5, sc) adds exactly one new space per side.
- Round 4: 4 sc per loop gives 316 sc on each long side, about 4.7 per inch. That matches Round 1, so the edges lie flat instead of waving.
Final Blocking
- Weave in all ends along the sc rows, not through the lattice chains.
- Soak the strip in cool water for 10 minutes, then press the water out gently. Don’t wring it.
- Roll the strip in a towel to remove more water.
- Lay it flat and pat it out to 5.5 in x 69 in (14.0 cm x 175.3 cm).
- Pin the center column straight first, then pin the outer edge every 3 in (7.6 cm).
- Pin out each end scallop and open the lattice diamonds evenly.
- Let it dry completely, usually for 24 hours.
- Compare all six strips and re-block any that differ by more than 0.5 in (1.3 cm).
Final Quality-Control Checklist
- [ ] Each column has 22 repeats (22 CC shells per strip)
- [ ] Each column measures 2.5 in x 66 in (6.4 cm x 167.6 cm) before the border
- [ ] Round 1 has 656 sc, with 309 sc along each long side
- [ ] Round 2 has 168 loops and Round 3 has 172 loops
- [ ] Each end has 5 scallops, and each long edge has 316 sc
- [ ] The hanging loop is centered on the top edge
- [ ] Every strip measures 5.5 in x 69 in (14.0 cm x 175.3 cm) after blocking
- [ ] You have 3 of Strip A and 3 of Strip B, hung B, A, B, A, B, A
Troubleshooting
The fans cup or ruffle: Your dc are too loose for an 11-dc fan. Go down a hook size, or snug each dc at its base.
The column gets narrower as you go: Count 13 sts after every Row 2, 4 and 6. A missed turning-chain stitch is usually the cause.
The carried yarn shows: Keep the carried strand loose, and make sure the Round 1 sc are worked over it.
The lattice count is off at a corner: Recount the Round 1 sts between the markers. You need 311 on each long side and 15 on each short side.
The long edges wave: You have extra sc. Work exactly 4 sc per loop and keep Round 4 slightly firm.
A strip stretches after hanging: Cotton relaxes over time. Re-block the strip and let it hang for a day before comparing lengths.
Care
Hand wash in cool water with a mild detergent, then reshape the strips and dry them flat. Don’t hang them while wet, because the weight of the water will stretch them.
Final Notes
Here is how the measurements add up. A 13-stitch column is 2.5 in (6.4 cm) wide, and 22 repeats of 3 in (7.6 cm) make it 66 in (167.6 cm) long. The border adds 1.5 in (3.8 cm) on every side, so each strip ends up 5.5 in x 69 in (14.0 cm x 175.3 cm). Six strips with 1 in (2.5 cm) gaps between them fill 38 in (96.5 cm) of rod.
Check your gauge on the test piece and count at every checkpoint, and all six strips will match.
Happy crocheting!