

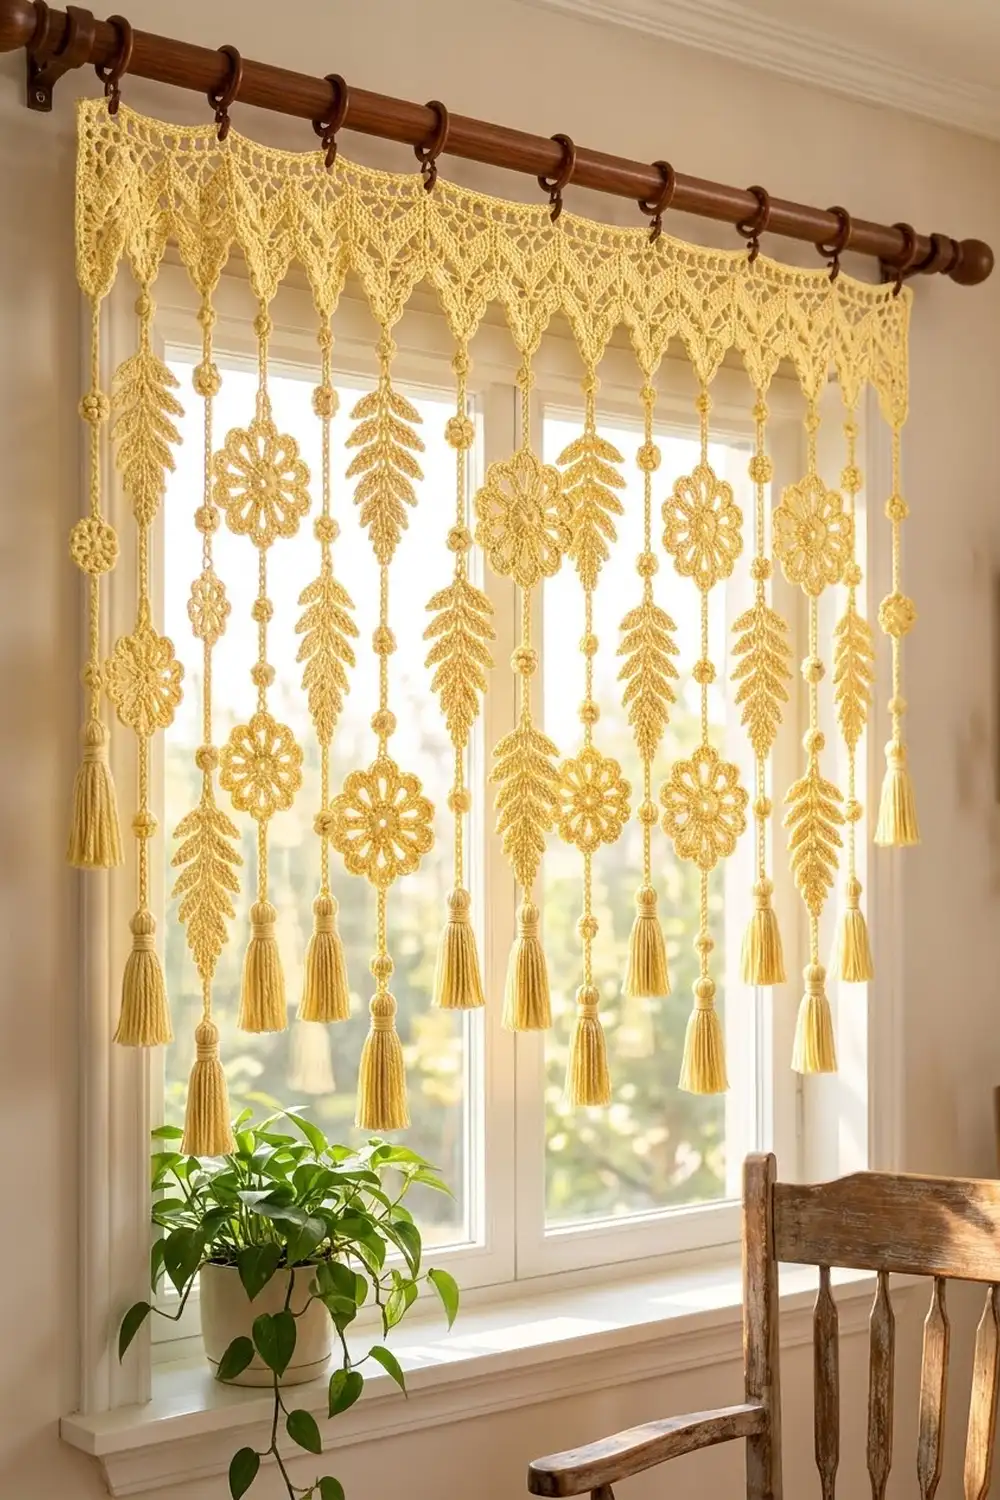
This window curtain has a lacy header band with 12 pointed triangles along the bottom. A long cord hangs from each point, carrying fern leaves, open flowers, small popcorn beads, and a tassel at the end. When the sun comes through, it makes a soft, filtered screen.
The whole curtain is one butter-yellow cotton. Fern strands and flower strands alternate, so the curtain has an even rhythm without any color changes. The style is cottage-meets-boho: light and a little vintage.
The pattern uses US crochet terms. The finished curtain is 36.4 in (92.5 cm) wide and 39.8 in (101.1 cm) long from the top edge to the ends of the tassels.
You make the header flat in rows, then shape the triangles one at a time on its lower edge. The flowers and leaves are made separately. Then you chain each strand down from a triangle tip, adding beads and joining motifs as you go. A single-crochet border finishes the header, and the tassels go on last.
Finished Size and Construction
- Finished size: 36.4 in (92.5 cm) wide × 39.8 in (101.1 cm) long
- Skill level: Intermediate
- Terminology: US
- Yarn weight: DK (#3) cotton
- Hook: 3.5 mm (E-4)
- Number of pieces: 1 header, 12 flowers, 36 leaves, 12 tassels (you make the 12 cords and 48 beads in place)
- Layout: 12 strands, alternating Fern (A) and Flower (B)
- Piece size: flower 3.5 in (8.9 cm) across; leaf 3.5 in (8.9 cm) long × 2 in (5.1 cm) wide; strand 30 in (76.2 cm) plus a 4 in (10.2 cm) tassel
- Header before border: 36 in (91.4 cm) × 5.6 in (14.2 cm), made up of a 2.4 in (6.1 cm) band plus 3.2 in (8.1 cm) points
- Border depth: 1 round of sc, about 0.2 in (0.5 cm)
Materials
Use a smooth mercerized or combed DK cotton. It holds a crisp shape, shows the stitches clearly, and doesn’t stretch under the weight of the strands. Pick a warm yellow, because very pale shades can look white against a bright window.
- Butter yellow: 350 g, about 805 m (880 yd)
Quantities include a margin of about 15% for gauge differences and tassel trimming.
Tools:
– 3.5 mm (E-4) crochet hook
– Tapestry needle
– Stitch markers
– Rust-proof pins and a blocking board
– Stiff card 4.5 in (11.4 cm) tall, for the tassels
– 13 curtain clip rings and a curtain rod
Abbreviations (US Terms)
- ch – chain
- sl st – slip stitch
- sc – single crochet
- dc – double crochet
- fdc – foundation double crochet
- dc2tog / dc3tog – double crochet 2 / 3 together
- BLO – back loop only
- st(s) – stitch(es)
- sp – space
- pc – popcorn bead
Popcorn bead (pc): Ch 3, then work 5 dc in the 3rd ch from the hook. Drop the loop from your hook and insert the hook in the top of the first dc. Pick up the dropped loop and pull it through. The bead is about 0.5 in (1.3 cm).
Gauge and Checkpoints
Gauge: 20 dc and 10 rows = 4 in (10.2 cm). Cord gauge: 6 ch = 1 in (2.5 cm), relaxed.
Make one flower and one leaf first, and check them against these measurements:
- Flower after Rnd 1: 1.25 in (3.2 cm)
- Flower after Rnd 2: 2 in (5.1 cm)
- Finished flower: 3.5 in (8.9 cm)
- Leaf after Row 1: 3.25 in (8.3 cm) long
- Finished leaf: 3.5 × 2 in (8.9 × 5.1 cm)
- Header after Row 1: 36 in (91.4 cm) wide
- Header after Row 6: 2.4 in (6.1 cm) deep
If your pieces are too big, go down 0.25 mm. If they are too small, go up 0.25 mm. Gauge matters most on the header: 180 sts have to come out to 36 in (91.4 cm).
Flower Motif (make 12)
Ch 5 and sl st to the first ch to form a ring. This ring leaves the small center hole.
Rnd 1: Ch 3 (counts as dc), 19 dc in the ring, sl st to the top of ch-3. (20 dc)
Rnd 2: Ch 3 (counts as dc), dc in the same st, dc in the next st, 2 dc in the next st, dc in the next st; repeat from * to * 8 more times, sl st to the top of ch-3. (30 dc)
Rnd 3: Ch 1, sc in the same st, ch 9, skip 2 sts, sc in the next st; repeat from * to * 8 more times. Ch 9, skip the last 2 sts, sl st to the first sc. (10 sc, 10 ch-9 loops)
Rnd 4: Sl st into the first loop. Work 15 sc in the ch-9 loop, sl st in the next sc; repeat from * to * around. (150 sc, 10 petals)
The sc edging firms each loop into a rounded, open petal. Fasten off and weave in the ends. Place a marker in the 8th sc of any petal, and another in the 8th sc of the petal opposite it (5 petals away).
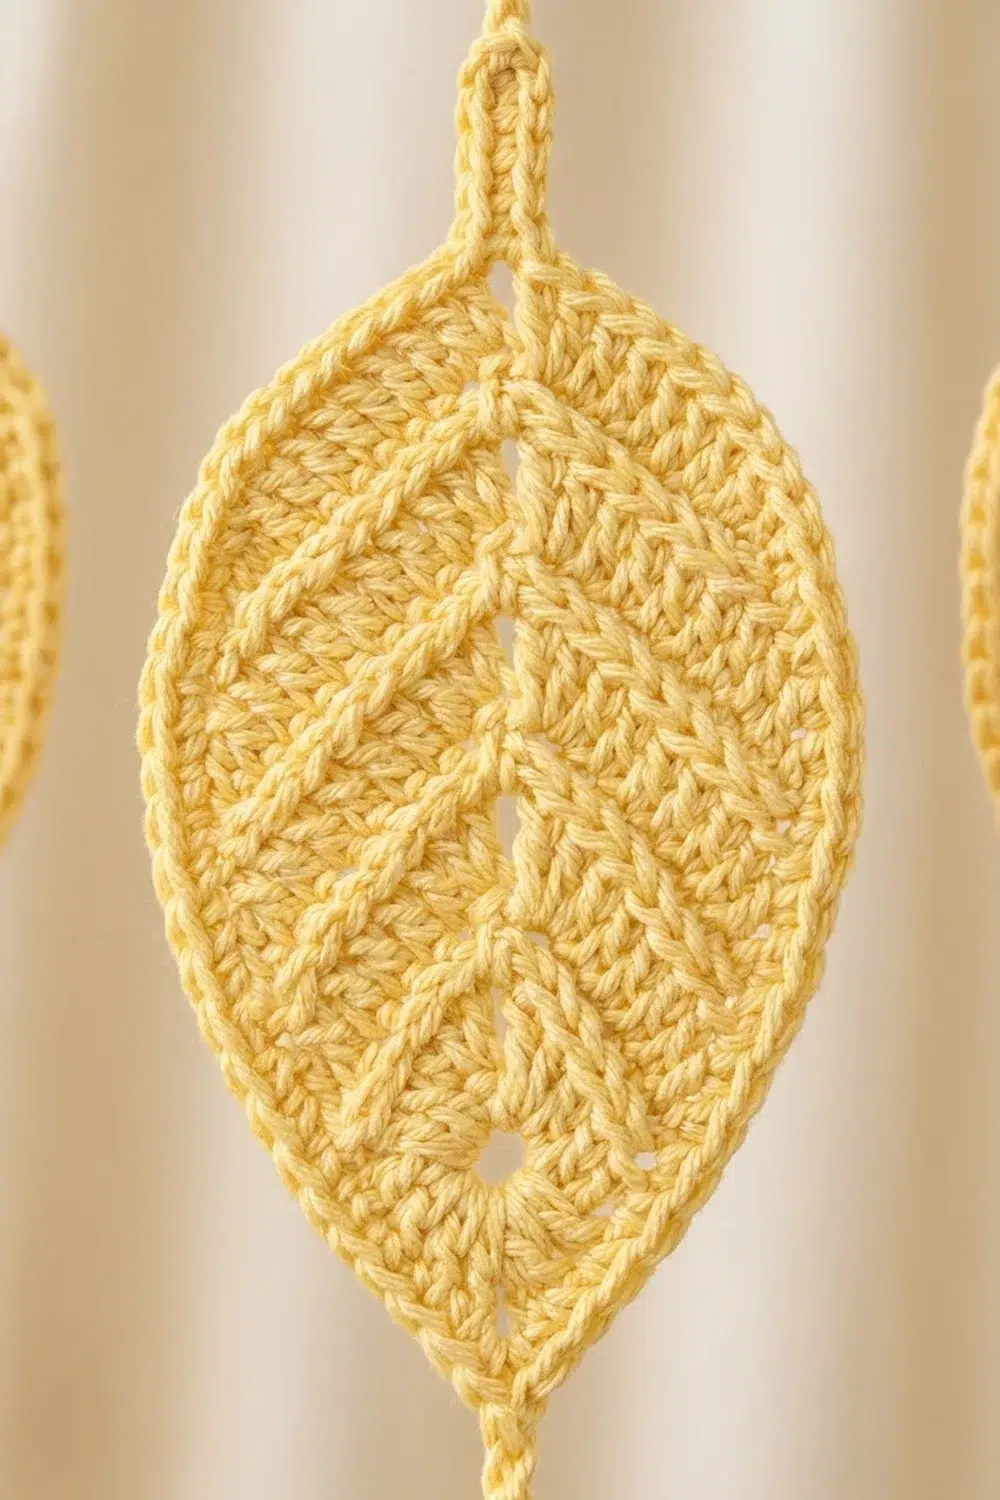
Fern Leaf (make 36)
The leaf is worked in turned rows around both sides of a foundation chain. Working in the back loops creates the herringbone ridges. Leaving 3 sts unworked at the end of each row creates the stepped fern edge.
Ch 16.
Row 1: Sc in the 2nd ch from the hook and in the next 13 ch, then 3 sc in the last ch (tip). Working along the opposite side of the chain, sc in the next 12 ch, leaving the last 2 ch unworked (stem). Turn. (14 + 3 + 12 = 29 sc)
Row 2: Ch 1, sc BLO in each st up to the center sc of the tip, 3 sc in the center sc, then sc BLO in each st down the other side, leaving the last 3 sts unworked. Turn. (13 + 3 + 12 = 28 sc)
Rows 3–5: Repeat Row 2. Each row has 1 st fewer than the row before. (Row 3: 27 sc; Row 4: 26 sc; Row 5: 25 sc)
Fasten off. Mark the center tip sc of Row 5. The leaf measures 3.5 × 2 in (8.9 × 5.1 cm).
Header Band
Row 1: 180 fdc. Turn. (180 sts) The piece should measure 36 in (91.4 cm) wide.
Row 2: Ch 3 (counts as dc throughout), dc in each st across. Turn. (180 dc)
Row 3 (mesh): Ch 3, dc in the next 2 sts, (ch 2, skip 2 sts, dc in the next st) 4 times, dc in the next 3 sts; repeat from * to * across, ending the last repeat after the 4th mesh. Turn. (12 repeats of 15 sts = 180 sts)
Row 4: Ch 3, dc in the next 2 dc, (2 dc in the ch-2 sp, dc in the next dc) 4 times, dc in the next 3 dc; repeat from * to * across, ending as in Row 3. Turn. (180 dc)
Rows 5–6: Repeat Rows 3–4. (180 dc)
The band should measure 2.4 in (6.1 cm) deep. Place a marker after every 15th st to divide the band into 12 sections.
Points (make 12, worked onto the header)
Work each point on one 15-st section. For the first point, continue from Row 6. For each later point, join with a sl st in the first st of the next section.
Row 1: Ch 3, dc in the next 14 sts. Turn. (15 dc)
Row 2: Ch 2 (does not count as a st), dc2tog, dc in the next 11 sts, dc2tog. Turn. (13 sts)
Row 3 (mesh): Ch 2, dc2tog, (ch 1, skip 1, dc in the next st) 4 times, dc in the next st, dc2tog. Turn. (1 + 8 + 1 + 1 = 11 sts)
Row 4: Ch 2, dc2tog, dc in each of the next 7 sts and ch-1 sps, dc2tog. Turn. (9 sts)
Row 5 (mesh): Ch 2, dc2tog, (ch 1, skip 1, dc in the next st) twice, dc in the next st, dc2tog. Turn. (1 + 4 + 1 + 1 = 7 sts)
Row 6: Ch 2, dc2tog, dc in the next 3 sts, dc2tog. Turn. (5 sts)
Row 7: Ch 2, dc2tog, dc in the next st, dc2tog. Turn. (3 sts)
Row 8: Ch 2, dc3tog. (1 st) Fasten off.
Each point should measure 3 in (7.6 cm) wide at the base and 3.2 in (8.1 cm) tall.
Make All Pieces
There is only one color, so these counts are the totals:
- Butter yellow: 1 header with 12 points, 12 flowers, 36 leaves, 12 tassels
- Fern strands (A): 6 strands with 4 leaves each (24 leaves)
- Flower strands (B): 6 strands of flower, leaf, flower, leaf (12 flowers and 12 leaves)
Layout (left to right, motifs top to bottom):
Strand:   1  2  3  4  5  6  7  8  9 10 11 12
Type:     A  B  A  B  A  B  A  B  A  B  A  B
Motif 1:  L  F  L  F  L  F  L  F  L  F  L  F
Motif 2:  L  L  L  L  L  L  L  L  L  L  L  L
Motif 3:  L  F  L  F  L  F  L  F  L  F  L  F
Motif 4:  L  L  L  L  L  L  L  L  L  L  L  L
L = leaf, F = flower. Every strand ends in a tassel.
Joining
You chain each strand straight down from its point and join the motifs as you reach them.
Joining a leaf: At the top, sl st into the first unworked foundation ch at the stem and fasten off. At the bottom, rejoin with a sl st in the marked tip sc.
Joining a flower: At the top, sl st into one marked petal sc and fasten off. At the bottom, rejoin in the opposite marked sc.
Each strand:
1. Sl st in the dc3tog at the point tip. Ch 12 (2 in / 5.1 cm), pc, ch 9 (1.5 in / 3.8 cm), then join Motif 1 at its top.
2. Rejoin at the bottom of Motif 1. Ch 9, pc, ch 9, join Motif 2.
3. Repeat Step 2 for Motifs 3 and 4.
4. Rejoin at the bottom of Motif 4. Ch 9 and fasten off, leaving a 6 in (15.2 cm) tail.
Length logic: The first section is 2 + 0.5 + 1.5 + 3.5 = 7.5 in (19.1 cm). Each of the next 3 sections is 1.5 + 0.5 + 1.5 + 3.5 = 7 in (17.8 cm). The final 1.5 in (3.8 cm) of chain brings the strand to 30 in (76.2 cm).
Tension: Chain at a relaxed, even tension. Finished strands should all be within 0.5 in (1.3 cm) of each other.
Size checkpoint: Hold the header up by 2 points and check that every strand hangs 30 in (76.2 cm) below its tip.
Border
Border gauge: Work 1 sc in each st along the top edge, and 2 sc in each dc row-end along the sides and point edges.
Rnd 1: With the right side facing, join at the top right corner.
- Top edge: 3 sc in the first st, sc in the next 178 sts, 3 sc in the last st. (184 sc, including both corner groups)
- Left band edge: 2 sc in each of the 6 row-ends. (12 sc)
- Each point: 2 sc in each of the 8 row-ends going down, 3 sc in the dc3tog tip (working around the cord), and 2 sc in each of the 8 row-ends going up. Then sl st in the valley before the next point (not counted). (16 + 3 + 16 = 35 sc per point; 12 × 35 = 420 sc)
- Right band edge: 2 sc in each of the 6 row-ends. (12 sc)
Sl st to the first sc. (184 + 12 + 420 + 12 = 628 sc) Fasten off.
Why the math works: The top edge is 180 sts plus 2 extra at each corner, for 184. A dc row-end is about as tall as 2 sc, so 2 sc per row-end keeps the edges flat. Each point has 8 rows, so each of its sides gets 16 sc. The uncounted valley sl st lets the points separate cleanly.
Tassels (make 12): Wrap yarn 30 times around the 4.5 in (11.4 cm) card. Tie the top with a 10 in (25.4 cm) strand and cut the bottom loops. Wrap the neck 8 times, 0.75 in (1.9 cm) below the top, and tie it off. Trim to 4 in (10.2 cm). Use the strand tail to sew each tassel to the end of its strand.
Final Blocking
- Soak the curtain in cool water for 10 minutes, then roll it in a towel to press out the water.
- Pin the header to 36.4 in (92.5 cm) × 6 in (15.2 cm), with a pin at every point tip.
- Pin each flower to 3.5 in (8.9 cm), opening every petal.
- Pin each leaf to 3.5 × 2 in (8.9 × 5.1 cm), straightening the center ridge.
- Lay the cords straight without stretching them.
- Let everything dry completely, then steam the tassels and trim them evenly.
Final Quality-Control Checklist
- Header is 36.4 in (92.5 cm) wide, and all 12 points are the same height
- Border has 628 sc and lies flat
- All 12 flowers have 10 open petals and measure 3.5 in (8.9 cm)
- All 36 leaves are 3.5 in (8.9 cm) long, with the ridges running the same way
- Strands alternate A/B and each one is 30 in (76.2 cm)
- All 48 beads are firmly closed
- Tassels are 4 in (10.2 cm) long
- All ends are woven in securely
Troubleshooting
- Header ruffles: Your fdc row is too loose. Redo it with a smaller hook.
- Header is narrower than 36 in (91.4 cm): Recount the Row 3 repeats, or go up 0.25 mm.
- Points lean sideways: Make sure you work a dc2tog at both ends of every row.
- Flower cups: Work Rnd 4 more loosely, or use ch-10 loops.
- Flower ruffles: Work 14 sc per loop instead of 15.
- Leaf twists: Check that every row is worked in BLO, and block the leaf firmly.
- Strands are uneven: Recount the chains and redo any cord that is off by more than 0.5 in (1.3 cm).
Care
Hand wash in cool water with a mild soap and dry the curtain flat, re-pinning the motifs if needed. Hang it only when it is fully dry so the strands don’t stretch.
Final Notes
Here is the measurement chain. At 20 dc = 4 in (10.2 cm), 180 sts make a 36 in (91.4 cm) header. That header divides into 12 points of 3 in (7.6 cm). Each point carries a 30 in (76.2 cm) strand with four 3.5 in (8.9 cm) motifs and a 4 in (10.2 cm) tassel. If you hit every checkpoint, the curtain will finish at 36.4 × 39.8 in (92.5 × 101.1 cm).
Happy crocheting!