

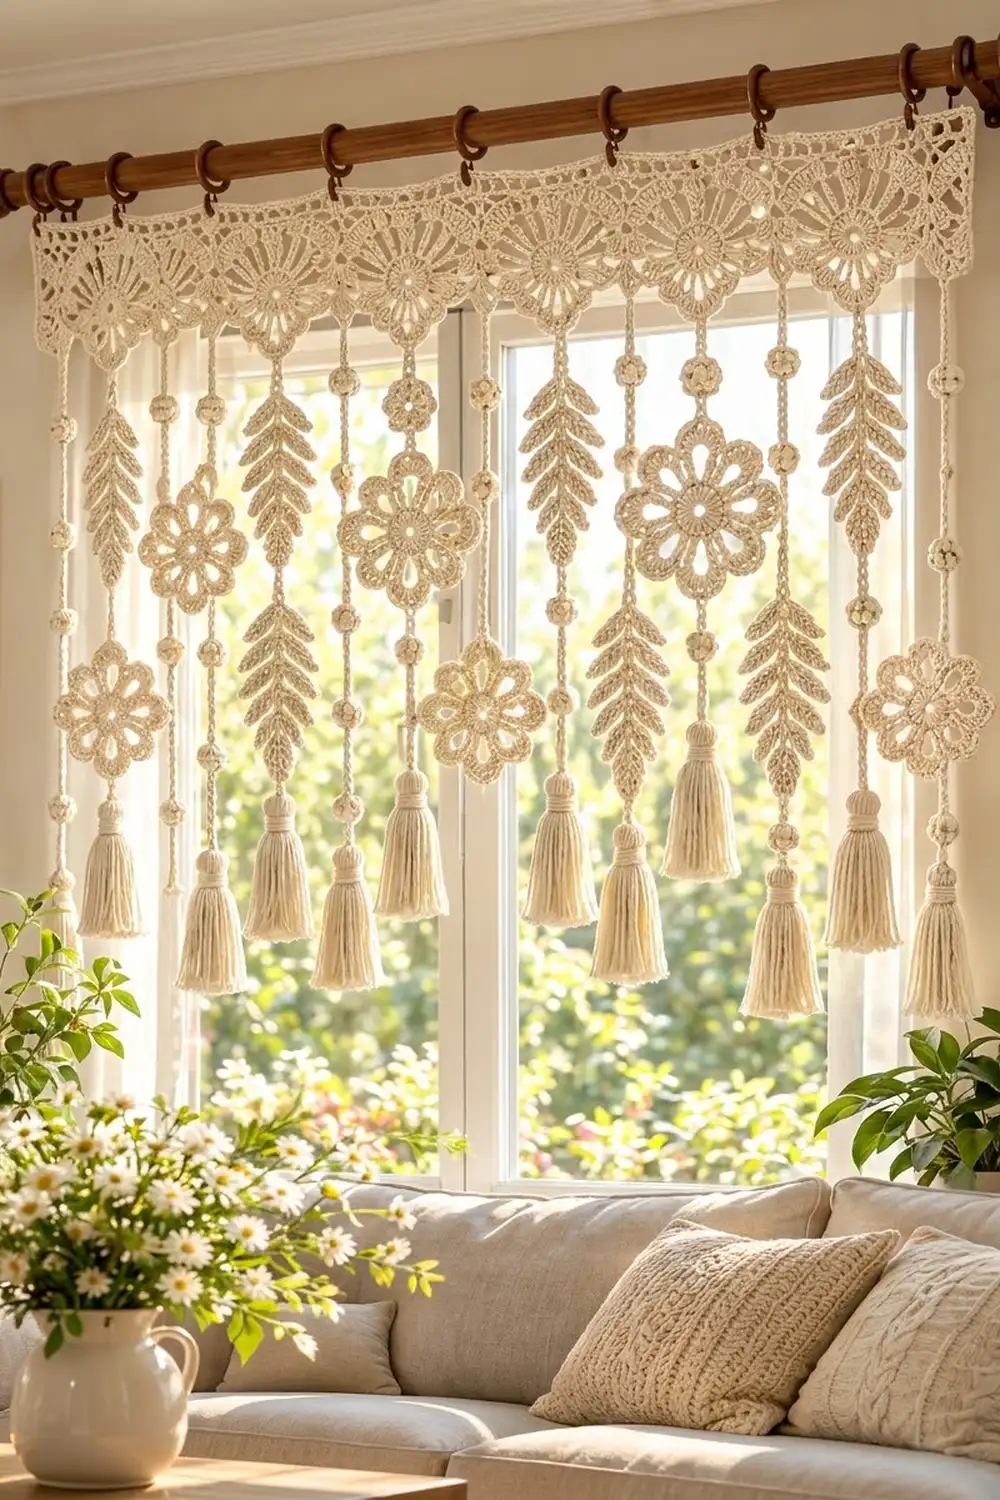
The Meadow Bloom Fringe Valance is a soft, airy window topper. It has a straight lace header, a row of eight sunburst medallions, and fifteen strands of ferns, bobble beads and flowers. Each strand ends in a full tassel. It filters the light without blocking the view.
It is worked in a single cream cotton, so the texture does all the work: crisp shells, open petals, raised leaves and tassels. The look is boho and cottage, and it suits a kitchen window, a reading nook or a doorway.
All instructions use US crochet terms. The finished valance is 40 in (101.6 cm) wide. The medallion band and header together are 6.75 in (17.1 cm) deep, and the total drop including tassels is about 24 in (61.0 cm).
Construction is modular. You make eight band medallions and join them as you go. Next you work a straight header across the top. Then you crochet each strand directly off the band, add the flower charms and beads, and tie a tassel to the end of every strand.
Finished Size and Construction
- Finished size: 40 in (101.6 cm) wide × about 24 in (61.0 cm) total drop
- Skill level: Intermediate
- Terminology: US
- Yarn weight: DK / light worsted (#3) cotton
- Hook: 4.0 mm (G-6)
- Number of pieces: 8 band medallions, 7 flower charms, 15 tassels; 15 strands are worked directly onto the band
- Layout: 1 row of 8 medallions; 15 strands below it
- Medallion size: 5 in (12.7 cm) diameter
- Band size before header: 40 in × 5 in (101.6 × 12.7 cm)
- Header depth: 1.75 in (4.4 cm) above the medallion tips
Materials
Choose a smooth, mercerized or combed cotton in DK weight, around 120 m per 50 g. Cotton holds the shells crisp and makes tassels that hang straight. Avoid fuzzy blends, because they blur the leaf shapes.
Yarn
– Cream: 300 g (720 m)
Estimated use is about 250 g (600 m): medallions 64 g, header 40 g, flowers 35 g, strand chains and ferns 60 g, tassels 50 g. The 300 g figure includes a safety margin for gauge differences and test pieces.
Tools
– 4.0 mm (G-6) crochet hook
– Tapestry needle
– Scissors
– Stiff card cut to 4.5 in (11.4 cm) tall, for the tassels
– Stitch markers
– Rust-proof pins and a blocking mat
– 9 curtain clip rings and a rod
Abbreviations (US Terms)
- ch – chain
- sl st – slip stitch
- sc – single crochet
- hdc – half double crochet
- dc – double crochet
- tr – treble crochet
- dtr – double treble crochet (yo 3 times, then work off loops in pairs)
- sp – space
- sk – skip
- st(s) – stitch(es)
- RS – right side
- rep – repeat
Special stitch – Bead: Ch 3. In the 3rd ch from hook, yo, insert hook, pull up a loop, yo, pull through 2 loops. Rep from * 4 more times in the same ch (6 loops on hook). Yo and pull through all 6 loops, then ch 1 to lock. This makes a round bobble bead on the strand.
Gauge and Checkpoints
Make one full band medallion before anything else, then measure it.
- Medallion after Round 1: 1.25 in (3.2 cm) across
- After Round 2: 2.25 in (5.7 cm)
- After Round 3: 3.25 in (8.3 cm)
- After Round 4: 5 in (12.7 cm) from shell tip to opposite shell tip
- Flower charm: 3.5 in (8.9 cm) from petal tip to opposite petal tip
- Header gauge: 37 sc = 8 in (20.3 cm)
- Chain gauge: 5 ch = 1 in (2.5 cm)
If your medallion is larger than 5 in (12.7 cm), go down 0.5 mm. If it is smaller, go up 0.5 mm. Gauge matters most here, because the medallion width sets the valance width: 8 × 5 in = 40 in (101.6 cm).
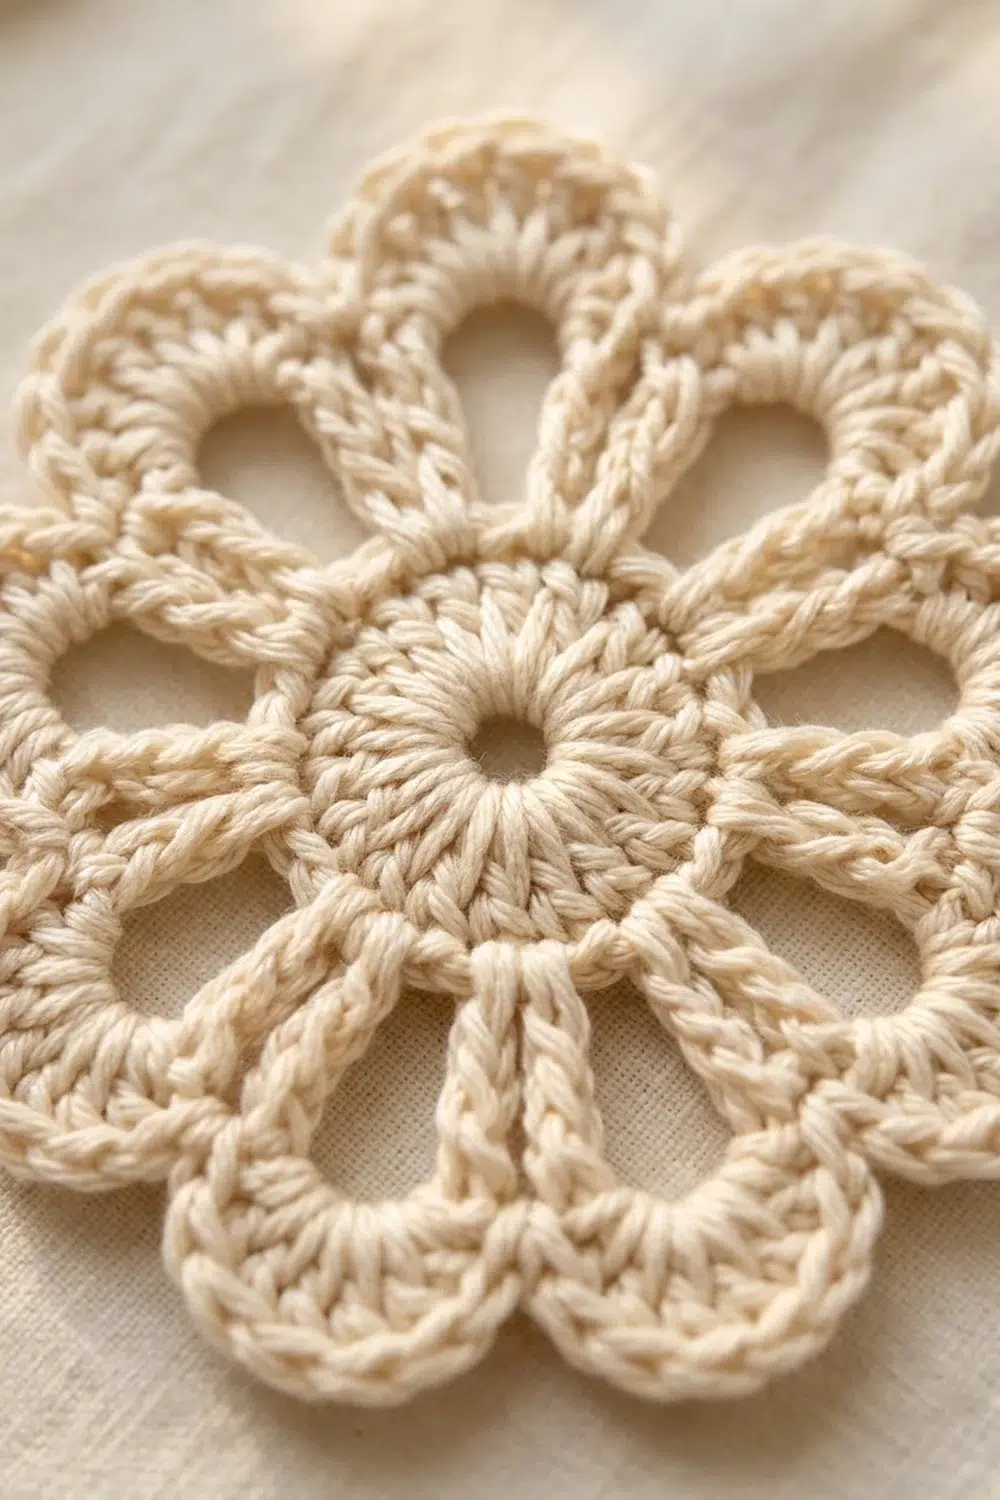
Band Medallion (Make 8)
Make a magic ring.
Round 1: Ch 3 (counts as dc), 15 dc in ring, then join with a sl st to the top of ch-3. Pull the ring tight. (16 dc)
Round 2: Ch 4 (counts as dc + ch 1). Dc in next dc, ch 1; rep from * 14 more times, then join to the 3rd ch of ch-4. (16 dc + 16 ch-1 sps = 32 sts)
Round 3: Sl st into the first ch-1 sp, then ch 3 (counts as dc) and dc in the same sp, ch 2. 2 dc in next ch-1 sp, ch 2; rep from * 14 more times, then join to the top of ch-3. (16 groups of 2 dc + 16 ch-2 sps = 64 sts)
This round makes the sunburst spokes.
Round 4: Sl st in the next dc and into the next ch-2 sp, ch 1, sc in the same sp. Work 7 dc in the next ch-2 sp (shell 1). Sc in next ch-2 sp, 7 dc in next ch-2 sp; rep from * 6 more times, then join to the first sc. Fasten off. (8 shells + 8 sc = 64 sts)
Number the shells 1–8 in the order you worked them. Hold the medallion with RS facing and shell 1 at the top (12 o’clock). The shells then sit like this:
- shell 2 at 10:30
- shell 3 at 9 o’clock (left side)
- shell 5 at 6 o’clock (bottom)
- shell 7 at 3 o’clock (right side)
- shell 8 at 1:30
The center (4th) dc of each shell is its tip.
Flower Charm (Make 7)
Make a magic ring.
Round 1: Ch 3 (counts as dc), 15 dc in ring, then join. (16 dc)
Round 2: Ch 1, sc in the same st, ch 7, sk next dc. Sc in next dc, ch 7, sk next dc; rep from * 6 more times, then join to the first sc. (8 sc + 8 ch-7 loops)
Round 3: Sl st into the first ch-7 loop. In the loop, work (2 sc, 2 hdc, 3 dc, 2 hdc, 2 sc), then sk the next sc; rep from * around, then join. Fasten off. (8 petals × 11 sts = 88 sts)
Each ch-7 loop spans a skipped stitch, so an open eyelet forms inside every petal. The tip of each petal is its 6th stitch (the middle dc).
Tassels (Make 15)
- Wrap yarn 30 times around the 4.5 in (11.4 cm) card.
- Thread a 12 in (30.5 cm) tie through the top of the loops and knot it firmly. Leave both ends long.
- Cut through all the loops at the bottom.
- With a separate strand, wrap the tassel neck 8 times, 0.75 in (1.9 cm) below the top. Knot the wrap and bury its ends inside the tassel.
- Trim the tassel to 4 in (10.2 cm).
Make All Pieces
- Band medallions: 8 in cream
- Flower charms: 7 in cream
- Tassels: 15 in cream
- Strand A (bead and fern): 8, one under shell 5 of each medallion
- Strand B (bead and flower): 7, one under each medallion join
Header: |=============== 185 sts ===============|
Band:   [M1]  [M2]  [M3]  [M4]  [M5]  [M6]  [M7]  [M8]
Strand:  A   B  A  B  A  B  A  B  A  B  A  B  A  B  A
The order runs left to right with RS facing: A under M1, B at the M1/M2 join, A under M2, and so on. That gives 15 strands in total.
Joining
The medallions are joined as you go in Round 4, with one join point between each pair of neighbors.
Make medallion 1 complete. For medallion 2, work Round 4 as written up to shell 3. In shell 3, work 3 dc, then drop the loop from your hook. Insert the hook from front to back through the 4th dc of shell 7 on medallion 1. Pick up the dropped loop, pull it through, and work the 4th dc. Finish the shell and the round as usual.
The joined dc still counts as one stitch, so the total stays at 64 sts. Add medallions 3–8 the same way, always joining the new medallion’s shell 3 to the previous medallion’s shell 7.
Tension: Pull the joining loop snug, but not tight. The two shell tips should just touch, and neither medallion should cup.
Checkpoint: Lay the strip flat. It should measure 40 in × 5 in (101.6 × 12.7 cm), with each join landing exactly 5 in (12.7 cm) from the next.
Border: Straight Header
Header gauge: 37 sc = 8 in (20.3 cm).
With RS facing, join yarn at the right end (medallion 8) and work toward the left. On every medallion, the “valley” is the sc between two shells.
Row 1 (leveling row): Repeat the following on each medallion, starting with medallion 8 and ending with medallion 1:
dtr in the valley between shells 7 and 8, ch 4, sc in the tip of shell 8, ch 5, sc in the tip of shell 1, ch 5, sc in the tip of shell 2, ch 4, dtr in the valley between shells 2 and 3.
On the first medallion only, begin with ch 5 (counts as the first dtr) in place of the first dtr. Turn.
- Per medallion: 1 + 4 + 1 + 5 + 1 + 5 + 1 + 4 + 1 = 23 sts
- Total: 8 medallions × 23 = 184 sts
The two dtr at each join sit side by side and fill the V-shaped gap. No extra stitches are added at the seams.
Row 2 (trim row): Ch 1, sc in each st and ch across, working 2 sc in the last st (the turning ch). Turn. (184 sts worked 1-per-stitch + 1 extra = 185 sc)
Row 3 (mesh): Ch 4 (counts as dc + ch 1), sk next sc. Dc in next sc, ch 1, sk next sc; rep from * 90 more times, then dc in the last sc. Turn. (93 dc + 92 ch-1 sps = 185 sts)
Row 4: Ch 1, sc in each dc and each ch-1 sp across. Turn. (185 sc)
Row 5: Work as Row 3. (185 sts)
Row 6: Work as Row 4. Fasten off. (185 sc)
Why the math works: Row 1 places exactly 23 stitches over each 5 in (12.7 cm) medallion. Row 2 adds just one stitch, so the mesh has an odd count, which a 2-stitch repeat needs to start and end on a dc. At 37 sc per 8 in, 185 sc = 5 × 8 in = 40 in (101.6 cm). That matches the joined band exactly, so the header neither ruffles nor pulls in.
Header checkpoint: 40 in (101.6 cm) wide, with Rows 2–6 adding 1.75 in (4.4 cm) above the shell tips.
Hanging Strands
Work every strand with RS facing, chaining downward from the band.
Strand A (make 8):
- Join yarn with a sl st in the tip of shell 5.
- Ch 5, Bead, ch 5, Bead, ch 3.
- Work the fern: 12 leaf pairs, as described below.
- Ch 5, Bead, ch 3.
- Fasten off, leaving a 6 in (15.2 cm) tail.
Fern leaf pair:
– Full leaf: Ch 7. Working back along the chain: sl st in the 2nd ch from hook, then sc, hdc, dc, hdc, sc in the next 5 ch.
– Pair: Make one leaf, then a second leaf. Sl st into the spine ch where the first leaf began, then ch 3 for the spine.
– Small leaf (pairs 1, 2, 11 and 12 only): Ch 5, sl st in the 2nd ch from hook, then sc, hdc, sc in the next 3 ch.
– Pairs 3–10 use full leaves.
The fern section measures about 7.5 in (19.1 cm). The finished strand hangs about 17 in (43.2 cm) below the bottom of the medallion, including the tassel.
Strand B (make 7):
- Join yarn in the joined dc at a medallion join.
- Ch 10, Bead, ch 5, Bead, ch 5.
- Sl st into the tip of any petal on a flower charm (petal 1). Fasten off.
- Join yarn at the tip of the opposite petal (petal 5).
- Ch 5, Bead, ch 5, Bead, ch 3.
- Fasten off, leaving a 6 in (15.2 cm) tail.
Tassel attachment: Thread both tie ends of a tassel through the last ch of the strand. Knot three times, then bury the ends inside the tassel.
Final Blocking
- Soak the valance in cool water for 15 minutes, then press out the water in a towel. Do not wring it.
- Lay it flat on blocking mats with RS up.
- Pin the header straight to 40 in (101.6 cm) wide.
- Pin each medallion to a 5 in (12.7 cm) circle, with a pin at every shell tip.
- Straighten each strand downward. Pin the fern leaves into a crisp V, alternating left and right.
- Pin each flower charm open to 3.5 in (8.9 cm) and open the petal eyelets.
- Leave it to dry completely.
- Steam the tassels lightly, comb them straight, and re-trim them to 4 in (10.2 cm) if needed.
Final Quality-Control Checklist
- 8 medallions, each with 64 sts and 8 even shells
- 7 joins, each at the shell 3 / shell 7 tips
- Header Row 1 = 184 sts; Rows 2–6 = 185 sts each
- Header is 40 in (101.6 cm) wide and lies flat
- 15 strands in an A-B-A layout, 8 A and 7 B
- Every fern has 12 pairs, with small leaves at both ends
- Every flower has 88 sts and 8 open eyelets
- 15 tassels, each 4 in (10.2 cm) long and securely tied
- All ends woven in
Troubleshooting
Medallion cups: Your Round 4 shells are tight. Go up a hook size for that round only.
Medallion ruffles: Round 3 chains are too loose. Work those ch-2 sps more snugly.
Header waves: You probably added stitches. Recount Row 1 at 23 sts per medallion.
Header pulls the band in: Loosen the chains in Row 1, or work Rows 2–6 with a hook 0.5 mm larger.
Leaves twist: Make sure the second leaf of each pair returns to the same spine ch before you chain down.
Strands hang crooked: Block them pinned straight, and check that each strand starts exactly at a shell tip or join.
Messy tassels: Steam them, comb them, and trim them while they hang.
Care
Hand wash in cool water with a mild soap, press out the water, and dry flat. Re-pin the shells and ferns while the valance is damp, and steam the tassels to refresh them.
Final Notes
The whole valance rests on one measurement chain:
- Each medallion is 5 in (12.7 cm).
- Eight joined medallions give 40 in (101.6 cm).
- The header places 23 stitches per medallion (184), adds one stitch to reach 185, and holds that 40 in width at 37 sc per 8 in (20.3 cm).
- Fifteen strands hang below the band in an A-B-A rhythm, each ending in a 4 in (10.2 cm) tassel, for a total drop of about 24 in (61.0 cm).
Check each link as you go and the finished piece will hang straight and even.
Happy crocheting!