

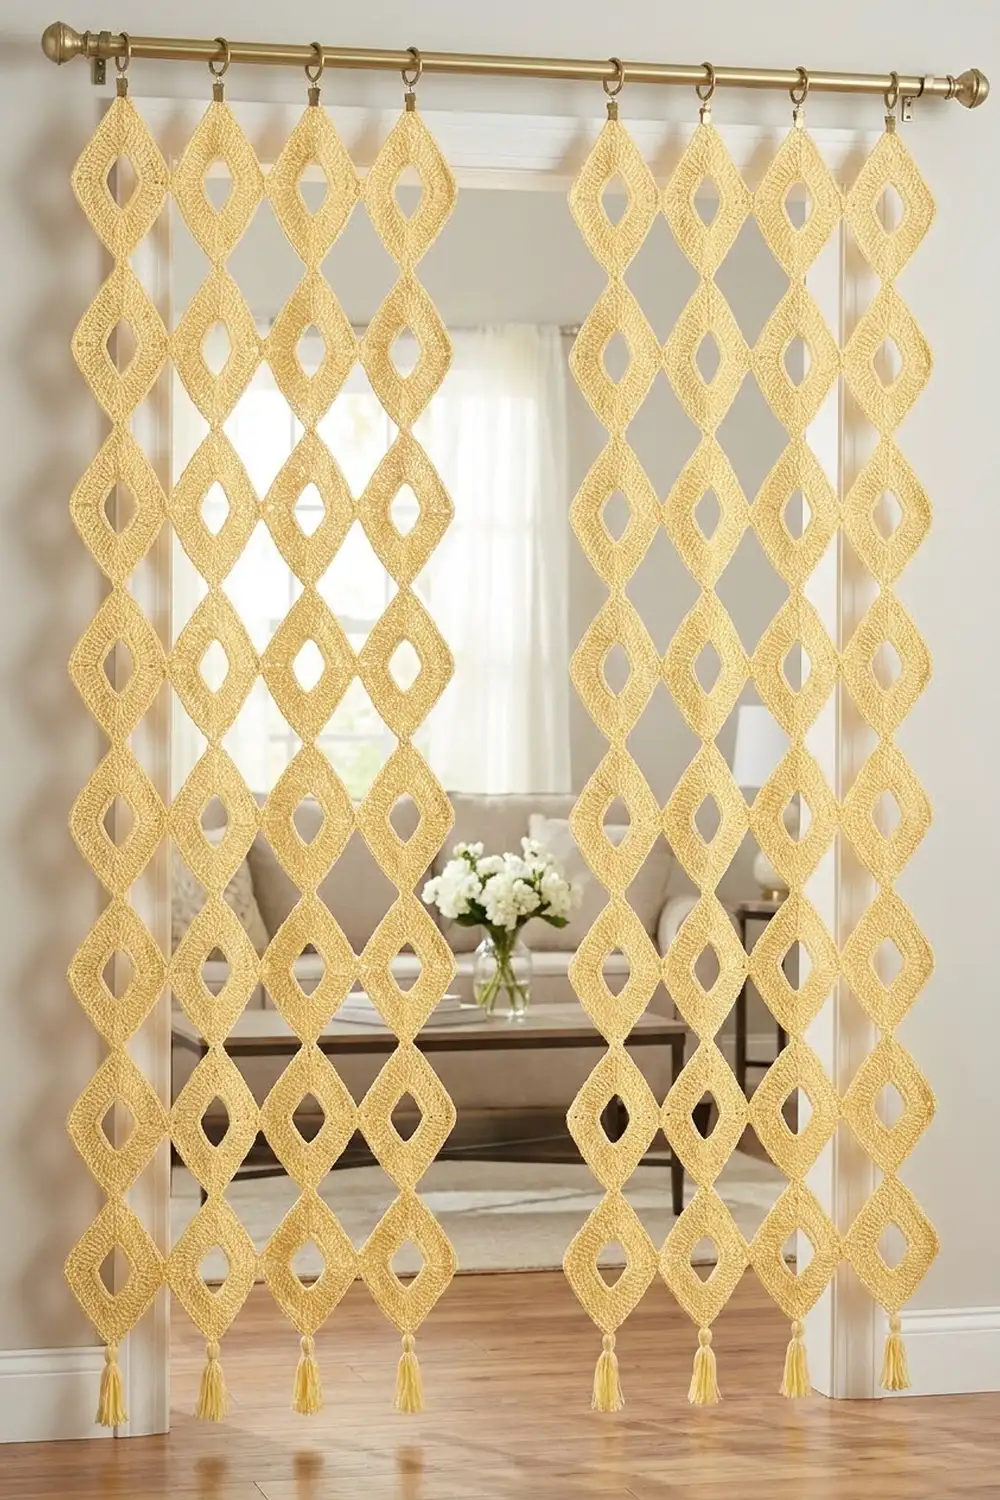
The Buttercup Lattice Curtain is an airy room divider and window panel built from simple diamond rings. Each ring has a smooth, solid band around a wide diamond opening. When the rings are joined tip to tip, they form an open lattice that filters light without blocking it.
The color is a single soft butter yellow, so the texture of the stitches and the shape of the lattice do the visual work. A row of short tassels at the bottom gives the panel weight and a finished edge. The style suits boho, cottage and modern warm-neutral rooms.
This pattern uses US crochet terms. One finished panel measures 33 in (83.8 cm) wide by 84 in (213.4 cm) tall before the trim. With tassels, the panel is 88 in (223.5 cm) tall. The photo shows a pair, so the materials list covers two panels.
The construction is simple. Each diamond is worked in the round from a chain ring with three rounds. You join the motifs as you go during the last round, connecting them at the tips. Hanging tabs go on the top tips, and tassels go on the bottom tips.
Finished Size and Construction
- Finished panel size: 33 in × 84 in (83.8 cm × 213.4 cm), plus 4 in (10.2 cm) tassels
- Skill level: Easy–Intermediate
- Terminology: US crochet terms
- Yarn weight: Worsted (#4) cotton or cotton blend
- Hook: 5.0 mm (H-8)
- Number of pieces: 72 diamond motifs per panel, 144 for the pair
- Layout: 6 motifs across × 12 motifs down per panel
- Single motif size: about 6 in (15.2 cm) square on point unblocked, blocked to 7 in tall × 5.5 in wide (17.8 cm × 14.0 cm)
- Size before border: 33 in × 84 in (83.8 cm × 213.4 cm)
- Border depth: hanging tabs 1.25 in (3.2 cm) at the top, tassels 4 in (10.2 cm) at the bottom
Materials
Yarn: Use a smooth worsted-weight cotton or cotton blend in pale yellow. Cotton holds the diamond shape, resists stretching under its own weight and blocks crisply. Avoid fuzzy or very stretchy acrylics, which can make a tall panel sag over time.
- Butter Yellow: about 1,520 g / 2,640 m (2,887 yd) for two panels, or about 760 g / 1,320 m (1,444 yd) per panel
Each motif uses about 9 g / 16 m (17.5 yd). Each tassel uses about 3 g / 5 m (5.5 yd). These quantities include a margin of about 10% for gauge swatches, joins and weaving in.
Tools:
– 5.0 mm (H-8) crochet hook
– Tapestry needle
– Stitch markers (at least 4)
– Scissors
– Cardboard strip 4 in (10.2 cm) wide for tassels
– Blocking mats, rust-proof pins and a spray bottle
– 12 curtain clip rings (6 per panel)
Abbreviations (US Terms)
- ch – chain
- sl st – slip stitch
- sc – single crochet
- hdc – half double crochet
- st(s) – stitch(es)
- sp – space
- rnd – round
- corner center st – the middle stitch of a 3-stitch corner group
Special stitch: Point join. Replace the “ch 3” of a tip with this: ch 1, sl st into the ch-3 tip loop of the neighboring finished motif, ch 1. The two motifs are now connected at that tip.
Gauge and Checkpoints
Gauge: 16 sc and 18 rows = 4 in (10.2 cm) in sc worked flat.
Test one complete motif before you start the panel. It is the most reliable gauge check because it shows both stitch size and how the corners shape.
Checkpoints:
– Foundation ring: ch 48 should lie flat at about 12 in (30.5 cm) around, or 3 in (7.6 cm) per side.
– After Rnd 1: each side measures about 3.5 in (8.9 cm) along the outer edge.
– After Rnd 3: each outer side measures about 4.25 in (10.8 cm) from tip to tip, and the motif is about 6 in (15.2 cm) square on point.
– After blocking: the motif measures 7 in (17.8 cm) tall by 5.5 in (14.0 cm) wide.
If your motif is too big: go down to a 4.5 mm (7) hook. If it is too small: go up to a 5.5 mm (I-9) hook. Over a 12-motif drop, an error of only 0.25 in (0.6 cm) per motif adds up to 3 in (7.6 cm), so match gauge closely.

Diamond Motif
Work in joined rounds with the right side facing throughout. Don’t turn.
Foundation: Ch 48 and join with a sl st to the first ch to form a ring. Check that the chain isn’t twisted. Count the chains into 4 groups of 12. The 12th ch of each group is a corner ch, and the other 11 are side chains.
Rnd 1 (conversion round): Ch 1. Sc in each of the next 11 ch, 3 sc in the next corner ch. Repeat from * 3 more times. Join with a sl st to the first sc.
Count: 48 sts worked 1 per ch + 8 extra corner sts = 56 sc, or 14 per side, counting each side from just after one corner center st through the next corner center st.
Place a marker in each corner center st.
Rnd 2 (growth round): Ch 1 (does not count as a st). Hdc in each st to the marked corner center st, 3 hdc in the corner center st. Repeat around. Join with a sl st to the first hdc. Move the markers to the new corner center sts.
Count: 64 hdc, or 16 per side (15 side sts + 1 corner center st).
The hdc round gives the band its height and its column texture. Each side grows by 2 sts, which keeps the corners sharp instead of rounded.
Rnd 3 (trim round, first motif): Ch 1. Sc in each st to the marked corner center st, then work (sc, ch 3, sc) in the corner center st. Repeat around. Join with a sl st to the first sc. Fasten off and weave in the ends.
Count: 64 sts worked 1 per st + 4 extra sc (1 per corner) = 68 sc + 4 ch-3 tip loops, or 17 sc per side.
The ch-3 loops form the four tips: top, right, bottom and left. They are the only connection points in the lattice.
After Rnd 3, pick one tip as the top. Every motif should face the same way so the stitch texture reads consistently.
Make All Pieces
Make one complete motif (Motif 1) with the plain Rnd 3. Work every other motif through Rnd 2, then work its Rnd 3 using the point join as described below.
Quantities:
– Per panel: 72 motifs, 6 tassels, 6 hanging tabs
– For the pair: 144 motifs, 12 tassels, 12 hanging tabs
– Color: all pieces in Butter Yellow
Layout grid for one panel (each ◇ is one motif; joins are at the tips):
Row 1:   ◇ ◇ ◇ ◇ ◇ ◇   <- top tips get hanging tabs
Row 2:   ◇ ◇ ◇ ◇ ◇ ◇
Row 3:   ◇ ◇ ◇ ◇ ◇ ◇
 ...      (rows 4–11 identical)
Row 12:  ◇ ◇ ◇ ◇ ◇ ◇   <- bottom tips get tassels
The motifs line up in straight columns and rows. Each motif’s side tips touch its left and right neighbors, and its top and bottom tips touch the motifs above and below. The small diamond-shaped gaps between the motifs form naturally.
Joining (Join-As-You-Go)
Join each motif during its own Rnd 3. Work across each row from left to right, then start the next row at the left.
Stitch-to-stitch logic: Work Rnd 3 as written. When you reach a tip that touches a finished motif, work (sc, point join, sc) in the corner center st instead of (sc, ch 3, sc). The sc count stays the same: 68 sc. Only the ch-3 loop is replaced, and its “ch 1, sl st, ch 1” has the same length as ch 3. The finished tip therefore sits exactly where a free tip would.
- Row 1, motifs 2–6: join the left tip to the right tip of the previous motif.
- Rows 2–12, first motif: join the top tip to the bottom tip of the motif above.
- Rows 2–12, motifs 2–6: join the top tip to the motif above and the left tip to the motif on the left. That’s 2 joins per motif.
The left and right tips along the outer edges of the panel stay free, and so do the top tips of Row 1 and the bottom tips of Row 12.
Tension advice: Keep the sl st of each join snug but not tight. A tight join pinches the tip and makes a dimple. A loose one makes the lattice droop. Pull the yarn gently after each sl st so the two ch-3 loops sit flat together.
Size checkpoint: Two joined motifs side by side should measure 11 in (27.9 cm) across when gently stretched to their blocked shape. A finished row of 6 should measure 33 in (83.8 cm) wide. Two joined rows should measure 14 in (35.6 cm) tall. Check this after Row 2, before committing to the full panel.
Border: Hanging Tabs and Tassel Trim
The lattice is open, so a solid border would fight the design. The “border” instead finishes the top and bottom tips. The side tips are left free, which keeps the scalloped side edges seen in the photo.
Border gauge: chains at the same 16 sts per 4 in (10.2 cm), so ch 10 = 2.5 in (6.4 cm).
Top edge: 6 hanging tabs per panel
Work this on each of the 6 free top tips of Row 1.
1. Join yarn with a sl st into the ch-3 tip loop.
2. Ch 10, then sl st into the same tip loop to form a loop.
3. Work 14 sc into the ch-10 loop, then sl st into the tip loop. Fasten off.
Count per tab: 10 ch reinforced with 14 sc. Folded, the tab hangs 1.25 in (3.2 cm) deep.
Bottom edge: 6 tassels per panel
Make one tassel for each of the 6 free bottom tips of Row 12.
1. Wrap yarn 20 times around the 4 in (10.2 cm) cardboard.
2. Thread a 9 in (22.9 cm) strand under the wraps at the top and tie it tightly.
3. Cut the wraps at the bottom.
4. Wrap a second strand 6 times around the tassel 0.75 in (1.9 cm) below the top and knot it. Bury the ends inside the tassel.
5. Use the top tie strands to sew the tassel through the bottom ch-3 tip loop.
6. Trim the tassel ends to 4 in (10.2 cm).
Side edges: 12 free tips per side. No stitches are added.
Why the math works: The top edge has one free tip per column, so 6 columns give 6 tabs. The bottom edge works the same way, so 6 columns give 6 tassels. The tab and tassel spacing therefore always equals the motif width of 5.5 in (14.0 cm). Six tabs × 5.5 in = 33 in (83.8 cm), which matches the panel width exactly. Since no stitches are added along the sides, the joined width and the finished width are the same. The tabs add 1.25 in (3.2 cm) at the top. That length hangs on the rings and isn’t counted in the drop.
Final Blocking
- Weave in all ends securely along the inside of the band, not at the tips.
- Lay the panel flat on blocking mats, working in sections if needed.
- Mist the panel evenly until it is damp, not dripping.
- Pin the top tip and bottom tip of each motif 7 in (17.8 cm) apart.
- Pin the side tips so each motif measures 5.5 in (14.0 cm) wide.
- Check that the columns are straight with a long ruler or a taut string.
- Leave the panel to dry completely, about 24 hours.
- Unpin and move on to the next section, overlapping one row so the shape stays continuous.
Final Quality-Control Checklist
- Every motif has 68 sc in Rnd 3 and four clean tips.
- All motifs face the same way.
- Every interior tip is joined. Outer side tips are free.
- The panel measures 33 in × 84 in (83.8 cm × 213.4 cm).
- There are 6 hanging tabs at the top and 6 tassels at the bottom.
- The tassels are an even 4 in (10.2 cm) long.
- No ends show on the front.
- Both panels match in size within 0.5 in (1.3 cm).
Troubleshooting
Corners look rounded: Check that the 3-st corner groups are worked into the marked corner center st every round.
The motif cups or waves: Your tension is tight in Rnd 1 or loose in Rnd 2. Try a larger hook for Rnd 1 only.
Joins pucker: Loosen the sl st of the point join and keep the ch 1 on each side of it.
The panel is too long after hanging: Cotton relaxes a little, so re-block it with less vertical stretch, 6.75 in (17.1 cm) per motif.
Tassels are uneven: Trim them all together while they hang, using a ruler across the bottom.
Care
Hand wash in cool water or machine wash in a mesh bag on a gentle cycle. Lay the panel flat to dry and reshape the diamonds while it’s damp.
Final Notes
The measurement chain is simple:
– A 48-ch ring with 3 rounds gives 68 sc per motif.
– Each motif blocks to 7 in × 5.5 in (17.8 cm × 14.0 cm).
– Six motifs across make 33 in (83.8 cm), and 12 motifs down make 84 in (213.4 cm).
– One tab and one tassel per column finish the top and bottom.
If you check the first motif and the first two joined rows carefully, the rest of the curtain is steady, relaxing repetition. Make two panels for a full window and enjoy the soft golden light coming through.
Happy crocheting!