

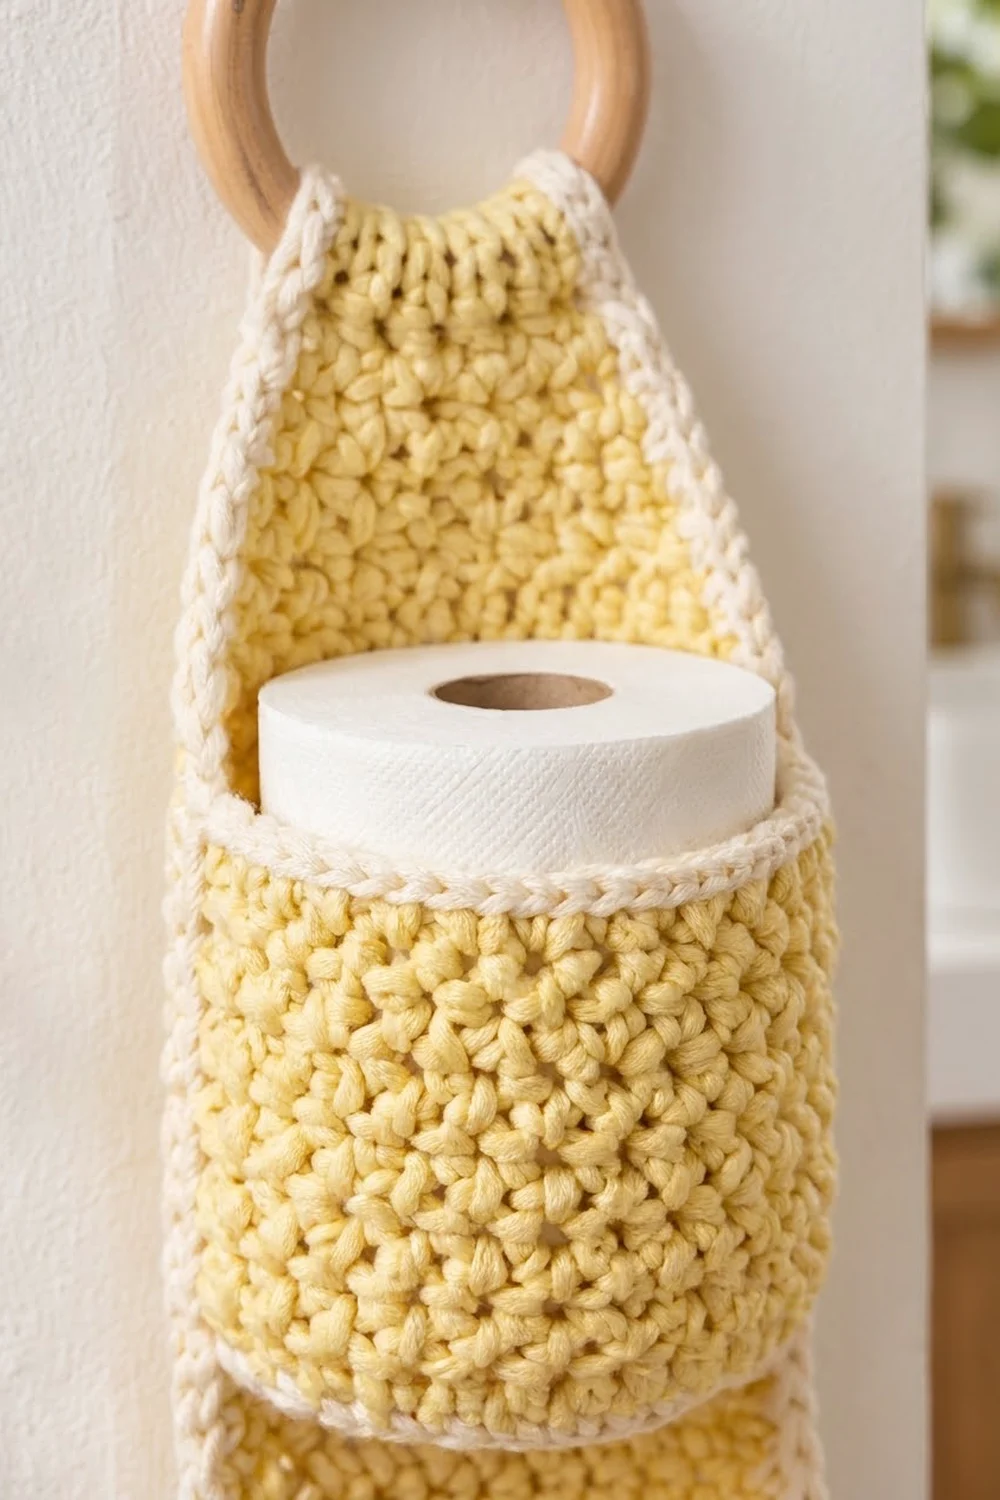
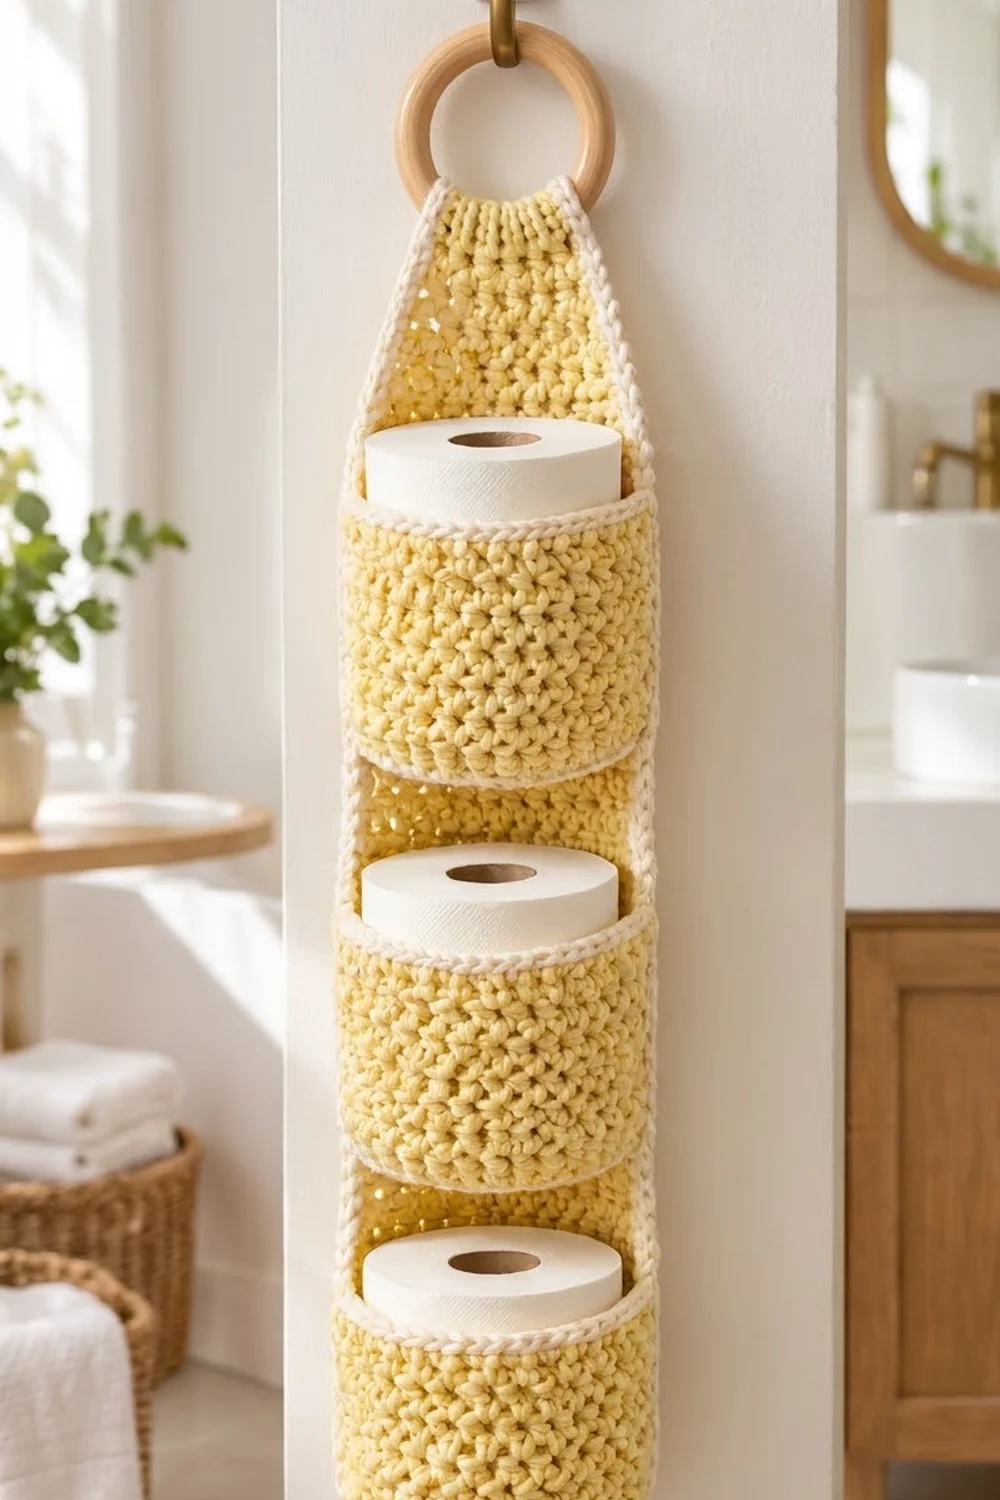
The Buttercup Tower is a tall, slim toilet paper holder that hangs from a wooden ring on a wall hook. It has one long back panel with three round pockets stacked one above the other. Each pocket holds one standard roll, and the top of the roll shows above the rim.
The main color is a soft butter yellow. A creamy off-white edging goes around the whole back panel and each pocket rim. The fabric is dense single crochet, which gives it a pebbly texture that holds its shape and doesn’t sag under the weight of the rolls. The look is bright and calm, and it suits a light, natural bathroom.
This pattern uses US crochet terms. The finished back panel is 6 in (15.2 cm) wide including the border. The holder hangs about 25.5 in (64.8 cm) from the bottom edge to the top of the strap fold, not counting the ring.
The construction is simple:
– Work the back panel flat in rows and taper it into a narrow strap.
– Work three pockets in joined rounds, each starting from a flat base.
– Sew the pockets onto the panel.
– Add a two-round border to the panel.
– Fold the strap over the ring and sew it down.
Finished Size and Construction
- Finished size: 6 in (15.2 cm) wide x 25.5 in (64.8 cm) hanging length
- Skill level: Easy / advanced beginner
- Terminology: US crochet terms
- Yarn weight: Worsted (#4) cotton
- Hook: 5.0 mm (H-8)
- Number of pieces: 4 (1 back panel, 3 pockets)
- Layout: 3 pockets stacked vertically on 1 panel
- Panel size before border: 5 in (12.7 cm) wide x 27 in (68.6 cm) long, unfolded
- Panel size after border: 6 in (15.2 cm) wide x 28 in (71.1 cm) long, unfolded
- Pocket size: 15 in (38.1 cm) around x 3.5 in (8.9 cm) tall walls, including the rim
- Border depth: 0.5 in (1.3 cm) on each edge
Materials
Use a smooth worsted-weight cotton or cotton blend. Cotton keeps the stitches crisp and doesn’t stretch when the pockets are full. Choose a yarn with about 155 m per 100 g.
- Color A (butter yellow): 250 g, about 388 m
- Color B (cream): 50 g, about 78 m
These amounts include a margin of about 15% for your gauge swatch and small differences in tension.
Tools:
- 5.0 mm (H-8) crochet hook
- Wooden ring, 4 in (10.2 cm) outside diameter
- Tapestry needle
- 6 locking stitch markers
- Scissors
- Measuring tape
- Rust-proof pins and a blocking mat
- Wall hook to hang the finished holder
Abbreviations (US Terms)
- ch – chain
- sc – single crochet
- sl st – slip stitch
- inc – 2 sc in the same stitch
- sc2tog – single crochet 2 together
- BLO – back loop only
- MR – magic ring
- st(s) – stitch(es)
- rev sc – reverse single crochet
Special stitch – reverse single crochet (crab stitch): Work from left to right (right to left if you’re left-handed). Insert the hook into the next stitch to the right, yarn over, and pull up a loop. Yarn over again and pull through both loops. This makes the raised, rope-like cream edge.
Gauge and Checkpoints
Gauge: 16 sc x 20 rows = 4 in (10.2 cm) in sc worked flat. That is 4 sts and 5 rows per 1 in (2.5 cm).
Start with a swatch of 20 sts x 20 rows. It should measure 5 in (12.7 cm) wide and 4 in (10.2 cm) tall. Before you start the panel, it’s also a good idea to make one pocket and test it with a real roll.
Checkpoints:
- Panel after Row 20: 5 in (12.7 cm) wide x 4 in (10.2 cm) tall
- Panel after Row 100: 20 in (50.8 cm) long
- Panel after Row 115: 23 in (58.4 cm) long, with the strap 1.5 in (3.8 cm) wide
- Panel after Row 135: 27 in (68.6 cm) long
- Pocket after Round 10: a flat circle about 4.5 in (11.4 cm) across
- Pocket after Round 25: a tube 15 in (38.1 cm) around and 3 in (7.6 cm) tall above the base ridge
If your swatch is too big, go down to a 4.5 mm hook. If it’s too small, go up to a 5.5 mm hook.
Check that the first pocket fits loosely around a roll before you make the other two. If it’s tight, go up one hook size for the pockets only.
Back Panel
Make 1 in Color A.
Row 1: Ch 21, sc in 2nd ch from hook and in each ch across, turn. (20 sts)
Rows 2–100: Ch 1 (doesn’t count as a st), sc in each st across, turn. (20 sts)
Checkpoint: the panel is 20 in (50.8 cm) long.
Taper (Rows 101–115):
Row 101: Ch 1, sc in each st across, turn. (20 sts)
Row 102 (decrease row): Ch 1, sc2tog, sc in each st until 2 sts remain, sc2tog, turn. (18 sts)
Row 103: Ch 1, sc in each st across, turn. (18 sts)
Repeat Rows 102–103 five more times. This puts decreases on Rows 104, 106, 108, 110, 112, and 114, with a plain row after each one. The stitch counts after those decrease rows are 16, 14, 12, 10, 8, and 6 sts.
Row 115: Ch 1, sc in each st across, turn. (6 sts)
That makes 7 decrease rows in total. Each one removes 2 sts, so 20 − 14 = 6 sts. The taper is 15 rows tall, which is 3 in (7.6 cm).
Strap (Rows 116–135): Ch 1, sc in each st across, turn. (6 sts)
The strap is 20 rows, which is 4 in (10.2 cm) long, and it is 1.5 in (3.8 cm) wide. Fasten off and weave in the ends.
Checkpoint: the panel is 27 in (68.6 cm) long and 5 in (12.7 cm) wide at the bottom.
Pockets
Make 3. Work in joined rounds with the right side facing you the whole time. The ch 1 at the start of each round doesn’t count as a stitch. Join each round with a sl st to the first sc.
Base (Color A):
Round 1: Make a MR, ch 1, work 6 sc in the ring, join. (6 sts)
Round 2: Ch 1, inc in each st, join. (12 sts)
Round 3: Ch 1, (sc 1, inc) 6 times, join. (18 sts)
Round 4: Ch 1, (sc 2, inc) 6 times, join. (24 sts)
Round 5: Ch 1, (sc 3, inc) 6 times, join. (30 sts)
Round 6: Ch 1, (sc 4, inc) 6 times, join. (36 sts)
Round 7: Ch 1, (sc 5, inc) 6 times, join. (42 sts)
Round 8: Ch 1, (sc 6, inc) 6 times, join. (48 sts)
Round 9: Ch 1, (sc 7, inc) 6 times, join. (54 sts)
Round 10: Ch 1, (sc 8, inc) 6 times, join. (60 sts)
Checkpoint: you have a flat circle about 4.5 in (11.4 cm) across.
Walls:
Round 11: Ch 1, sc in the BLO of each st, join. (60 sts)
The unused front loops form a ridge. This makes the walls turn upward while the base stays flat.
Rounds 12–25: Ch 1, sc in each st, join. (60 sts)
On the final join of Round 25, pull Color B through to finish the sl st. Cut Color A.
Rim (Color B):
Round 26: Ch 1, sc in each st, join. (60 sts)
Round 27: Ch 1, rev sc in each st, join. (60 sts)
Fasten off and weave in the ends.
The yellow walls (Rounds 11–25) are 15 rounds, which is 3 in (7.6 cm). The two cream rounds add 0.5 in (1.3 cm), so each pocket wall is 3.5 in (8.9 cm) tall. A standard roll sticks up about 0.5 in (1.3 cm) above the rim.
Make All Pieces
- Color A: 1 back panel, plus the base and walls of 3 pockets
- Color B: the rims of 3 pockets now, and the panel border after joining
Layout (front view, top to bottom):
      [ ring ]
      [strap ]   Rows 116–135 (folds over ring)
     [ taper  ]  Rows 101–115
    |          |
    | Pocket 3 |  base at 13 in (33.0 cm)
    |          |
    | Pocket 2 |  base at 7 in (17.8 cm)
    |          |
    | Pocket 1 |  base at 1 in (2.5 cm)
    |__________|  Row 1
Joining
Sew the pockets on before you add the border, so the panel edges stay free for the border. Use Color A and a whipstitch.
Placement: Lay the panel right side up with Row 1 at the bottom. Measure up from the bottom edge and mark where each pocket base will go:
- Pocket 1 at 1 in (2.5 cm), which is Row 6
- Pocket 2 at 7 in (17.8 cm), which is Row 36
- Pocket 3 at 13 in (33.0 cm), which is Row 66
The top of Pocket 3 ends at 16.5 in (41.9 cm). That leaves 3.5 in (8.9 cm) of plain panel below the taper.
Stitch-to-stitch logic: Flatten each pocket and mark the 15 center-back stitches of Round 11. At 4 sts per inch, 15 stitches cover 3.75 in (9.5 cm). The pocket sits centered on the 5 in (12.7 cm) panel, with 0.625 in (1.6 cm) of panel showing on each side.
- Whipstitch the 15 marked front loops of Round 11 to 15 stitches across the marked row. Match one stitch to one stitch.
- From each end of that seam, sew straight up the wall to Round 25. That’s 15 rounds on each side, sewn to 15 panel rows, one to one.
- Whipstitch the 15 back stitches of Round 25 to the panel row they lie on. Leave the cream rim free.
Tension: Pull each stitch snug but not tight. If the panel puckers, your stitches are too tight. If you can see gaps, they’re too loose.
Size checkpoint: The panel should still be 5 in (12.7 cm) wide. The pocket fronts should stand far enough away from the panel to hold a roll easily.
Border
Border gauge: The border keeps the panel’s gauge of 4 sts per inch. Work 1 sc into each stitch along the bottom and top edges. Along the sides, work 4 sc for every 5 row-ends.
Every corner is 3 sc worked into one stitch, and the middle sc of each group is the corner stitch. Each side count below includes both of that side’s corner stitches.
Round 1 (Color B): With the right side facing, join the yarn at the first st of Row 1 (the bottom right corner).
- Bottom edge: 3 sc in the corner st, sc in each of the next 18 sts, 3 sc in the last st. (22 sts on this side)
- First long side: Work 108 sc evenly across the 135 row-ends, which is 4 sc for every 5 rows. (112 sts on this side)
- Strap top: 3 sc in the first st of Row 135, sc in each of the next 4 sts, 3 sc in the last st. (8 sts on this side)
- Second long side: Work 108 sc evenly across the row-ends. (112 sts on this side)
- Join to the first sc.
Round 1 total: 12 corner-group sts + 18 + 108 + 4 + 108 = 250 sts. To double-check, add the side counts and subtract the 4 corners that are each counted twice: 22 + 112 + 8 + 112 − 4 = 250.
Round 2: Ch 1, rev sc in each st around, join. (250 sts) Fasten off and weave in the ends.
Why the math works: The bottom edge has 20 sts on 5 in (12.7 cm), which is 4 sts per inch. Each side is 135 rows at 5 rows per inch, which is 27 in (68.6 cm). Since 135 ÷ 5 × 4 = 108, the side stitches also come out to 4 per inch. That’s why the edge lies flat instead of flaring or pulling in.
The border adds 0.5 in (1.3 cm) to each edge. The unfolded panel becomes 5 + 1 = 6 in (15.2 cm) wide and 27 + 1 = 28 in (71.1 cm) long.
Attach the ring: Pass the strap through the ring from front to back. Fold it in half so the bordered end of the strap lies against the back of the panel at Row 115. Whipstitch it in place with Color B. The 4 in (10.2 cm) strap becomes a loop 2 in (5.1 cm) deep.
Hanging length: 23 in (58.4 cm) of body and taper + 2 in (5.1 cm) of loop + 0.5 in (1.3 cm) of bottom border = 25.5 in (64.8 cm).
Final Blocking
- Lightly spray the holder with water until it’s damp but not soaked.
- Pin the panel flat to 6 in (15.2 cm) wide and 28 in (71.1 cm) long, unfolded. If you’ve already sewn the strap, hang the holder instead.
- Smooth the side borders straight with your fingers.
- Put a roll, or a rolled towel wrapped in plastic, in each pocket to shape it round.
- Let it dry completely, which takes 12–24 hours.
- Remove the forms and check the measurements again.
Final Quality-Control Checklist
- The panel is 6 in (15.2 cm) wide along its full straight length.
- The taper is even on both sides.
- The border has 250 sts, lies flat, and has crisp corners.
- Each pocket rim has 60 cream rev sc.
- The pockets are centered and level, 6 in (15.2 cm) apart from base to base.
- The strap is sewn securely, and the ring doesn’t twist.
- All ends are woven in on the back.
- A roll slides into and out of each pocket without stretching it.
Troubleshooting
- The panel gets narrower: You’re probably skipping the last stitch of the row. Mark the first and last stitches and count to 20 on each row.
- The base cups instead of lying flat: Your tension is tight. Go up half a hook size for Rounds 1–10.
- The base ruffles: Check that each round has exactly 6 increases.
- The walls flare out: Make sure Round 11 is worked in the BLO and the walls stay at 60 sts.
- The border waves: There are too many side stitches. Go back to 4 sc for every 5 rows.
- The border pulls in: There are too few side stitches. Check that each side has 108 sc.
- The pockets sag forward: Add a second line of whipstitches across Round 25.
- The crab stitch twists: Keep your loops loose and work slowly.
Care
Hand wash in cool water with mild soap and lay flat to dry. While it’s still damp, reshape the pockets with rolls.
Final Notes
Every measurement follows from your gauge:
– 16 sc x 20 rows = 4 in (10.2 cm).
– 20 sts make the panel 5 in (12.7 cm) wide, and 135 rows make it 27 in (68.6 cm) long.
– The border adds 0.5 in (1.3 cm) on every edge, for 6 in (15.2 cm) x 28 in (71.1 cm).
– With the strap folded over the ring, the holder hangs 25.5 in (64.8 cm).
– Each 60-st pocket is 15 in (38.1 cm) around.
If your swatch and first pocket match their checkpoints, the rest of the pieces will fit together.
Happy crocheting!