

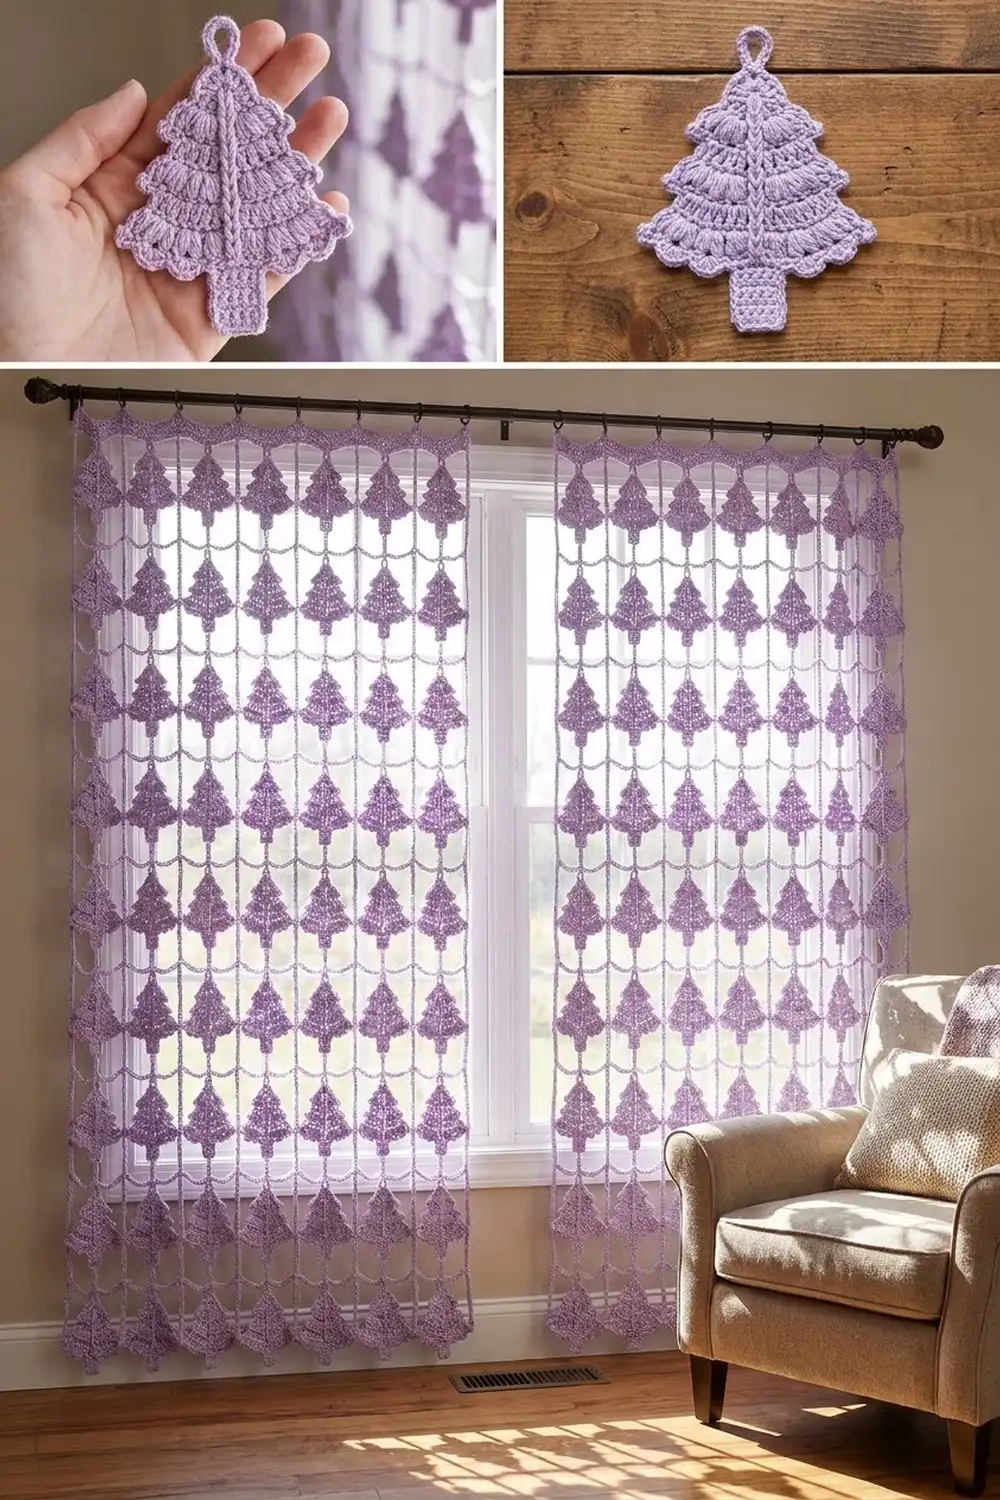
This curtain is a soft, airy screen of crochet Christmas trees in a single lavender cotton. Each tree has a pointed tip, a raised center spine, three tiers of long puff “needles,” and a neat little trunk. The trees hang in vertical strands joined by fine chains, and horizontal chain bridges hold the strands in an even lattice.
The look is calm and seasonal without being loud. Using one color keeps the focus on texture, and window light shows through every gap. Use it as a holiday window dressing, a room divider, or a doorway screen. Because the color is a gentle pastel and not a traditional red or green, you can leave it up well past the holidays as a winter forest.
The pattern uses US crochet terms. Each finished panel measures 26.4 in (67.1 cm) wide and 76 in (193.0 cm) long, not counting the rod loops. The instructions make one panel, so make two for the pair shown.
You crochet each tree in one piece around a foundation chain, then add a short trunk. Next, you work a single-crochet header band and hang six strands of ten trees from it with chain connectors. Last, you tie neighboring strands together with chain bridges.
Finished Size and Construction
- Finished panel size: 26.4 in x 76 in (67.1 cm x 193.0 cm), plus 1.5 in (3.8 cm) rod loops
- Skill level: Intermediate
- Terminology: US crochet terms
- Yarn weight: DK (#3) cotton
- Hook: 4.0 mm (G-6)
- Number of pieces: 60 tree motifs per panel (120 for a pair)
- Layout: 6 strands across x 10 trees down per panel
- Piece size: each tree is 3.5 in x 5.5 in (8.9 cm x 14.0 cm)
- Size before border: the strand section is 26.4 in (67.1 cm) wide x 75 in (190.5 cm) long
- Border depth: 1 in (2.5 cm) header band, plus rod loops
Materials
Choose a smooth, mercerized or combed DK cotton. Cotton gives the puffs crisp definition and helps the curtain hang straight. Avoid fuzzy or very stretchy yarns, because they blur the needles and let long strands sag.
- Lavender DK cotton: 800 g / about 1,760 m (16 balls of 50 g / 110 m) for two panels. One panel needs 400 g / about 880 m.
- Each tree uses about 5.5 g / 12 m.
These quantities include a margin of about 10 percent for swatching and tails.
Tools:
– 4.0 mm (G-6) crochet hook
– Tapestry needle
– Locking stitch markers
– Tape measure
– Rust-proof pins and a blocking mat
– Spray bottle
– Scissors
Abbreviations (US Terms)
- ch – chain
- sc – single crochet
- sl st – slip stitch
- st(s) – stitch(es)
- sp – space
- yo – yarn over
- RS – right side
- lp – long puff (see below)
Special stitch – Long Puff (lp): (Yo, insert hook in the indicated ch, yo, and pull up a loop to the stated length) 3 times. Yo and draw through all 7 loops on the hook, then ch 1 to lock. The locking ch doesn’t count as a stitch, but you work into it in Round 2. The loop length sets the size of each tier:
– Top tier: ¾ in (1.9 cm)
– Middle tier: 1 in (2.5 cm)
– Bottom tier: 1¼ in (3.2 cm)
Gauge and Checkpoints
Gauge: 20 sc and 20 rows = 4 in (10.2 cm) in sc with a 4.0 mm hook.
Chain gauge: 5 ch = 1 in (2.5 cm), relaxed.
Make one complete tree before anything else and measure it at each stage:
- After Round 1: the spine measures about 4 in (10.2 cm) from tip to base.
- After Round 2: the bottom tier is 3.5 in (8.9 cm) wide, and the tree is 4.3 in (10.9 cm) from tip to base.
- After the trunk: the trunk is 1 in (2.5 cm) wide x 1.2 in (3.0 cm) long, and the tree is 5.5 in (14.0 cm) tall.
If your tree is too big, go down half a hook size or pull the puff loops up a little shorter. If it’s too small, go up half a size or make the loops a little longer. Check your chain gauge too, because the connectors and bridges depend on 5 ch = 1 in (2.5 cm).
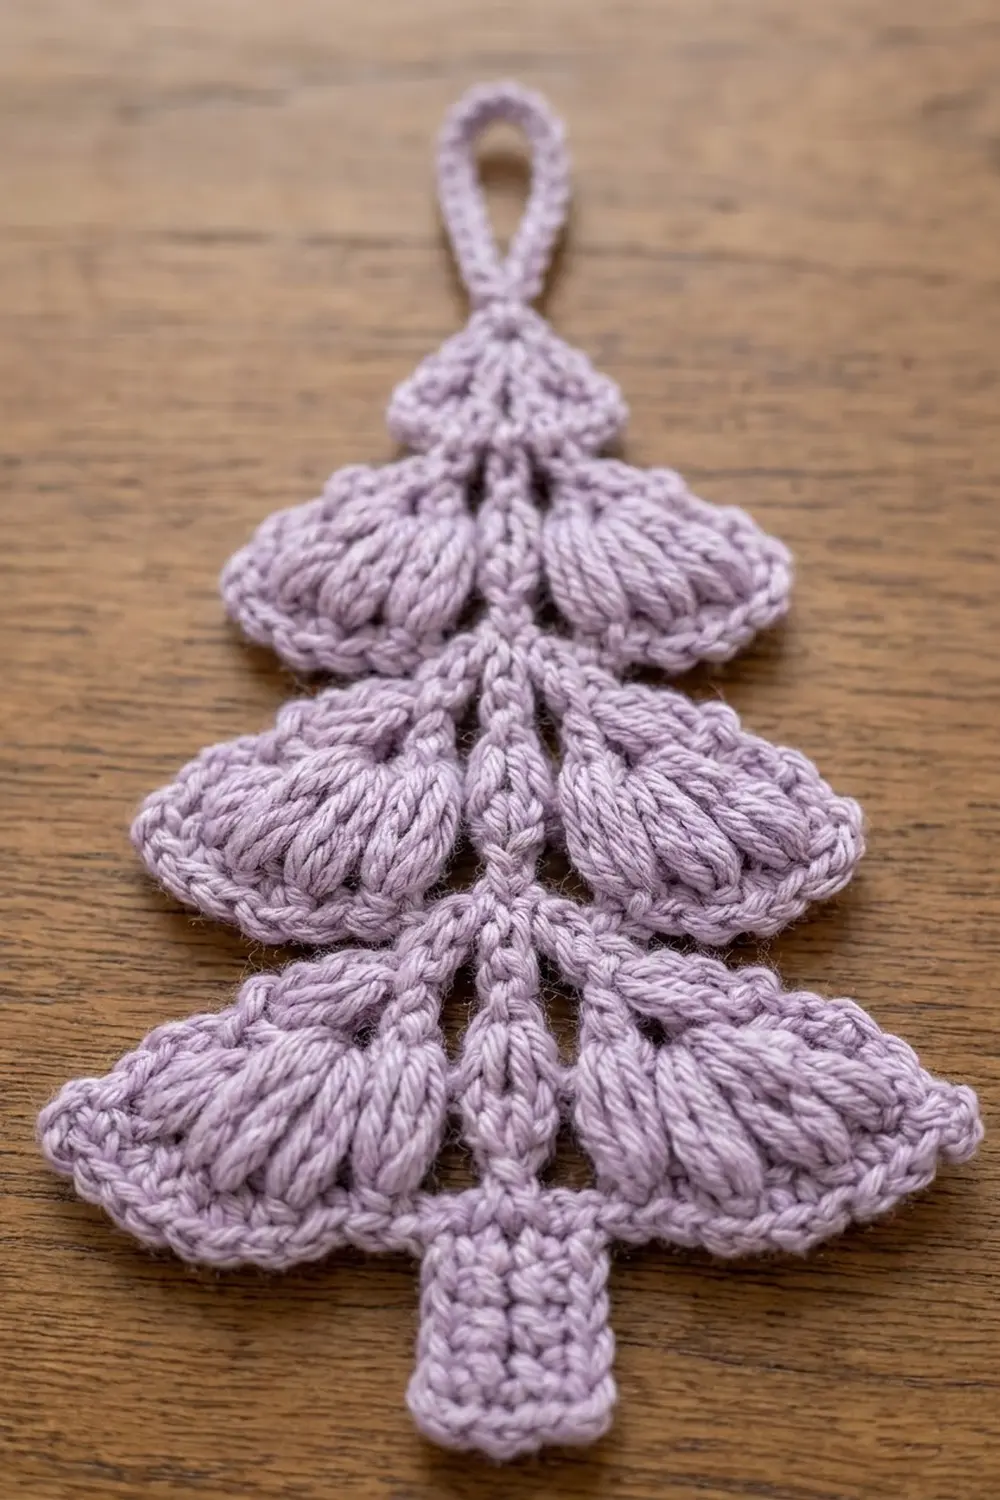
Tree Motif (make 60 per panel)
Foundation
Ch 21. The slip-knot end is the base of the tree, and the hook end is the tip.
Round 1 (spine and puff tiers)
Side 1, from tip to base:
– (Sc, ch 2, sc) in 2nd ch from hook. This forms the tip.
– Sc in next 2 ch.
– Top tier: (lp, ch 1, lp, ch 1, lp) in next ch, with loops pulled to ¾ in (1.9 cm).
– Sc in next 4 ch.
– Middle tier: (lp, ch 1, lp) in next ch, ch 1, (lp, ch 1, lp) in next ch, with loops pulled to 1 in (2.5 cm).
– Sc in next 4 ch.
– Bottom tier: (lp, ch 1, lp) in next ch, ch 1, lp in next ch, ch 1, (lp, ch 1, lp) in next ch, with loops pulled to 1¼ in (3.2 cm).
– Sc in next 2 ch.
Base: 5 sc in last ch.
Side 2, back up to the tip: Work into the free loops on the other side of the foundation chain, mirroring Side 1.
– Sc in next 2 ch.
– Work the bottom tier across the next 3 ch.
– Sc in next 4 ch.
– Work the middle tier across the next 2 ch.
– Sc in next 4 ch.
– Work the top tier in the next ch.
– Sc in next 2 ch.
– Join with a sl st to the first sc.
Count: 55 sts and 19 sps:
– 2 tip sc
– 24 sts per side (12 spine sc + 12 lp)
– 5 base sc
– One ch-2 sp and 18 ch-1 sps
As you work, angle the puffs downward and away from the spine so each tier fans out like a branch.
Round 2 (tier edging, conversion round)
Sl st into the tip ch-2 sp, ch 1, then work (sc, ch 3, sc) in the same sp. The ch-3 is the hanging loop.
Side 1:
– Sl st in next 3 sts (the second tip sc and 2 spine sc).
– Top tier: sc in each lp and 2 sc in each ch-1 sp (7 sc).
– Sl st in next 4 spine sc.
– Middle tier: sc in each lp and 2 sc in each ch-1 sp (10 sc).
– Sl st in next 4 spine sc.
– Bottom tier: sc in each lp and 2 sc in each ch-1 sp (13 sc).
– Sl st in next 2 sc.
Base: Sc in each of the 5 base sc.
Side 2:
– Sl st in next 2 sc.
– Bottom tier (13 sc).
– Sl st in next 4 sts.
– Middle tier (10 sc).
– Sl st in next 4 sts.
– Top tier (7 sc).
– Sl st in next 3 sts.
– Join with a sl st to the first sc. Fasten off.
Count: 93 sts plus the ch-3 loop. That’s 55 sts worked one into each Round 1 st, plus 36 extra sc (2 in each of the 18 ch-1 sps), plus 2 sc in the tip sp: 55 + 36 + 2 = 93.
The sc edging makes a scallop around each fan. The sl sts stay tight along the spine, which raises the center ridge and pulls in a clear notch between tiers.
Trunk
- Row 1: With RS facing, join yarn in the first of the 5 base sc. Ch 1, sc in the same st and in next 4 sts (5 sc).
- Rows 2–6: Ch 1, turn, sc in each st across (5 sc).
Fasten off and weave in all ends. The trunk measures 1 in x 1.2 in (2.5 cm x 3.0 cm).
Make All Pieces
All pieces are lavender:
– Per panel: 60 trees
– For a pair: 120 trees
Lightly block each tree before joining (see Final Blocking). Then stack the trees in groups of ten, one group per strand.
Layout for one panel, viewed from the front (H = header band, T = tree, | = connector chain, — = bridge):
H  H  H  H  H  H    header band, 132 sts
|  |  |  |  |  |    top connectors
T  T  T  T  T  T    row 1
|——|——|——|——|——|    bridges, level 1
T  T  T  T  T  T    row 2
|——|——|——|——|——|    level 2
...                 repeat to
T  T  T  T  T  T    row 10 (trunks hang free)
Joining
Work the header band in the Border section first, then come back here.
Strand positions: The header’s 132 sts divide into 6 cells of 22 sts, and each strand hangs from the 11th st of its cell. On the foundation edge of the header, mark sts 11, 33, 55, 77, 99, and 121. The strands end up 22 sts apart, which is 4.4 in (11.2 cm).
Top connectors: Join yarn at a marked st, ch 10, and sl st into the ch-3 tip loop of tree 1. Fasten off. Repeat for all 6 strands.
Tree-to-tree connectors: Join yarn in the center (3rd) st of trunk Row 6. Ch 10, then sl st into the tip loop of the next tree. Fasten off. Each strand has 9 of these connectors.
Bridges: Place a marker in the 5th ch of every tree-to-tree connector. At each of the 9 levels, join yarn at the marked ch on strand 1, ch 22, and sl st into the marked ch on strand 2. Continue across, making 5 bridges per level and 45 per panel. The 22-ch bridge matches the 22-st strand spacing exactly, so the lattice stays square.
Tension: Keep the chains relaxed and even. Tight chains make the curtain pucker sideways, and loose chains make it sag. Count every chain instead of eyeballing it.
Size checkpoint: Each strand measures 75 in (190.5 cm) from the header to the bottom of the last trunk, because 10 x (2 in connector + 5.5 in tree) = 75 in. The bridges should lie straight across at 4.4 in (11.2 cm).
Border: Header Band
Border gauge: 5 sc and 5 rows = 1 in (2.5 cm), the same as the main gauge.
- Foundation: Ch 133.
- Row 1: Sc in 2nd ch from hook and in each ch across (132 sc). That’s 6 strands x 22 sts per strand cell = 132.
- Rows 2–5: Ch 1, turn, sc in each st across (132 sc). The band now measures 26.4 in x 1 in (67.1 cm x 2.5 cm).
- Row 6 (rod loops): Ch 1, turn. [Sc in next st, ch 15, sl st in the top of the sc just made, sc in next 21 sts] 6 times. Ch 15 and sl st in the last sc. You now have 132 sc and 7 loops.
Fasten off. Each loop is 3 in (7.6 cm) around and stands about 1.5 in (3.8 cm) tall, so it fits a rod up to 1 in (2.5 cm) thick.
Why the math works: At 5 sts per inch, 132 sc equals exactly 26.4 in. Each strand cell is 22 sts, or 4.4 in, which matches the 22-ch bridge. That means the strands, bridges, and header all share one measurement. The loops sit at sts 1, 23, 45, 67, 89, 111, and 132, about every 4.4 in, so the weight spreads evenly along the rod.
Final Blocking
- Before joining, pin each tree flat, RS up. Fan the puffs downward and outward, open the scallops, and square the trunk.
- Spray each tree until it’s damp but not soaked, and let it dry completely.
- After joining, hang the panel from its rod.
- Mist the whole panel evenly.
- Straighten the bridges by hand and adjust the strands so they hang straight down.
- Let the panel dry on the rod. Its own weight settles it to 76 in (193.0 cm).
Final Quality-Control Checklist
- Every tree measures 3.5 in x 5.5 in (8.9 cm x 14.0 cm).
- Every tree has 93 sts in Round 2 and a trunk 5 sts wide and 6 rows long.
- All puffs angle downward, and the tiers get wider toward the base.
- Every connector is 10 ch and every bridge is 22 ch.
- The header has 132 sts and 7 loops.
- Strands are 4.4 in (11.2 cm) apart and 75 in (190.5 cm) long.
- All ends are woven in securely.
Troubleshooting
- Puffs look uneven: Pull every loop up to the same height before closing the puff. A ruler held beside the hook helps.
- Tiers are all the same width: Check that your loop lengths are ¾ in, 1 in, and 1¼ in.
- Spine looks flat: Work the Round 2 sl sts firmly.
- Strands twist: Join every connector into the tip loop from the front, with RS facing.
- Panel narrows in the middle: The bridges are too tight. Redo them with a relaxed chain.
- Header ripples: Your foundation chain is tighter than your stitches. Go up a hook size for the foundation chain only.
- Trees look different sizes: Block each one to 3.5 in x 5.5 in (8.9 cm x 14.0 cm) before joining.
Care
Hand wash in cool water with mild detergent. Roll the panel in a towel to remove water and rehang it to dry, without wringing or tumble drying.
Final Notes
Each measurement leads to the next. A 3.5 in x 5.5 in (8.9 cm x 14.0 cm) tree plus a 2 in (5.1 cm) connector makes a 7.5 in (19.1 cm) drop, and ten drops make a 75 in (190.5 cm) strand. Six strands set 22 sts apart fill a 132-st header 26.4 in (67.1 cm) wide, and the 1 in (2.5 cm) band brings the panel to 76 in (193.0 cm). If your first tree measures correctly, the rest of the curtain will come out the right size.
Happy crocheting!