

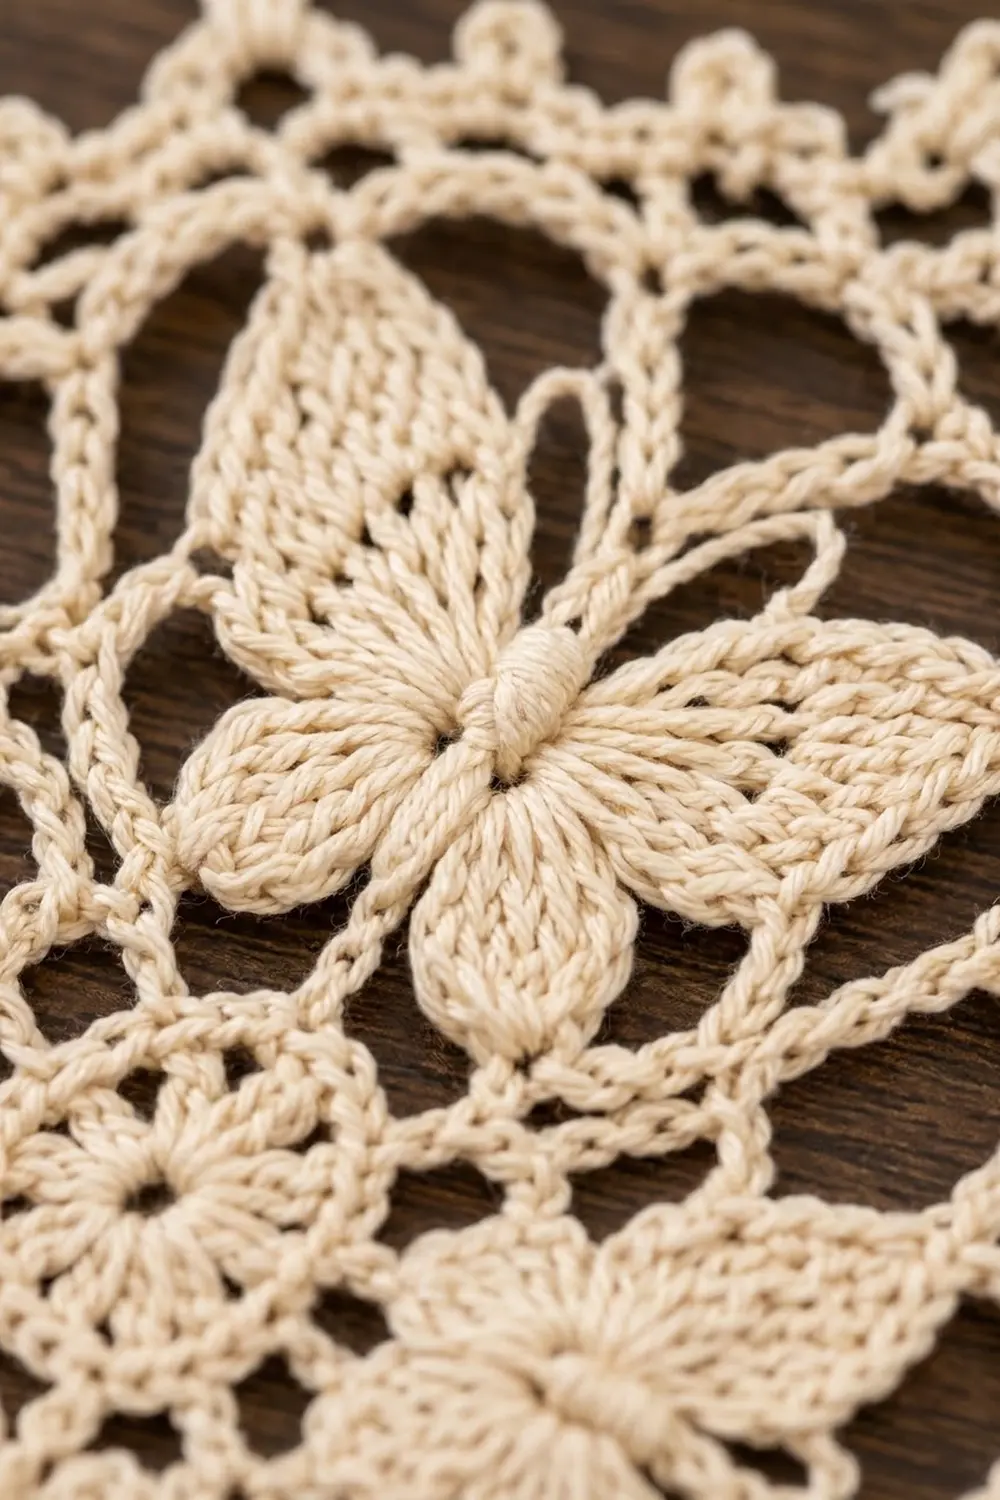
This small round doily has four butterflies set into a light, open lace frame. Each butterfly has soft cluster wings around a raised body, and a ring of picot arches finishes the edge. The doily works up quickly and makes a pretty coaster, a sachet topper or a gift.
The sample is crocheted in one color: a warm cream cotton thread. A single neutral shade lets the texture show clearly, and the wings look almost carved against the open mesh. White, pale pink or soft sage would also suit the vintage-garden style.
This pattern uses US crochet terms throughout. The finished doily is 6¼ in (15.9 cm) in diameter after blocking.
The doily is one piece, worked in joined rounds from the center out. You make a small double crochet wheel, add two rings of chain loops, then work all four butterflies in a single round. A chain-loop frame round connects the wing tips, and a two-round picot border finishes the edge. Nothing is sewn on afterward.
Finished Size and Construction
- Finished size: 6¼ in (15.9 cm) diameter, blocked
- Skill level: Intermediate
- Terminology: US crochet terms
- Yarn weight: Size 3 crochet cotton thread (light fingering)
- Hook: 2.25 mm (US B-1)
- Number of pieces: 1
- Layout: Single round motif with 4 butterflies spaced evenly at 12, 3, 6 and 9 o’clock
- Piece size: 6¼ in (15.9 cm) diameter
- Size before border (after Round 6): 5 in (12.7 cm) diameter
- Border depth (Rounds 7–8): about ⅝ in (1.6 cm) on each side
Materials
Yarn: Use a mercerized cotton thread in size 3. Mercerized thread has a slight sheen, holds clusters crisply and blocks well. Avoid fuzzy or very soft cotton, because the lace and wing shapes will blur.
- Cream (one color): 25 g, about 105 m (115 yd)
The quantity includes a generous margin for a gauge swatch and blocking adjustments. The doily itself uses roughly 18 g.
Tools:
– 2.25 mm (US B-1) crochet hook
– Tapestry needle with a small eye
– Sharp scissors
– Blocking mat or folded towel
– Rustproof pins
– Spray bottle with water
– Optional: light spray starch
Abbreviations (US Terms)
- ch – chain
- sl st – slip stitch
- sc – single crochet
- dc – double crochet
- tr – treble crochet
- dtr – double treble crochet
- sp – space
- st(s) – stitch(es)
- rep – repeat
- MR – magic ring
Special stitches:
- Lower-wing pair (LWP): Worked into one ch-7 loop. Yo twice, insert hook into the left third of the loop, pull up a loop, [yo, pull through 2] twice. Repeat 3 more times in the same left third (5 loops on hook). Then yo twice, insert hook into the right third of the loop, pull up a loop, [yo, pull through 2] twice. Repeat 3 more times in the right third (9 loops on hook). Yo and pull through all 9 loops. This makes two wing lobes with a small gap between them, closed at a single top point.
- Body: After the LWP, ch 1 tightly. This ch-1 is the body stitch that both upper wings grow from.
- Upper wing (UW): Ch 6. Yo three times, insert hook into the body st, pull up a loop, [yo, pull through 2] three times. Repeat 3 more times (5 loops on hook). Yo and pull through all 5 loops. This is a dtr4tog worked into the body st, and its top is the wing tip. Ch 6, then sl st into the body st.
- Picot: Ch 3, sl st in the 3rd ch from the hook.
Gauge and Checkpoints
Gauge matters here because the butterflies need enough room in Round 5 to sit flat. Work Rounds 1–3 as a test piece first. If they measure correctly, continue straight on with the same piece.
Checkpoints (measured flat, lightly pressed, before blocking):
– After Round 1: 1 in (2.5 cm)
– After Round 2: 1¼ in (3.2 cm)
– After Round 3: 2 in (5.1 cm), which is the main gauge check
– After Round 4: 2¾ in (7.0 cm)
– After Round 5: 4½ in (11.4 cm), measured from wing tip to opposite wing tip
– After Round 6: 5 in (12.7 cm)
– After Round 7: 5½ in (14.0 cm)
– After Round 8 and blocking: 6¼ in (15.9 cm)
If your Round 3 is too big (2¼ in / 5.7 cm or more), go down to a 2.0 mm hook. If it’s too small (1¾ in / 4.4 cm or less), go up to a 2.5 mm hook. A difference of ¼ in (0.6 cm) at Round 3 grows to about ¾ in (1.9 cm) at the edge, so fix it now.
Pattern
Round 1 – Center Wheel
Make a MR. Ch 3 (counts as the first dc), then work 15 dc into the ring. Pull the ring closed, leaving a small hole about ⅛ in (0.3 cm) wide. Sl st to the top of the beginning ch-3.
Count: 16 dc.
Round 2 – Wheel Outline
Ch 1, 2 sc in each dc around. Sl st to the first sc.
Count: 32 sc.
This is a growth round: every one of the 16 stitches from Round 1 gets 2 sc, for 32 sc total. The sc ring forms the raised outline around the spokes.
Round 3 – First Loop Ring
Ch 1, sc in the same st as the join. Ch 5, skip 3 sc, sc in the next sc. Rep from * 6 more times. Ch 5, skip the last 3 sc, sl st to the first sc.
Count: 8 sc and 8 ch-5 loops.
Check: 8 repeats × 4 sc used per repeat (1 worked into, 3 skipped) = 32 sc. That matches Round 2 exactly.
Measure now. The piece should be 2 in (5.1 cm) across.
Round 4 – Second Loop Ring
Sl st in the next 2 ch to reach the center of the first ch-5 loop. Ch 1, sc in the same loop. Ch 7, sc in the next ch-5 loop. Rep from * 6 more times. Ch 7, sl st to the first sc.
Count: 8 sc and 8 ch-7 loops.
Label the loops as you go: loop 1 is A, loop 2 is B, and so on, alternating A, B, A, B. You’ll have 4 A loops and 4 B loops. Butterflies are worked into the A loops, and the B loops are spacers.
Round 5 – Butterfly Round
Sl st in the next 3 ch of the last B loop (the loop just before the join), so you’re at the center of that B loop. Ch 1, sc in the same loop.
Ch 4. Work an LWP in the next A loop. Ch 1 for the body. Work 1 UW, then 1 more UW, both from the same body st. Ch 4, sc in the next B loop. Rep from * 3 more times, but on the last repeat skip the final sc. Instead, sl st to the first sc of the round.
Count: 4 butterflies, 4 sc (one in each B loop), 8 ch-4 spaces, and 8 upper wings.
How the butterfly forms: The LWP’s legs are anchored in the A loop, close to the center. Its legs come together at the top, so the two lower wings point inward and meet at the body. Each UW begins and ends at the body st, and its dtr cluster closes at the far end. That makes each upper wing a leaf pointing outward. Upper wings use dtr and lower wings use tr, so the upper wings are bigger, as in the photo.
Gently spread the two upper wings of each butterfly into a V that opens away from the center. Check: the piece should be 4½ in (11.4 cm) from wing tip to opposite wing tip.
Round 6 – Frame Round
Ch 1, sc in the same st as the join (the first B-loop sc). Ch 7, sc in the tip of the next UW. Ch 5, sc in the tip of the following UW. Ch 7, sc in the next B-loop sc. Rep from * 3 more times, but on the last repeat sl st to the first sc instead of working the final sc.
Count: 12 sc and 12 loops (8 ch-7 loops and 4 ch-5 loops).
Per butterfly section: 3 anchors (2 wing tips + 1 B sc) and 3 loops. 4 sections × 3 = 12 loops.
Lay the piece flat. It should measure 5 in (12.7 cm) and lie without cupping. This is your size before the border.
Border
The border is two rounds: a doubling round of chain loops, then the picot arches. Border gauge: each ch-5 loop of Round 7 spans about ¾ in (1.9 cm) along the edge before blocking.
Round 7 – Doubling Round
Sl st in the next 3 ch to reach the center of the first loop. Ch 1. In the current loop work (sc, ch 5, sc), then ch 5 and move to the next loop. Rep from * in all 12 loops. Sl st to the first sc.
Count: 24 sc and 24 ch-5 loops (12 worked inside the old loops + 12 between them).
This is a conversion round. Each of the 12 old loops gives 1 new loop inside it, and 1 new loop links it to the next old loop: 12 + 12 = 24. Per butterfly section: 6 ch-5 loops.
Check: the piece should be 5½ in (14.0 cm) across.
Round 8 – Picot Arch Edge
Sl st in the next 2 ch to reach the center of the first ch-5 loop. Ch 1, sc in the same loop. Ch 4, picot, ch 4, sc in the next ch-5 loop. Rep from * 22 more times. Ch 4, picot, ch 4, sl st to the first sc. Fasten off.
Count: 24 sc and 24 picot arches.
Per butterfly section: 6 picot arches.
Why the math works: A flat circle needs its edge to grow about 6 times faster than the radius. Round 6 has 12 loops around a 5 in (12.7 cm) circle. Doubling to 24 loops in Round 7 adds enough length for the next ⅝ in (1.6 cm) of depth. Round 8 keeps the same 24 anchors and adds length through the chains and picots. That makes the edge ruffle just slightly, so blocking can open it into crisp scallops instead of letting it cup.
Weave in both ends along the chain loops, splitting the thread fibers as you go, then trim.
Final Blocking
- Soak the doily in cool water for 10 minutes, then press out the water gently in a towel. Don’t wring it.
- Optional: mist it with light starch for a crisper finish.
- Lay the doily face up on the blocking mat. Draw or imagine a 6¼ in (15.9 cm) circle.
- Pin the center hole open with one pin.
- Pin all 24 picots evenly around the circle, starting with 4 pins at 12, 3, 6 and 9 o’clock above the butterflies.
- Shape each butterfly. Push the lower wings toward the center, open the upper wings into a V, and round the body with a fingertip.
- Pull the Round 6 ch-7 loops gently outward so they curve evenly.
- Let it dry completely, about 6–8 hours, before removing the pins.
Final Quality-Control Checklist
- Diameter is 6¼ in (15.9 cm) across in several directions.
- The center hole is closed to about ⅛ in (0.3 cm).
- Round 2 has 32 sc, and Round 3 has 8 even loops.
- All 4 butterflies sit at 12, 3, 6 and 9 o’clock.
- Every butterfly has 2 lower wings pointing inward and 2 larger upper wings pointing outward.
- Round 6 has 12 loops, 3 per butterfly section.
- Rounds 7 and 8 each have 24 repeats, 6 per section.
- All 24 picots are formed and pinned evenly.
- The doily lies flat with no cupping or ruffling.
- All ends are woven in invisibly.
Troubleshooting
The doily cups after Round 5. Your chains are too tight. Loosen the ch-4 spaces, or add 1 ch to each one, so you have ch 5.
The edge ruffles after Round 8. Change ch 4 to ch 3 on both sides of each picot, or go down a hook size for the border only.
Lower wings look like one blob. Spread the two groups of legs farther apart in the A loop, leaving a clear gap in the middle third.
Upper wings twist or lean. Pull the final sl st of each UW snugly into the body st. Then reshape the wings during blocking.
The center hole won’t close. Weave the tail back through the base of the Round 1 stitches and cinch it tight.
Count is off in Round 7. Make sure each old loop gets both sc, with ch 5 between them, before moving on.
Care
Hand wash in cool water with mild soap, roll it in a towel, and dry it flat. Re-pin to 6¼ in (15.9 cm) if it needs reshaping.

Final Notes
The measurement chain is simple to follow: 1 in (2.5 cm) after the wheel, 2 in (5.1 cm) at the gauge check, 4½ in (11.4 cm) once the butterflies are in, 5 in (12.7 cm) before the border, and 6¼ in (15.9 cm) blocked. If you check your size at each step, the four butterflies will sit evenly inside a neat picot edge.
Happy crocheting!