

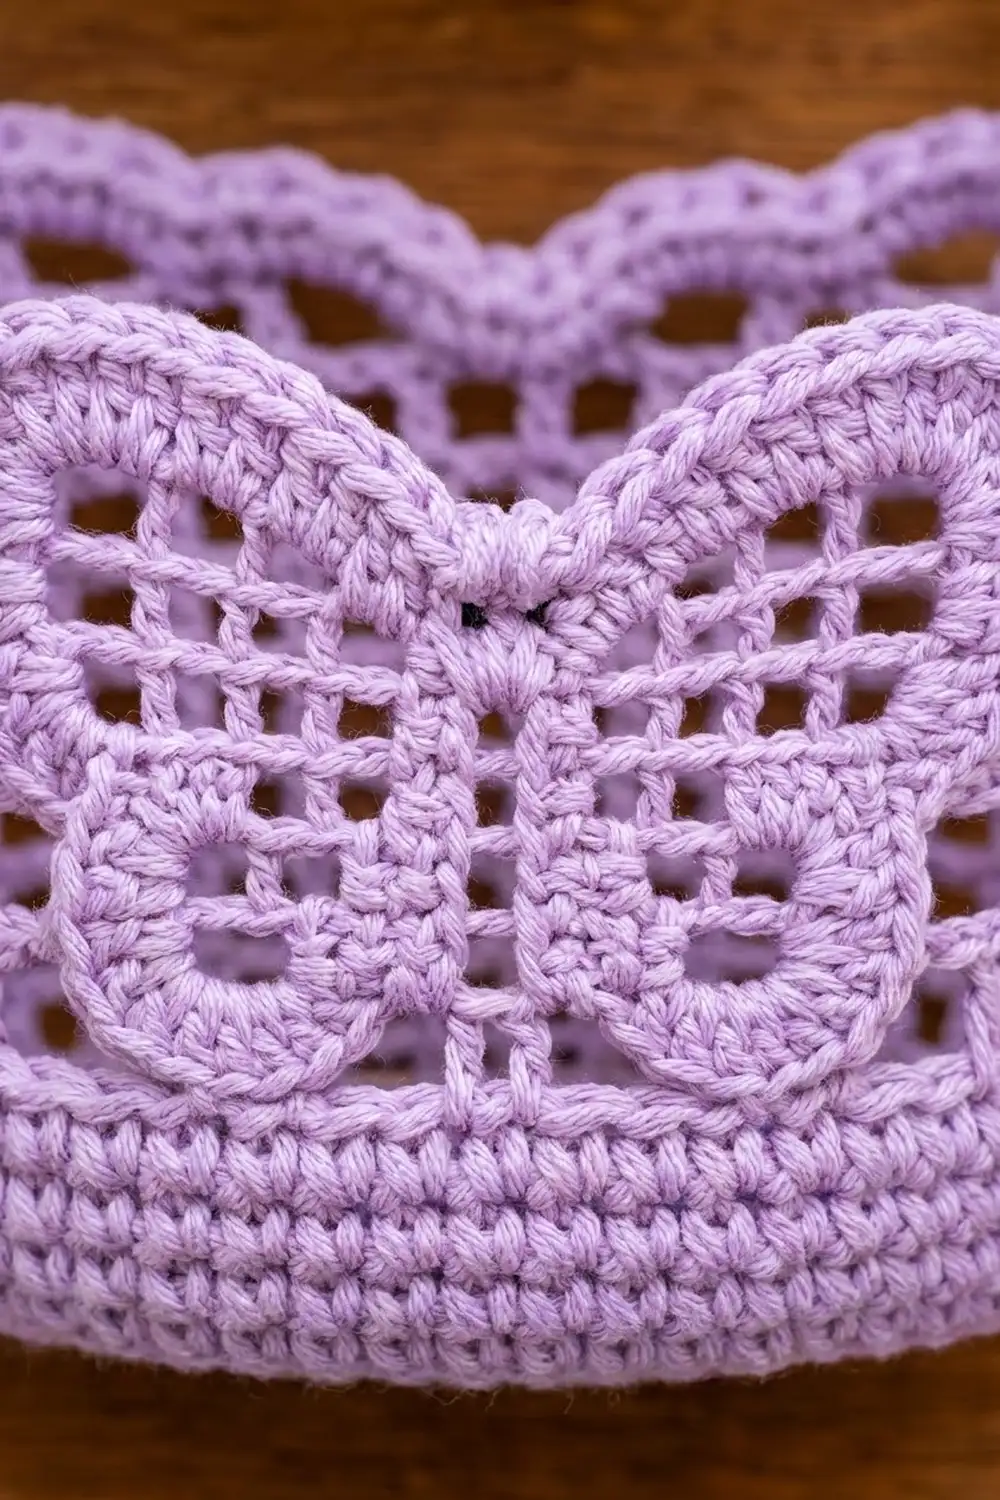
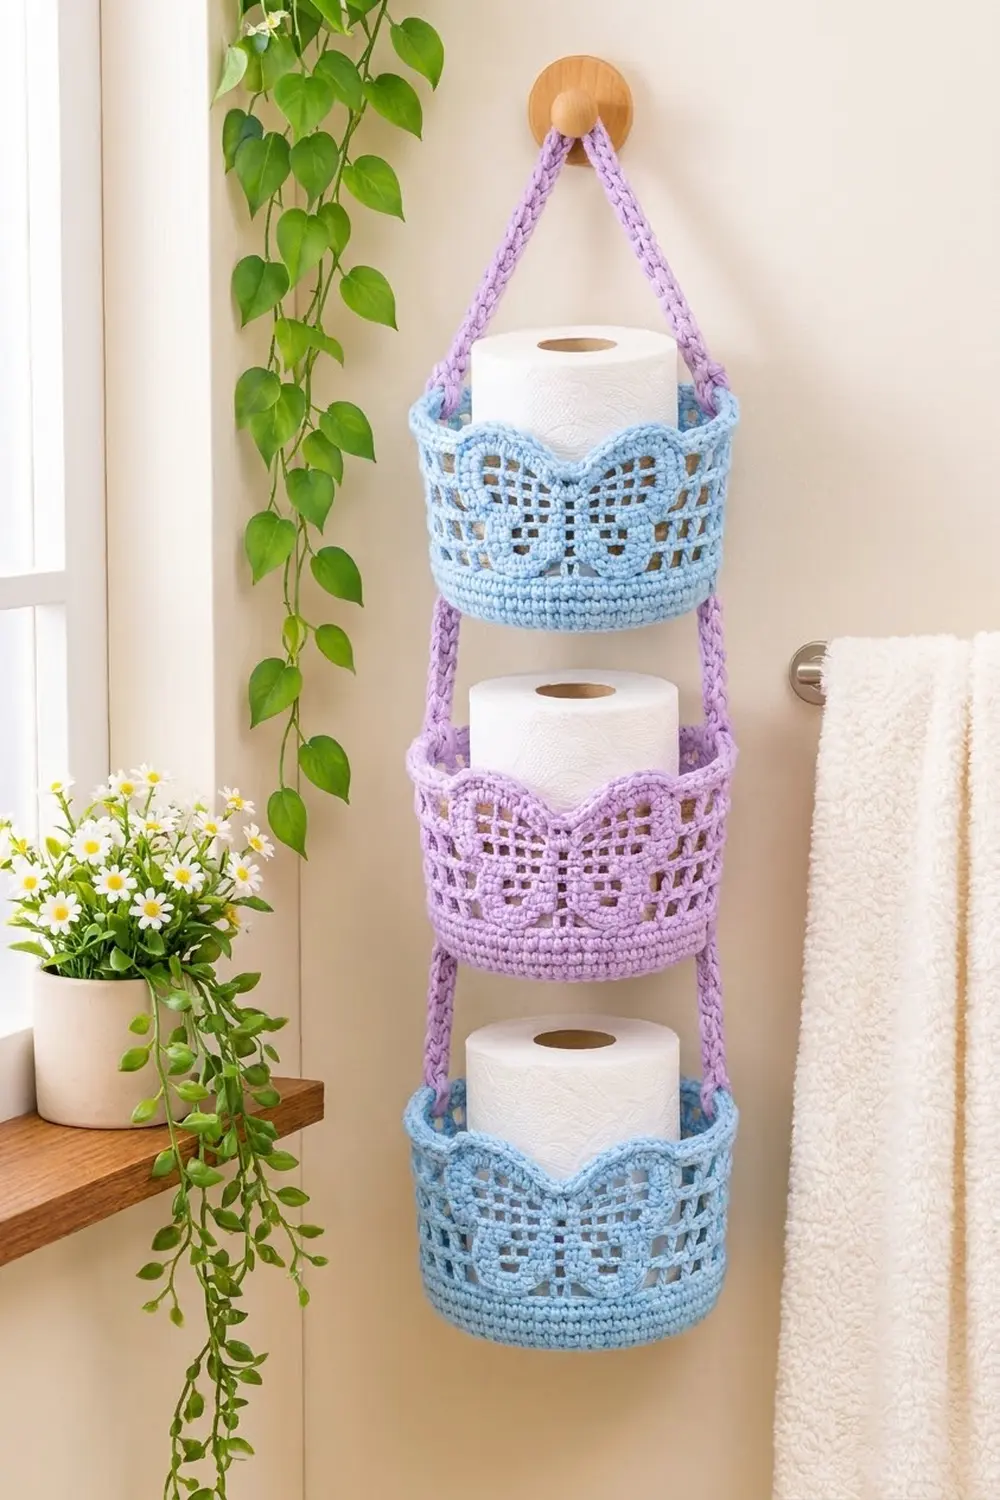
This three-tier hanging holder turns spare toilet rolls into a small piece of bathroom decor. Each basket has a flat, heart-shaped base, a solid lower band, an open filet wall with a butterfly across the front, and a scalloped rope rim.
The sample uses two soft pastels: sky blue for the top and bottom baskets and lavender for the middle basket, the cords and the hanging ring. The result looks light and cottage-style, and the solid lower band keeps each basket sturdy.
This pattern uses US crochet terms. Each basket measures 7 in (17.8 cm) wide and 5 in (12.7 cm) deep. The walls are 4.5 in (11.4 cm) tall at the sides and 5 in (12.7 cm) at the peaks. The assembled holder hangs about 24.5 in (62.2 cm) from the ring to the bottom basket.
Construction: you work each base in oval rounds, then raise the walls in back loops, add filet mesh rounds with the butterfly, and finish with a shaped rim border. After that you make two slip-stitch cords and a ring, sew the cords down the sides of the stacked baskets, and join them at the ring.
Finished Size and Construction
- Finished size: 7 in (17.8 cm) wide × about 24.5 in (62.2 cm) long, hanging
- Skill level: Intermediate
- Terminology: US
- Yarn weight: Worsted (#4) cotton
- Hook: 4.0 mm (G-6)
- Number of pieces: 6 (3 baskets, 2 cords, 1 ring)
- Layout: 1 column × 3 tiers
- Piece size (basket): 7 in (17.8 cm) wide × 5 in (12.7 cm) deep × 4.5 in (11.4 cm) tall at the sides
- Wall height before border: about 4 in (10.2 cm)
- Border depth: about 0.5 in (1.3 cm) at the sides and 1 in (2.5 cm) at the front and back peaks
Materials
Use a smooth, firm worsted-weight cotton with about 170 m per 100 g (186 yd per 100 g). Cotton holds its shape, makes crisp filet blocks and survives a humid bathroom. Avoid fuzzy or very stretchy acrylic, because the walls may slump.
- Color A, sky blue: 90 g / 155 m (2 baskets)
- Color B, lavender: 60 g / 100 m (1 basket, 2 cords, 1 ring)
Tools:
– 4.0 mm (G-6) crochet hook
– Tapestry needle
– 6 locking stitch markers
– Measuring tape
– Rust-proof pins
– A plastic-wrapped toilet roll or a similar container for blocking
– Wall peg or hook for hanging
These quantities include about a 15% margin for the gauge swatch and tails.
Abbreviations (US Terms)
- ch: chain
- sl st: slip stitch
- sc: single crochet
- hdc: half double crochet
- dc: double crochet
- tr: treble crochet
- BLO: back loop only
- sp: space
- st(s): stitch(es)
- rev sc: reverse single crochet (crab stitch). Work sc from left to right: insert the hook into the next st to the right, yarn over, pull up a loop, yarn over, then pull through both loops.
Filet cells: each cell is 2 sts wide.
– Open cell: dc in next st, ch 1, skip next st (or skip the ch-1 sp).
– Filled cell: dc in next st, dc in next st (or dc in the ch-1 sp).
Gauge and Checkpoints
Gauge: 16 sc × 18 rounds = 4 in (10.2 cm). In filet mesh, 8 cells = 4 in (10.2 cm) wide and 5 rounds = 2.5 in (6.4 cm) tall.
Make one complete basket before you start the others. It is your real gauge test.
- After Rnd 10: base is 6.75 in (17.1 cm) × 4.25 in (10.8 cm)
- After Rnd 11: base is 7 in (17.8 cm) × 4.75 in (12.1 cm) at center, 5 in (12.7 cm) at the lobes
- After Rnd 17: solid wall band is 1.3 in (3.3 cm) tall
- After Rnd 22: wall is about 3.8 in (9.7 cm) tall
- After Rnd 25: wall is 4.5 in (11.4 cm) at the sides
If your piece comes out too big, go down one hook size (3.75 mm). If it is too small, go up one size (4.5 mm). Do not change the stitch counts, because the rim and cord math depends on 86 sts.
Basket (Make 3)
Base
Ch 13.
Rnd 1: 3 sc in 2nd ch from hook, sc in next 10 ch, 3 sc in last ch. Working along the opposite side of the foundation chain, sc in next 10 ch. Join with sl st to first sc. (26 sts: End 1 = 3, Side A = 10, End 2 = 3, Side B = 10)
All following rounds begin with ch 1 (does not count) and are joined with sl st to the first st. Do not turn.
Rnd 2: [2 sc in each of next 3 sts, sc in next 10 sts] twice. (32 sts)
Rnd 3: [(sc in next st, 2 sc in next st) 3 times, sc in next 10 sts] twice. (38 sts)
Rnd 4: [(sc in next 2 sts, 2 sc in next st) 3 times, sc in next 10 sts] twice. (44 sts)
Rnd 5: [(sc in next 3 sts, 2 sc in next st) 3 times, sc in next 10 sts] twice. (50 sts)
Rnd 6: [(sc in next 4 sts, 2 sc in next st) 3 times, sc in next 10 sts] twice. (56 sts)
Rnd 7: [(sc in next 5 sts, 2 sc in next st) 3 times, sc in next 10 sts] twice. (62 sts)
Rnd 8: [(sc in next 6 sts, 2 sc in next st) 3 times, sc in next 10 sts] twice. (68 sts)
Rnd 9: [(sc in next 7 sts, 2 sc in next st) 3 times, sc in next 10 sts] twice. (74 sts)
Rnd 10: [(sc in next 8 sts, 2 sc in next st) 3 times, sc in next 10 sts] twice. (80 sts: each end = 30, each side = 10)
Rnd 11 (lobe round): Ch 2 (does not count). Side B becomes the back.
– End 1, first 10 sts: 2 dc in next st, dc in next st, 2 dc in next st, dc in next st, 2 hdc in next st, hdc in next 2 sts, sc in next 3 sts. (13 sts)
– End 1, remaining sts: sc in next 20 sts.
– Side A (front): sc in next 10 sts.
– End 2, first 20 sts: sc in next 20 sts.
– End 2, last 10 sts: sc in next 3 sts, hdc in next 2 sts, 2 hdc in next st, dc in next st, 2 dc in next st, dc in next st, 2 dc in next st. (13 sts)
– Side B (back): dc in next 2 sts, hdc in next st, sc in next 4 sts (center dip), hdc in next st, dc in next 2 sts.
Join to first dc. (86 sts = 13 + 20 + 10 + 20 + 13 + 10)
The taller stitches at both back corners form the two lobes, and the 4 sc between them form the dip. Number the sts 1–86 from the join from now on. St 1 stays at the start of every round.
Walls
Rnd 12: Ch 1, sc in BLO of each st around. (86 sts) The unworked front loops make a crisp fold line for the base edge.
Rnds 13–17: Ch 1, sc in each st around. (86 sts) The solid band should be 1.3 in (3.3 cm) tall.
Filet Butterfly Section
There are 43 cells in each round (86 ÷ 2). Cell k covers sts 2k−1 and 2k, so the butterfly fills cells 13–25 (sts 25–50) on the front. Place a marker in st 25.
Start each round with ch 4 (counts as dc + ch 1) and skip the next st. This makes cell 1 open. Join with sl st to the 3rd ch of the beginning ch. All cells not listed are open.
Rnd 18: Filled cells 14, 15, 19, 23, 24. (43 cells, 86 sts)
Rnd 19: Filled cells 13, 16, 19, 22, 25. (43 cells, 86 sts)
Rnd 20: Filled cells 14–17, 19, 21–24. (43 cells, 86 sts)
Rnd 21: Filled cells 13, 17, 19, 21, 25. (43 cells, 86 sts)
Rnd 22: Filled cells 14–16, 18, 20, 22–24. (43 cells, 86 sts)
Here is how the 13 motif cells look, with the top row first (X = filled, o = open):
Rnd 22:  o X X X o X o X o X X X o
Rnd 21:  X o o o X o X o X o o o X
Rnd 20:  o X X X X o X o X X X X o
Rnd 19:  X o o X o o X o o X o o X
Rnd 18:  o X X o o o X o o o X X o
- Upper wings: Rnds 20–22
- Lower wings: Rnds 18–20
- Body: cell 19, Rnds 18–21
- Antennae: cells 18 and 20 in Rnd 22
Rnd 23: Ch 1, sc in each dc and each ch-1 sp around. (86 sts) The wall should be about 4 in (10.2 cm) tall. Leave the yarn attached and go to the Rim Border below before joining.
Make All Pieces
- Color A: 2 baskets (top and bottom tiers)
- Color B: 1 basket (middle tier), 2 cords, 1 ring
Finish all three baskets through Rnd 25 (see Rim Border) before joining.
Cord (make 2): Ch 111. Sl st in the back bump of the 2nd ch from hook and in each ch across. (110 sl sts)
Cord gauge is 9 sl sts = 2 in (5.1 cm), so the finished cord is about 24.5 in (62.2 cm). Mark these points on each cord:
– Sts 1–32: top drop, about 7 in (17.8 cm)
– Sts 33–52: sewn to the top basket
– Sts 53–61: gap, 2 in (5.1 cm)
– Sts 62–81: sewn to the middle basket
– Sts 82–90: gap, 2 in (5.1 cm)
– Sts 91–110: sewn to the bottom basket
Ring: Ch 8, join with sl st to form a ring. Work 16 sc into the ring and join. (16 sts, about 1 in / 2.5 cm across)
Layout:
        [ring]
        /    \
   cord      cord
  [  Basket 1 – A  ]
  [  Basket 2 – B  ]
  [  Basket 3 – A  ]
Joining
Sew the cords on with a tapestry needle and matching yarn, using a whipstitch.
Position: Each cord runs down the dc column at st 15 (left side) and st 59 (right side). These are the center columns of the side zones, so the butterflies face forward.
Stitch-to-stitch logic: Sew cord sts 33–52 to the top basket. Pin these 4 anchor points first:
1. Cord st 33 at Rnd 25 (rim)
2. Cord st 35 at Rnd 23
3. Cord st 47 at Rnd 17 (top of the solid band)
4. Cord st 52 at Rnd 12 (base fold)
Between anchors, whipstitch through the cord and the wall stitch beside it. In the filet section, wrap around the dc post of that column.
Repeat with cord sts 62–81 on the middle basket and sts 91–110 on the bottom basket, using the same anchor offsets.
Tension: Keep the whipstitches snug but not tight. The cord should lie flat against the wall without puckering it. Leave the gap sections free.
Top: Sew st 1 of each cord to opposite sides of the ring’s lower edge.
Size checkpoint: Hang the holder empty.
– Each gap between a basket’s base and the rim of the basket below it should be 2 in (5.1 cm).
– All three baskets should hang level.
– Total length should be about 24.5 in (62.2 cm).
Rim Border
Work this on each basket directly after Rnd 23. Border gauge matches the body: 16 sts = 4 in (10.2 cm) along the edge.
The 86 sts form 4 zones:
– Left side: sts 8–24 (17 sts)
– Front: sts 25–50 (26 sts)
– Right side: sts 51–67 (17 sts)
– Back: sts 68–86 plus sts 1–7 (26 sts)
Rnd 24 (shaping): Ch 3 (counts as dc).
– Back, part 1: dc in next 4 sts, hdc in next 2 sts.
– Left side: sc in next 17 sts. (17)
– Front: hdc in next 2 sts, dc in next 2 sts, tr in next 4 sts, dc in next 2 sts, hdc in next 2 sts; sc in next 2 sts (center dip); hdc in next 2 sts, dc in next 2 sts, tr in next 4 sts, dc in next 2 sts, hdc in next 2 sts. (26)
– Right side: sc in next 17 sts. (17)
– Back, part 2: hdc in next 2 sts, dc in next 10 sts, sc in next 2 sts (back dip), dc in next 5 sts.
Join to top of ch-3. (86 sts: back 26 = 2 hdc + 10 dc + 2 sc + 10 dc [5 at round start + 5 at end] + 2 hdc)
Rnd 25: Ch 1, rev sc in each st around. (86 sts) Join and fasten off.
Why the math works: 86 = 26 + 17 + 26 + 17. The front zone has exactly 26 sts, the same width as the 13-cell butterfly, so each tr peak sits over a wing and the center dip sits over the body (sts 37–38 = cell 19).
The back peaks sit above the base lobes, so the rim echoes the base outline. Neither rim round adds or removes stitches, so the border lies flat without ruffling.
Final Blocking
- Soak each basket in cool water for 10 minutes, then press out the water in a towel.
- Slide each basket over a plastic-wrapped toilet roll or container that is about 4.5 in (11.4 cm) across.
- Fold the base edge sharply along the Rnd 12 front loops.
- Square the filet cells and press the butterfly blocks flat with your fingers.
- Pin the rim peaks upward and pinch the center dips into a gentle V.
- If you want firmer walls, mist with spray starch.
- Let the baskets dry completely, about 24 hours.
- Steam the cords lightly and hang them straight to dry.
Final Quality-Control Checklist
- [ ] Each base measures 7 in (17.8 cm) × 4.75 in (12.1 cm) at center
- [ ] Every wall round has 86 sts or 43 cells
- [ ] The butterfly is centered on the front, between sts 25 and 50
- [ ] Rim peaks line up over the wings and over the base lobes
- [ ] Walls are 4.5 in (11.4 cm) tall at the sides
- [ ] Each cord has 110 sl sts and measures about 24.5 in (62.2 cm)
- [ ] Gaps between tiers are 2 in (5.1 cm)
- [ ] All tails are woven in securely
Troubleshooting
- Base cups upward: Your sc tension is tight. Go up a hook size for Rnds 1–11 only.
- Base ruffles: Make sure you are putting exactly 3 increases at each end per round.
- Walls lean outward: Rnd 12 must be worked in BLO, and your Rnds 13–17 tension should match the base.
- Butterfly looks off-center: Check that the marker is in st 25 and that every round starts at st 1.
- Rim peaks are flat: Make sure you worked tr (not dc) in the 4 center stitches of each wing, then block with pins.
- Basket tilts when hanging: Re-pin the cord anchors so both sides match row for row.
Care
Hand wash in cool water, reshape over a roll, and lay flat or hang to dry. Avoid the dryer, which can shrink cotton and soften the walls.
Final Notes
The measurement chain:
– A 7 in × 4.75 in (17.8 cm × 12.1 cm) base with 86 sts
– 6 solid rounds of 1.3 in (3.3 cm)
– 5 filet rounds of 2.5 in (6.4 cm)
– A rim that brings the sides to 4.5 in (11.4 cm)
– 110-st cords that space the tiers 2 in (5.1 cm) apart
Check each link in that chain on your first basket and the rest will follow. Happy crocheting!