

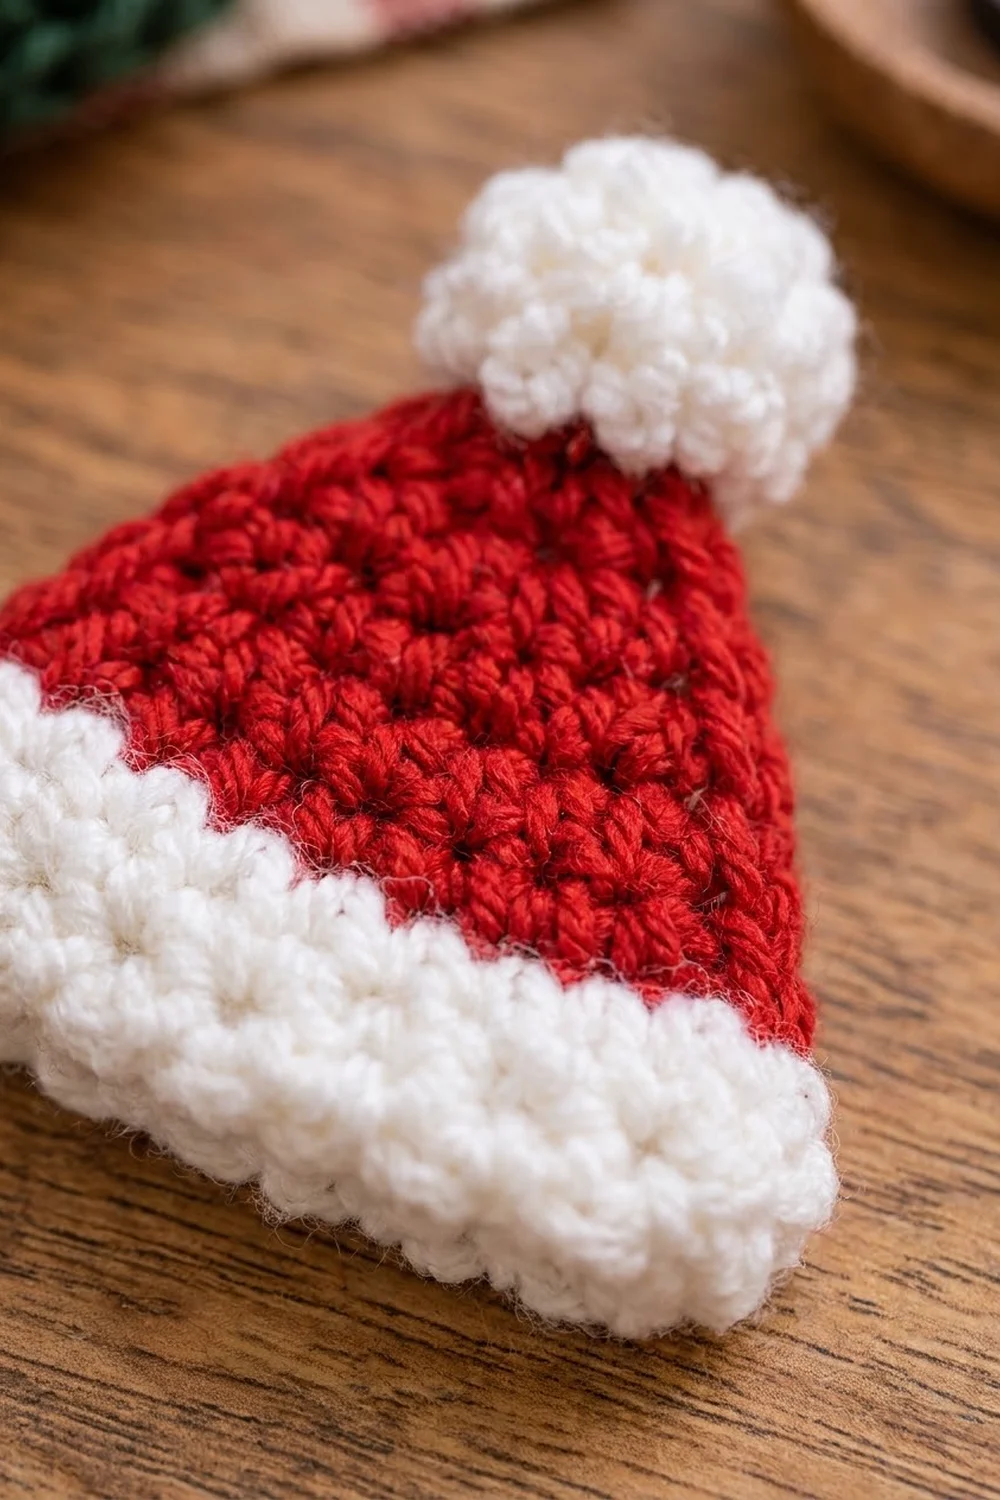
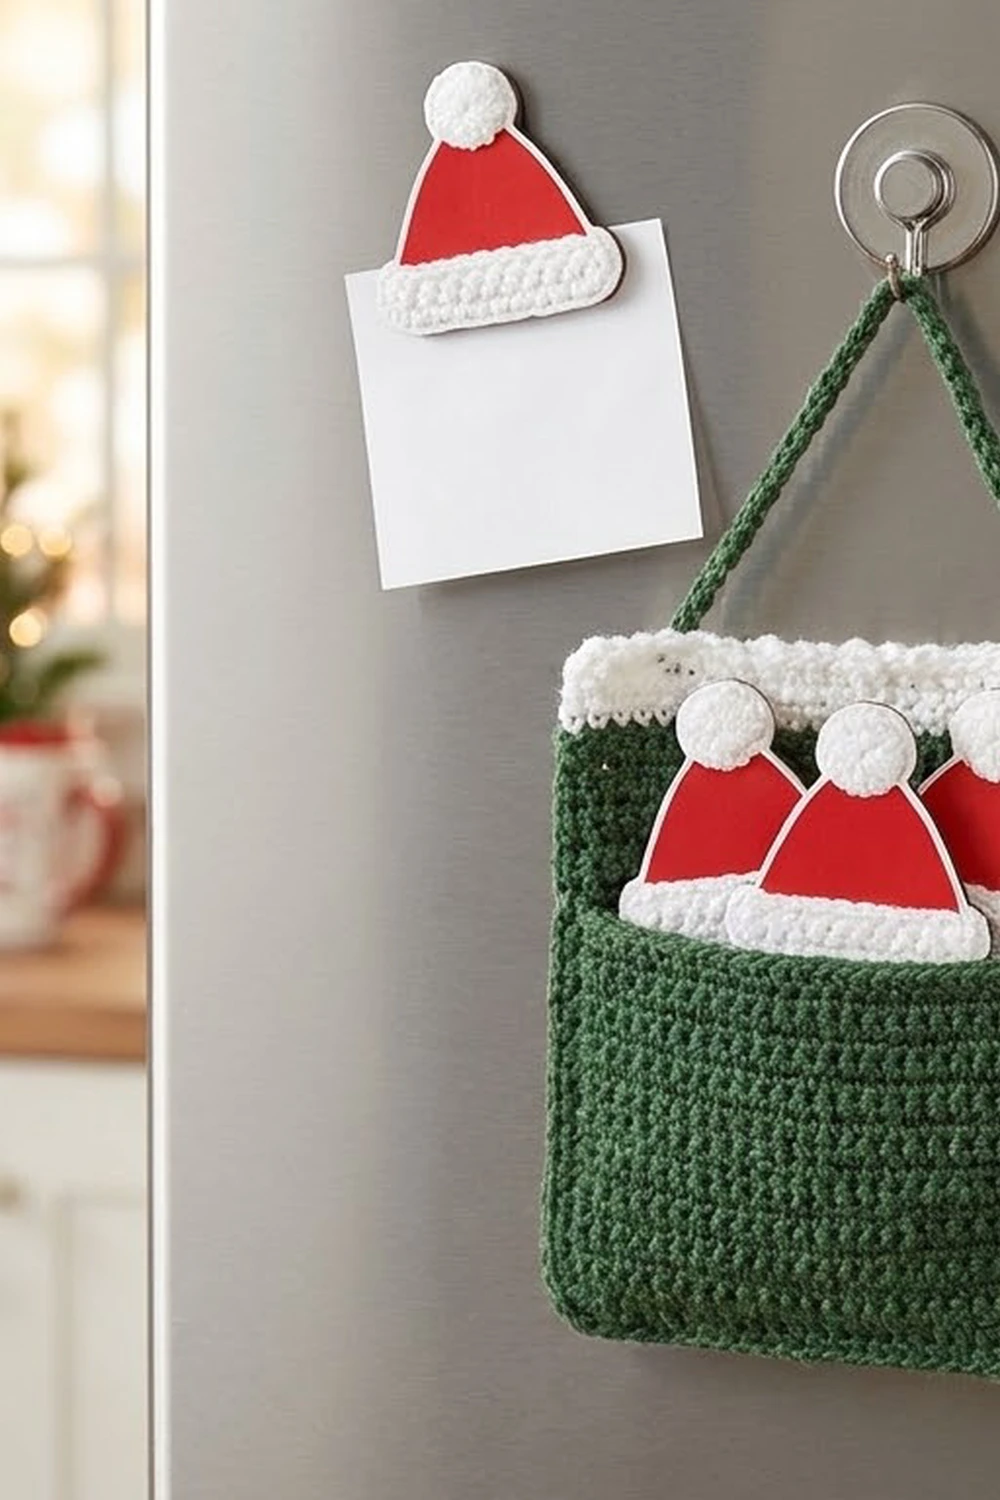
These little Santa hat magnets bring some holiday cheer to the fridge. Each hat is a flat red triangle with a bumpy white brim and a puffy white pom-pom on top, with a magnet hidden on the back. When the hats aren’t in use, they sit in a forest-green pocket holder that hangs from a magnetic hook.
The colors are classic Christmas red, snowy white, and deep green. Single crochet makes the fabric firm and tidy, so the hats keep their shape on a metal surface. The brim gets its texture from a crunch stitch that alternates single crochet and half double crochet.
This pattern uses US crochet terms. Each hat is about 2.5 in (6.4 cm) wide and 3.25 in (8.3 cm) tall including the pom-pom. The finished holder is about 6 in (15.2 cm) wide and 6.5 in (16.5 cm) tall, plus a 1.5 in (3.8 cm) hanging loop.
Each hat is worked from the bottom up in rows: first the white brim, then the red body, which decreases to a point. A tiny crocheted ball becomes the pom-pom. The holder is made of two flat rectangles, a back panel with sloped shoulders and a shorter front pocket. A two-round border joins them and adds a corded edge.
Finished Size and Construction
- Hat size: 2.5 in (6.4 cm) wide × 2.75 in (7.0 cm) tall before pom-pom; 3.25 in (8.3 cm) tall with pom-pom
- Holder size: 6 in (15.2 cm) wide × 6.5 in (16.5 cm) tall, plus a 1.5 in (3.8 cm) loop
- Skill level: Easy
- Terminology: US
- Yarn weight: Worsted (#4)
- Hook: 4.0 mm (G-6)
- Number of pieces: 4 hats, 4 pom-poms, 1 back panel, 1 front pocket
- Layout: The hats are separate. The pocket sits on the lower part of the back panel, with the bottom and side edges aligned.
- Back panel size before border: 5 in (12.7 cm) wide × 5.5 in (14.0 cm) tall
- Front pocket size: 5 in (12.7 cm) wide × 3 in (7.6 cm) tall
- Border depth: 0.5 in (1.3 cm) on every side
Materials
Use a smooth worsted-weight yarn in acrylic or cotton. Avoid fuzzy or very splitty yarn, because the crunch-stitch brim and the corded border look best with clear stitches. Use a bright, true white for the brims and pom-poms.
- Red: 10 g / 20 m (4 hat bodies)
- White: 8 g / 16 m (4 brims and 4 pom-poms)
- Green: 25 g / 50 m (back panel, pocket, border, loop)
These quantities include a margin of about 30% for swatching and tails.
Tools:
- 4.0 mm (G-6) crochet hook
- Yarn needle
- 4 round disc magnets, 1 in (2.5 cm) across
- White felt or cotton fabric: four 1.5 in (3.8 cm) squares
- Sewing needle and white thread
- A small pinch of fiberfill or yarn scraps for the pom-poms
- Stitch markers, scissors, and straight pins
- One magnetic hook for hanging the holder
Abbreviations (US Terms)
- ch – chain
- sl st – slip stitch
- sc – single crochet
- hdc – half double crochet
- sc2tog – single crochet 2 together
- st(s) – stitch(es)
- rev sc – reverse single crochet (crab stitch)
- MR – magic ring
Special stitch: reverse single crochet (rev sc). Work from left to right (right to left if you crochet left-handed). Insert the hook into the next stitch to the right, yarn over, pull up a loop, yarn over, and pull through both loops. This makes a twisted, corded edge.
Crunch pattern: Alternate sc and hdc across a row. On the next row, work an sc into each hdc and an hdc into each sc, so the stitches nest together into bumps.
Gauge and Checkpoints
Gauge: 16 sc × 16 rows = 4 in (10.2 cm) in single crochet, worked firmly.
This gauge gives 4 sc and 4 rows per inch, so a single crochet stitch is as tall as it is wide. That square shape is what makes the border math work later.
Make one complete hat before you start anything else. It works as a gauge test.
- After Row 1 (brim): 10 sc should measure 2.5 in (6.4 cm) across.
- After Row 3: The brim should be about 0.75 in (1.9 cm) tall.
- After Row 11: The hat should be 2.75 in (7.0 cm) tall.
- Back panel after Row 18: 5 in (12.7 cm) wide × 4.5 in (11.4 cm) tall.
- Pocket after Row 12: 5 in (12.7 cm) × 3 in (7.6 cm).
If your pieces come out too big, go down 0.5 mm in hook size. If they come out too small, go up 0.5 mm. Small differences in the hats don’t matter, but the holder needs to stay close to gauge so the hats still fit side by side in the pocket.
Santa Hat (Make 4)
Brim
With white, ch 11.
Row 1: Sc in the 2nd ch from the hook and in each ch across. (10 sc)
Row 2: Ch 1, turn. Sc in next st, hdc in next st; repeat from * 4 more times. (10 sts: 5 sc, 5 hdc)
Row 3: Ch 1, turn. Sc in next st (an hdc), hdc in next st (an sc); repeat from * 4 more times. (10 sts)
Change to red on the final yarn over of Row 3. Fasten off white, leaving a 6 in (15.2 cm) tail.
Hat Body
Row 4: Ch 1, turn. Sc in each st across. (10 sc)
Row 5: Ch 1, turn. Sc2tog, sc in next 6 sts, sc2tog. (8 sc)
Row 6: Ch 1, turn. Sc in each st across. (8 sc)
Row 7: Ch 1, turn. Sc2tog, sc in next 4 sts, sc2tog. (6 sc)
Row 8: Ch 1, turn. Sc in each st across. (6 sc)
Row 9: Ch 1, turn. Sc2tog, sc in next 2 sts, sc2tog. (4 sc)
Row 10: Ch 1, turn. Sc2tog twice. (2 sc)
Row 11: Ch 1, turn. Sc2tog. (1 sc)
Fasten off, leaving an 8 in (20.3 cm) tail.
The red body uses 8 rows, so it is 2 in (5.1 cm) tall. With the 0.75 in (1.9 cm) brim, the hat is 2.75 in (7.0 cm) tall. The decreases come in pairs on alternating rows, which gives the steep triangle shown.
Pom-Pom (Make 4)
With white:
Rnd 1: 6 sc in MR. (6 sc)
Rnd 2: 2 sc in each st around. (12 sc)
Rnd 3: Sc in each st around. (12 sc)
Stuff lightly with a small pinch of fiberfill or white scraps.
Rnd 4: Sc2tog 6 times. (6 sc)
Fasten off, leaving an 8 in (20.3 cm) tail. Thread the tail through the front loops of the last 6 sts and pull tight. The ball is about 1 in (2.5 cm) across.
Finishing the Hat
- Weave in the white brim tails.
- Sew the pom-pom over the tip so that about half of it, 0.5 in (1.3 cm), sits above the point. This brings the total height to 3.25 in (8.3 cm).
- Fold under 0.125 in (0.3 cm) on each edge of a 1.5 in (3.8 cm) fabric square.
- Center the square on the back of the hat, overlapping the brim and the lower body. Whipstitch three sides with white thread.
- Slip in the 1 in (2.5 cm) magnet and sew the fourth side closed.
Pocket Holder
Back Panel
With green, ch 21.
Row 1: Sc in the 2nd ch from the hook and in each ch across. (20 sc)
Rows 2–18: Ch 1, turn. Sc in each st across. (20 sc)
Checkpoint: 5 in (12.7 cm) × 4.5 in (11.4 cm).
Row 19: Ch 1, turn. Sc2tog, sc in next 16 sts, sc2tog. (18 sc)
Row 20: Ch 1, turn. Sc2tog, sc in next 14 sts, sc2tog. (16 sc)
Row 21: Ch 1, turn. Sc2tog, sc in next 12 sts, sc2tog. (14 sc)
Row 22: Ch 1, turn. Sc in each st across. (14 sc)
Fasten off and weave in the ends. The panel is 5 in (12.7 cm) wide and 5.5 in (14.0 cm) tall. Its top edge is 14 sts, or 3.5 in (8.9 cm), with sloped shoulders on each side.
Front Pocket
With green, ch 21.
Row 1: Sc in the 2nd ch from the hook and in each ch across. (20 sc)
Rows 2–12: Ch 1, turn. Sc in each st across. (20 sc)
Fasten off and weave in the ends. The pocket is 5 in (12.7 cm) × 3 in (7.6 cm).
Make All Pieces
| Piece | Qty | Color |
|---|---|---|
| Hat (brim + body) | 4 | White + red |
| Pom-pom | 4 | White |
| Back panel | 1 | Green |
| Front pocket | 1 | Green |
Layout of the holder, front view, rows counted from the bottom:
        [ loop ]
     /  Back rows 19-22  \     (shoulders)
    | Back rows 13-18     |    (open, behind hats)
    |=====================|    <- pocket top (Row 12)
    | Pocket rows 1-12    |
    | over back rows 1-12 |
    +---------------------+    <- both foundation chains
Three hats stand inside the pocket, and the fourth hat goes wherever you like on the fridge.
Joining
The pocket and back panel are joined during Border Round 1 by working single crochet through both layers.
- Lay the back panel flat with its right side up and Row 1 at the bottom.
- Lay the pocket on top, right side up, with Row 1 at the bottom.
- Line up the foundation chains so that pocket stitch 1 sits on back panel stitch 1, and so on through stitch 20.
- Line up the side edges so that pocket row-end 1 sits on back panel row-end 1, and so on through row-end 12.
- Pin each bottom corner and the top corner of the pocket on each side.
Stitch-to-stitch logic: Both pieces have 20 sts across and the same row gauge, so every border stitch on the joined sections goes through exactly one stitch or row-end of each layer.
Tension: Use the same firm tension you used for the panels. If you pull too tight, the pocket will cup inward. If you work too loosely, the border will ripple.
Checkpoint: The pinned pocket top should sit 3 in (7.6 cm) above the bottom edge, and the panel should still measure 5 in × 5.5 in (12.7 cm × 14.0 cm).
Border
Border gauge: 4 sc per inch along stitches, and 1 sc per row-end along the sides.
Round 1 (Joining Round)
With the front facing you, join green in the first st of Row 22 at the top right.
- Top side: Sc in each of the next 7 sts, ch 12 for the loop, then sc in each of the next 7 sts. That makes 14 sc on this side. Work 1 extra sc in the last st (corner).
- Left side: Work 22 sc, one in each row-end. Work the lowest 12 row-ends through both the pocket and the back panel. Work 1 extra sc in the last row-end (corner).
- Bottom side: Work 20 sc in the free loops of the foundation chains, through both layers. Work 1 extra sc in the last st (corner).
- Right side: Work 22 sc, one in each row-end, with the lowest 12 row-ends through both layers. Work 1 extra sc in the last row-end (corner).
- Sl st to the first sc.
Round 1 count: 14 + 22 + 20 + 22 = 78 sc worked 1-per-existing-stitch, plus 4 corner extras, for 82 sc. The ch-12 loop is separate and not counted.
Round 2 (Corded Edge)
- Ch 1. Work 1 rev sc in each sc around.
- When you reach the ch-12 loop, work 18 regular sc into the loop to cover it, then continue in rev sc.
- Sl st to the first st and fasten off.
Round 2 count: 82 rev sc, plus 18 sc in the loop.
Why the Math Works
- The gauge is square, 4 sts and 4 rows per inch, so one sc per row-end fills each side exactly without stretching or ruffling.
- Along the top and bottom, the border has one sc per existing stitch, so those edges stay 14 sts and 20 sts long.
- The single extra sc at each corner lets the border turn gently, which gives the soft, rounded corners.
- The rev sc round is worked 1-for-1 into Round 1, so it adds a cord without spreading the edge.
- The two rounds add about 0.25 in (0.6 cm) each, for 0.5 in (1.3 cm) per side. The finished holder is 5 + 1 = 6 in (15.2 cm) wide and 5.5 + 1 = 6.5 in (16.5 cm) tall.
Final Blocking
- Weave in all remaining ends on the wrong side.
- Pin the holder flat to 6 in × 6.5 in (15.2 cm × 16.5 cm), keeping the pocket edges straight.
- Pin each hat to 2.5 in (6.4 cm) across the brim, with the point centered.
- Mist lightly with water. Do not soak the magnets.
- Let everything dry completely before you unpin it.
- For acrylic yarn, you can steam-block lightly, holding the iron above the piece without touching it.
Final Quality-Control Checklist
- Each hat brim has 10 sts and 3 rows of clear crunch texture.
- Each hat body comes to a single point in Row 11.
- The pom-poms are firmly sewn and round, not flattened.
- Each magnet is fully enclosed and the patch doesn’t show from the front.
- The back panel measures 5 in × 5.5 in (12.7 cm × 14.0 cm) before the border.
- Border Round 1 has 82 sc.
- The pocket opening sits 3 in (7.6 cm) above the bottom edge and opens easily.
- The loop is centered and fully covered with sc.
- Three hats fit in the pocket side by side, overlapping slightly.
Troubleshooting
- The hat leans to one side: Each decrease row needs one sc2tog at both ends. Count the stitches after each row.
- The brim looks flat, not bumpy: In the crunch rows, always work sc into the hdc and hdc into the sc.
- The border ripples: Work just 1 sc per row-end, and check that your tension is firm.
- The border pulls in or cups: Your row gauge is shorter than your stitch gauge. Add 1 sc on each side at about row-end 6 and row-end 17.
- The pocket gapes: Re-pin and check that pocket row-ends 1–12 line up with back panel row-ends 1–12.
- The magnet is too weak: Use a thinner fabric patch or a stronger neodymium disc.
Care
Remove the magnets, or keep them away from water, before cleaning. Spot clean or hand wash gently in cool water, then lay flat to dry.
Final Notes
The measurement chain is simple. A square gauge of 16 sc × 16 rows = 4 in (10.2 cm) gives 10-st hats that are 2.5 in (6.4 cm) wide. The same gauge gives a 20-st back panel that is 5 in × 5.5 in (12.7 cm × 14.0 cm) and a pocket that is 3 in (7.6 cm) tall. An 82-st border then brings the holder to 6 in × 6.5 in (15.2 cm × 16.5 cm). Check your gauge on the first hat, and the rest will fit together.
Happy crocheting!