

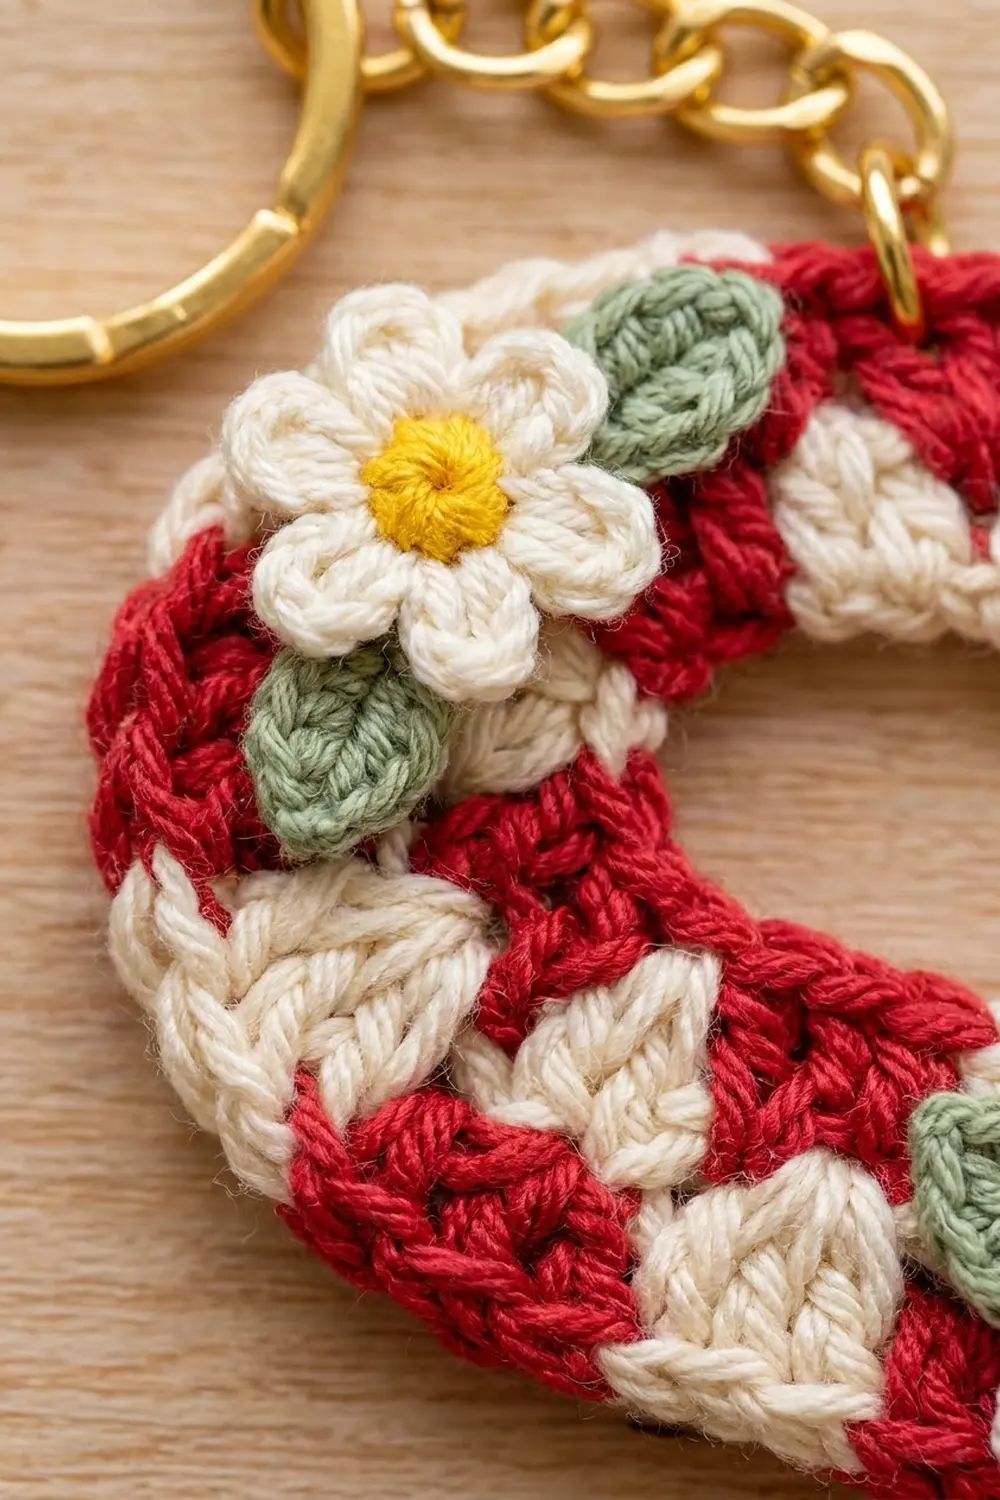
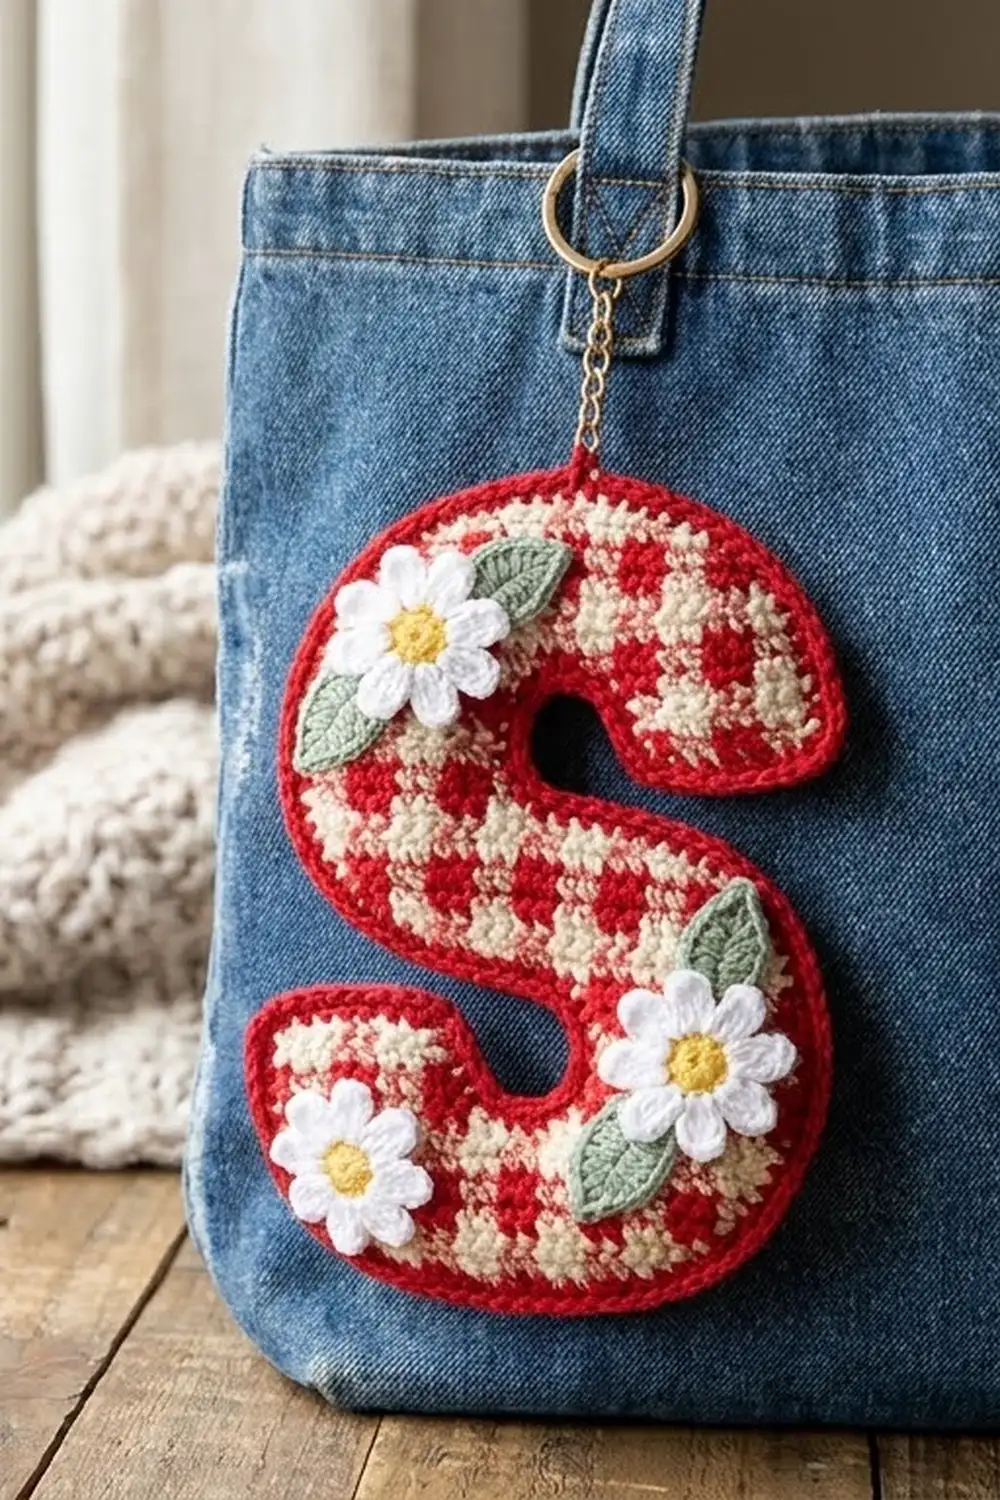
The Candy Daisy Letter S is a chunky, flat initial that works well as a keychain or bag charm. Cream fans and red wedges alternate along the letter like candy stripes. A crisp red border frames the whole shape, and three tiny white daisies with yellow centers and sage leaves add a spring-garden touch.
The letter is crocheted as one single piece. You work in rounds around a foundation chain, so the chain becomes the center line of the “S.” Increases on one side and decreases on the other bend the strip into its two opposite curves while you work. The daisies and leaves are made separately and sewn on, and gold hardware is added at the top end.
This pattern uses US crochet terms. The finished letter measures 5 in (12.7 cm) tall by 3.75 in (9.5 cm) wide, and the stroke is 1.25 in (3.2 cm) wide.
Construction overview: foundation chain → Round 1 shaped single crochet → Round 2 cream fans → Round 3 red spike fill → Round 4 red border → blocking → daisies, leaves, and hardware.
Finished Size and Construction
- Finished size: 5 in (12.7 cm) tall × 3.75 in (9.5 cm) wide
- Skill level: Easy-intermediate
- Terminology: US crochet terms
- Yarn weight: Fingering (#1) cotton
- Hook: 2.25 mm (US B-1)
- Number of pieces: 1 letter, plus 3 daisy and 6 leaf appliqués
- Layout: Single piece; no joining
- Stroke width: 1.25 in (3.2 cm)
- Size before border: 4.75 in (12.1 cm) × 3.5 in (8.9 cm), stroke 1 in (2.5 cm)
- Border depth: 0.125 in (0.3 cm), one round of sc
Materials
Mercerized fingering-weight cotton is the best choice. It gives sharp stitch definition, holds the curves after blocking, and wears well on a bag. The amounts below assume about 4 m per gram (13 ft per gram).
- Red: 10 g / 40 m (44 yd)
- Cream: 5 g / 20 m (22 yd)
- White: 2 g / 8 m (9 yd)
- Yellow: 1 g / 4 m (4 yd)
- Sage green: 1 g / 4 m (4 yd)
All quantities include a safety margin of about 30%.
Tools:
– 2.25 mm (US B-1) crochet hook
– Tapestry needle
– Scissors
– Stitch markers (4)
– Gold split ring, 1 in (2.5 cm)
– Gold chain, 1.5 in (3.8 cm)
– Two 6 mm gold jump rings and two pairs of flat-nose pliers
– Blocking mat, rustproof pins, and spray bottle
Abbreviations (US Terms)
- ch – chain
- sl st – slip stitch
- sc – single crochet
- sc2tog – single crochet 2 together
- hdc – half double crochet
- dc – double crochet
- MR – magic ring
- sk – skip
- st(s) – stitch(es)
- rnd – round
- rep – repeat
Special stitches:
- Fan: 3 dc in the same stitch.
- Spike dc (Sdc): Yo, insert the hook into Round 1 in the gap between two fans. If two stitches were skipped there, insert the hook between those two stitches. Pull up a loop to the height of the current round, then finish as a regular dc. Each Sdc makes a red wedge between the cream fans.
Gauge and Checkpoints
Gauge: 8 sc and 9 rows = 1 in (2.5 cm).
First make a test swatch: ch 17, then work 9 rows of 16 sc. It should measure 2 in (5.1 cm) wide by 1 in (2.5 cm) tall. Gauge matters more than usual here, because the curves depend on how the stitch counts balance.
Checkpoints (measure the stroke width across the strip, on a straight part of the spine):
- Foundation chain: about 7 in (17.8 cm) relaxed
- After Round 1: 0.4 in (1.0 cm) wide
- After Round 2: 0.8 in (2.0 cm) wide
- After Round 3: 1 in (2.5 cm) wide; letter 4.75 × 3.5 in (12.1 × 8.9 cm)
- After Round 4: 1.25 in (3.2 cm) wide; letter 5 × 3.75 in (12.7 × 9.5 cm)
If your piece is too big, go down to a 2.0 mm hook. If it is too small, go up to a 2.5 mm hook. Keep the stitch counts the same, because they create the shape.
Letter Pattern
Foundation
With red, ch 57.
Here is how the chain is used:
– Ch 2 from the hook = End A, the top end of the S
– Chs 3–56 = the body: 24 chs for the top curve, 6 for the spine, 24 for the bottom curve
– Ch 57 = End B, the bottom end
Round 1 (Red) – Shaping Round
Work along one side of the chain:
- 3 sc in 2nd ch from hook (End A, first half).
- Top curve (outer edge): [sc in next ch, 2 sc in next ch] 12 times. (36 sc)
- Spine: sc in each of the next 6 ch. (6 sc)
- Bottom curve (inner edge): [sc2tog over next 2 ch] 12 times. (12 sc)
- End B: 6 sc in last ch.
Rotate the work and continue along the other side of the chain:
- Bottom curve (outer edge): [sc in next ch, 2 sc in next ch] 12 times. (36 sc)
- Spine: sc in each of the next 6 ch. (6 sc)
- Top curve (inner edge): [sc2tog over next 2 ch] 12 times. (12 sc)
- 3 sc in the same ch as the first 3 sc (End A, second half). Sl st to the first sc.
Round 1 total: 120 sc = End A 3 + side 1 54 (36 + 6 + 12) + End B 6 + side 2 54 (36 + 6 + 12) + End A 3.
Each section of the chain has a longer edge and a shorter edge, so the strip starts to bend. The two curves bend in opposite directions, which forms the S. Place a marker at the start of each of the four 36-st sections. Fasten off red.
Round 2 (Cream) – Fans
Stitch numbers below refer to the 120 sts of Round 1. Sts 1–3 and 118–120 are End A, sts 4–57 are side 1, sts 58–63 are End B, and sts 64–117 are side 2.
- Sk st 4. Join cream with a sl st in st 5. Ch 3 (counts as dc), then 2 dc in the same st (first fan). Sk 1.
- Top curve outer: [sk 1, fan in next st, sk 1] 11 times. (12 fans total in this section)
- Spine: [sk 1, fan in next st, sk 1] 2 times. (2 fans)
- Bottom curve inner: [sk 1, fan in next st, sk 1] 4 times. (4 fans)
- End B: [fan in next st, sk 1] 3 times. (3 fans)
- Side 2: [sk 1, fan in next st, sk 1] 12 times for the bottom curve outer, 2 times for the spine, and 4 times for the top curve inner. (18 fans)
- End A: [fan in next st, sk 1] 3 times. The last skip lands on st 3, which completes the round. Sl st to the top of the beginning ch-3.
Round 2 total: 42 fans (126 dc) = 18 per side + 3 per end.
Fasten off cream.
Round 3 (Red) – Spike Fill
On the inner curves, this round uses sc2tog on the fans so those edges stay short and the curves stay tight. The Sdc stitches fill every gap between fans with red.
- Join red with a standard sc in the first dc of the first fan.
- Top curve outer: sc in next 2 dc, Sdc. Then [sc in each of the 3 dc of the next fan, Sdc] 11 times. (48 sts)
- Spine: [sc in each of 3 dc, Sdc] 2 times. (8 sts)
- Bottom curve inner: [sc in first dc, sc2tog over next 2 dc, Sdc] 4 times. (12 sts)
- End B: [sc in first dc, 2 sc in center dc, sc in last dc, Sdc] 3 times. (15 sts)
- Side 2: Work the bottom curve outer as in step 2 (48 sts), the spine as in step 3 (8 sts), and the top curve inner as in step 4 (12 sts).
- End A: as in step 5. (15 sts) Sl st to the first sc.
Round 3 total: 166 sts = each side 68 (48 + 8 + 12) + each end 15. This is 124 sc plus 42 Sdc.
Do not fasten off.
Border
Border gauge: 8 sc = 1 in (2.5 cm), the same as the main gauge.
Round 4 (Red)
- Ch 1. Sc in the same st and in each st along side 1:
- top curve outer: 48 sc
- spine: 8 sc
- bottom curve inner: 12 sc
- (side 1 total: 68 sc)
- End B: End B has 15 sts. Each of its three fans has a 4-sc group followed by an Sdc. In each group, work 2 sc in the 2nd sc and 1 sc in every other st. (18 sc)
- Side 2: sc in each st: 48 + 8 + 12. (68 sc)
- End A: as for End B. (18 sc)
- Sl st to the first sc. Fasten off with an invisible join.
Round 4 total: 172 sc = 68 + 18 + 68 + 18.
Why the math works: Along the sides, the border works one sc into each Round 3 stitch, so those edges stay flat. At each rounded end, the edge sits on a half circle. That half circle gets longer by about π × 0.125 in = 0.39 in (1.0 cm). At 8 sc per inch, that is 3 extra stitches, which is exactly the 3 increases added at each end. The outer and inner curves keep the 3:1 ratio set in Round 1 (36 sts vs. 12 sts), so the S keeps its shape without extra shaping in the border.
Daisies and Leaves
Daisy (make 3)
- Rnd 1 (yellow): MR, 6 sc in ring. Sl st to the first sc. Fasten off. (6 sc)
- Rnd 2 (white): Join with a sl st in any sc. (Ch 2, 2 dc, ch 2, sl st) in the same st. Then [(sl st, ch 2, 2 dc, ch 2, sl st) in next st] 5 times. (6 petals) Fasten off and leave a 6 in (15.2 cm) tail.
Each daisy should measure 0.75 in (1.9 cm) across.
Leaf (make 6)
With green, ch 5.
1. Sc in 2nd ch from hook, hdc in each of the next 2 ch, sc in the last ch.
2. Ch 1 for the tip. Rotate the work.
3. Working along the other side of the chain: sc, hdc, hdc, sc. Sl st to the first sc. (8 sts + ch-1 tip)
Leave a tail for sewing. Each leaf should measure 0.5 in (1.3 cm) long.
Placement
Pin the appliqués first, then sew them on.
- Daisy 1: upper left of the top curve, with one leaf pointing toward the top end and one pointing down
- Daisy 2: right side of the lower bowl, just below the spine, with one leaf on each side
- Daisy 3: on the lower left end, with leaves on the left and right
Tuck the base of each leaf under its daisy. Sew through the leaves first, then whipstitch around the yellow center so the petals stay free. Weave all tails into the back of the letter.
Hardware
- Open a jump ring and pass it through the Round 3 and Round 4 stitches at the center of End A. Hook on one end of the chain and close the ring.
- Use the second jump ring to attach the other end of the chain to the split ring.
Final Blocking
- Weave in all ends before you block. Leave the daisies off for now.
- Mark a 5 × 3.75 in (12.7 × 9.5 cm) rectangle on the blocking mat with pins.
- Mist the letter until it is evenly damp but not dripping.
- Lay it face up inside the rectangle and shape the two curves until they look the same size.
- Pin the outer curve edges every 0.5 in (1.3 cm). Gently pull the stroke to 1.25 in (3.2 cm) wide.
- Round the ends with 3 pins each.
- Let it dry completely, at least 4 hours.
- Unpin it, then sew on the daisies and add the hardware.
Final Quality-Control Checklist
- Round 1 count is 120. Round 2 has 42 fans. Round 3 count is 166. Round 4 count is 172.
- The letter measures 5 × 3.75 in (12.7 × 9.5 cm), with a 1.25 in (3.2 cm) stroke.
- Every gap between fans has exactly one red Sdc.
- Cream fans sit evenly along both edges, in a checker pattern.
- The border lies flat at both ends and on all curves.
- The daisies are secure, the petals sit free, and no tails show on the front.
- The jump rings are fully closed, and the chain hangs from the top end.
Troubleshooting
- The curves are too open: The inner-edge sc2tog stitches were worked too loosely. Redo Round 1 with tighter decreases, or block the piece more firmly.
- The strip twists like a ribbon: You probably mixed up the outer and inner sections on side 2. Check the markers. On each side, the 36-st section must be opposite the 12-st section.
- The fans ruffle: Your tension is loose. Go down a hook size for Round 2 only.
- The Sdc stitches pucker: Pull up the loop to the full height of the round before you finish the stitch.
- The ends cup: Check that you made the 3 increases at each end in Round 4. The ends flare: Work the border a little tighter.
- The daisy petals curl: Steam them lightly and press flat with your fingers.
Care
Hand wash in cool water with mild soap and press out the water in a towel. Reshape the letter and dry it flat. Remove the metal hardware first if possible.
Final Notes
Here is the measurement chain:
– Foundation chain: 7 in (17.8 cm)
– Round 1: stroke 0.4 in (1.0 cm)
– Round 2: stroke 0.8 in (2.0 cm)
– Round 3: stroke 1 in (2.5 cm), letter 4.75 × 3.5 in (12.1 × 8.9 cm)
– Round 4 border (0.125 in / 0.3 cm deep): letter 5 × 3.75 in (12.7 × 9.5 cm), stroke 1.25 in (3.2 cm)
Check your counts at each stage. The shaping is built into the stitches, so a correct count gives you a correct S.
Happy crocheting!