

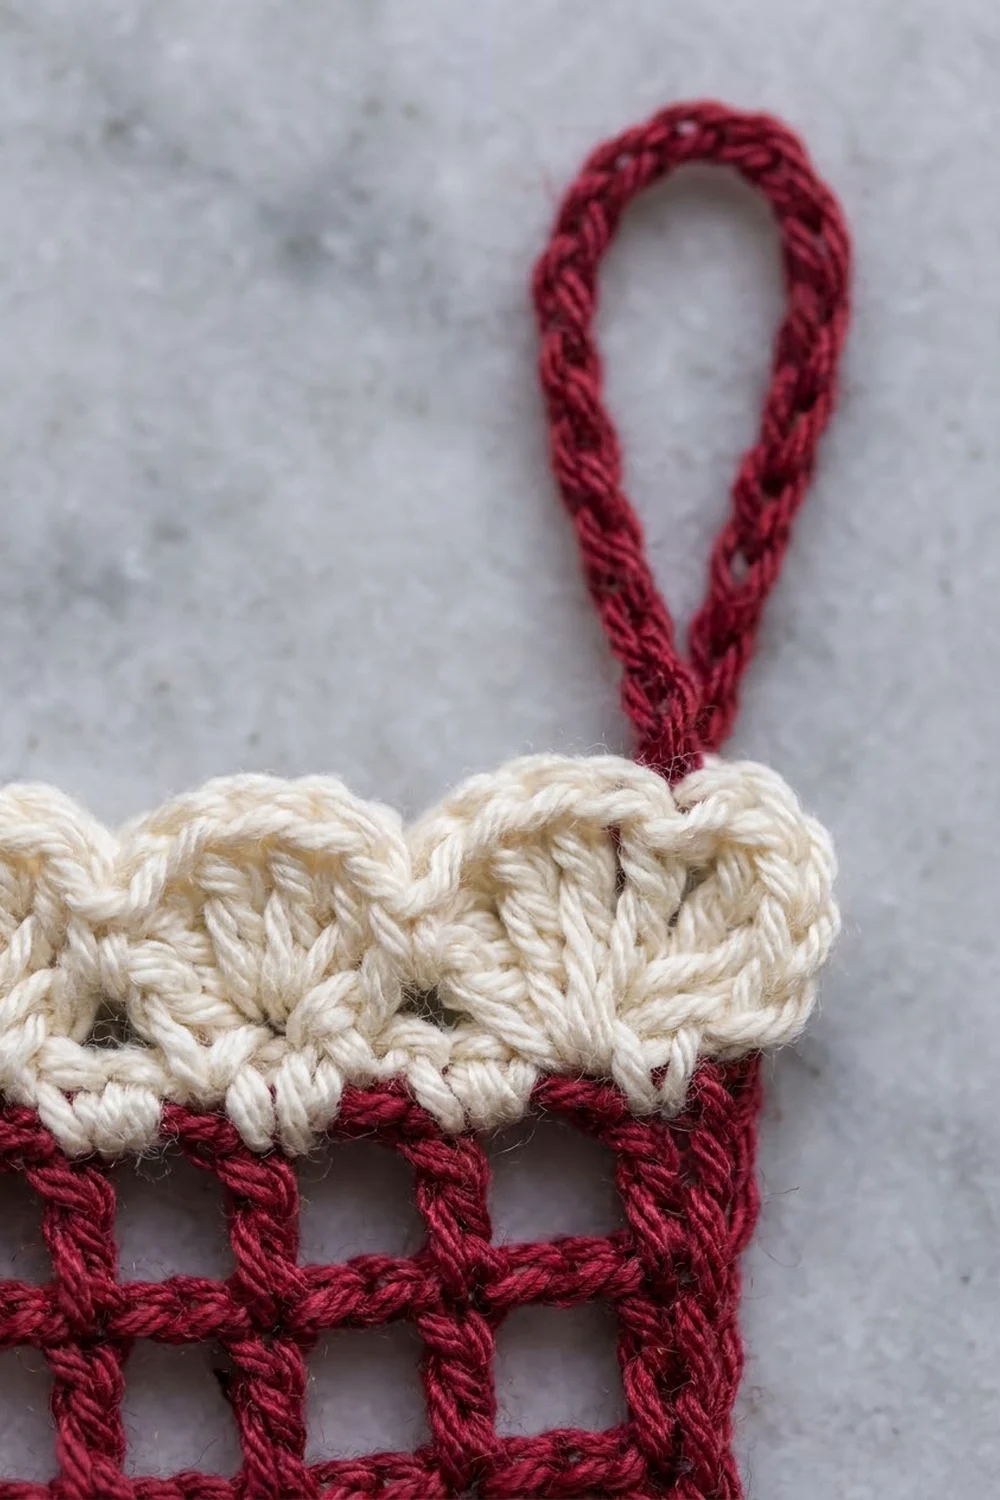
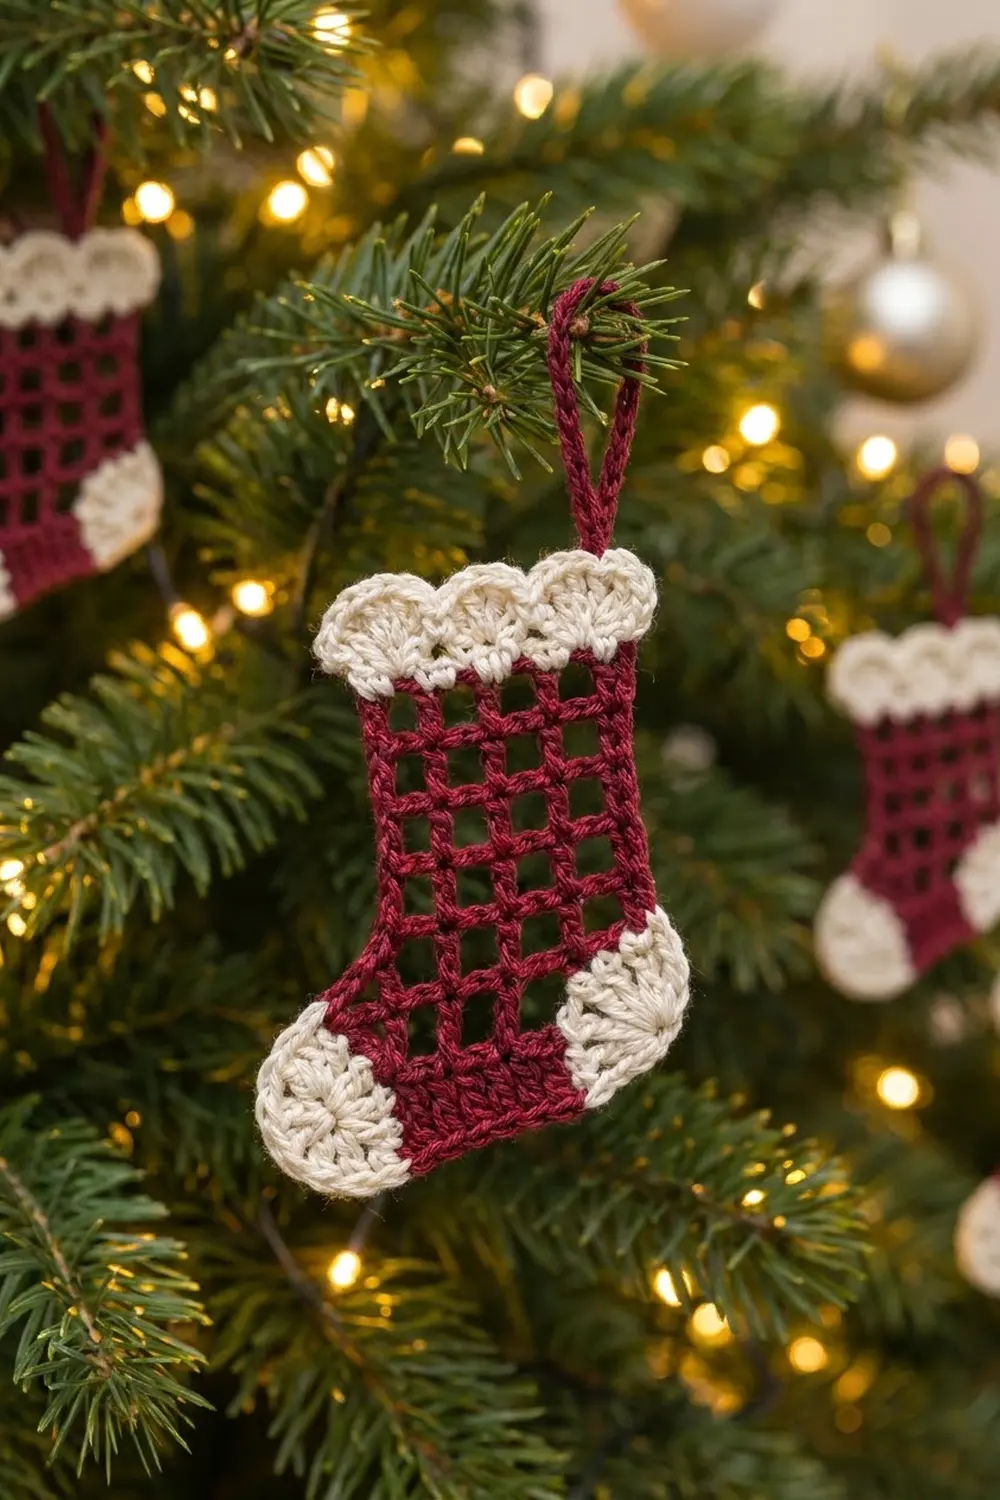
This little stocking combines an open burgundy lattice with soft cream accents. The foot has a solid red sole band, and the toe and heel are rounded cream fans. The leg is a light, see-through filet mesh, and a three-shell cream cuff finishes the top. Lit from behind on a Christmas tree, the open grid looks like a tiny window.
The palette is two colors: a deep cranberry burgundy and a warm ivory cream. It is a classic, cozy look that suits farmhouse, Scandinavian or traditional red-and-white decor.
The pattern uses US crochet terms. The finished ornament measures about 3.4 in (8.6 cm) wide at the foot and 4.6 in (11.7 cm) tall without the loop. The hanging loop adds about 1.5 in (3.8 cm).
Construction is flat and in one piece. You work the sole band first and add a cream fan to each end for the toe and heel. Then you build the burgundy mesh up from the combined top edge, narrow to the leg, and finish with the shell cuff and the hanging loop. Everything is crocheted in place, so the only sewing is weaving in ends.
Finished Size and Construction
- Finished size: 3.4 in (8.6 cm) wide × 4.6 in (11.7 cm) tall, plus a 1.5 in (3.8 cm) loop
- Skill level: Easy / advanced beginner
- Terminology: US crochet terms
- Yarn weight: DK (#3, light)
- Hook: 3.5 mm (US E-4)
- Number of pieces: 1 (single flat ornament)
- Layout: one stocking, toe pointing left, heel at the right
- Piece size before cuff: 3.4 in (8.6 cm) wide × 4.0 in (10.2 cm) tall
- Cuff (“border”) depth: 0.6 in (1.5 cm)
- Leg width: 2.2 in (5.6 cm); cuff width 2.6 in (6.6 cm)
Materials
Yarn: Use a smooth DK cotton or cotton blend. Mercerized cotton gives crisp mesh lines and holds its shape on the tree. Soft acrylic also works, but the grid will look rounder and less defined.
- Burgundy (Color A): 5 g, about 12 m (13 yd)
- Cream (Color B): 3 g, about 7 m (8 yd)
These quantities include a margin of roughly 30% for your gauge swatch and weaving in ends.
Tools:
– 3.5 mm (US E-4) crochet hook
– Tapestry needle
– Scissors
– Stitch marker (1)
– Blocking mat and rust-proof pins
– Spray bottle with water
– Ruler or measuring tape
Abbreviations (US Terms)
- ch: chain
- sl st: slip stitch
- sc: single crochet
- dc: double crochet
- sk: skip
- st(s): stitch(es)
- sp: space
- RS: right side
Special stitches
- Mesh square: (dc, ch 1, sk 1). Each square uses 2 stitches of the row below, and every mesh row ends with one closing dc. A mesh row of n squares therefore has 2n + 1 stitches.
- Shell: 5 dc worked into the same stitch.
- Standing dc: Start with a slip knot on the hook, yarn over, insert the hook into the stitch and complete a dc as usual.
Gauge and Checkpoints
Gauge: 10 dc and 5 dc rows = 2 in (5.1 cm). That is 5 dc per 1 in (2.5 cm), and each dc row is 0.4 in (1.0 cm) tall.
Since the whole ornament is one small piece, make one stocking as your test. Check the measurements below as you go:
- After the sole band (Row 2): 2.2 in (5.6 cm) long × 0.8 in (2.0 cm) tall
- After the toe and heel: each fan sticks out about 0.8 in (2.0 cm) past the end of the band
- After foot Row 4: mesh section 3.0 in (7.6 cm) wide; total height 1.6 in (4.1 cm)
- After leg Row 10: leg 2.2 in (5.6 cm) wide; total height 4.0 in (10.2 cm)
- After the cuff: total height 4.6 in (11.7 cm)
If your band is too long (over 2.4 in / 6.1 cm), go down to a 3.25 mm (D-3) hook. If it is too short (under 2.0 in / 5.1 cm), go up to a 3.75 mm (F-5) hook. Mesh squares should look square. If they come out tall and narrow, try a shorter yarn-over wrap or go down a hook size for the mesh rows only.
Pattern
Sole Band (Color A, Burgundy)
Foundation: With A, ch 13.
Row 1 (RS): Dc in 4th ch from hook (the skipped 3 ch count as the first dc), dc in each remaining ch across, turn. (11 dc)
Row 2: Ch 3 (counts as first dc here and throughout), dc in each st across, working the last dc into the top of the turning ch, turn. (11 dc)
Fasten off A.
Checkpoint: the band is a solid red strip 2.2 in (5.6 cm) long and 0.8 in (2.0 cm) tall.
Toe Fan (Color B, Cream)
Hold the band with the RS facing you and the foundation edge at the bottom. The toe goes on the left short edge.
Row 1: Join B at the bottom-left corner. Ch 3, then work 3 dc into the side of Row 1 and 6 dc into the side of Row 2, working around the dc posts and ending at the top-left corner. Turn. (10 dc)
The 10 stitches crowd onto a 0.8 in (2.0 cm) edge, so they fan outward into a half-circle.
Row 2: Ch 3, dc in the same st, then 2 dc in each of the remaining 9 sts. Turn. (20 dc)
Fasten off B. The toe is now a rounded cream cap with stitches radiating from the end of the band.
Heel Fan (Color B, Cream)
Rotate the band so the right short edge faces you, keeping the RS of the band facing you.
Rows 1–2: Join B at the top-right corner and work exactly as for the toe, ending Row 1 at the bottom-right corner. (Row 1: 10 dc; Row 2: 20 dc)
Fasten off B.
Checkpoint: from toe tip to heel back, the bottom of the foot now measures about 3.8 in (9.7 cm) laid flat.
Foot Mesh (Color A, Burgundy)
The top edge of the foot is made up of three parts: the straight top edge of the toe fan, the 11 stitches along the top of the band (Row 2), and the straight top edge of the heel fan. Each fan’s top edge is the two row-ends where its rows begin and end.
Row 3 (RS): Work left to right across the top edge:
– Make a standing dc with A in the outer row-end of the toe fan (Row 2 end). Ch 1, skipping the Row 1 end.
– Dc in the 1st st of the band. Ch 1, sk 1, dc in next st across the band, ending with a dc in the 11th band st.
– Ch 1, skipping the heel Row 1 end, then dc in the heel Row 2 end. Turn.
(15 sts: 8 dc + 7 ch-1 sps = 7 mesh squares)
Working only 2 stitches over each fan’s top edge pulls the fans in gently. That makes the toe and heel tilt upward into the cupped shape, and the finished foot width settles at 3.4 in (8.6 cm).
Row 4: Ch 4 (counts as dc + ch 1), sk the first ch-1 sp, dc in the next dc. Ch 1, sk ch-1 sp, dc in next dc across, working the last dc into the top of the standing dc. Turn. (15 sts, 7 squares)
Row 4 ends at the toe side. Checkpoint: the mesh is 3.0 in (7.6 cm) wide and the total height is 1.6 in (4.1 cm).
Leg Mesh (Color A, Burgundy)
The leg sits over the heel side of the foot, 5 squares wide.
Row 5: Sl st in each of the first 4 sts and in the next dc (the 5th st). Ch 4 (counts as dc + ch 1), sk the ch-1 sp, dc in the next dc. Ch 1, sk ch-1 sp, dc in next dc across, ending in the 3rd ch of the turning ch-4. Turn.
(11 sts: 6 dc + 5 ch-1 sps = 5 mesh squares)
The 4 slipped stitches (2 squares) are left unworked along the toe side, which forms the front of the ankle.
Rows 6–10: Ch 4 (counts as dc + ch 1), sk the ch-1 sp, dc in the next dc. Ch 1, sk ch-1 sp, dc in next dc across, ending in the 3rd ch of the turning ch-4. Turn. (11 sts, 5 squares each row)
Fasten off A after Row 10.
Checkpoint: you have 8 mesh rows in total (2 foot rows and 6 leg rows) at 0.4 in (1.0 cm) each, which is 3.2 in (8.1 cm). The band adds 0.8 in (2.0 cm), so the stocking is 4.0 in (10.2 cm) tall before the cuff, and the leg is 2.2 in (5.6 cm) wide.
Border: Scalloped Cuff
On this single-piece ornament, the cuff is the only border. It is worked along the top edge of the leg only. The other edges are left as the clean dc lattice edges you see in the finished piece.
Border gauge: 5 sc = 1 in (2.5 cm). Each shell is about 0.5 in (1.3 cm) wide.
Row 1 (RS, conversion row): With RS facing, join B in the first st of leg Row 10. Ch 1, 2 sc in the first dc, 1 sc in each of the next 9 sts (dc and ch-1 sps), 2 sc in the last st (the turning ch). Turn.
(11 sts worked 1-per-existing-st + 2 extra = 13 sc)
Row 2 (shell row): Ch 1, sc in the first sc. Sk 1, shell in next sc, sk 1, sc in next sc 3 times. (3 shells + 4 sc = 19 sts)
Fasten off B.
Why the math works: a shell repeat uses 4 stitches (skip, shell, skip, sc), plus 1 starting sc. Three shells need 1 + (3 × 4) = 13 stitches, which is exactly the count from Row 1. The 2 extra sc widen the cuff from 2.2 in (5.6 cm) to 2.6 in (6.6 cm). That gives the small flare above the leg in the photo without making the cuff ruffle.
Hanging Loop (Color A, Burgundy)
Join A with a sl st in the last sc of cuff Row 2, at the top right (heel side). Ch 18, then sl st in the same sc to close the loop. Fasten off.
The loop stands about 1.5 in (3.8 cm) above the cuff. For a sturdier loop, work 1 sc in each ch around it.
Final Blocking
- Weave in all ends along stitches of the same color. Hide the cream ends inside the fans and the burgundy ends inside the sole band or the mesh posts.
- Mist the ornament until it is evenly damp, but not dripping.
- Lay it RS up on the blocking mat.
- Pin the bottom of the sole band straight, 2.2 in (5.6 cm) long.
- Pin each mesh column straight up and each chain bar level, so the squares measure 0.4 in (1.0 cm) on each side.
- Pin the leg to 2.2 in (5.6 cm) wide and the total height to 4.6 in (11.7 cm).
- Shape the toe and heel fans into smooth curves, and pin each shell into a rounded scallop.
- Pin the loop straight up.
- Leave it to dry completely, about 4–6 hours. For extra stiffness, mist with a light fabric starch before it dries.
Final Quality-Control Checklist
- The sole band has 11 dc in each of its 2 rows.
- Each fan ends with 20 dc in Row 2.
- Foot Rows 3–4 each have 7 mesh squares (15 sts).
- Leg Rows 5–10 each have 5 mesh squares (11 sts).
- The cuff has 13 sc in Row 1, then 3 shells and 4 sc in Row 2.
- All squares line up in straight vertical columns.
- The total height is 4.6 in (11.7 cm) and the foot width is 3.4 in (8.6 cm).
- The loop is securely attached on the heel side.
- No ends show on the RS.
Troubleshooting
The fans ruffle or curl. Your Row 1 fan stitches are too loose. Go down half a hook size for the fans only, or work only 9 dc in Row 1 and 18 dc in Row 2.
The fans lie flat instead of tilting up. Make sure you work exactly 2 stitches across each fan’s top edge in Row 3, not more.
The mesh squares are tall rectangles. Your dc are too tall. Pull up a shorter loop on the first yarn over, or go down a hook size.
The leg leans toward the toe. You started Row 5 in the wrong place. The leg must begin at the 5th st counted from the toe side.
The cuff ruffles. Skip the increases in Row 1 and use a 3.25 mm hook instead, keeping the 13-st count.
The loop twists. Work a round of sc around the chain, then block it straight.
Care
Spot clean with cool water and mild soap, then reshape and dry flat. Store flat or hanging, away from sunlight, so the burgundy keeps its color.
Final Notes
The measurement chain is simple:
– Gauge is 5 dc per 1 in (2.5 cm), and each row is 0.4 in (1.0 cm) tall.
– The 11-st band is 2.2 in (5.6 cm), and the cream fans bring the foot to 3.4 in (8.6 cm).
– Seven mesh squares cover the foot and five cover the leg.
– Eight mesh rows plus the band give 4.0 in (10.2 cm), and the 0.6 in (1.5 cm) shell cuff completes the 4.6 in (11.7 cm) stocking.
Check each stage and the ornament will come out right. Happy crocheting!