

This little tree is all soft glow: tier after tier of creamy scallops alternating with antique-gold ruffles, small pearls tucked between the gold scallops, and a satin bow with two pearls at the top. A round gold trunk peeks out at the bottom, and a cream slip-stitch cord makes the hanging loop.
The palette is two colors, cream and antique gold, plus gold satin ribbon and ivory pearls. It suits a neutral, vintage-style tree, and it also works well as a gift topper.
The pattern uses US crochet terms. The finished ornament measures about 4.5 in (11.4 cm) wide across the flared bottom tier and about 5.5 in (14.0 cm) tall from the apex to the bottom of the trunk, not counting the loop. The loop adds about 2 in (5.1 cm).
Construction is simple and flat. You work a gold single crochet triangle from the tip down, leaving free loops on nine rows. Then you work ruffled tiers into those loops, alternating cream and gold. A one-round gold edging tidies the outline. Finally you sew on the trunk, cord, bow, and pearls.
Finished Size and Construction
- Finished size: about 4.5 in (11.4 cm) wide x 5.5 in (14.0 cm) tall, plus a 2 in (5.1 cm) loop
- Skill level: Easy-intermediate
- Terminology: US crochet terms
- Yarn weight: DK (weight 3) cotton or cotton blend
- Hook: 3.5 mm (E-4)
- Number of pieces: 1 tree body, plus 1 trunk circle and 1 cord sewn on
- Layout: One single ornament (no joining)
- Body size before border: 4.2 in (10.7 cm) wide x 4.7 in (11.9 cm) tall
- Border depth: 1 round of sc, about 0.125 in (0.3 cm)
Materials
Pick a smooth, firmly plied DK cotton. A slight sheen or metallic strand in the gold looks lovely, but stay away from fuzzy yarn because it hides the scallops.
- Gold (antique gold / champagne): 12 g, about 29 m
- Cream (ivory): 6 g, about 14 m
These quantities include a margin of about 25 percent for your gauge swatch and tails.
Tools and notions:
- 3.5 mm (E-4) crochet hook
- Tapestry needle
- Sewing needle and cream or gold thread
- 20 ivory pearl beads, 6 mm, with sew-through holes
- 2 ivory pearl beads, 8 mm, for the bow
- 12 in (30.5 cm) of gold satin ribbon, 1 in (2.5 cm) wide
- Stitch markers, scissors, pins, and a blocking mat
Abbreviations (US Terms)
- ch – chain
- sl st – slip stitch
- sc – single crochet
- dc – double crochet
- st(s) – stitch(es)
- sk – skip
- inc – increase (2 sc in the same st)
- BLO – back loop only
- FLO – front loop only
- RS / WS – right side / wrong side
- rep – repeat
Special stitches:
- Shell: 5 dc in the same st.
- Scallop: 3 dc in the same st.
- Slip-stitch cord: sl st into the back bump of each ch. This gives a firm, braided-looking cord.
Gauge and Checkpoints
Gauge: 20 sc x 24 rows = 4 in (10.2 cm) in sc worked in rows. That is 5 sc and 6 rows per 1 in (2.5 cm).
If you are short on time, work a smaller swatch of 10 sc x 12 rows. It should measure 2 in (5.1 cm) square.
Make one complete tree before you make a set for gifting. Measure it flat and unstretched at these checkpoints:
- After Row 10 (9 sts): 1.8 in (4.6 cm) wide at the bottom, 1.7 in (4.3 cm) tall
- After Row 19 (15 sts): 3.0 in (7.6 cm) wide, 3.2 in (8.1 cm) tall
- After Row 28 (21 sts): 4.2 in (10.7 cm) wide, 4.7 in (11.9 cm) tall
- Trunk circle: 1.75 in (4.4 cm) across
Too big? Change to a 3.25 mm hook, or tighten the yarn over your finger.
Too small? Change to a 3.75 mm hook.
Since the tiers are built on the body’s stitch counts, it is the body gauge that determines the final size. Fix the gauge before you start the ruffles.
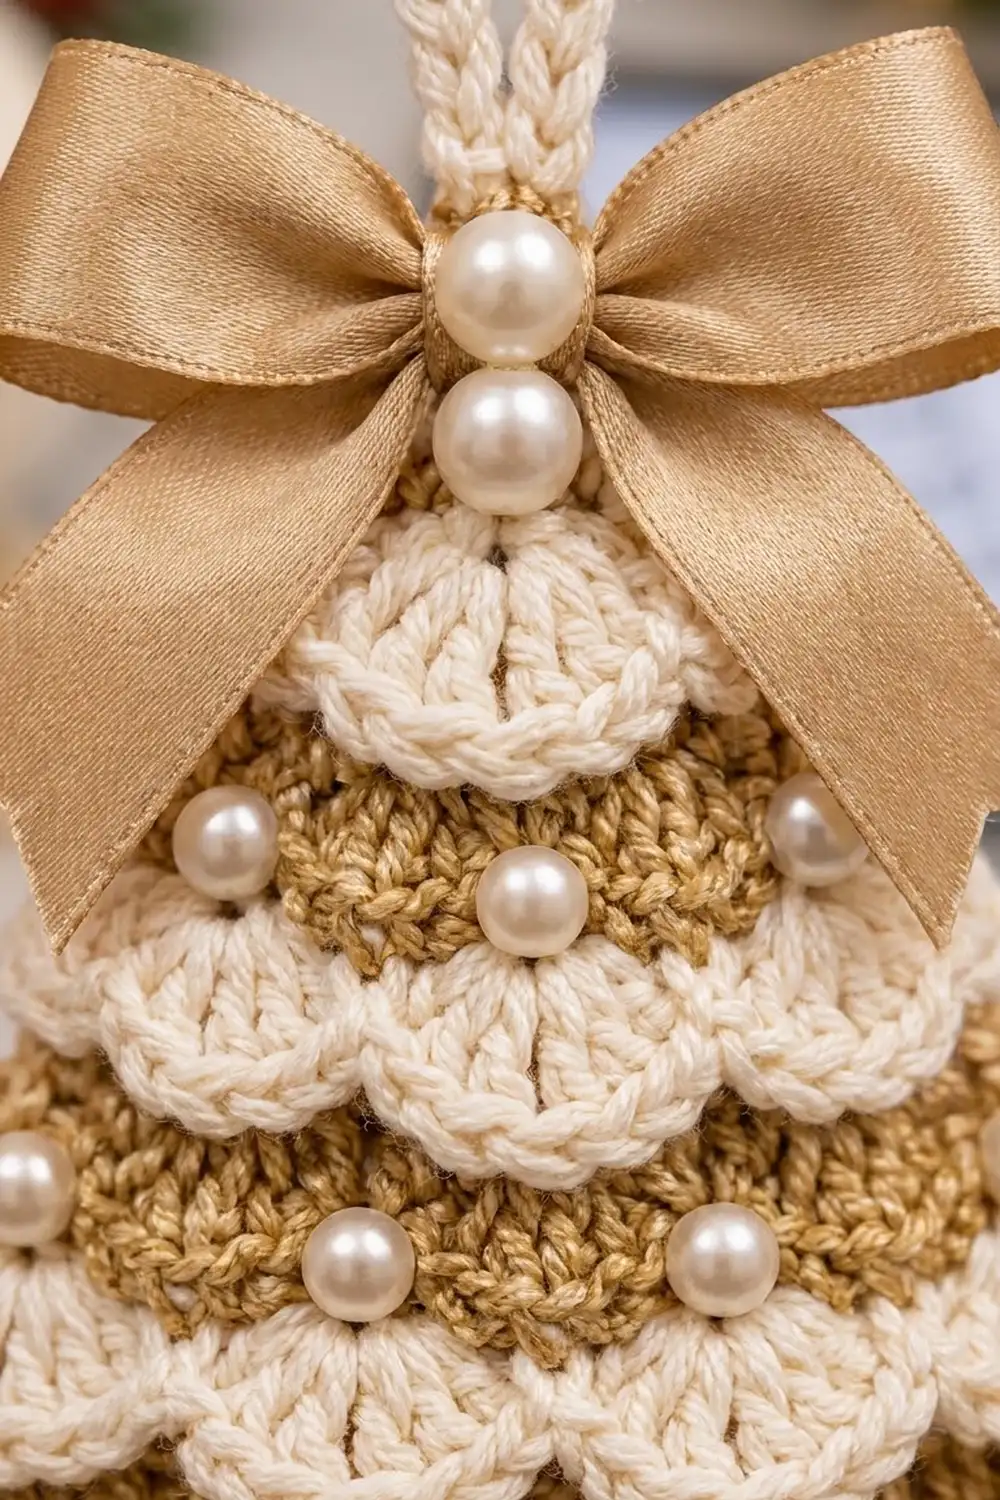
Tree Body (Gold)
You work the body from the tip down. At the start of every row, ch 1 and turn. The ch 1 does not count as a stitch.
Each 3-row block follows the same plan:
- Inc row: 2 sc in the first st, sc in each st to the last st, 2 sc in the last st (+2 sts).
- Plain row: sc in each st across.
- Loop row: sc in each st across, working in BLO if it is a RS row or in FLO if it is a WS row.
Either way, the loop row leaves one unworked loop of the row below on the RS. Your tiers go into those free loops later.
Row 1 (WS): Ch 2, 3 sc in the 2nd ch from the hook. (3 sts)
Put a marker on the side facing you when you work Row 2. That is the RS. All even rows are RS rows.
Row 2 (RS, inc): 2 sc in the first st, sc in the next st, 2 sc in the last st. (5 sts)
Row 3 (WS, plain): Sc across. (5 sts) Cream tier base.
Row 4 (RS, loop): Sc in BLO across. (5 sts)
Row 5 (WS, inc): (7 sts)
Row 6 (RS, plain): (7 sts) Gold tier base.
Row 7 (WS, loop): Sc in FLO across. (7 sts)
Keep repeating the inc / plain / loop sequence. Stitch counts:
| Rows | Sts | Tier base (plain row) | Loop row |
|---|---|---|---|
| 8–10 | 9 | Row 9, cream | Row 10, BLO |
| 11–13 | 11 | Row 12, gold | Row 13, FLO |
| 14–16 | 13 | Row 15, cream | Row 16, BLO |
| 17–19 | 15 | Row 18, gold | Row 19, FLO |
| 20–22 | 17 | Row 21, cream | Row 22, BLO |
| 23–25 | 19 | Row 24, gold | Row 25, FLO |
| 26–28 | 21 | Row 27, cream | Row 28, BLO |
At the end of Row 28 you have 21 sts. Fasten off and weave in the ends.
Check the RS. You should see nine rows with a line of free loops: Rows 3, 6, 9, 12, 15, 18, 21, 24, and 27. The cream tiers go on Rows 3, 9, 15, 21, and 27. The gold tiers go on Rows 6, 12, 18, and 24.
Ruffle Tiers
Work each tier with the RS facing and the tip pointing up. Join at the right-hand end of the free loops and work across to the left. Every tier stitch goes into one free loop. When a tier is finished, fasten off and leave a 4 in (10.2 cm) tail.
Begin at the bottom tier and work up. This way each new tier lies over the base of the tier below it.
Cream Tiers (Rows 27, 21, 15, 9, 3)
Join cream with a sc in the first free loop, sk 1, shell in the next loop, sk 1, sc in the next loop; rep from * across.
The repeat is 4 loops, plus 1. Every cream base row has a count that fits exactly:
- Row 27 tier (21 loops): 5 shells. That is 25 dc + 6 sc = 31 sts.
- Row 21 tier (17 loops): 4 shells. That is 20 dc + 5 sc = 25 sts.
- Row 15 tier (13 loops): 3 shells. That is 15 dc + 4 sc = 19 sts.
- Row 9 tier (9 loops): 2 shells. That is 10 dc + 3 sc = 13 sts.
- Row 3 tier (5 loops): 1 shell. That is 5 dc + 2 sc = 7 sts.
Gold Tiers (Rows 24, 18, 12, 6)
Join gold with a sc in the first free loop, scallop in the next loop, sc in the next loop; rep from * across.
The repeat is 2 loops, plus 1, so it fits any odd count:
- Row 24 tier (19 loops): 9 scallops. That is 27 dc + 10 sc = 37 sts.
- Row 18 tier (15 loops): 7 scallops. That is 21 dc + 8 sc = 29 sts.
- Row 12 tier (11 loops): 5 scallops. That is 15 dc + 6 sc = 21 sts.
- Row 6 tier (7 loops): 3 scallops. That is 9 dc + 4 sc = 13 sts.
The shells and scallops are each about 0.5 in (1.3 cm) deep. The tiers are spaced 3 rows apart, which is also 0.5 in (1.3 cm), so every tier covers the gold body down to the next tier. On the Row 27 tier, the shells hang about 0.3 in (0.8 cm) past the bottom edge, which gives the scalloped hem.
Sew each tail along the back of its own tier and trim.
Trunk, Cord, and Embellishments
Trunk (gold): Make a magic ring.
Rnd 1: Ch 2 (does not count), 12 dc in the ring, sl st to the first dc. (12 sts)
Rnd 2: Ch 2, 2 dc in each st, sl st to the first dc. (24 sts)
Rnd 3: Ch 1, sc in the next st, 2 sc in the next st; rep from * 11 more times, sl st to the first sc. (36 sts)
The trunk should measure 1.75 in (4.4 cm) across. Fasten off and leave a 12 in (30.5 cm) tail.
Cord (cream): Ch 31. Sl st in the back bump of the 2nd ch from the hook and in each ch across. (30 sl sts) The cord should be 5 in (12.7 cm) long.
Border
The border is a single gold sc round around the body. Work it after the tiers. Fold the ruffles forward out of the way and stitch into the row-ends of the body only.
Border gauge: 5 sc per 1 in (2.5 cm) along every edge, the same as the body gauge.
Edging round: Turn the tree upside down with the RS facing. Join gold with a sc in the first st of Row 28 at the right-hand corner.
- Bottom edge: Sc in each of the next 20 sts. (21 sc)
- Corner: Ch 1.
- First side: Work down the row-ends to the tip with 1 sc per row-end, skipping the row-ends of Rows 19 and 10. (26 sc)
- Apex: Ch 2.
- Second side: Work back up with 1 sc per row-end, skipping the row-ends of Rows 10 and 19. (26 sc)
- Corner: Ch 1, sl st to the first sc.
Round total: 21 + 26 + 26 = 73 sc, plus 3 corner ch-spaces. The corners are ch-spaces, so they are not part of the side counts. Nothing gets counted twice.
Why the math works: The bottom edge is 21 sts. At 5 sc per inch, that is 4.2 in (10.7 cm), which matches the body exactly. Each slanted side runs about 5.2 in (13.2 cm) from the corner to the tip. At 5 sc per inch, that calls for 26 sc. There are 28 row-ends, so skipping 2 gives exactly 26 and keeps the sides from rippling. The ch-spaces let the corners turn without cupping.
When the border is done, the body measures about 4.4 in (11.2 cm) wide x 4.8 in (12.2 cm) tall. With the cream shells flaring out, the widest point is about 4.5 in (11.4 cm).
Final Blocking
- Lay the tree RS up on a blocking mat.
- Pin only the gold edging, at the two bottom corners and the tip. Line the bottom edge up to 4.4 in (11.2 cm) and the height to 4.8 in (12.2 cm).
- Hold a steam iron about 1 in (2.5 cm) above the piece and steam it. Do not press. The ruffles need to keep their lift.
- While it is still damp, roll each shell and scallop downward with a fingertip so the tiers sit evenly.
- Leave it to dry fully, about 1 hour.
- Assembly after blocking:
- Sew the trunk to the WS, centered, so that 0.75 in (1.9 cm) of it shows below the bottom edging.
- Fold the cord in half. Sew both ends to the WS at the tip, overlapping them by 0.5 in (1.3 cm), so that a 2 in (5.1 cm) loop stands above the tree.
- Tie the ribbon into a bow about 2.75 in (7.0 cm) wide with 1.5 in (3.8 cm) tails. Sew it over the top of the RS so it hides Rows 1–2.
- Sew the two 8 mm pearls one above the other on the bow knot.
- Sew one 6 mm pearl at each sc between scallops on the gold tiers, not counting the sc at each end: 2 + 4 + 6 + 8 = 20 pearls.
Final Quality-Control Checklist
- Body is 21 sts across Row 28 and 28 rows tall
- All free loops are on the RS, and all nine tiers fold downward
- Cream tiers have 1, 2, 3, 4, 5 shells from top to bottom
- Gold tiers have 3, 5, 7, 9 scallops from top to bottom
- Edging is 21 / 26 / 26 sc with flat corners
- Trunk is 1.75 in (4.4 cm), centered, with 0.75 in (1.9 cm) showing
- Loop is 2 in (5.1 cm) and firmly sewn
- 20 small pearls and 2 bow pearls are attached securely
- All ends are woven in on the WS
Troubleshooting
Free loops are on the wrong side: You mixed up BLO and FLO. RS loop rows use BLO and WS loop rows use FLO. Frog back to that row and rework it.
Tier won’t fit the count: Count the free loops again. Cream bases need 4n + 1 loops and gold bases need an odd number. If you’re off, an increase was probably missed.
Tiers flare too much: Go down 0.5 mm for the tiers only, or change the shells to 4 dc.
Body gaps show between tiers: Your rows are taller than 6 per inch. Use a smaller hook for the body.
Sides ripple: Skip one more row-end on each side in the edging.
Tree leans: Block again with the tip pinned straight above the center of the bottom edge.
Care
Spot clean with cool water and mild soap, then dry flat. Do not iron the satin bow or the pearls directly.
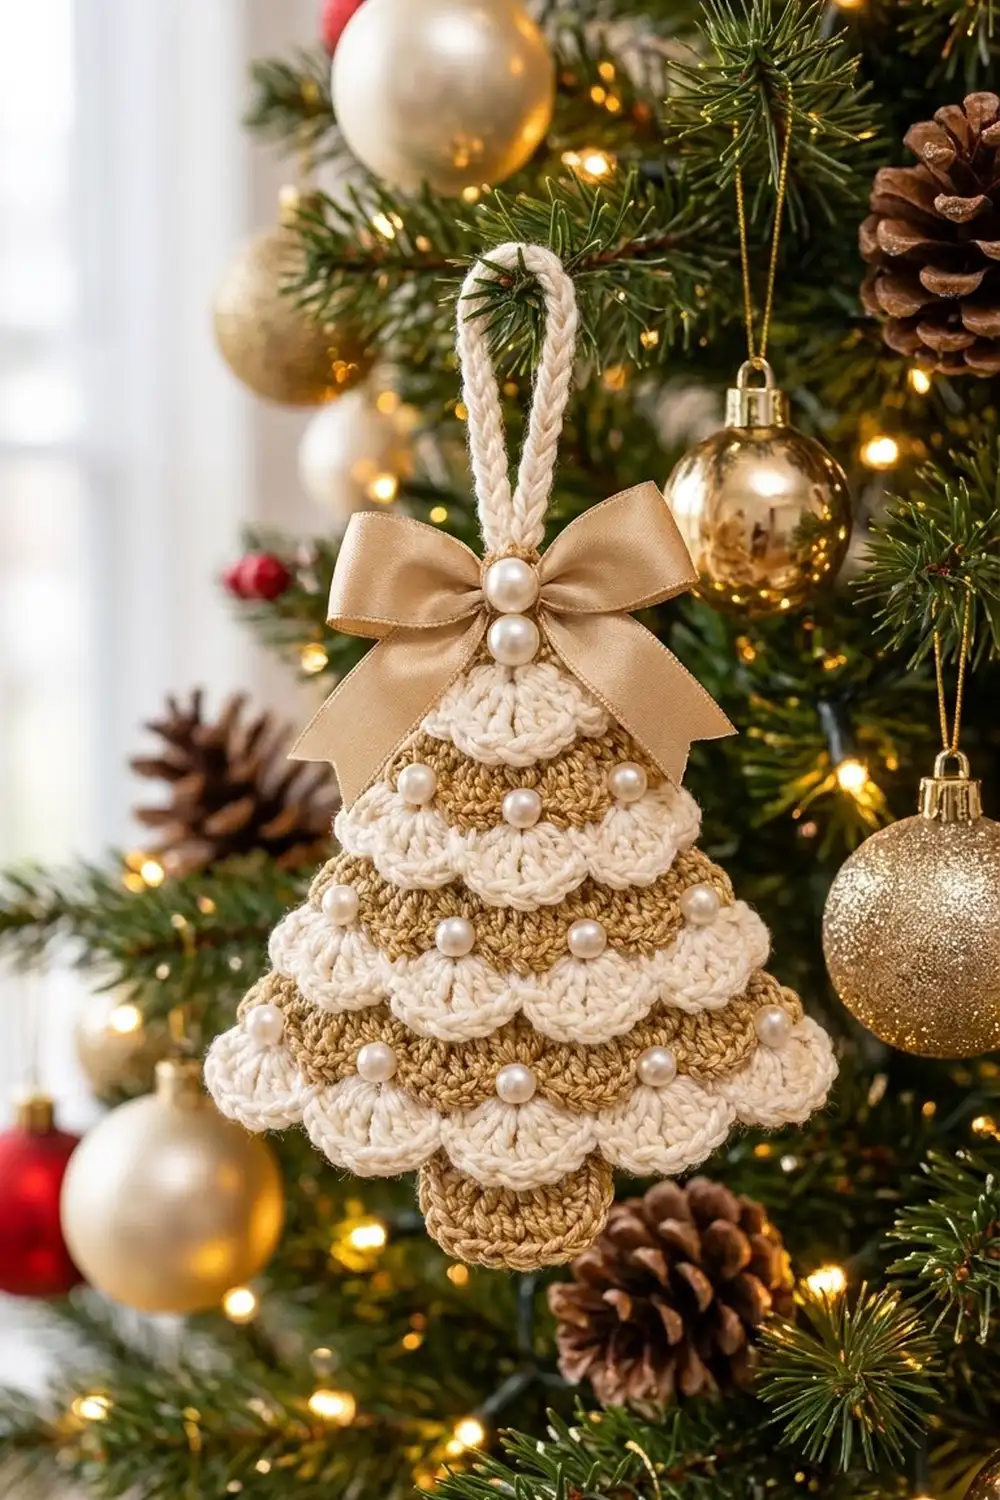
Final Notes
The measurement chain is short and dependable. A gauge of 5 sc and 6 rows per inch gives a 21-st, 28-row body measuring 4.2 x 4.7 in (10.7 x 11.9 cm). Nine tiers spaced 0.5 in (1.3 cm) apart cover it completely. A 73-sc edging finishes it at 4.4 x 4.8 in (11.2 x 12.2 cm), and the trunk brings the full height to about 5.5 in (14.0 cm). If your first tree hits each checkpoint, every tree after it will match.
Happy crocheting!