

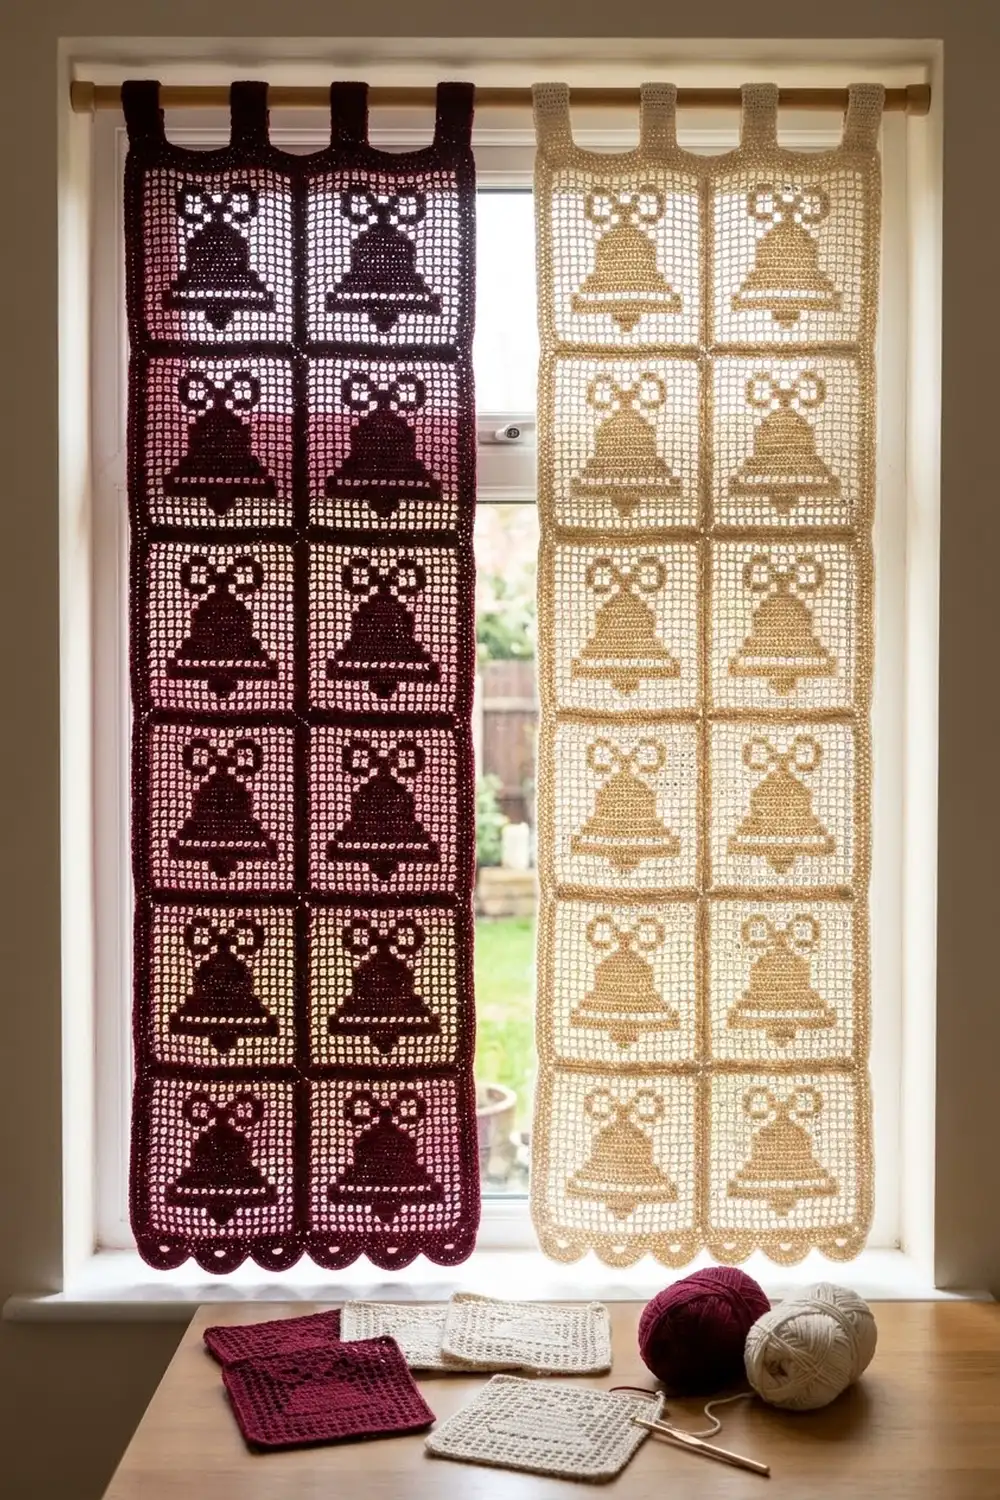
These curtain panels bring a soft holiday glow to any window. Each panel is a column of filet mesh squares, and every square holds a solid bell topped with a ribbon bow. Light passes through the open mesh, so the bells read like a shadow pattern when the sun is behind them.
The sample set has two panels: one in deep burgundy and one in warm cream. Hang them as a pair, or make two of the same color. The look is classic and cottage-style, and the stepped tiers of the bell give it a gentle vintage feel.
The pattern uses US crochet terms. Each finished panel measures 19 in (48.3 cm) wide by 73.5 in (186.7 cm) long, plus 3 in (7.6 cm) tab loops at the top.
Construction is simple. You crochet 16 identical filet squares per panel in rows and join them with slip stitch seams into a 2 x 8 layout. Then you work a two-round border with scallops along the bottom and add tab loops along the top.
Finished Size and Construction
- Finished panel size: 19 x 73.5 in (48.3 x 186.7 cm), plus 3 in (7.6 cm) tabs
- Skill level: Intermediate (filet blocks and meshes)
- Terminology: US crochet terms
- Yarn weight: Worsted weight (#4) cotton
- Hook: 5 mm (US H-8)
- Number of pieces: 16 squares per panel; 32 squares for the pair
- Layout: 2 squares wide x 8 squares tall per panel
- Square size: 9 x 9 in (22.9 x 22.9 cm), 15 meshes x 15 rows
- Panel size before border: 18 x 72 in (45.7 x 182.9 cm)
- Border depth: 0.5 in (1.3 cm) on the sides and top; 1 in (2.5 cm) at the scalloped bottom
Materials
Choose a smooth, mercerized or combed worsted cotton. Cotton keeps the filet grid crisp, hangs straight, and does not fuzz in sunlight. Avoid fluffy or very stretchy yarns, because the mesh will sag over the 6 ft (1.8 m) drop.
Yarn (per panel):
- Burgundy panel: 500 g / approx. 850 m
- Cream panel: 500 g / approx. 850 m
Each square uses about 24 g (approx. 41 m). The border and tabs use about 60 g (approx. 102 m) per panel. Quantities include a margin of about 10 percent for gauge swatches and differences in tension.
Tools:
- 5 mm (US H-8) crochet hook
- Tapestry needle
- Locking stitch markers
- Tape measure
- Rust-proof pins and a blocking surface
- Spray bottle
- Scissors
Abbreviations (US Terms)
- ch – chain
- sl st – slip stitch
- sc – single crochet
- dc – double crochet
- sk – skip
- sp – space
- st(s) – stitch(es)
- RS / WS – right side / wrong side
Special stitches (filet meshes): Each mesh is 3 sts wide and always ends with 1 dc.
- Open mesh (O): Ch 2, sk 2 (the ch-2 sp or 2 dc below), dc in next dc.
- Block (B): Over an open mesh: 2 dc in the ch-2 sp, dc in next dc. Over a block: dc in each of next 3 dc.
Every row begins with ch 3, which counts as the first dc, and ends with a dc in the top of the turning ch-3. Every row has 46 sts: 16 dc posts plus 15 meshes of 2 sts each.
Gauge and Checkpoints
Gauge: 5 meshes x 5 rows = 3 x 3 in (7.6 x 7.6 cm) in filet. One mesh is 0.6 in (1.5 cm) wide and one row is 0.6 in (1.5 cm) tall.
Make one full square before anything else. It is your real gauge swatch.
Checkpoints:
- After Row 5: piece measures 9 in (22.9 cm) wide and 3 in (7.6 cm) tall.
- After Row 15: square measures 9 x 9 in (22.9 x 22.9 cm) after a light steam.
- After joining: panel measures 18 x 72 in (45.7 x 182.9 cm).
- After border: panel measures 19 x 73.5 in (48.3 x 186.7 cm).
If your square is too big, go down a hook size. If it is too small, go up a hook size. If the width is right but the height is short, pull up the first loop of each dc a little taller, or keep the ch-3 turning chain snug so it matches the dc height. Height errors multiply by 8 along the panel, so fix them now.
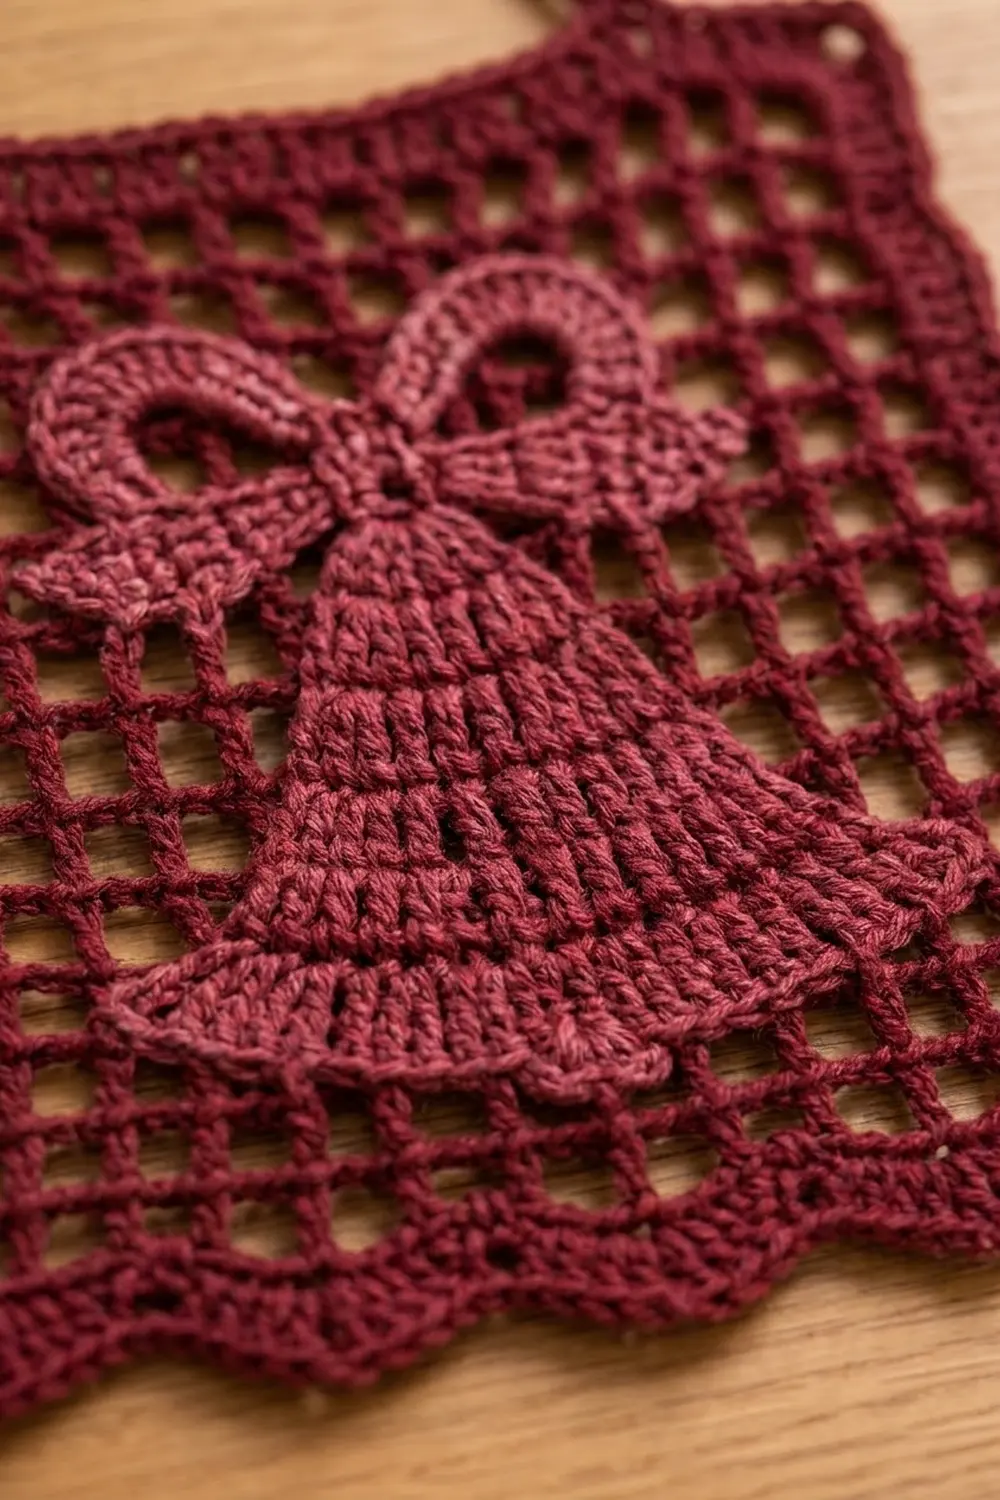
Bell Square (Make 16 per Panel)
Read each row below as a sequence of open meshes (O) and blocks (B). Every row is symmetrical, so it reads the same in both directions. Row 1 is the RS.
Foundation: Ch 50.
Row 1 (RS): Dc in 8th ch from hook (first open mesh made), ch 2, sk 2 ch, dc in next ch; rep from * 13 more times. Turn. (15 O; 46 sts)*
Row 2 (clapper): Ch 3, 7 O, 1 B, 7 O. Turn. (14 O, 1 B; 46 sts)
Row 3 (bell lip): Ch 3, 2 O, 11 B, 2 O. Turn. (11 B)
Row 4: Ch 3, 3 O, 9 B, 3 O. Turn. (9 B)
Row 5: Ch 3, 3 O, 9 B, 3 O. Turn. (9 B)
Row 6: Ch 3, 4 O, 7 B, 4 O. Turn. (7 B)
Row 7: Ch 3, 4 O, 7 B, 4 O. Turn. (7 B)
Row 8: Ch 3, 5 O, 5 B, 5 O. Turn. (5 B)
Row 9: Ch 3, 5 O, 5 B, 5 O. Turn. (5 B)
Row 10 (crown): Ch 3, 6 O, 3 B, 6 O. Turn. (3 B)
Row 11 (bow knot and tails): Ch 3, 5 O, 1 B, 1 O, 1 B, 1 O, 1 B, 5 O. Turn. (3 B)
Row 12 (bow, lower loops): Ch 3, 3 O, 3 B, 1 O, 1 B, 1 O, 3 B, 3 O. Turn. (7 B)
Row 13 (bow, loop sides): Ch 3, 3 O, 1 B, 1 O, 1 B, 3 O, 1 B, 1 O, 1 B, 3 O. Turn. (4 B)
Row 14 (bow, loop tops): Ch 3, 3 O, 3 B, 3 O, 3 B, 3 O. Turn. (6 B)
Row 15: Ch 3, 15 O. (15 O; 46 sts) Fasten off, leaving a 6 in (15.2 cm) tail.
Every row totals 15 meshes and 46 sts. The bell steps in by one mesh on each side every two rows, which creates the tiered shape. The blocks in Rows 11 to 14 form the knot, two short tails, and two closed bow loops with open centers.
Weave in the starting tail. Keep the ending tail for seaming if you like.
Make All Pieces
- Burgundy panel: 16 squares
- Cream panel: 16 squares
- Total for the pair: 32 squares
Steam each square lightly to 9 x 9 in (22.9 x 22.9 cm) before joining. Place every square with the foundation edge at the bottom so all the bells hang upright.
Layout (one panel, B = bell square):
Row 8 (top):    B  B
Row 7:          B  B
Row 6:          B  B
Row 5:          B  B
Row 4:          B  B
Row 3:          B  B
Row 2:          B  B
Row 1 (bottom): B  B
Joining
Join with a slip stitch seam worked on the WS. Hold two squares RS together and work through both layers.
Step 1 – Vertical seams (make 8 pairs). Place two squares side by side with Row 1 at the bottom of both. Along the matching side edges, work 2 sl st into each row-end (around the dc post or turning ch). Each seam has 15 rows x 2 = 30 sl st. You now have 8 strips, each 18 x 9 in (45.7 x 22.9 cm).
Step 2 – Horizontal seams (7 seams). Place the top edge of one strip against the foundation edge of the next strip. Work 1 sl st through each matching pair of sts: 46 sl st per square, 92 sl st per seam. Match every dc post to a dc post and every ch to a ch. Nothing is added at the center seam.
Tension: Keep the slip stitches as loose as the dc fabric. Pull up each loop to about the height of a ch. A tight seam puckers and shortens the panel. Over 7 horizontal seams, even 0.1 in (0.3 cm) per seam adds up.
Checkpoint: The joined panel measures 18 x 72 in (45.7 x 182.9 cm). Measure it flat, not hanging.
Border
Border gauge: 5 sc = 1 in (2.5 cm). This matches the square: 46 sts across 9 in (22.9 cm) is about 5 per inch, and 3 sc per 0.6 in (1.5 cm) row-end is also 5 per inch. That is why the border lies flat without ruffling or pulling.
Round 1: With RS facing, join yarn in the first foundation ch at the bottom-left corner. Ch 1.
- Bottom edge: Sc in each foundation ch at the base of the sts across: 46 per square x 2 squares = 92 sc.
- Corner: Ch 2.
- Right side: 3 sc in each row-end: 15 rows x 3 = 45 sc per square x 8 squares = 360 sc.
- Corner: Ch 2.
- Top edge: Sc in each st across: 46 x 2 = 92 sc.
- Corner: Ch 2.
- Left side: 360 sc, as on the right side.
- Corner: Ch 2, sl st in first sc to join.
(904 sc and 4 corner ch-2 sps)
Round 2: Sl st into the bottom-left corner ch-2 sp. Ch 1.
- Bottom edge (scallops): Sc in the corner sp, *sk 1 sc, 5 dc in next sc, sk 1 sc, sc in next sc; rep from * 22 more times, then sc in the bottom-right corner sp. The bottom has 23 scallops: 1 sc + (23 x 6) + 1 sc = 140 sts. This works because 92 = 23 x 4, so the last repeat lands exactly in the last sc.
- Right side: Sc in each of the 360 sc.
- Top-right corner: (Sc, ch 2, sc) in the ch-2 sp.
- Top edge: Sc in each of the 92 sc.
- Top-left corner: (Sc, ch 2, sc) in the ch-2 sp.
- Left side: Sc in each of the 360 sc. Sl st in first sc to join. Fasten off.
Tabs (make 5): The top edge now has 94 sc between the corner ch-2 sps (1 corner sc + 92 + 1 corner sc). Divide them as tab 6 sc, gap 16 sc, repeated, ending with a tab: (5 x 6) + (4 x 16) = 94. The first and last tabs sit flush with the panel edges.
Mark the tab positions. For each tab, join yarn with RS facing in the first of its 6 sc.
- Row 1: Ch 1, sc in each of 6 sc. Turn. (6 sc; 1.2 in / 3.0 cm wide)
- Row 2 and every row after: Ch 1, sc in each sc. Turn. (6 sc)
Repeat until the tab measures 6 in (15.2 cm), about 26 rows. Fasten off, leaving a 10 in (25.4 cm) tail. Fold the tab to the WS and sew the last row to the base of the tab to make a 3 in (7.6 cm) loop.
Final Blocking
- Weave in all remaining ends along seams or inside blocks, never across open meshes.
- Lay the panel flat on a large surface, such as a bed or blocking mats placed in a long line.
- Pin the sides straight to 19 in (48.3 cm) wide.
- Pin the length to 73.5 in (186.7 cm), checking that each row of squares is 9 in (22.9 cm) tall.
- Pin each scallop into a smooth curve, and square up every bell lip.
- Spray until damp but not dripping. Let it dry completely, about 24 hours.
- Unpin and hang the panel on the rod. Let it hang for one day before judging the final length.
Final Quality-Control Checklist
- All 16 squares measure 9 x 9 in (22.9 x 22.9 cm).
- All bells point the same way, with the bow at the top.
- Every row of every square has 15 meshes.
- Vertical seams have 30 sl st; horizontal seams have 92 sl st.
- Border Round 1 has 92 sc on the top and bottom and 360 sc per side.
- The bottom has 23 even scallops.
- Five tabs are evenly spaced, with 16 sc between them.
- The panel hangs straight with no puckering at the seams.
Troubleshooting
Mesh rows lean or slant. Your turning ch-3 is looser than your dc. Tighten it, or replace it with a standing dc.
Bell looks lumpy. When placing a block over an open mesh, work the 2 dc into the ch-2 sp, not around a single ch.
Wrong mesh count. Count the dc posts: there are always 16 per row. A missing post usually means the last dc was not worked into the turning ch.
Seams pucker. Undo the seam and rework it with a larger hook for the slip stitches only.
Bottom edge flares. Check that Round 1 has exactly 92 sc along the bottom before starting the scallops.
Panel grows longer when hung. Cotton relaxes over time. Steam the panel again and dry it flat, or remove one sc row from each tab.
Care
Hand wash, or machine wash on a gentle cold cycle in a mesh laundry bag. Dry flat and steam lightly to refresh the shape.
Final Notes
The measurement chain is short and reliable: one mesh is 0.6 in (1.5 cm), 15 meshes make a 9 in (22.9 cm) square, 2 x 8 squares make an 18 x 72 in (45.7 x 182.9 cm) panel, and the border brings it to 19 x 73.5 in (48.3 x 186.7 cm). Check gauge on the first square and the rest follows.
Hang the burgundy and cream panels together for a warm holiday window, or make a matching pair in your favorite color.
Happy crocheting!