

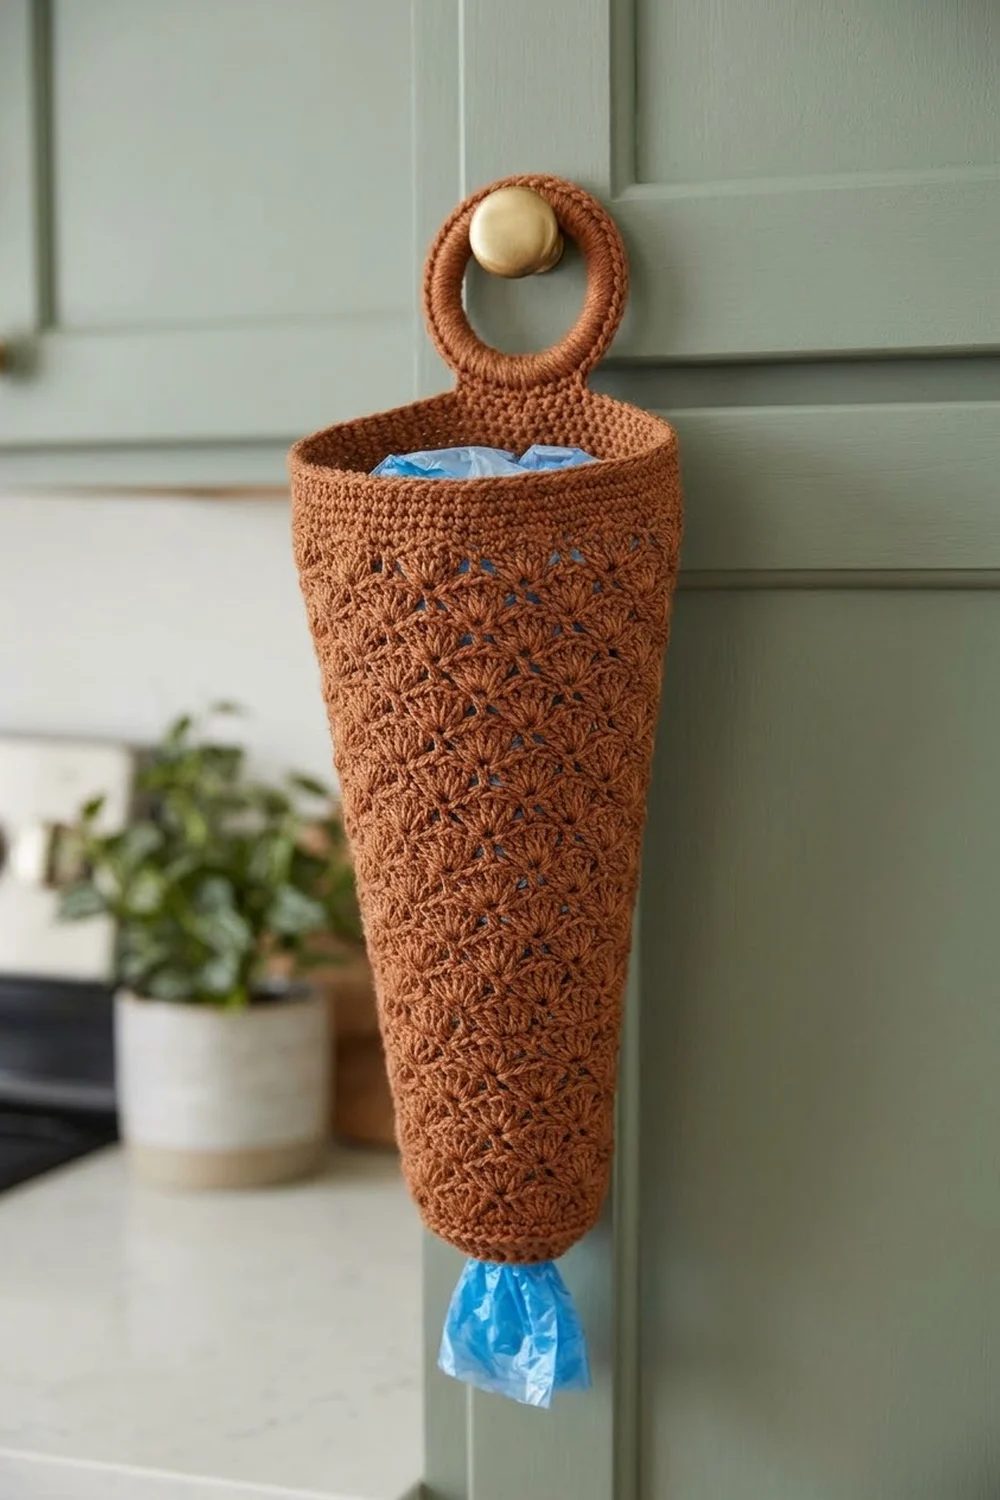
This cone-shaped bag holder is a small kitchen project you’ll use every day. You stuff used plastic bags in through the wide top, hang it from a cabinet knob, and pull a fresh bag out of the small opening at the bottom tip. It keeps a messy drawer of bags out of sight and makes a handy housewarming gift.
The design uses one warm cinnamon brown with an allover shell (fan) texture. The shells sit in staggered rounds, so the fabric looks rich and sculpted but stays firm enough to hold its cone shape when full. A smooth single crochet rim finishes the top, and a thick crocheted ring at the back makes it easy to hang.
The pattern uses US crochet terms. The finished holder measures about 9″ (22.9 cm) wide at its widest point when flattened, 14.75″ (37.5 cm) long for the body, and about 18.75″ (47.6 cm) long including the hanging ring.
The construction is simple and has no seams. You start at the narrow bottom with a chain ring and work shell rounds upward, adding shells at set points to widen the cone. Then you finish with a single crochet rim, a hanging ring worked straight off the rim, and a firm edging around the bottom opening.
Finished Size and Construction
- Finished size: 9″ (22.9 cm) widest flat width; body length 14.75″ (37.5 cm); total length with ring 18.75″ (47.6 cm)
- Skill level: Easy / advanced beginner
- Terminology: US crochet terms
- Yarn weight: Worsted (#4), cotton or cotton blend
- Hook: 5.0 mm (H-8)
- Number of pieces: 1 (body and ring are worked as one piece)
- Layout: Single cone worked in joined rounds from bottom tip to top rim
- Body size before rim: 9″ (22.9 cm) wide flat, 13.75″ (34.9 cm) long
- Rim depth: 3 rounds of sc, about 0.75″ (1.9 cm)
- Bottom opening: about 1.5″ (3.8 cm) across when opened round
Materials
Choose a worsted-weight cotton or cotton blend with good stitch definition. Cotton keeps the shells crisp, holds the cone shape, and stands up to frequent handling in a busy kitchen. Avoid very fuzzy or splitty yarn, because the shells will blur and the bottom opening will lose its firmness.
Yarn
– Cinnamon / terracotta brown: 150 g, about 280 m (306 yd)
This amount includes a comfortable margin for your gauge check and small tension differences.
Tools
– 5.0 mm (H-8) crochet hook
– 2 stitch markers (plus 6 extra markers or scraps of yarn for placing the handle)
– Tapestry needle
– Scissors
– Measuring tape
– Spray bottle and pins for blocking
Abbreviations (US Terms)
- ch – chain
- sl st – slip stitch
- sc – single crochet
- sc2tog – single crochet 2 together
- dc – double crochet
- st(s) – stitch(es)
- rep – repeat
- Rnd – round
Special stitches
- Shell: 5 dc in the same stitch. The 3rd dc of a shell is its center dc.
- Increase group (inc group): Work this over one shell of the previous round, in place of a single sc in its center dc: sc in 2nd dc, shell in center dc, sc in 4th dc. It turns one sc into sc + shell + sc, which adds exactly 1 shell repeat (6 stitches) to the round.
- Shell repeat: 1 shell + 1 sc = 6 stitches.
Gauge and Checkpoints
Shell gauge: 2 shell repeats (12 sts) = 3″ (7.6 cm) wide; 4 shell rounds = 3″ (7.6 cm) tall.
Single crochet gauge: 16 sc = 4″ (10.2 cm); 4 sc rounds = 1″ (2.5 cm).
Because this is a single piece, the start of the holder doubles as your gauge test. Work Rnds 1–3, then flatten the little tube and measure.
Checkpoints
– After Rnd 3: 3″ (7.6 cm) wide flat, about 1.75″ (4.4 cm) tall.
– After Rnd 8: 6″ (15.2 cm) wide flat, about 5.5″ (14.0 cm) tall.
– After Rnd 19: 9″ (22.9 cm) wide flat, about 13.75″ (34.9 cm) tall.
– After the rim: 8″ (20.3 cm) wide flat at the top edge, about 14.5″ (36.8 cm) tall.
– After the bottom edging: 14.75″ (37.5 cm) body length.
If your piece is too big, go down to a 4.5 mm hook. If it is too small, go up to a 5.5 mm hook. Keep the stitch counts exactly as written and change only the hook, so the cone keeps its proportions.
Body
Work the body in joined rounds without turning. Two round types alternate:
- Type A rounds begin with a sc and end with a full shell.
- Type B rounds begin and end with a half shell. The two halves close into one shell at the join.
Every completed round has the same number of shells and sc, so the stitch count is always (number of repeats) × 6.
Rnd 1: Ch 24 and join with sl st to form a ring, taking care not to twist. Ch 1, sc in each ch around, join with sl st to first sc. (24 sc)
Rnd 2 (set-up, Type A): Ch 1, sc in first st, skip 2 sts, shell in next st, skip 2 sts, sc in next st, skip 2 sts, shell in next st, skip 2 sts; rep from * 2 more times, join with sl st to first sc. (4 shell repeats, 24 sts)*
Rnd 3 (Type B): Ch 3 (counts as dc), 2 dc in same st, sc in center dc of next shell, shell in next sc, sc in center dc of next shell; rep from * around, 2 dc in first st (the same st as the beginning ch-3), join with sl st to top of ch-3. (4 shell repeats, 24 sts)*
The join of a Type B round sits at the center of the split shell, so the next Type A round starts right there.
Type A without increases: Ch 1, sc in same st, *shell in next sc, sc in center dc of next shell; rep from * around, ending with shell in last sc, join with sl st to first sc.
When you count shells in a Type A round, the split shell at the join is shell 1.
Rnd 4 (Type A, increase): Ch 1, sc in same st, shell in next sc, inc group over next shell (shell 2), shell in next sc, sc in center dc of next shell, shell in next sc, inc group over next shell (shell 4), shell in next sc, join with sl st to first sc. (6 shell repeats, 36 sts)
Rnds 5–7: Work Type B, Type A, Type B with no increases. (6 shell repeats, 36 sts each round)
Rnd 8 (Type A, increase): Work as a Type A round, working inc groups over shells 2 and 5. (8 shell repeats, 48 sts)
Checkpoint: about 6″ (15.2 cm) wide flat.
Rnds 9–11: Work Type B, Type A, Type B. (8 shell repeats, 48 sts each round)
Rnd 12 (Type A, increase): Work as a Type A round, working inc groups over shells 3 and 7. (10 shell repeats, 60 sts)
Rnds 13–15: Work Type B, Type A, Type B. (10 shell repeats, 60 sts each round)
Rnd 16 (Type A, increase): Work as a Type A round, working inc groups over shells 3 and 8. (12 shell repeats, 72 sts)
Rnds 17–19: Work Type B, Type A, Type B. (12 shell repeats, 72 sts each round)
Checkpoint: the body is now about 9″ (22.9 cm) wide flat and 13.75″ (34.9 cm) long. In each increase round the two increases sit roughly opposite each other, so the cone widens evenly on both sides instead of twisting.
Do not fasten off. Continue straight into the rim.
Border: Rim, Hanging Ring, and Bottom Edging
Border gauge: 16 sc = 4″ (10.2 cm). The top edge measures 16″ (40.6 cm) around, which is 8″ (20.3 cm) flat, or 32 sc per flattened side.
Rnd 20 (rim conversion round): Ch 1, sc in next 7 sts, sc2tog over next 2 sts; rep from * 8 times total, join with sl st to first sc. (64 sc: 72 sts worked into one-for-one, minus 8 sc2tog decreases)*
Rnds 21–22: Ch 1, sc in each st around, join. (64 sc each round; 32 sc per flattened side)
Why the math works: Rnd 19 has 72 sts over 18″ (45.7 cm) of circumference. At sc gauge, 72 sc would also measure 18″ (45.7 cm) and give a straight, open top. Taking away 8 stitches brings the rim to 64 sc, or 16″ (40.6 cm). This gently gathers the top into the rounded shoulder of the finished holder. The 8 decreases fall every 9 stitches, so the gathering is even all the way around.
Fasten off and weave in the end.
Hanging Ring
Flatten the holder so the beginning-of-round seam runs along one fold, and choose one flat side as the back. Mark the 6 center back stitches of Rnd 22 as st A through st F.
Row 1: Join yarn with sl st in st A, ch 40, skip sts B–E, sl st in st F. (ch-40 loop)
Row 2: Working back toward st A, work 64 sc into the ch-40 loop (around the chain, not into individual chains). Push the stitches together so they cover the chain completely. Sl st in st A. (64 sc)
Row 3: Turn, sc in each sc of Row 2, sl st in st F. (64 sc)
Fasten off, leaving a 10″ (25.4 cm) tail. Use the tail to whipstitch the base of the ring firmly across sts A–F so it can’t pull away from the rim.
The finished ring is about 4.25″ (10.8 cm) across on the outside, with an opening about 2.75″ (7.0 cm) across. The 64 packed sc make the ring stiff and round rather than floppy. It stands about 4″ (10.2 cm) above the rim.
Bottom Opening Edging
Turn the holder upside down. Join yarn with sl st in any remaining loop of the foundation chain on Rnd 1.
Edging Rnd: Ch 1, sc in next 4 ch, sc2tog over next 2 ch; rep from * 4 times total, join with sl st to first sc. (20 sc: 24 foundation loops worked one-for-one, minus 4 sc2tog decreases; 10 sc per flattened side)*
Why the math works: The foundation ring has 24 sts, or 6″ (15.2 cm) around at sc gauge. Bringing it down to 20 sc makes it 5″ (12.7 cm) around, so the opening is about 1.5″ (3.8 cm) across. That’s snug enough to keep bags inside but wide enough to pull one out easily.
Fasten off and weave in all ends.
Final Blocking
- Lightly mist the whole holder with water until it is damp but not wet.
- Stuff the cone loosely with a rolled towel or plastic bags to support the shape.
- Smooth each round of shells so the fans sit straight and evenly staggered.
- Gently shape the rim into a smooth curve, 8″ (20.3 cm) wide flat.
- Shape the ring into a neat circle about 4.25″ (10.8 cm) across.
- Check that the body measures 14.75″ (37.5 cm) from the bottom edge to the rim.
- Let it dry completely before you remove the stuffing.
Final Quality-Control Checklist
- Every shell has exactly 5 dc.
- Shell rounds alternate cleanly, with each shell sitting above a sc.
- Round counts: 24, 36, 48, 60, then 72 sts at the widest.
- Rim: 64 sc, 32 sc per flattened side.
- Bottom edging: 20 sc, 10 sc per flattened side.
- Hanging ring: 64 sc in each of Rows 2 and 3, firmly stitched at the base.
- Widest point: 9″ (22.9 cm) flat.
- Total length: about 18.75″ (47.6 cm) including the ring.
- All ends woven in securely.
Troubleshooting
The cone twists or spirals. Joined rounds of shells can lean slightly. Make sure each Type B round joins to the top of the ch-3 and each Type A round starts in that same stitch. Blocking will straighten a mild lean.
The stitch count is off after an increase round. Count shells, not single stitches. Each increase round should add exactly 2 shells and 2 sc. A missing inc group usually means you counted the split shell wrong at the join.
Shells look crowded at increase points. This is normal. The inc group fits a sc, a shell, and a sc into one shell. Keep the sc stitches small and the next round will spread them out.
The top flares open. Your rim tension is loose. Rework Rnd 20 with a 4.5 mm hook, or add one more round of sc.
Bags fall out of the bottom. The opening is too wide. Rework the edging with a smaller hook, or work a second round with an sc2tog every 4th stitch.
The ring sags. Work Row 2 more densely, or add an extra row of sl sts around the outer edge.
Care
Hand wash in cool water with mild soap, press out the water in a towel, and dry it laid flat over a support. Reshape while damp.

Final Notes
Every measurement in this pattern follows from the one before it. Your shell gauge sets the bottom at 3″ (7.6 cm) flat and the widest point at 9″ (22.9 cm) flat after 19 rounds. The rim decreases from 72 sts to 64 sc, pulling the top in to 8″ (20.3 cm) flat. The bottom edging brings the opening to about 1.5″ (3.8 cm) across. The 64-sc ring adds about 4″ (10.2 cm), for a total length of about 18.75″ (47.6 cm). If your gauge is right at Rnd 3, everything else falls into place.
Happy crocheting!