

The Sunlit Rings Curtain is a grid of open crochet circles that lets daylight through and casts soft dotted shadows across the floor. Each ring is a thick, rounded band of stitches around an open center. Short chain bars link each ring to its neighbors, and a solid header band with rod windows keeps the top straight.
The pattern is written for one cream cotton yarn. A single natural color gives the panel a calm, airy feel, and the plain grid suits most rooms. The pattern uses US crochet terms throughout.
One finished panel measures 35.5 in (90.2 cm) wide by 79.5 in (201.9 cm) long, including a 5 in (12.7 cm) header. The photo shows two matching panels, and the materials list covers the pair.
Each ring is two rounds. From the second ring on, you join it to its finished neighbors during Round 2, so you never sew rings together. When all 300 rings of a panel are joined, you work the header in rows straight across the top rings.
Finished Size and Construction
- Finished panel size: 35.5 in (90.2 cm) wide x 79.5 in (201.9 cm) long
- Skill level: Easy intermediate (repetitive, with careful joining)
- Terminology: US crochet terms
- Yarn weight: DK / light worsted (weight 3) cotton
- Hook: 4.0 mm (G-6)
- Number of pieces: 300 rings per panel, 600 for the pair
- Layout: 12 rings across x 25 rings down per panel
- Ring size: 2.5 in (6.4 cm) across, with a 1 in (2.5 cm) center hole
- Size before header: 35.5 in (90.2 cm) x 74.5 in (189.2 cm)
- Header (border) depth: 5 in (12.7 cm), worked across the top edge only
Materials
Yarn: Use a smooth, mercerized or combed cotton in DK weight, about 230 m per 100 g. Cotton holds the round shape and won’t stretch out on the rod the way acrylic can. Buy all of your yarn from one dye lot, because small shade differences show up clearly against window light.
- Cream (natural ecru): 1,400 g / about 3,220 m for the pair (700 g / about 1,610 m per panel)
These amounts include about a 10% margin for gauge swatches, tails, and small differences in tension.
Tools:
- 4.0 mm (G-6) crochet hook
- Tapestry needle
- Locking stitch markers (at least 10)
- Measuring tape
- Rustproof pins and a large blocking surface (foam mats or a carpeted floor with a sheet)
- Spray bottle
- Curtain rod up to 1.5 in (3.8 cm) in diameter
Abbreviations (US Terms)
- ch – chain
- sl st – slip stitch
- sc – single crochet
- hdc – half double crochet
- dc – double crochet
- sk – skip
- st(s) – stitch(es)
- RS / WS – right side / wrong side
Special stitch – Link Bar: Work the sc as instructed and ch 2. Remove your hook, insert it from front to back into the matching point sc on the finished neighbor ring, pick up the dropped loop, and pull it through. Ch 2, then sl st into the top of the sc you just made. This forms a double-strand bar about 0.5 in (1.3 cm) long. The link bar does not count as a stitch.
Gauge and Checkpoints
Ring gauge: One ring measures 2 in (5.1 cm) across after Round 1 and 2.5 in (6.4 cm) across after Round 2.
Header gauge: 16 sc x 16 rows = 4 in (10.2 cm) square, and 16 hdc x 12 rows = 4 in (10.2 cm) square.
Make one complete ring first and measure it. Then work a small header swatch in sc and hdc. Do not start the panel until both are on gauge.
Checkpoints:
- One ring: 2.5 in (6.4 cm) across, lying flat without ruffling or cupping.
- Two rings joined side by side: 5.5 in (14.0 cm) from outer edge to outer edge.
- First full row of 12 rings: 35.5 in (90.2 cm) wide.
- First 3 rows of rings: 8.5 in (21.6 cm) tall.
- All 25 rows: 74.5 in (189.2 cm) tall.
- Finished panel: 35.5 in (90.2 cm) x 79.5 in (201.9 cm).
If your ring is too big, go down a half size or a full hook size. If it’s too small, go up a size. If the ring cups, try a larger hook for Round 2 only. If it ruffles, try a smaller hook for Round 2 only. A ring that is off by 0.25 in (0.6 cm) adds up to about 3 in (7.6 cm) across the width, so it’s worth getting this right.
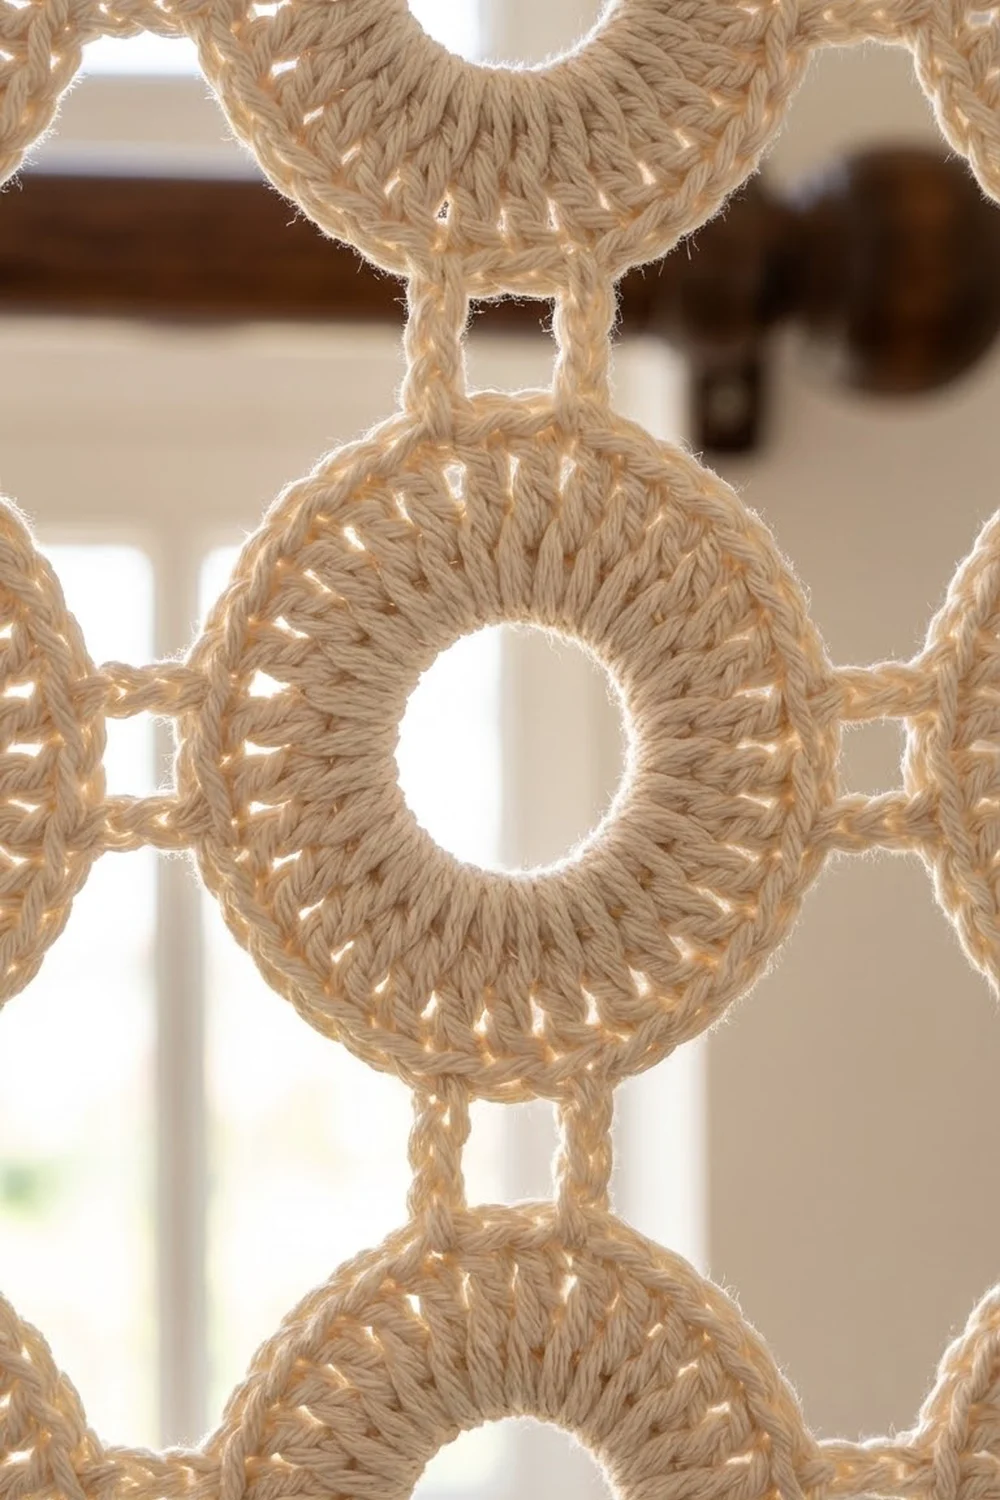
Ring Motif
Make 1 ring as a test. Every ring after that uses the same two rounds, with link bars added in Round 2 where needed.
Foundation: Ch 12 and sl st to the first ch to form a ring.
Round 1 (RS): Ch 3 (counts as dc). Work 23 dc into the ring, then sl st to the top of the beginning ch-3. (24 dc)
The ring should measure 2 in (5.1 cm) across, with an open center about 1 in (2.5 cm) wide. Don’t pull the starting chain tight, because the open center is part of the design.
Round 2: Ch 1. Work 2 sc in the next dc, then sc in each of the next 2 dc. Repeat from * to * 7 more times. Sl st to the first sc. (32 sc)
Round 2 is a growth round: 24 dc become 32 sc, with 8 increases spread evenly. This gives the ring its smooth, flat outer edge.
Point stitches: Number the sc of Round 2 from 1 to 32, where sc 1 is the first sc of the round. Hold the ring with sc 1 at the top. Because you work counterclockwise with the RS facing, the four points are:
- Top point: sc 1
- Left point: sc 9
- Bottom point: sc 17
- Right point: sc 25
Fasten off and weave in the ends, working them into the back of the dc band so they don’t show in the open center.
Joining As You Go
Joining method: Each new ring joins to finished rings with a link bar at its own point stitches. Since sc 1 (top) and sc 9 (left) both come early in Round 2, every join you need happens near the start of the round.
Stitch-to-stitch logic:
- The left point (sc 9) of a new ring joins the right point (sc 25) of the ring to its left.
- The top point (sc 1) of a new ring joins the bottom point (sc 17) of the ring above it.
Fill the grid one row at a time, working left to right across each row.
Row 1 of rings:
- Ring 1: Work as written, with no links.
- Rings 2–12: Work Round 1. In Round 2, when you reach sc 9, work a Link Bar into sc 25 of the previous ring. Finish the round as written.
Rows 2–25 of rings:
- First ring of the row: In Round 2, work a Link Bar at sc 1 into sc 17 of the ring directly above.
- Rings 2–12 of the row: In Round 2, work a Link Bar at sc 1 into sc 17 of the ring above, and a Link Bar at sc 9 into sc 25 of the ring to the left.
Link bars don’t change the count: every ring still ends with exactly 32 sc. A ring that measures 2.5 in (6.4 cm) plus a 0.5 in (1.3 cm) bar puts the ring centers 3 in (7.6 cm) apart in both directions.
Tension advice: Keep the ch-2 parts of each bar relaxed but not loose. If the bars are too tight, the rings overlap and the grid puckers. If they are too loose, the panel sags in the middle. Make all your link bars in one sitting if you can, so they stay the same length.
Size checkpoint: After Row 3 of rings, lay the panel flat. It should measure 35.5 in (90.2 cm) wide and 8.5 in (21.6 cm) tall. Fix any difference now, before you go on.
Make All Pieces
Per panel: 300 cream rings (12 across x 25 down). For the pair: 600 cream rings.
Layout for one panel (R = ring, – = side link bar, | = vertical link bar):
Header band (worked last, across the top of Row 1)
Row 1:   R-R-R-R-R-R-R-R-R-R-R-R
         | | | | | | | | | | | |
Row 2:   R-R-R-R-R-R-R-R-R-R-R-R
         | | | | | | | | | | | |
 ...     (repeat to Row 25)
Row 25:  R-R-R-R-R-R-R-R-R-R-R-R
The rings along the outer sides and the bottom row have no links at their outer points. These open edges make the scalloped sides and hem you see in the photo.
Width math: 12 rings x 2.5 in (6.4 cm) plus 11 bars x 0.5 in (1.3 cm) = 35.5 in (90.2 cm).
Length math: 25 rings x 2.5 in (6.4 cm) plus 24 bars x 0.5 in (1.3 cm) = 74.5 in (189.2 cm).
Border: Header Band
The header is worked in rows across the top edge of Row 1 only.
Border gauge: 4 sts per inch (2.5 cm) across, so 142 sts = 35.5 in (90.2 cm).
Marking: On each of the 12 top rings, place a marker in sc 28. With the RS facing, the header works right to left, starting at the right-hand ring.
Row 1 (RS): Join yarn in the marked sc 28 of the right-hand ring. Ch 1, then sc in sc 28 through sc 32 and sc 1 through sc 5 of the same ring, for 10 sc. Ch 2, then sc in sc 28 through sc 5 of the next ring, for 10 sc. Repeat from * to * across all 12 rings. Turn. (142 sts: 12 rings x 10 sc = 120, plus 11 gaps x 2 ch = 22)
There are no extra stitches at the ends of the row. The 22 gap chains are counted here and nowhere else. Row 1 skips the side points (sc 9 and sc 25) of each top ring, so the header doesn’t touch any side link bars.
Rows 2–7: Ch 2 (doesn’t count as a stitch). Hdc in each st across, working into each ch as one st. Turn. (142 hdc)
Row 8 (WS): Ch 1, then sc in each st across. Turn. (142 sc)
The solid band now measures 2.5 in (6.4 cm) deep: 0.25 in (0.6 cm) for Row 1, 2 in (5.1 cm) for Rows 2–7, and 0.25 in (0.6 cm) for Row 8.
Rows 9–16 (posts): Counting from the right edge with the RS facing, the posts sit on sts 1–10, 23–32, 45–54, 67–76, 89–98, 111–120, and 133–142.
- Post 1: For Row 9, ch 1 and sc in sts 1–10 only, then turn. Work 7 more rows of 10 sc on these stitches only. Fasten off.
- Posts 2–7: Join yarn with the RS facing in the first st of the next post and work the same 8 rows of 10 sc. Fasten off each post.
The 12 sts between each pair of posts are left unworked.
Count: 7 posts x 10 sts = 70, plus 6 gaps x 12 sts = 72, for 142 in total.
Row 17 (RS): Join yarn in the top right corner of Post 1. Ch 1, then sc in the 10 sts of Post 1. Ch 12, then sc in the 10 sts of the next post. Repeat from * to * 5 more times. Turn. (70 sc + 72 ch = 142 sts)
Row 18: Ch 1, then sc in each sc and in each ch across. Fasten off. (142 sc)
This makes 6 rod windows, each 3 in (7.6 cm) wide by 2 in (5.1 cm) tall. They easily fit a rod up to 1.5 in (3.8 cm) across. Posts and bar add 2.5 in (6.4 cm), for a total header depth of 5 in (12.7 cm).
Why the math works: Each top ring adds 10 sts, and each gap adds 2. Twelve rings take up 11 pitches of 3 in (7.6 cm) plus one last ring, and that equals 11 x 12 sts + 10 sts = 142 sts. At 4 sts per inch, 142 sts is exactly 35.5 in (90.2 cm), the same as the ring grid. The header matches the panel width without easing in or adding stitches.
Final Blocking
- Weave in any remaining ends along the back of the dc bands.
- Lay the panel flat on your blocking surface. If you don’t have room, block it in sections.
- Pin the header straight, at 35.5 in (90.2 cm) wide.
- Pin each ring row so the ring centers sit 3 in (7.6 cm) apart across and down.
- Pin through each ring’s center hole to keep it round.
- Mist the panel evenly with water until it is damp. Don’t soak it.
- Leave it to dry completely, which usually takes 24 hours.
- Unpin and check the measurements: 35.5 in (90.2 cm) x 79.5 in (201.9 cm).
- Hang the panel on the rod for a day to let it settle before you judge its final length.
Final Quality-Control Checklist
- Every ring has 24 dc in Round 1 and 32 sc in Round 2.
- Every ring is 2.5 in (6.4 cm) across, with an open center about 1 in (2.5 cm) wide.
- All link bars are about 0.5 in (1.3 cm) long and look the same.
- Each panel has 12 columns and 25 rows, with no missing joins inside the grid.
- The outer sides and bottom edge have no links at their outer points.
- Header Rows 1–8 have 142 sts each, and Rows 17–18 have 142 sts.
- There are 6 windows, all the same size.
- Both panels match each other within 0.5 in (1.3 cm) in width and length.
Troubleshooting
The rings cup. Round 2 is too tight. Use a larger hook for that round.
The rings ruffle. Your increases are too loose. Use a smaller hook for Round 2, and check that you have 32 sc, not more.
The panel is too wide. Your link bars are probably long. Count your chains and keep each side of the bar at exactly ch 2.
The panel leans to one side. You may have joined the wrong points. Check that every left point (sc 9) is joined to a right point (sc 25).
The header is narrower than the rings. Your header tension is tighter than the rings. Rework Row 1 with a 4.5 mm hook.
The windows stretch. The posts are too soft. Work the post rows with a smaller hook.
Care
Hand wash in cool water with a mild soap, then press out the water in a towel without wringing. Lay the panel flat to dry, and re-pin the rings if you need to.
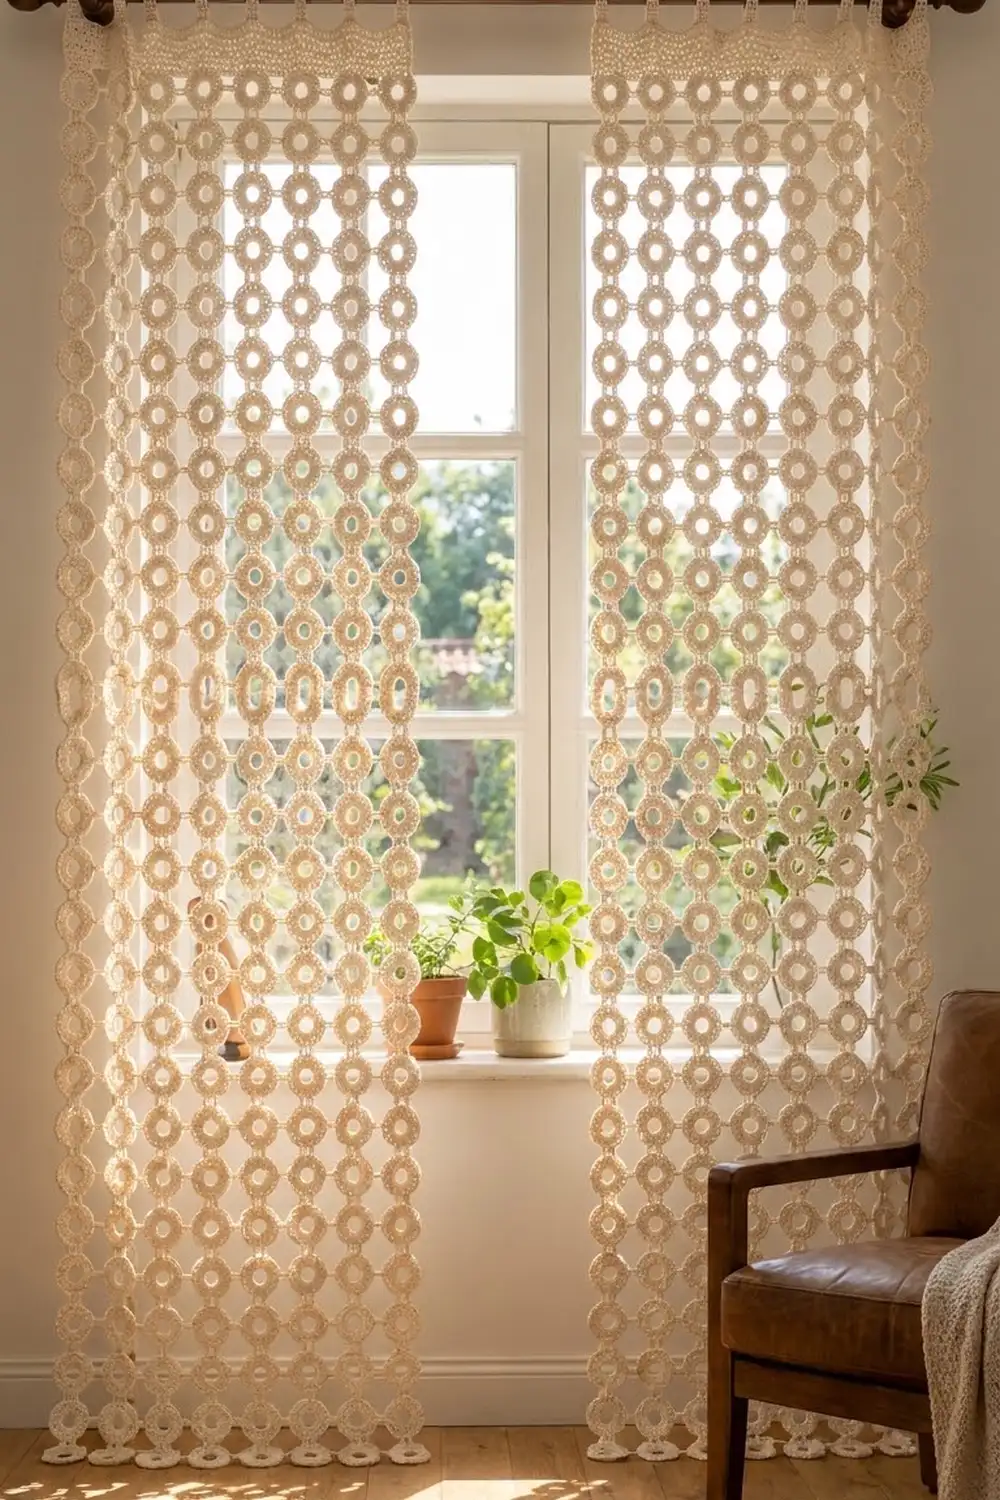
Final Notes
Each measurement depends on the one before it. A 2.5 in (6.4 cm) ring plus a 0.5 in (1.3 cm) link bar gives a 3 in (7.6 cm) pitch. Twelve rings across make 35.5 in (90.2 cm), and the 142-stitch header matches that width exactly. Twenty-five rings down make 74.5 in (189.2 cm), and the 5 in (12.7 cm) header brings each panel to 79.5 in (201.9 cm). Check your first ring, check the first three rows, and the rest of the panel will follow.
Happy crocheting!