
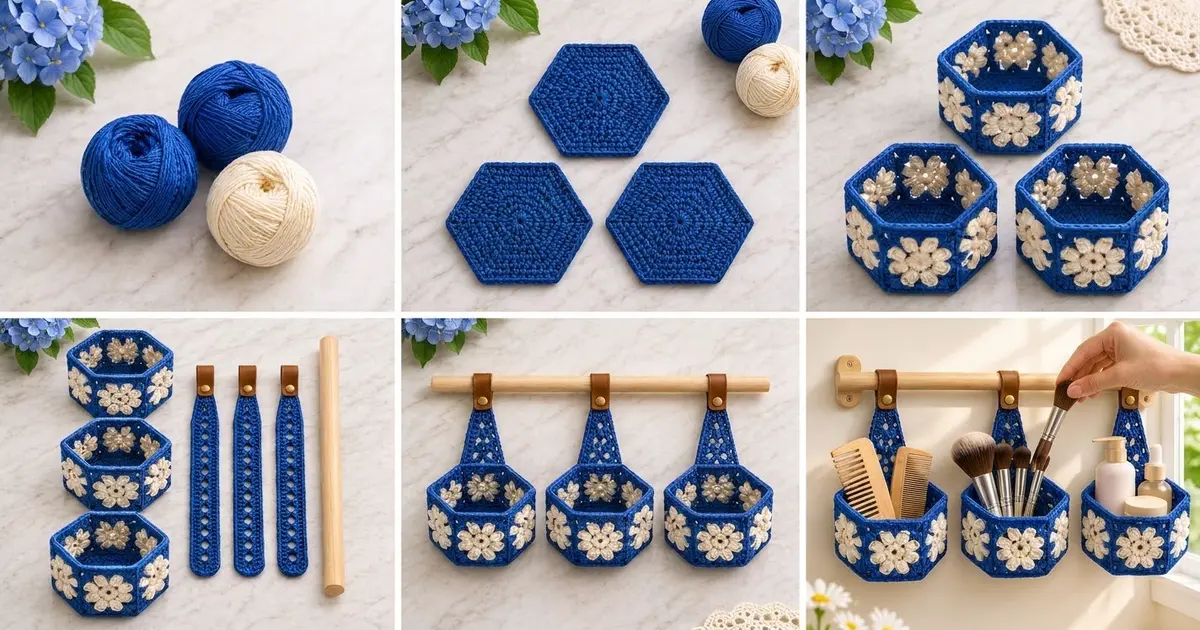
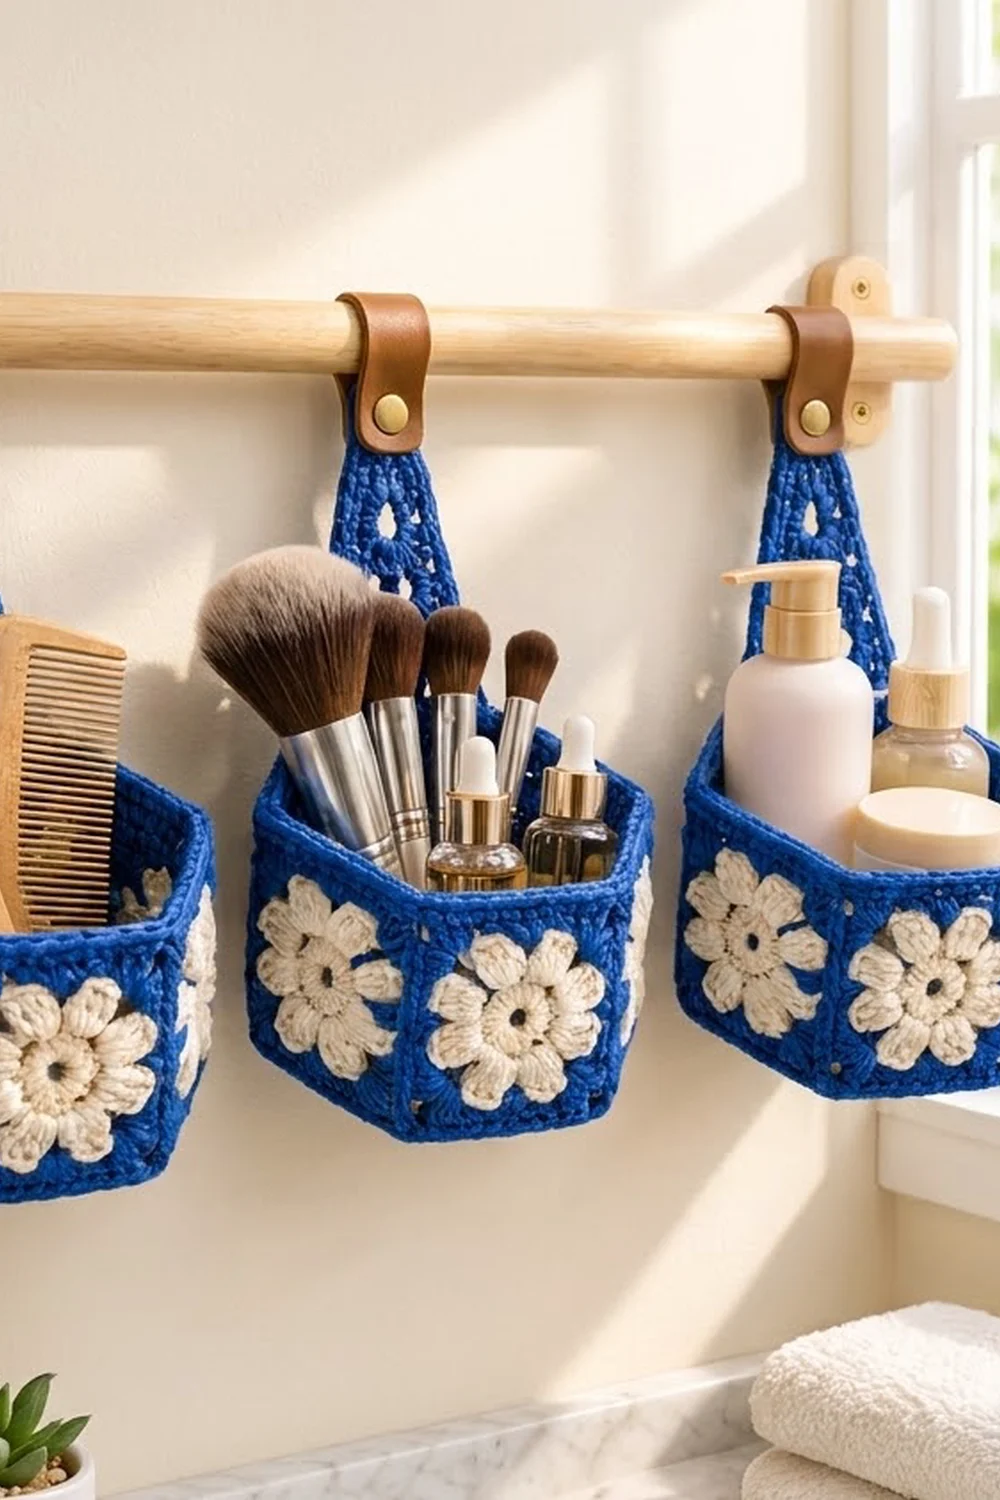
These small hexagon baskets hang from a wooden rod on leather tabs. They hold brushes, combs and little bottles. Each basket has six cream flower panels set into royal blue walls, so it looks fresh and tidy.
The pattern uses US crochet terms. Each finished basket measures 6.5 in (16.5 cm) from corner to corner, 5.6 in (14.2 cm) from one flat side to the opposite flat side, and 3.7 in (9.4 cm) tall. The hanging strap is 9.25 in (23.5 cm) long and 1.5 in (3.8 cm) wide.
For each basket you make one solid hexagon base, six flower squares and one strap with a column of eyelets. The squares join into a ring, the ring joins to the base, and a two-round rim finishes the top. The strap is sewn inside the back wall and riveted to a leather tab that loops over a dowel.
The photo shows a set of three identical baskets on one rod. This pattern covers one basket. Make three for the full set.
Finished Size and Construction
- Finished basket: 6.5 in (16.5 cm) corner to corner, 5.6 in (14.2 cm) flat side to flat side, 3.7 in (9.4 cm) tall
- Skill level: Intermediate
- Terminology: US
- Yarn weight: Worsted (4), 100% cotton
- Hook: 4.0 mm (G-6)
- Pieces per basket: 8 (1 hexagon base, 6 flower squares, 1 strap)
- Layout: 6 squares in a ring around a hexagon base
- Square size: 3.25 in (8.3 cm), 13 sts per side
- Height before rim: 3.25 in (8.3 cm)
- Rim depth: 2 rounds, about 0.45 in (1.1 cm)
Materials
Use a smooth, firm worsted-weight cotton. Cotton holds the hexagon shape and copes well with damp bathroom air. Acrylic also works, but the walls will be softer and less upright.
These amounts are for the full set of three baskets, based on yarn of about 1.5 m per gram:
- Color A, Royal Blue: 200 g (300 m)
- Color B, Cream: 50 g (75 m)
- Color C, Sand: 15 g (23 m)
For one basket, divide by three. All amounts include about 15% extra for gauge swatches and seaming.
Tools:
- 4.0 mm (G-6) crochet hook
- Tapestry needle
- Stitch markers
- Scissors
- 3 leather strips, 0.75 in (1.9 cm) wide and 5 in (12.7 cm) long, with brass rivets
- Wooden dowel, 0.75 in (1.9 cm) across and 24 in (61.0 cm) long, with 2 wall brackets
- Blocking mat and pins
- Optional: fabric stiffener spray
Abbreviations (US Terms)
- ch: chain
- sl st: slip stitch
- sc: single crochet
- hdc: half double crochet
- dc: double crochet
- sk: skip
- sp: space
- st(s): stitch(es)
- RS / WS: right side / wrong side
Special stitch, Petal: work (hdc, 3 dc, hdc) all in the same stitch.
Gauge and Checkpoints
Gauge: 16 sc and 18 rows = 4 in (10.2 cm) in sc with a 4.0 mm hook.
Make one flower square and one base first. The base sides must be the same length as the square sides, so these two pieces are your real gauge test.
Checkpoints:
- Square after Rnd 3 (flower only): about 1.75 in (4.4 cm) across
- Square after Rnd 5: about 2.75 in (7.0 cm) square
- Square after Rnd 6: 3.25 in (8.3 cm) square
- Base after Rnd 6: each side about 1.5 in (3.8 cm)
- Base after Rnd 13: each side 3.25 in (8.3 cm)
If your square is bigger than 3.25 in (8.3 cm), use a hook half a size smaller. If it is smaller, use a hook half a size bigger. Change the hook, never the stitch counts: every square side and every base side must stay at 13 sts.
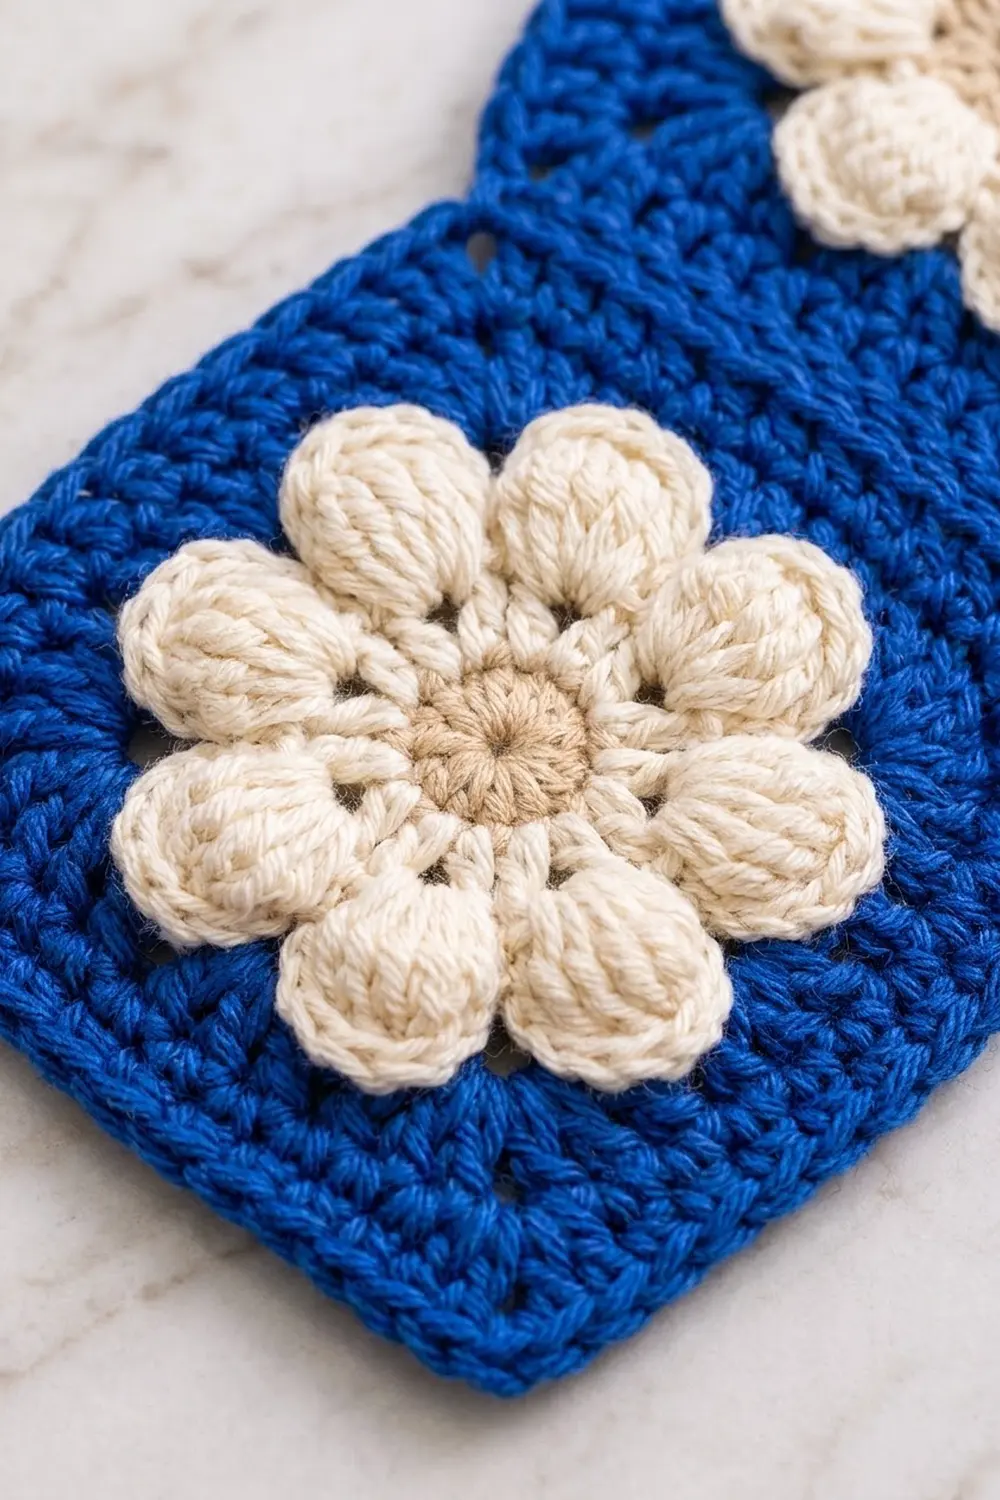
Flower Square (Make 6)
Rnd 1 (Color C): Make a magic ring. Ch 1, work 8 sc in the ring. Sl st to the first sc. Fasten off. (8 sts)
Rnd 2 (Color B): Join with a sl st in any sc. Ch 1, work 2 sc in each sc around. Sl st to the first sc. (16 sts)
Rnd 3 (Color B): Sl st in next st, Petal in next st. Repeat from * 7 more times. Fasten off. (8 petals, 8 sl sts)
Each Petal sits on its own stitch, and the sl st between petals pulls them apart. This gives eight rounded, separate petals.
Rnd 4 (Color A): Join with a sc in any sl st between petals, working into the sl st of Rnd 3. Ch 3 behind the next petal, sc in the next sl st between petals. Repeat from * 6 more times. Ch 3 behind the last petal and sl st to the first sc. (8 sc, 8 ch-3 sps)
The ch-3 loops sit behind the petals, so the flower stays raised in front of the frame.
Rnd 5 (Color A): Sl st into the first ch-3 sp. Ch 3 (counts as dc), then work (2 dc, ch 2, 3 dc) in the same sp for the first corner. Dc in next sc, 3 dc in next ch-3 sp, dc in next sc, (3 dc, ch 2, 3 dc) in next ch-3 sp. Repeat from * 2 more times. Dc in next sc, 3 dc in next ch-3 sp, dc in last sc. Sl st to the top of the beginning ch 3. (44 dc, 4 ch-2 corner sps)
Each side has 3 dc (half of one corner) + 1 + 3 + 1 + 3 dc (half of the next corner) = 11 dc.
Rnd 6 (Color A): Ch 1, sc in the same st as the join and in the next 2 sts. Work (sc, ch 2, sc) in the corner sp. Sc in next 11 sts, (sc, ch 2, sc) in corner sp. Repeat from * 2 more times. Sc in the last 8 sts. Sl st to the first sc. Fasten off, leaving a 12 in (30.5 cm) tail. (52 sc, 4 ch-2 corner sps)
Each side now has 13 sc: 1 corner sc + 11 sc + 1 corner sc. The ch-2 corner sps are not part of this count.
Weave in the Color B and Color C ends on the WS now. The flower centers are hard to reach once the basket is put together.
Hexagon Base (Make 1)
Work in joined rounds with Color A, and mark the first st of each round. The six 2-sc increases sit on top of the ones from the round before. This builds six straight sides and six clear corners.
Rnd 1: Make a magic ring. Ch 1, work 6 sc in the ring. Sl st to the first sc. (6 sts)
Rnd 2: Ch 1, 2 sc in each st around. Sl st to the first sc. (12 sts)
Rnd 3: Ch 1, sc in next st, 2 sc in next st. Repeat from * 5 more times. Sl st to the first sc. (18 sts)
Rnd 4: Ch 1, sc in next 2 sts, 2 sc in next st. Repeat from * 5 more times. Sl st to the first sc. (24 sts)
Rnds 5–13: Keep going the same way. Each round, work one more plain sc before each increase than in the round before. In general, round n is sc in next (n − 2) sts, 2 sc in next st, repeated six times.
- Rnd 5: 30 sts
- Rnd 6: 36 sts (6 per side)
- Rnd 7: 42 sts
- Rnd 8: 48 sts
- Rnd 9: 54 sts
- Rnd 10: 60 sts
- Rnd 11: 66 sts
- Rnd 12: 72 sts
- Rnd 13: sc in next 11 sts, 2 sc in next st, repeated six times. (78 sts, 13 per side)
Fasten off. Each side now has 13 sts and measures 3.25 in (8.3 cm), the same as one square side.
Hanging Strap (Make 1)
The strap is a narrow strip with one column of tall rectangular eyelets.
With Color A, ch 5.
Row 1 (RS): Sc in the 2nd ch from the hook and in each ch across. Turn. (4 sc)
Row 2: Ch 3 (counts as dc), ch 2, sk the next 2 sc, dc in the last sc. Turn. (2 dc, 1 ch-2 sp)
Row 3: Ch 1, sc in the first dc, 2 sc in the ch-2 sp, sc in the top of the turning ch 3. Turn. (4 sc)
Rows 4–25: Repeat Rows 2–3 eleven more times. (25 rows, 12 eyelets. The strip is about 8.75 in / 22.2 cm long and 1 in / 2.5 cm wide.)
Edging Rnd: Do not turn. Ch 1 and work around the strip:
- First long side: 1 sc in the end of each sc row and 2 sc in the end of each dc row, so 13 × 1 + 12 × 2 = 37 sc.
- Short end: 3 sc in the first st, sc in the next 2 sts, 3 sc in the last st = 8 sc.
- Second long side: 37 sc.
- Second short end: 8 sc.
Sl st to the first sc and fasten off. (90 sc)
The 3-sc corners round off the ends. The finished strap measures 9.25 in (23.5 cm) by 1.5 in (3.8 cm).
Make All Pieces
For the full set of three baskets:
- Flower squares: 18 (Color C centers, Color B petals, Color A frames)
- Hexagon bases: 3 (Color A)
- Straps: 3 (Color A)
Layout for one basket, seen from above:
         [S1]    [S2]
   [S6]    [ BASE ]    [S3]
         [S5]    [S4]
The squares go around the base in order: S1, S2, S3, S4, S5, S6, then back to S1. The bottom edge of each square meets one side of the base. S4 is the back wall, where the strap goes.
Joining
Method: Join with single crochet in Color A, holding the pieces WS together. This leaves a neat, low blue ridge on the outside along each seam.
Joining the squares into a ring: Hold S1 and S2 WS together, flower sides out, with the top corners lined up. Insert the hook through both corner ch-2 sps and work 1 sc. Work 1 sc through each matching pair of sts down the side (13 sc). Finish with 1 sc through both bottom corner ch-2 sps. (15 sc per side seam)
Join S2 to S3, S3 to S4, S4 to S5 and S5 to S6. Then join S6 to S1 to close the ring. (6 side seams)
Joining the ring to the base: Turn the ring upside down so the bottom edges are on top. Hold the base against it, WS together. Line up the six side seams with the six base corners, where the 2-sc increases stack.
Work 1 sc through each square st and the matching base st: 13 sc per side, 78 sc in total. Do not work into the square corner sps here. The side seams already close them, and they tuck into the base corners.
Tension: Keep your joining sc the same size as the sc in the fabric. Tight seams pull the walls inward, and loose seams make the basket slump.
Checkpoint: The basket should now stand on its own, 3.25 in (8.3 cm) tall, with straight walls and six clear corners.
Border (Top Rim)
Border gauge: Same as the body, 16 sc = 4 in (10.2 cm).
Rnd 1 (Color A): With RS facing, join with a sc in the first top st of S1, just after a side seam. Sc in each of the other 12 top sts of S1. Sc in each of the 13 top sts of the next square. Repeat from * for the other 5 squares, skipping the corner sps at each seam. Sl st to the first sc. (78 sc, 13 per side)
Rnd 2: Ch 1, sc in each st around. Sl st to the first sc and fasten off. (78 sc)
Why the math works: The base has 78 sts. The six squares have 13 sts per side, so the bottom and top edges of the ring both have 6 × 13 = 78 sts. The rim adds no stitches, so it is the same size around as the base. The walls go straight up without flaring or pulling in.
The rim adds about 0.45 in (1.1 cm), which brings the basket to 3.7 in (9.4 cm) tall.
Attaching the Strap
- Center the strap on the inside of S4, the back wall.
- Lay the bottom 3.5 in (8.9 cm) of the strap flat against the inside wall, with its end just above the base.
- With Color A, whipstitch both long edges and the bottom end in place. Catch only the back of the square stitches so no stitches show on the flower side.
- About 5.75 in (14.6 cm) of strap now stands above the rim.
- Fold a leather strip around the dowel. Put the top 1 in (2.5 cm) of the strap between the two layers of leather and fix it with the rivet.
Final Blocking
- Weave in all ends on the WS.
- Mist the basket with water until it is damp but not soaked.
- Stuff it firmly with a towel, or set it over a hexagon-shaped form, so all six walls stand straight.
- Pinch each side seam to sharpen the corners.
- Pin the strap flat at 9.25 in (23.5 cm) by 1.5 in (3.8 cm).
- If you want stiffer walls, spray with stiffener while the basket is still shaped.
- Let everything dry completely, at least 24 hours.
Final Quality-Control Checklist
- Each square measures 3.25 in (8.3 cm) and has 13 sts per side
- Each flower has 8 separate petals standing in front of the blue frame
- The base has 78 sts and six straight sides
- Each of the 6 side seams has 15 sc
- The base seam has 78 sc
- Both rim rounds have 78 sc
- The basket is 6.5 in (16.5 cm) corner to corner and 3.7 in (9.4 cm) tall
- The strap has 12 eyelets and 90 edging sc
- The strap is centered on the back wall and the leather tab is secure
- No yarn ends show on the outside
Troubleshooting
Square sides shorter than the base sides: Use a hook half a size bigger for the squares, or half a size smaller for the base. Don’t add stitches.
Petals lie flat or run together: Check that each sl st sits in its own stitch between petals, and that the Rnd 4 chains stay behind the petals.
Base curls up like a bowl: Your increases are drifting. Place each 2-sc increase right on top of the one below it.
Base ruffles: You are crocheting the base more loosely than the squares. Use a hook half a size smaller for the base.
Walls lean inward: The base seam or the rim is too tight. Pull it out and redo it a little more loosely.
Small gaps at the top of the seams: Run the seam tail through both corner sps once more to close them.
Care
Hand wash in cool water with a mild soap. Press the water out in a towel, reshape the basket and dry it flat. Take off the leather tabs before washing.
Final Notes
Everything in this basket depends on one chain of measurements. A 13-st square side at 3.25 in (8.3 cm) matches a 13-st base side at 3.25 in (8.3 cm). Six sides give 78 sts at the base, at the base seam and at the rim. The walls are 3.25 in (8.3 cm) high, and the rim adds 0.45 in (1.1 cm), for 3.7 in (9.4 cm) in total. The basket measures 6.5 in (16.5 cm) corner to corner. Check your first square and base against these numbers before making the rest of the set.
Happy crocheting!