

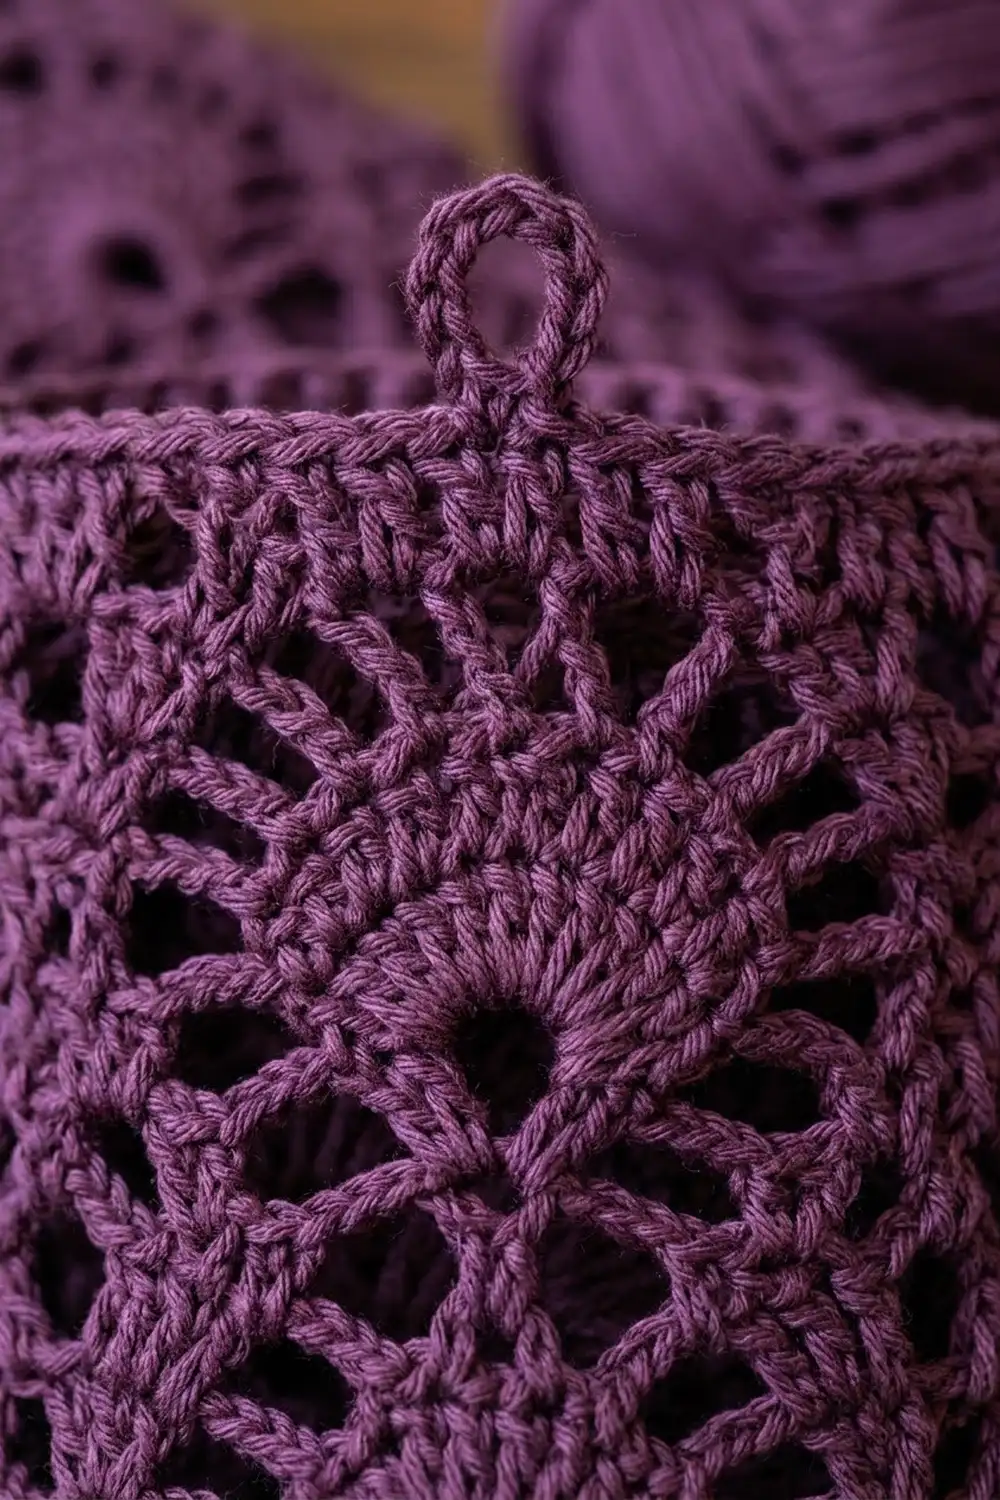
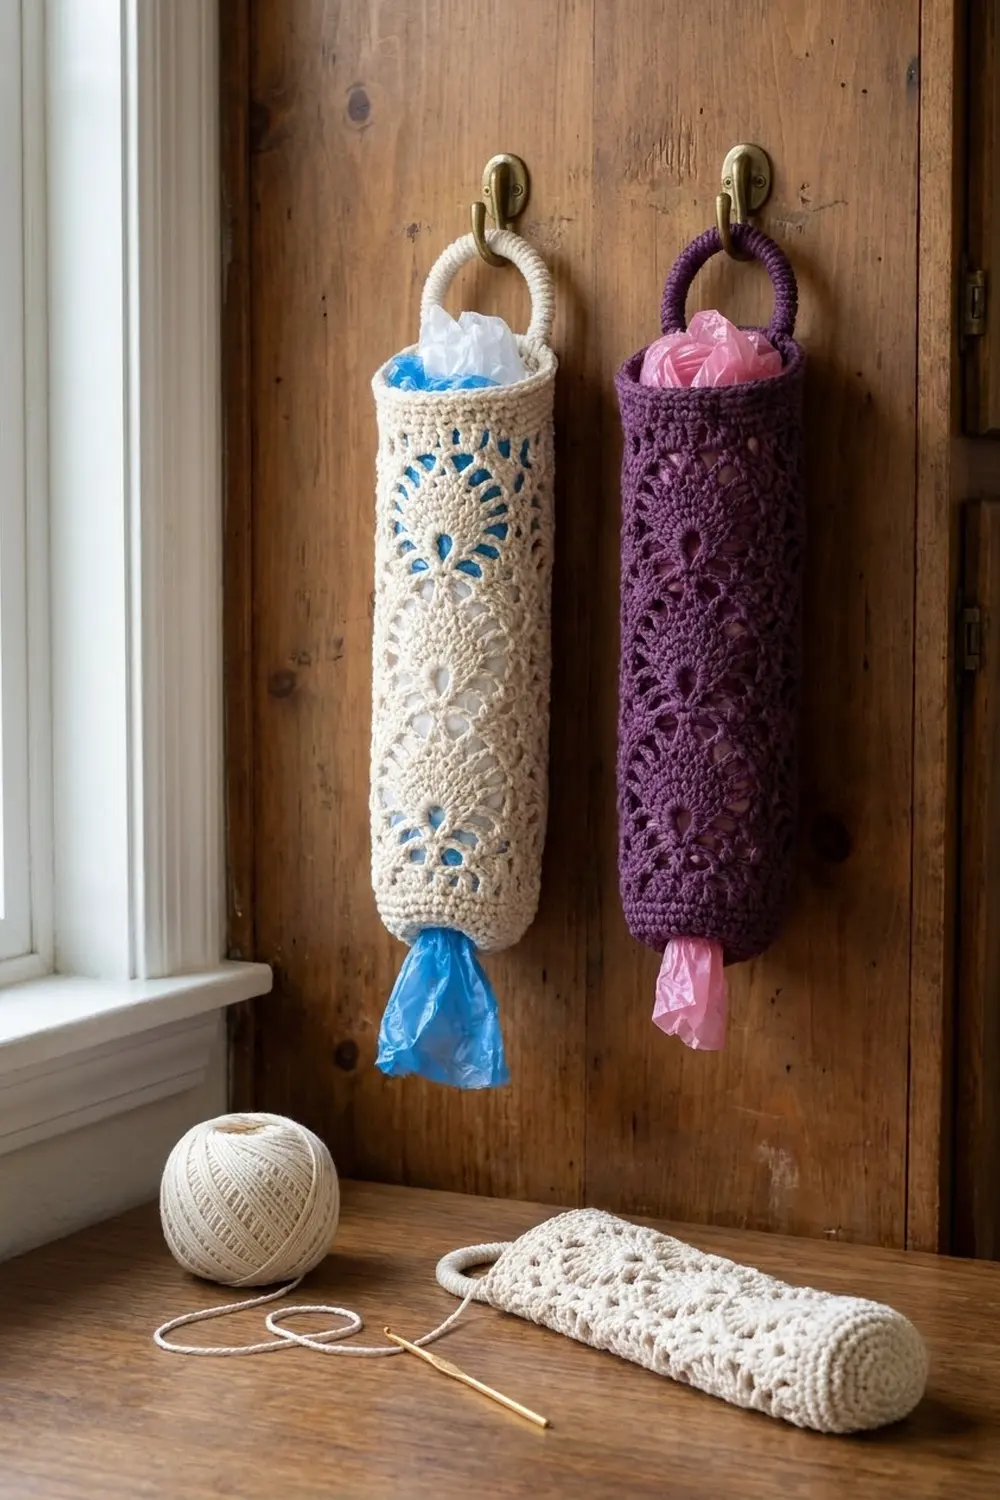
This hanging bag holder is a lacy tube that stores plastic grocery bags. You push bags in at the top and pull them out one at a time from the bottom. Columns of pineapple motifs run down the body: ridged double crochet fans that narrow into chain-loop points, with teardrop eyelets between them. A solid single crochet band finishes each end, and a covered ring at the top hangs on a wall hook.
The sample is made in cream cotton for a soft farmhouse look. A deep plum version works just as well and hides wear in a busy kitchen. Both colors use the same amount of yarn and the same instructions.
This pattern uses US crochet terms. The finished holder is 6 in (15.2 cm) wide laid flat, 12 in (30.5 cm) around, and 17 in (43.2 cm) long, not counting the ring. The covered ring is 3 in (7.6 cm) across.
You work the tube from the top down in joined rounds. First comes a single crochet band, then four tiers of pineapple lace, then a bottom band. Last, you cover a ring with single crochet and sew it inside the back of the top band. The holder is one piece, with no seams along the tube.
Finished Size and Construction
- Finished size: 6 in (15.2 cm) flat width × 17 in (43.2 cm) body length
- Circumference: 12 in (30.5 cm)
- Skill level: Intermediate (lace in the round, counting chain spaces)
- Terminology: US
- Yarn weight: Worsted (#4), cotton or cotton blend
- Hook: 5.0 mm (H-8)
- Number of pieces: 1 tube plus 1 covered ring, attached
- Layout: 4 pineapple columns around the tube, 4 tiers tall
- Piece size: one lace repeat is 12 sts, or 3 in (7.6 cm) of the circumference; one tier is 7 rounds, or 3.5 in (8.9 cm) tall
- Size before bottom band: 15.5 in (39.4 cm) long
- Band depth: 1.5 in (3.8 cm) at the top and 1.5 in (3.8 cm) at the bottom
Materials
Choose a smooth, firm worsted-weight cotton. It holds the lace open, doesn’t sag under the weight of the bags, and washes well. Acrylic also works, but the lace will be softer and droopier.
- Main color (cream or plum): 130 g, about 245 m (268 yd)
- Ring: one 3 in (7.6 cm) metal, plastic or wooden ring
- 5.0 mm (H-8) crochet hook
- 2 stitch markers
- Tapestry needle
- Scissors
- Tape measure
- Rustproof pins and a towel for blocking
The yarn amounts include about 15% extra to cover a gauge check and small differences in tension.
Abbreviations (US Terms)
- ch: chain
- sl st: slip stitch
- sc: single crochet
- dc: double crochet
- sp: space
- lp: loop
- st(s): stitch(es)
- rnd: round
- rep: repeat
Special stitches
- Shell: (2 dc, ch 2, 2 dc) in the same st or sp. Each shell has 4 dc and 1 ch-2 sp.
- Beginning shell: ch 3 (counts as dc), then (dc, ch 2, 2 dc) in the same st or sp.
- Fan: 7 dc in the same st or lp.
Gauge and Checkpoints
Sc gauge: 16 sc × 16 rnds = 4 in (10.2 cm), worked in the round.
Lace gauge: one 12-st repeat = 3 in (7.6 cm) wide; one 7-rnd tier = 3.5 in (8.9 cm) tall.
The top band is your gauge swatch, so check it before you start the lace. When the band is done, lay it flat and measure it.
- After the top band: 6 in (15.2 cm) flat width, 1.5 in (3.8 cm) tall.
- After Lace Rnd 7: 5 in (12.7 cm) total length.
- After Lace Rnd 28: 15.5 in (39.4 cm) total length.
- After the bottom band: 17 in (43.2 cm) total length.
If the band is wider than 6.5 in (16.5 cm) flat, switch to a 4.5 mm hook and start again. If it’s narrower than 5.5 in (14.0 cm), switch to a 5.5 mm hook. Bags have to fit through the openings, so if you’re unsure, go slightly bigger.
If the lace tiers come out short, keep the same hook but stop pulling the chain loops tight. Each loop of ch 3 or longer should lie open, not cinched.
Top Band
Ch 48. Check that the chain isn’t twisted, then join with a sl st into the first ch to form a ring.
Rnd 1: Ch 1, sc in each ch around, join with sl st to first sc. (48 sc)
Rnds 2–6: Ch 1, sc in each st around, join. (48 sc each rnd)
Put a marker in the first st. The join line will run down one side fold of the holder.
Checkpoint: 6 in (15.2 cm) flat and 1.5 in (3.8 cm) tall.
Pineapple Lace Body
Every lace rnd begins at a shell. Work the rnds in this order:
- Lace Rnd 1 (a Fan rnd)
- Pineapple Rnds A–F followed by a Fan rnd, 3 times in total
- Pineapple Rnds A–F once more
That makes 28 lace rnds and 4 full tiers. Counts are given per repeat and for the whole rnd, with 4 repeats around.
Lace Rnd 1 (Fan rnd, set-up): Beginning shell in the same st as the join. Ch 2, sk 5 sts, fan in next st, ch 2, sk 5 sts, shell in next st; rep from * around, ending the last rep at . Join with sl st to top of beginning ch-3.
Per repeat: 1 shell, 1 fan and 2 ch-2 sps, using 12 base sts. Total: 4 shells, 4 fans (44 dc), 8 ch-2 side sps.*
Rnd A: Sl st in next dc and in shell ch-2 sp, then work a beginning shell in the same sp. Ch 2, sk ch-2 sp, (dc in next dc, ch 1) 6 times, dc in last dc of fan, ch 2, sk ch-2 sp, shell in next shell sp; rep from * around, ending at . Join.
Per repeat: 4 shell dc, plus 7 dc with 6 ch-1 sps. Total: 44 dc, 24 ch-1 sps, 8 ch-2 side sps.*
Rnd B: Sl st to shell sp, then work a beginning shell. Ch 3, sk ch-2 sp, sc in first ch-1 sp, (ch 3, sc in next ch-1 sp) 5 times, ch 3, sk ch-2 sp, shell in shell sp; rep from * ending at . Join.
Per repeat: 6 sc, 5 ch-3 lps. Total: 16 dc, 24 sc, 20 pineapple lps.*
Rnd C: Sl st to shell sp, then work a beginning shell. Ch 3, sk side ch-sp, sc in first pineapple lp, (ch 3, sc in next lp) 4 times, ch 3, sk side ch-sp, shell in shell sp; rep from * ending at . Join.
Per repeat: 5 sc, 4 lps. Total: 16 dc, 20 sc, 16 lps.*
Rnd D: Work as Rnd C, but use ch 4 for both side chains and work (ch 3, sc in next lp) 3 times.
Per repeat: 4 sc, 3 lps. Total: 16 dc, 16 sc, 12 lps.
Rnd E: Work as Rnd D, keeping ch-4 side chains, and work (ch 3, sc in next lp) 2 times.
Per repeat: 3 sc, 2 lps. Total: 16 dc, 12 sc, 8 lps.
Rnd F: Work as Rnd D, but use ch 5 for both side chains and work (ch 3, sc in next lp) once.
Per repeat: 2 sc, 1 lp. Total: 16 dc, 8 sc, 4 lps, 8 ch-5 side sps.
The side chains get longer as the pineapple narrows. This keeps the circumference at 12 in (30.5 cm).
Fan rnd (tiers 2–4): Sl st to shell sp, then work a beginning shell. Ch 2, sk ch-5 sp, fan in the single ch-3 lp at the pineapple tip, ch 2, sk ch-5 sp, shell in shell sp; rep from * ending at . Join.
Total: 4 shells, 4 fans (44 dc), 8 ch-2 side sps.* This matches Lace Rnd 1.
The skipped ch-5 sps open into the teardrop eyelets on each side of the new fan. Each new fan sits directly under the tip of the pineapple above it, so the motifs stack in straight columns.
Checkpoint: after Lace Rnd 7 (the first Rnd F), the piece is 5 in (12.7 cm) long. After Lace Rnd 28 (the last Rnd F), it’s 15.5 in (39.4 cm) long. Don’t fasten off.
Bottom Band and Top Edge (Border)
Border gauge: the same as the top band, 16 sc = 4 in (10.2 cm). When the tube is laid flat, each face counts as one side of the border: 24 sts on the front and 24 on the back.
Conversion Rnd (from Lace Rnd 28 to sc): Ch 1. Sc in each of next 2 dc, sc in shell sp, sc in each of next 2 dc, 3 sc in ch-5 sp, sk sc, sc in ch-3 lp, sk sc, 3 sc in ch-5 sp; rep from * around. Join.
Per repeat: 4 sc worked one per existing dc, plus 8 sc worked into sps (1 + 3 + 1 + 3), for 12 sc.
Total: 16 (one per dc) + 32 (into sps) = 48 sc, or 24 per flat side.*
Bottom Rnds 2–6: Ch 1, sc in each st around, join. (48 sc each rnd; 24 per side)
Fasten off and weave in the end.
Top Edge Finish: Join yarn at the marker on the foundation edge. Sl st loosely in each ch around. (48 sl st; 24 per side) Fasten off. This round firms up the foundation chain so the top opening doesn’t stretch.
Why the math works: 4 repeats × 12 sts = 48 sts, and 48 ÷ 2 flat sides = 24 sts per side. At 16 sc per 4 in (10.2 cm), 24 sts measure 6 in (15.2 cm). That matches the top band, so both openings are the same width and the tube hangs straight. The bottom band adds 6 rnds, or 1.5 in (3.8 cm), so the total length is 15.5 + 1.5 = 17 in (43.2 cm).
Covered Ring
Attach the yarn around the ring with a sl st. Work 60 sc tightly over the ring, pushing them together so none of the ring shows. Join with a sl st to the first sc and leave a 16 in (40.6 cm) tail.
Flatten the tube so the marker sits on one side fold, and find the center back of the top band. Place the ring inside the back so its lowest 8 sc overlap Top Band Rnds 1–3. Use the tail to whipstitch those 8 sc to the inside of the band, going through both layers twice. Most of the ring will stand above the top edge for hanging.
If you’re making a pair like the cream and plum holders, make each one completely from the full 130 g (245 m) of its own color.
Final Blocking
- Soak the holder in cool water for 10 minutes. Press the water out gently, without wringing.
- Roll the holder in a towel to remove more water.
- Slide a rolled towel, or a 3.5 in (8.9 cm) wide bottle wrapped in plastic, into the tube to hold its round shape.
- Open each fan with your fingers and pull each pineapple point down so it lines up with its column.
- Pin the bands straight at 6 in (15.2 cm) flat width.
- Check that the body measures 17 in (43.2 cm) long.
- Let it dry completely, at least 24 hours, then remove the form.
Final Quality-Control Checklist
- 48 sc in every band rnd, 24 per flat side.
- 4 pineapple columns, each 4 tiers tall, stacked in straight lines.
- Every fan has exactly 7 dc, and every shell has 4 dc with a ch-2 sp.
- The teardrop eyelets are open and even on both sides of every fan.
- The body is 17 in (43.2 cm) long and 6 in (15.2 cm) wide flat.
- The ring is fully covered and firmly sewn to the inside back of the top band.
- All ends are woven in through solid sc, not through lace.
Troubleshooting
The tube spirals. Your rounds are drifting. Always sl st over to the shell sp and start the beginning shell there.
The pineapple counts are off. Count the lps per repeat after each Pineapple Rnd: there should be 5, 4, 3, 2, then 1. If you have an extra lp, you probably worked into a side chain.
The lace pulls in at the middle. The side chains are too tight. Loosen your tension on the ch-4 and ch-5 chains, or add 1 ch to each side chain in Rnds E and F.
The bottom opening flares. The conversion rnd is too loose. Work the bottom band only with a hook 0.5 mm smaller.
The ring tips forward. Sew it lower so it overlaps all 6 band rnds, and add a second line of whipstitches.
Care
Hand wash in cool water with mild soap, then dry flat over a rolled towel to keep the shape. You can reshape cotton while it’s damp.
Final Notes
Each stage of this pattern sets up the next measurement. The top band sets 48 sts at 6 in (15.2 cm) flat. The lace keeps 4 repeats of 12 sts at that same width for 28 rnds, reaching 15.5 in (39.4 cm). The bottom band converts back to exactly 48 sc and brings the holder to 17 in (43.2 cm). If you check each stage as you go, the finished holder will hang straight and give out bags one at a time.
Happy crocheting!