

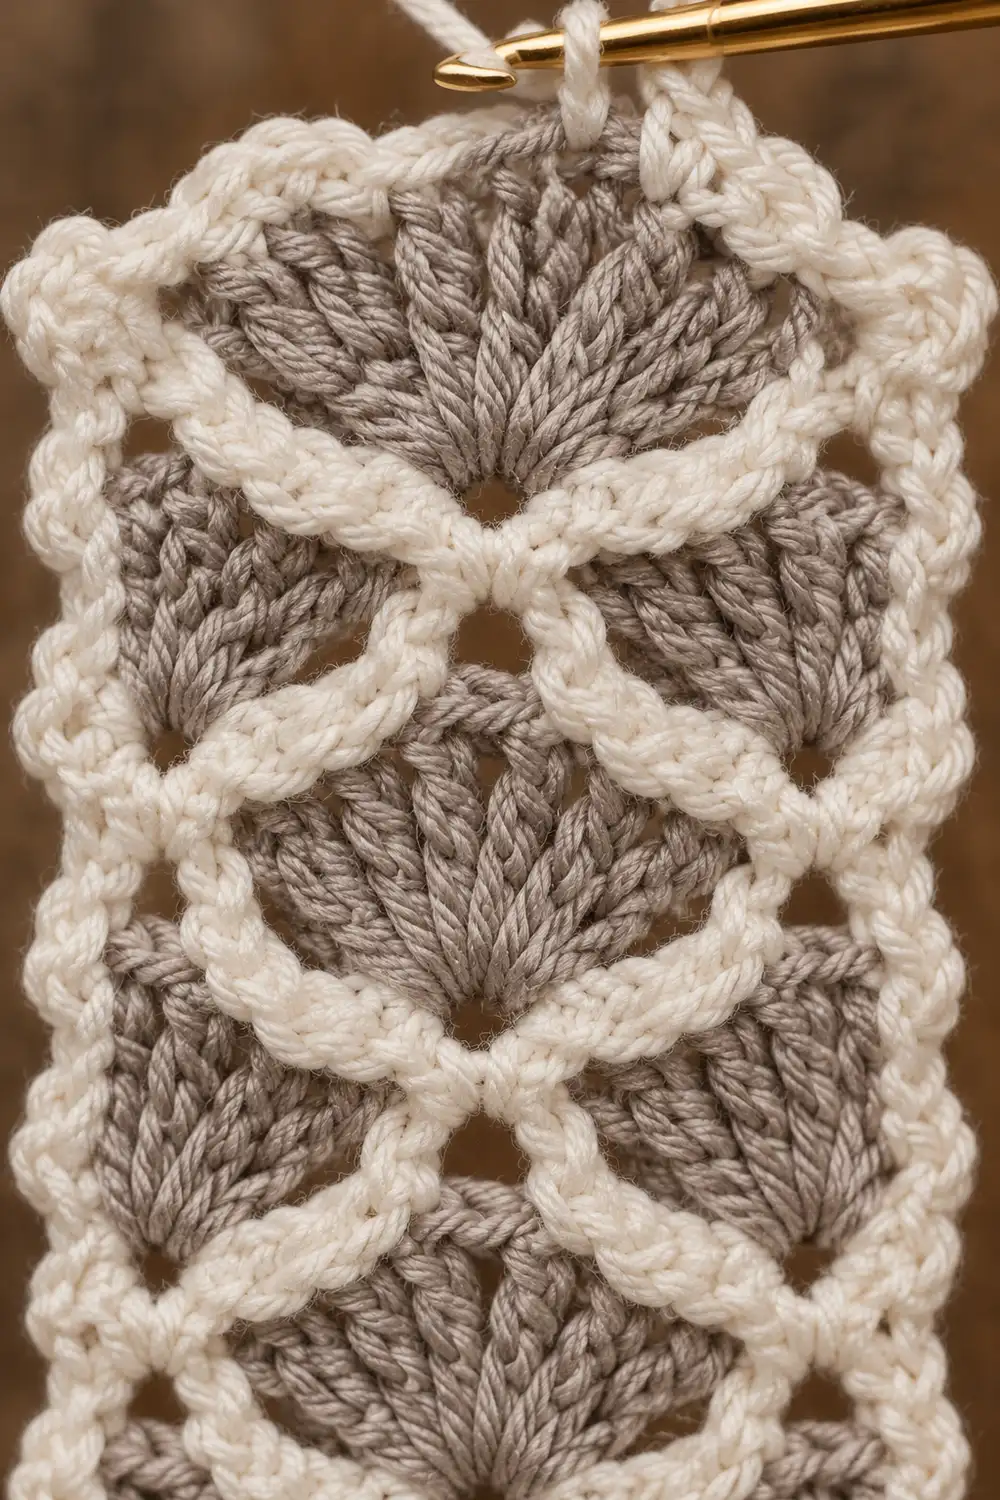
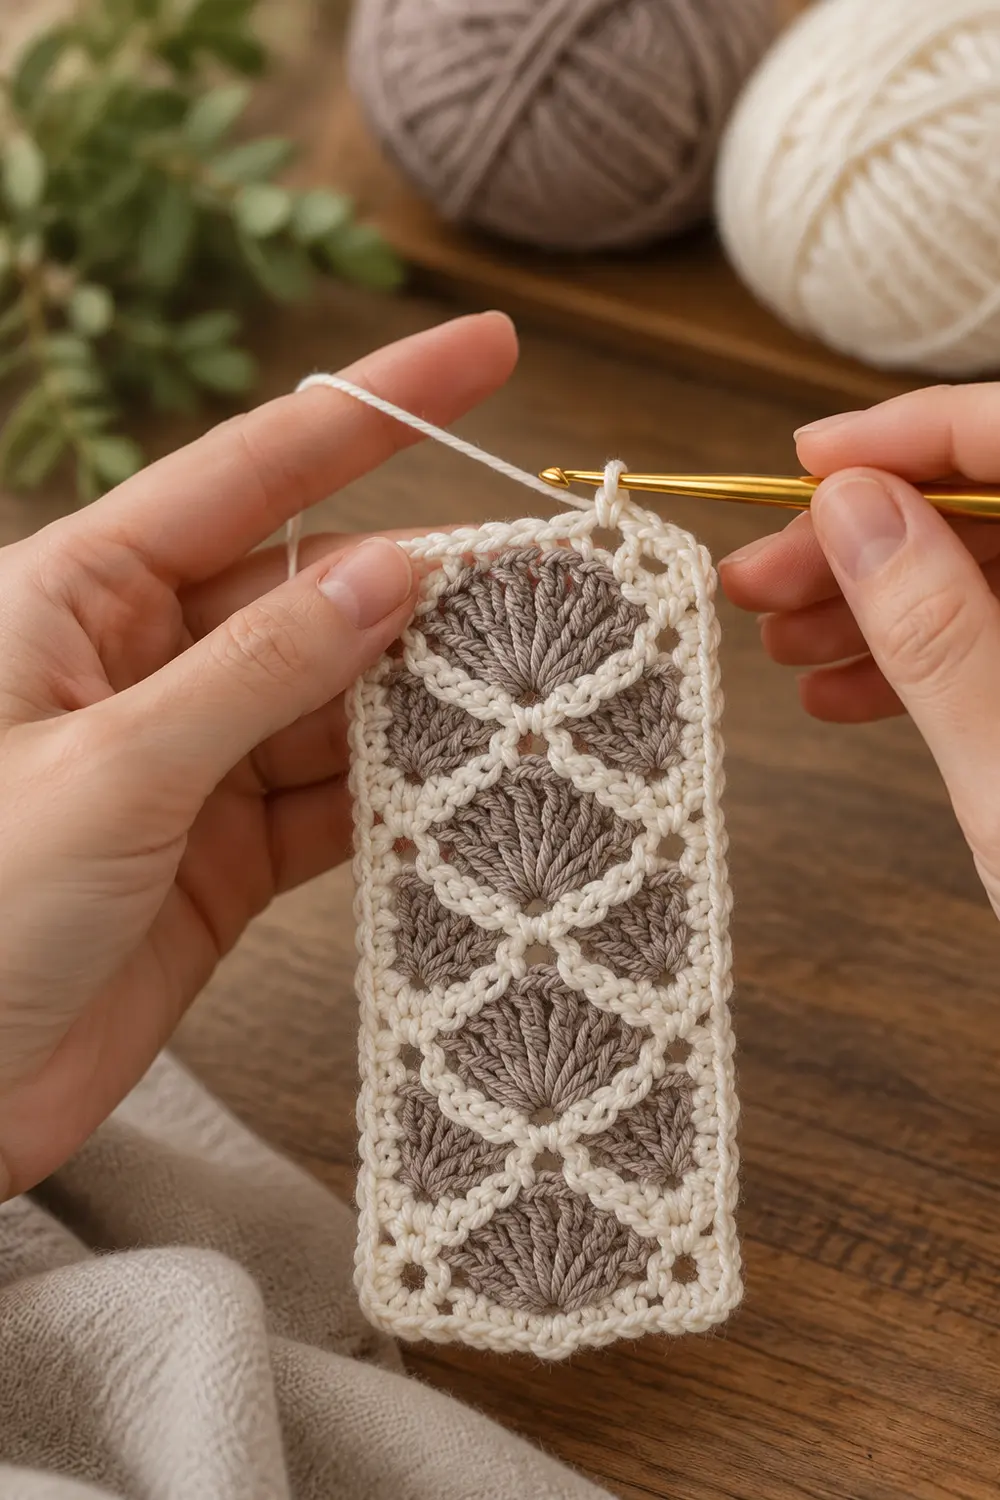
This little strip is a study in contrast. Four taupe fan shells are stacked in a single vertical column, and each one radiates out from a single stitch like a tiny scallop. Cream connecting rows sit between the shells and frame each fan, so the piece reads as a neat column of separate motifs.
The color pairing is soft and wintry: a warm taupe-gray for the dense, textured shells and a cream or ivory for the connecting rows and border. Small open windows form where the cream rows meet the low ends of each fan. That gives the strip its lacy, open look.
The pattern uses US crochet terms throughout. The finished strip measures 2.5 in wide x 3.5 in tall (6.4 cm x 8.9 cm), including a smooth cream border.
Construction is simple. You work the strip flat in rows, changing color every row. A cream foundation row comes first. Then you alternate a taupe fan row with a cream leveling row four times. You finish with a two-round cream border around the whole rectangle. It is one piece, with no joining.
Finished Size and Construction
- Finished size: 2.5 in wide x 3.5 in tall (6.4 cm x 8.9 cm)
- Skill level: Advanced beginner
- Terminology: US crochet terms
- Yarn weight: Sport weight (#2)
- Hook: 3.25 mm (US D-3)
- Number of pieces: 1
- Layout: Single vertical strip, 4 fan shells stacked in one column
- Piece size before border: 2 in wide x 3 in tall (5.1 cm x 7.6 cm)
- Border depth: 0.25 in (0.6 cm) on every side
- Size after border: 2.5 in x 3.5 in (6.4 cm x 8.9 cm)
Materials
Yarn advice: Choose a smooth sport-weight yarn with good stitch definition. A cotton or cotton blend shows the fan ridges most clearly. Acrylic also works, though it blocks a little less crisply. Avoid fuzzy or brushed yarns, because they blur the fan lines.
- Color A, Taupe (shells): 4 g / 12 m
- Color B, Cream (foundation, connecting rows, border): 6 g / 18 m
Both quantities include a margin of about 30% for tails, a test swatch, and any ripping back.
Tools:
- 3.25 mm (US D-3) crochet hook
- Tapestry needle
- Scissors
- Ruler or tape measure
- Rust-proof pins and a blocking surface
- Spray bottle with clean water
Abbreviations (US Terms)
- ch: chain
- sc: single crochet
- hdc: half double crochet
- dc: double crochet
- sl st: slip stitch
- sk: skip
- st(s): stitch(es)
- sp: space
- t-ch: turning chain
Special stitch: Fan. Work 9 dc into the same stitch. The stitches fan outward from a single base point to form a shell.
Standing sc: With a slip knot already on your hook, insert the hook into the stitch, yarn over, pull up a loop, yarn over, and pull through both loops. Use this to join a new color without a slip stitch and chain.
Gauge and Checkpoints
Gauge: 11 sc = 2 in (5.1 cm) wide, which is 5.5 sc per inch.
Test this before you start. Ch 12 and work 1 row of sc, which gives 11 sc. Measure that row. It should be 2 in (5.1 cm) across. Because the strip is a single piece, your first attempt at Rows 1 to 3 doubles as your gauge test.
Checkpoints (measured flat, before border):
- After Row 1: 2 in (5.1 cm) wide, about 0.2 in (0.5 cm) tall
- After Row 3: 0.9 in (2.3 cm) tall
- After Row 5: 1.6 in (4.1 cm) tall
- After Row 7: 2.3 in (5.8 cm) tall
- After Row 9: 3 in (7.6 cm) tall, still 2 in (5.1 cm) wide
Each fan row plus its cream leveling row adds about 0.7 in (1.8 cm) of height.
If your piece is too big, try a 3 mm hook. Also check that your fan dc are not pulled up too tall.
If it is too small, try a 3.5 mm (US E-4) hook.
Width matters most. If Row 1 measures 2 in (5.1 cm), the rest will follow closely.
Color Changes
You change color every row. To keep the edges clean, do this at the end of every row:
- Fasten off, leaving a 4 in (10.2 cm) tail.
- Turn the work.
- Join the next color in the first stitch.
You will crochet over all of these tails in the border, so there is very little sewing later.
Strip Pattern
Row 1 (Cream, foundation): With Color B, ch 12. Sc in 2nd ch from hook and in each ch across. (11 sc)
Fasten off and turn.
Row 2 (Taupe, fan row):
- Join Color A with a standing sc in the first st.
- Sk next 4 sts.
- Work a Fan (9 dc) in the next st. This is the 6th st, the center of the row.
- Sk next 4 sts.
- Sc in the last st.
(11 sts: 1 sc, 9 dc, 1 sc)
The fan should open into a semicircle. Its two ends dip low at the sc. Fasten off and turn.
Row 3 (Cream, leveling row): This row fills in the low ends of the fan and gives the next row a flat base. It is worked across the fan row in this order: end sc, dc 9 back to dc 1, then the other end sc.
- Join Color B with a sl st in the first sc.
- Ch 4. This counts as 1 dc plus a ch-1 sp.
- Sk dc 9. Hdc in dc 8.
- Sc in dc 7, dc 6, dc 5, dc 4, and dc 3. That is 5 sc.
- Hdc in dc 2. Ch 1.
- Sk dc 1. Dc in the last sc.
(11 sts and sps: 1 t-ch dc, 1 ch-1 sp, 1 hdc, 5 sc, 1 hdc, 1 ch-1 sp, 1 dc)
The two ch-1 spaces sit over the low fan ends and create the small open windows. The tall dc at each edge level off the sides. Fasten off and turn.
Row 4 (Taupe, fan row): This row is worked across Row 3.
- Join Color A with a standing sc in the first dc.
- Sk the next 4 sts and sps. These are the ch-1 sp, the hdc, and 2 sc.
- Fan in the next st. This is the 3rd of the 5 sc, the center of the row.
- Sk the next 4 sts and sps.
- Sc in the 3rd ch of the t-ch.
(11 sts: 1 sc, 9 dc, 1 sc)
Fasten off and turn.
Row 5 (Cream): Repeat Row 3. (11 sts and sps)
Rows 6 to 9: Repeat Rows 4 and 5 twice more.
When you finish Row 9, you have 4 taupe fans (Rows 2, 4, 6, and 8) and 5 cream rows (Rows 1, 3, 5, 7, and 9). That is 9 rows in total. Row 9 ends with 11 sts and sps.
Do not fasten off Row 9 if you prefer to begin the border right away. Otherwise, fasten off.
Checkpoint: the piece should measure 2 in x 3 in (5.1 cm x 7.6 cm).
Border
Border gauge: The border uses the same gauge as the strip, 5.5 sc per inch.
- Top and bottom edges: 2 in x 5.5 = 11 working positions. This matches the 11 stitches already in each of those rows.
- Sides: 3 in x 5.5 = 16.5, so each side gets 17 sc.
Crochet over the color-change tails as you work along the sides.
Round 1 (Cream, sc)
This is a conversion round: 1 sc goes into each existing stitch or row-end, with extra stitches added only at the corners.
Top edge:
- Join Color B with a standing sc in the first st of Row 9.
- Work 2 more sc in that same st. This is the corner, 3 sc.
- Sc in each of the next 9 sts and ch-1 sps.
- Work 3 sc in the last st (corner).
Top edge total: 15 sc, counting both corner groups.
First side: Work down the row-ends.
- Each sc row-end gets 1 sc. These are Rows 9 down to 1 wherever the row ends in a sc: Rows 8, 6, 4, 2, and 1. That makes 5 sc.
- Each dc row-end gets 3 sc. These are Rows 9, 7, 5, and 3. That makes 12 sc.
Side total: 17 sc.
Bottom edge: Work into the free loops of the foundation chain.
- Work 3 sc in the first ch (corner).
- Sc in each of the next 9 ch.
- Work 3 sc in the last ch (corner).
Bottom edge total: 15 sc.
Second side: Work up the row-ends as for the first side. 17 sc.
Sl st to the first sc to close the round.
Round 1 count: 56 sc worked one per existing stitch or row-end, plus 8 extra corner sc (2 extra at each of 4 corners), for a total of 64 sc.
- Top: 15
- Side: 17
- Bottom: 15
- Side: 17
Round 2 (Cream, slip stitch)
Sl st in each sc around. Keep the slip stitches loose enough that the edge does not pucker. (64 sl st)
Join to the first sl st and fasten off.
This round gives the smooth, tight, clean outline. Round 1 adds about 0.18 in (0.5 cm) and Round 2 adds the rest, for a total border depth of 0.25 in (0.6 cm).
Why the Math Works
- The top and bottom each start from 11 positions, matching their rows exactly.
- Each 3-sc corner adds 2 stitches so the corner turns flat instead of cupping.
- Each side’s 17 sc over 3 in (7.6 cm) gives about 5.7 sc per inch, which is within easy blocking range of 5.5.
- Adding 0.25 in (0.6 cm) on each side turns 2 in x 3 in (5.1 cm x 7.6 cm) into 2.5 in x 3.5 in (6.4 cm x 8.9 cm).
Final Blocking
- Weave in any tails that were not covered by the border. Trim them close.
- Lay the strip on your blocking surface, right side up.
- Mist it evenly until it is damp but not soaked.
- Pin the four corners to a 2.5 in x 3.5 in (6.4 cm x 8.9 cm) rectangle.
- Add one pin at the center of each long side to straighten the edges.
- Gently press each fan open with your fingertips so its dc spread evenly into a semicircle.
- Open each ch-1 window slightly with a pin tip.
- Let the piece dry completely, then unpin it.
Final Quality-Control Checklist
- [ ] There are 4 taupe fans, each with exactly 9 dc.
- [ ] Each fan is centered, with 4 skipped stitches on each side.
- [ ] Each cream leveling row has 11 sts and sps, with 2 visible ch-1 windows.
- [ ] Border Round 1 has 64 sc (15, 17, 15, 17).
- [ ] Border Round 2 has 64 sl st, with no puckering.
- [ ] The corners are square and lie flat.
- [ ] The finished size is 2.5 in x 3.5 in (6.4 cm x 8.9 cm).
- [ ] No tails are visible on the right side.
Troubleshooting
The fan cups or ruffles. Your dc are probably too tall. Shorten each dc’s first loop, or go down to a 3 mm hook for the fan rows only.
The fan is off-center. Recount the 4 skipped stitches on each side. The Fan always goes in the 6th position.
The sides of the strip curve inward. The leveling row’s end dc may be too short. Pull the t-ch and the final dc up fully to dc height.
The border waves along the sides. You have too many stitches there. Check that you worked exactly 3 sc per dc row-end and 1 sc per sc row-end, for 17 sc per side.
The border pulls the sides tight. You have too few stitches, or your slip stitches are too tight. Redo Round 2 more loosely, or with a hook one size larger.
The corners are rounded. Make sure each corner has 3 sc worked into a single stitch.
The strip is too tall or too short. Compare it to the row checkpoints. Adjust tension in the fan rows, since they contribute the most height.
Care
Hand wash in cool water with a mild soap. Press out the water in a towel and lay the strip flat to dry, re-pinning it if needed.
Final Notes
The measurement chain is short and predictable:
- Row 1 sets the width: 11 sc = 2 in (5.1 cm).
- Each fan and leveling pair adds 0.7 in (1.8 cm).
- Four pairs plus the foundation row bring the strip to 3 in (7.6 cm) tall.
- The 64-stitch border adds 0.25 in (0.6 cm) all around, for a finished 2.5 in x 3.5 in (6.4 cm x 8.9 cm).
If Row 1 and the Row 3 checkpoint are right, everything after them lines up.
Optional: To make a longer strip, repeat Rows 4 and 5 for more fans. Add 4 sc to each side of Border Round 1 for every extra pair.
Happy crocheting!