

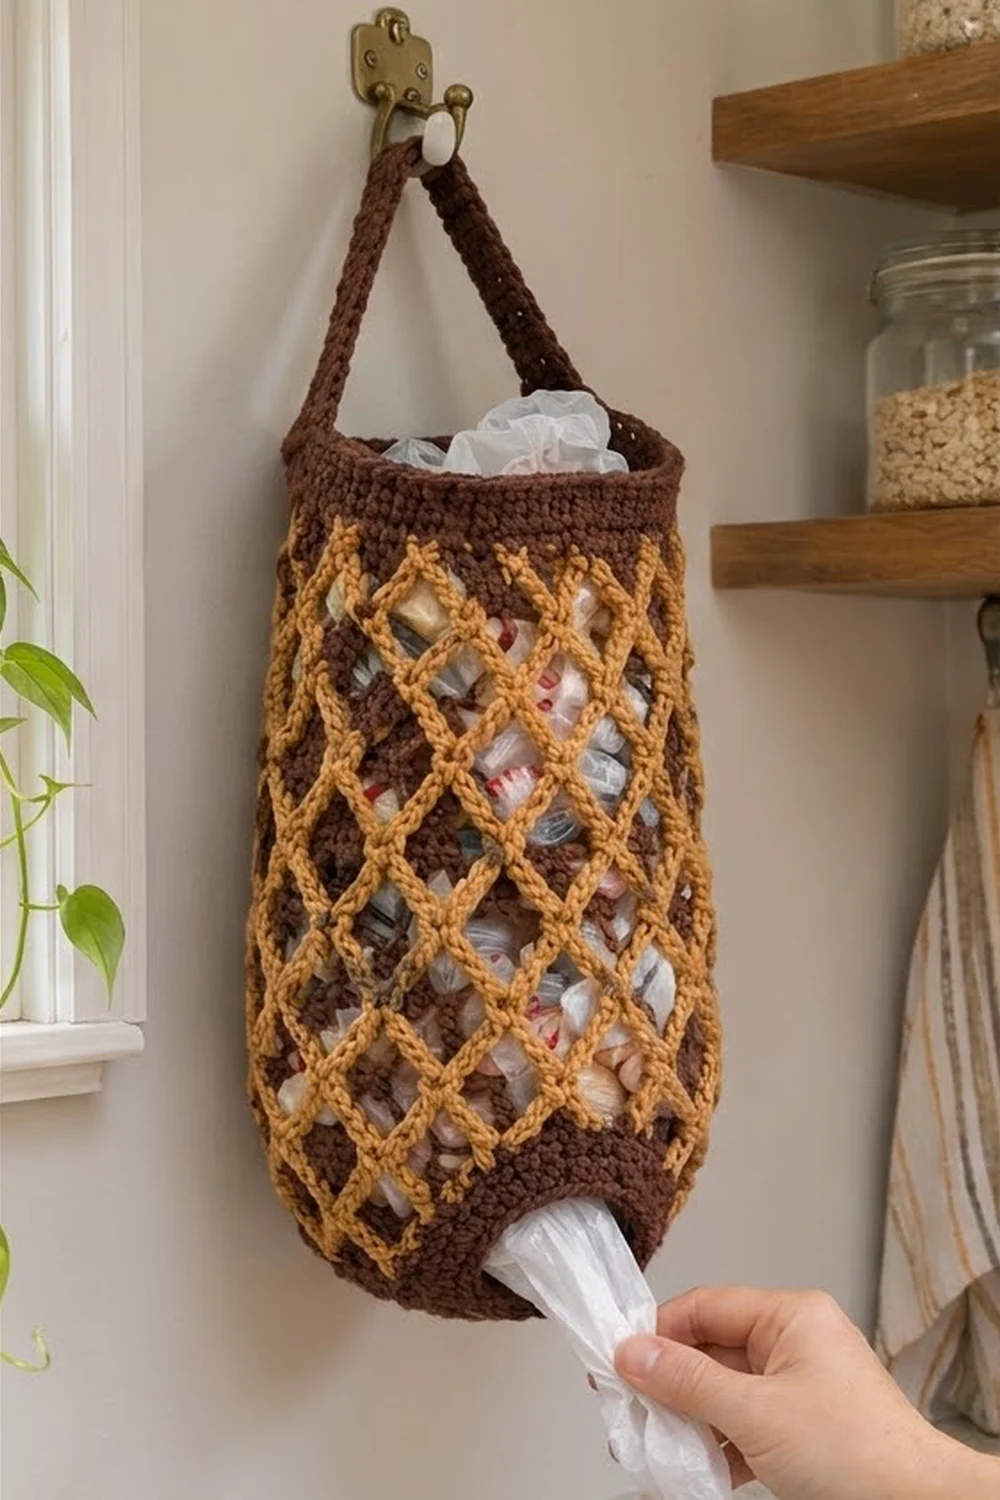
The Cocoa Lattice Bag Holder is a tidy way to store plastic grocery bags. You stuff bags in at the top and pull them out one at a time through a round opening at the bottom. A dark chocolate mesh tube carries a raised golden lattice, so the piece looks woven but still lets you see when it is running low.
The design uses two colors: deep cocoa brown for the structure and warm mustard gold for the diamonds. Solid brown bands frame the top and bottom, and a sturdy strap hangs it from a hook or cabinet knob. The look is farmhouse kitchen with a basketweave feel.
The pattern uses US crochet terms. The finished holder is 6.9 in (17.5 cm) wide laid flat and 15.25 in (38.7 cm) tall, not counting the strap. The strap adds about 4 in (10.2 cm) of arch, so the hanging length is about 19 in (48.3 cm).
Construction is simple. You start at the bottom opening and work a tapered sc base, then a 21-round dc mesh body. Next you add the gold lattice in surface slip stitch, then a solid sc top band. Finally, you work the strap straight off the top edge and sew it to the opposite side.
Finished Size and Construction
- Finished size: 6.9 in (17.5 cm) wide flat × 15.25 in (38.7 cm) tall
- Skill level: Easy-intermediate
- Terminology: US
- Yarn weight: Worsted (#4), cotton or cotton blend
- Hook: 5.0 mm (H-8)
- Number of pieces: 1 (the strap is worked directly from the top edge)
- Layout: Single tube worked in joined rounds; no assembly grid
- Circumference: 48 sts = 13.7 in (34.8 cm)
- Size before top band: 13.75 in (34.9 cm) tall
- Top band depth: 1.5 in (3.8 cm)
- Bottom opening: about 2.2 in (5.6 cm) across, 6.9 in (17.5 cm) around
- Strap: 1.1 in (2.8 cm) wide × 10 in (25.4 cm) long
Materials
Choose a smooth worsted cotton or cotton-acrylic blend. Cotton holds its shape when the holder is full and does not stretch out under weight. Avoid fuzzy yarns, because the lattice should read crisply against the mesh.
- Color A, Cocoa Brown: 100 g / 183 m (base, mesh, top band, strap)
- Color B, Mustard Gold: 35 g / 64 m (lattice)
Both quantities include about a 15% margin for gauge swatching and weaving in ends.
Tools:
– 5.0 mm (H-8) crochet hook
– Tapestry needle
– 2 stitch markers
– Scissors
– Measuring tape
– Rust-proof pins and a spray bottle for blocking
Abbreviations (US Terms)
- ch – chain
- sl st – slip stitch
- sc – single crochet
- dc – double crochet
- inc – 2 sc in the same stitch
- sp – space
- sk – skip
- st(s) – stitch(es)
- beg – beginning
- rnd(s) – round(s)
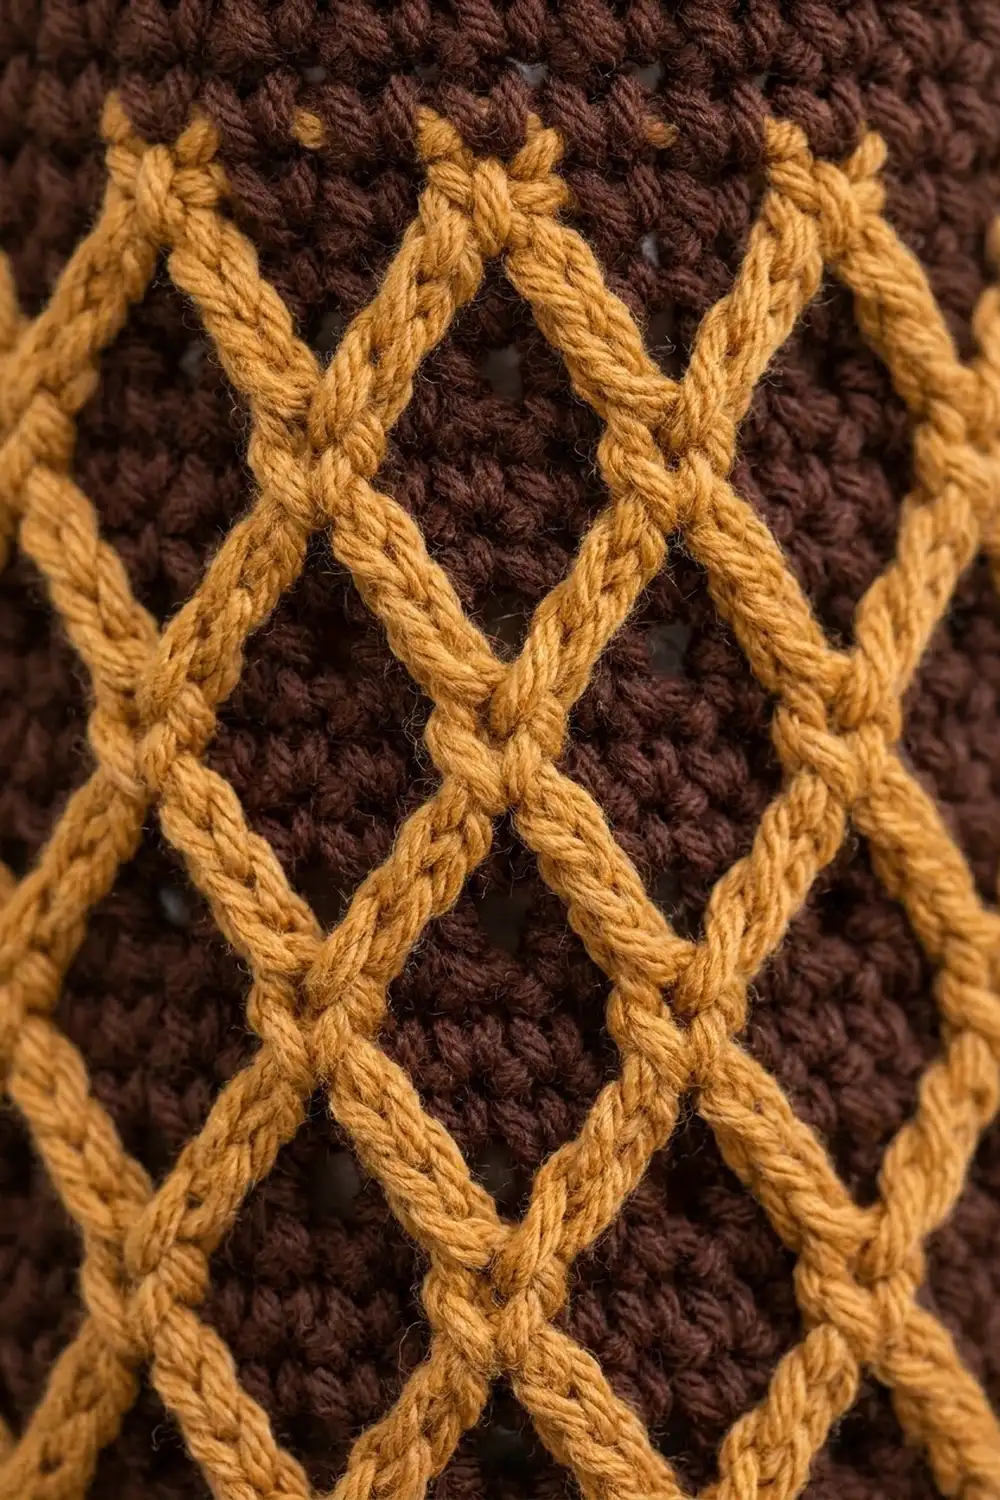
Surface slip stitch (surf sl st): Hold Color B on the inside of the tube. Insert the hook from the right side through the target ch-1 sp, yarn over, and pull a loop up to the front and through the loop on the hook. This makes one raised “chain” stitch on the surface.
Gauge and Checkpoints
Sc gauge: 14 sts × 16 rnds = 4 in (10.2 cm), or 3.5 sts and 4 rnds per inch.
Mesh gauge: 7 mesh units (14 sts) × 7 rnds = 4 in (10.2 cm). Each mesh round is about 0.57 in (1.4 cm) tall.
Before you start the holder, work a test piece: a flat swatch of 16 sc for 16 rows, then 7 rows of dc mesh on top. Measure the sc and mesh gauge separately, because both matter.
Checkpoints:
1. After Rnd 7 (base): The edge circumference is 13.7 in (34.8 cm), and the base is 1.75 in (4.4 cm) tall.
2. After Rnd 14 (7 mesh rnds): The mesh section is 4 in (10.2 cm) tall.
3. After Rnd 28 (body): The total height is 13.75 in (34.9 cm).
4. After Rnd 34 (top band): The total height is 15.25 in (38.7 cm).
If your piece is too big, go down to a 4.5 mm hook. If it is too small, go up to a 5.5 mm hook. Don’t add stitches: the 48-stitch count is what makes the lattice spacing work.
Pattern
Join every round with a sl st to the first st. Do not turn; the right side always faces you.
Base (Color A)
Ch 24 and join with a sl st to form a ring, taking care not to twist the chain. This ring is the bottom opening.
Rnd 1: Ch 1, sc in each ch around, join. (24 sts)
Rnd 2: Ch 1, sc in next 3 sts, inc in next st; repeat from * 6 times total, join. (30 sts)
Rnd 3: Ch 1, sc in next 4 sts, inc; repeat 6 times, join. (36 sts)
Rnd 4: Ch 1, sc in next 5 sts, inc; repeat 6 times, join. (42 sts)
Rnd 5: Ch 1, sc in next 6 sts, inc; repeat 6 times, join. (48 sts)
Rnds 6–7: Ch 1, sc in each st around, join. (48 sts)
The six increases per round give the base a rounded cone shape, like the bottom of the finished holder. Checkpoint 1: 13.7 in (34.8 cm) around and 1.75 in (4.4 cm) tall.
Body Mesh (Color A)
Rnd 8 (first mesh rnd): Ch 4 (counts as dc + ch 1), sk next st, dc in next st, ch 1, sk next st; repeat from * 23 times, join with a sl st in the 3rd ch of beg ch-4. (24 dc + 24 ch-1 sps = 48 sts)
Number the spaces now. Space 1 is the ch-1 sp made by the beg ch-4. Count spaces 2 through 24 in the direction you are working. Place a marker in space 1.
Rnds 9–28: Ch 4 (counts as dc + ch 1), dc in next dc, ch 1; repeat from * 23 times, join in the 3rd ch of beg ch-4. (24 dc + 24 ch-1 sps = 48 sts per rnd)
Each dc sits on top of a dc, so the spaces stack in straight vertical columns. Move the space 1 marker up every few rounds. The body is 21 mesh rounds, which is 12.0 in (30.5 cm).
Checkpoint 2 comes after Rnd 14: 4 in (10.2 cm) of mesh. Checkpoint 3 comes after Rnd 28: 13.75 in (34.9 cm) total. Do not fasten off Color A. Put the live loop on a stitch marker while you work the lattice.
Gold Lattice (Color B)
The lattice is two sets of 8 diagonal lines worked in surface slip stitch. Each line moves exactly one space sideways per mesh round. Work the lattice now, while the top is still open, so you can reach inside.
Set A (leaning left): There is one line for each starting space: 1, 4, 7, 10, 13, 16, 19 and 22.
- Make a slip knot in Color B and hold it inside the tube, leaving a 6 in (15.2 cm) tail.
- From the right side, insert the hook through the starting space in Rnd 8 and draw up a loop.
- Surf sl st into the space one column to the left in Rnd 9.
- Keep going up the tube, moving one column left each round, through Rnd 28.
- Cut the yarn and pull the end through to the inside through the same Rnd 28 space.
Each line has 1 starting loop + 20 surf sl sts = 21 stitches. A line that starts in space 1 ends in space 5, because the moves wrap around the tube.
Set B (leaning right): Work 8 more lines from the same starting spaces, moving one column to the right each round. A line that starts in space 1 ends in space 21.
Lines that start 3 spaces apart cross every 1.5 rounds in a regular pattern. The result is 8 diamonds around the tube, each about 1.7 in (4.3 cm) wide and 1.7 in (4.3 cm) tall. That is 3 columns × 0.57 in and 3 rounds × 0.57 in. The 21 rounds give 7 rows of diamonds.
Keep the surface stitches loose enough that the mesh doesn’t pucker. Lay the tube flat after every few lines to check.
The lattice uses 16 lines × 21 sts = 336 surface stitches. Tie each pair of tails together inside and weave them into the mesh.
Border: Top Band, Strap and Bottom Opening Edge
Border gauge: sc, 3.5 sts and 4 rnds per inch (2.5 cm).
Top Band (Color A)
Put the live Color A loop back on the hook.
Rnd 29 (conversion rnd): Ch 1, sc in the same st, sc in next ch-1 sp, sc in next dc, sc in next ch-1 sp; repeat from * 23 times, join. The count is 24 sc worked into the dc + 24 sc worked into the spaces = 48 sts.
Rnds 30–34: Ch 1, sc in each st around, join. (48 sts)
This adds 6 rounds, or 1.5 in (3.8 cm). Checkpoint 4: the total height is 15.25 in (38.7 cm).
Why the math works: The mesh has 24 dc + 24 ch-1 sps = 48 stitch positions, and the base has 48 sc. Working one sc into each position keeps 48 stitches without adding any. That means the band sits exactly as wide as the body: 13.7 in (34.8 cm) around, or 6.9 in (17.5 cm) flat.
Strap (Color A)
Don’t fasten off. Turn so you can work rows.
Row 1: Ch 1, sc in the first 4 sts of Rnd 34, turn. (4 sts)
Rows 2–40: Ch 1, sc in each st across, turn. (4 sts)
The strap is 40 rows, or 10 in (25.4 cm) long and 1.1 in (2.8 cm) wide. Fasten off, leaving a 12 in (30.5 cm) tail.
Flatten the tube so the strap’s starting point is at one side fold. Count around to sts 25–28 of Rnd 34: they sit directly opposite sts 1–4, since 48 ÷ 2 = 24. Make sure the strap isn’t twisted, then whipstitch Row 40 to sts 25–28.
Strap edging (optional): Join Color A at one long edge of the strap and sl st evenly along it, 1 sl st per row end (40 sl sts). Repeat on the other long edge. This firms up the strap and matches the band.
Bottom Opening Edge (Color A)
Join Color A in any unused loop of the foundation chain. Ch 1, sc in each loop around, and join with an invisible join (24 sts). The opening is 6.9 in (17.5 cm) around, or about 2.2 in (5.6 cm) across. This sc round stops the chain from stretching as bags are pulled through.
Final Blocking
- Weave in every remaining end through stitches of the same color.
- Lightly mist the whole holder with water until it is damp but not wet.
- Stuff the tube with plastic bags or a rolled towel until it is round, filling out but not stretching it.
- Pin the top band flat so it is 6.9 in (17.5 cm) wide at the fold.
- Gently straighten the lattice lines with your fingers so each diamond is even.
- Lay the strap flat beside the holder and pin it at 10 in (25.4 cm).
- Let it dry completely, usually 12 to 24 hours, then remove the stuffing.
Final Quality-Control Checklist
- Width laid flat: 6.9 in (17.5 cm), the same at the top band and across the mesh
- Height: 15.25 in (38.7 cm) without the strap
- Exactly 8 diamonds around and 7 rows of diamonds up the body
- All 16 lattice lines move one column per round, with no skipped spaces
- No puckering under the lattice
- Strap sewn exactly opposite its starting point and not twisted
- Bottom opening edged with 24 sc, about 2.2 in (5.6 cm) across
- All ends secured on the inside
Troubleshooting
The mesh spirals or leans. You may be working the beg ch-4 into the wrong dc. Each round, the first dc after the ch-4 goes into the first real dc of the previous round.
The lattice puckers the body. Your surface stitches are too tight. Pull out that line and redo it with a larger hook, such as 5.5 mm, only for Color B.
The diamonds are uneven. One line skipped or doubled a column. Count the spaces from the space 1 marker and redo that line.
The bottom opening is too loose. Work a second sc round, or sc2tog 3 times evenly spaced (21 sts).
The bottom opening is too tight. Replace the sc edge with a sl st edge, which adds no bulk.
The strap stretches. Add the optional sl st edging, or line the strap with a cotton ribbon.
The top band flares. Use a hook 0.5 mm smaller for Rnds 29–34.
Care
Hand wash in cool water with mild soap, press out the water gently, and lay flat to dry in shape. Don’t hang it to dry while wet, because the strap can stretch.
Final Notes
Everything in this pattern comes from one number: 48 stitches around. The base increases from 24 to 48. The mesh keeps 48 positions as 24 dc and 24 spaces. The 24 columns split evenly into 8 diamonds, and the top band converts back to 48 sc. At gauge, that is 13.7 in (34.8 cm) around and 6.9 in (17.5 cm) flat. The height adds up as 1.75 in (4.4 cm) of base + 12.0 in (30.5 cm) of mesh + 1.5 in (3.8 cm) of band = 15.25 in (38.7 cm). Check your gauge at each checkpoint and the holder will come out straight, round and evenly latticed.
Happy crocheting!