

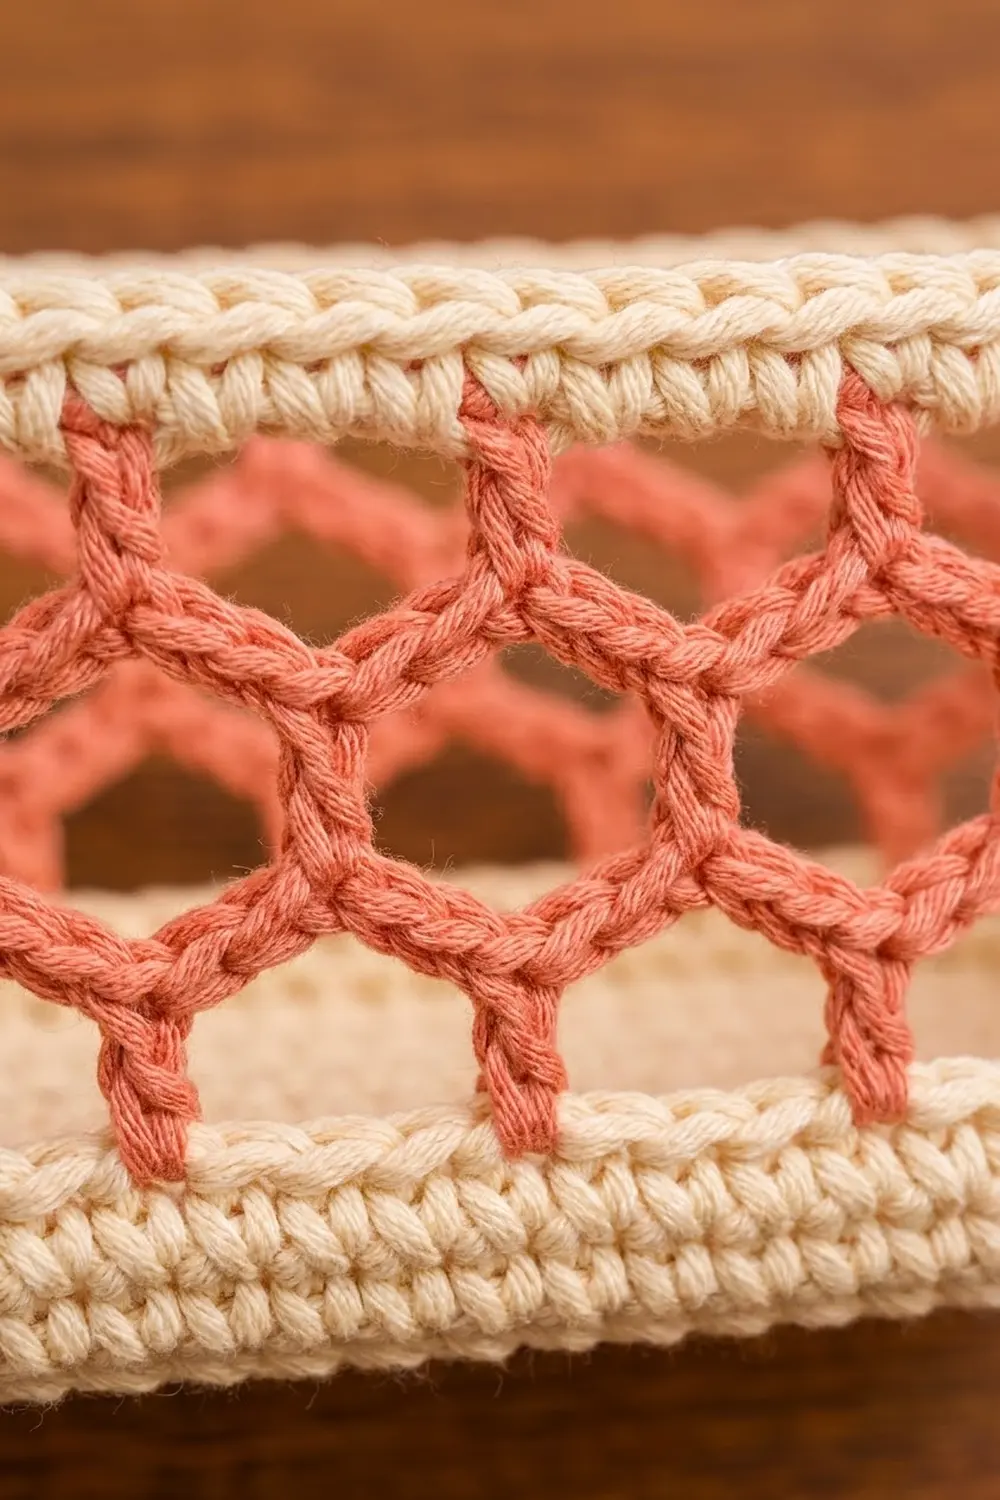
This hanging basket has a solid cream oval base, an open coral honeycomb wall and a twisted cream rim. A long strap with a ring loop at each end runs under the basket and slips over two wall pegs. It hangs neatly beside a sink or vanity and holds three standard toilet paper rolls.
The colors are soft and warm. Cream is used for the base, the lower wall band, the rim and the strap, and coral for the mesh. The coral chain loops meet at short double ties, which turns a simple chain net into rows of hexagon-shaped cells.
The pattern uses US crochet terms. The finished basket measures about 13 in (33.0 cm) long, 5 in (12.7 cm) wide and 5 in (12.7 cm) tall. The strap is about 43 in (109.2 cm) long and 1.4 in (3.6 cm) wide.
You work the base in the round from a foundation chain, turn up the walls with a back-loop round, add the coral mesh, go back to solid stitches for the rim, and finish with reverse single crochet. The strap is worked separately in rows between two rings, then sewn under the base and up both short ends.
Finished Size and Construction
- Finished size: 13 x 5 x 5 in (33.0 x 12.7 x 12.7 cm)
- Skill level: Easy-Intermediate
- Terminology: US
- Yarn weight: Aran / heavy worsted cotton (#4)
- Hook: 5.0 mm (H-8)
- Number of pieces: 2 (basket body, strap)
- Layout: The strap runs lengthwise under the base and up both short ends, and the rings hang on two pegs
- Base size: 13.1 x 5.1 in (33.3 x 13.0 cm)
- Wall height before rim: 3.9 in (9.9 cm)
- Rim (border) depth: 1.1 in (2.8 cm)
Materials
Choose a smooth, firm cotton or cotton blend in aran or heavy worsted weight. Cotton holds the oval shape and doesn’t stretch much under the weight of the rolls. Avoid very soft acrylic, because it lets the base sag.
- Cream: about 150 g, about 255 m (279 yd)
- Coral: about 50 g, about 85 m (93 yd)
These amounts assume a cotton of about 85 m per 50 g. They include a safety margin of roughly 30 percent.
Tools:
- 5.0 mm (H-8) crochet hook
- Tapestry needle
- 4 stitch markers
- Scissors
- Measuring tape
- Pins and a spray bottle for blocking
Abbreviations (US Terms)
- ch = chain
- sl st = slip stitch
- sc = single crochet
- BLO = back loop only
- sp = space
- sk = skip
- rev sc = reverse single crochet (crab stitch)
- st(s) = stitch(es)
- rep = repeat
Special stitch – honeycomb tie: Work (sc, ch 1, sc) in the indicated ch-5 sp. The two sc and the ch-1 make a short bar that becomes one side of a hexagon cell.
Reverse single crochet: Work from left to right (right to left if you are left-handed). Insert the hook into the next st to the right, pull up a loop, yarn over and pull through both loops.
Gauge and Checkpoints
Gauge: 14 sc and 14 rounds = 4 in (10.2 cm) with a 5.0 mm hook. Work firmly. The dense fabric is what keeps the basket upright.
Make the base first as your test piece. It is part of the basket and shows quickly whether your tension matches.
Checkpoints:
- After Rnd 1: about 8.6 x 0.6 in (21.8 x 1.5 cm)
- After Rnd 5: about 10.9 x 2.9 in (27.7 x 7.4 cm)
- After Rnd 9: 13.1 x 5.1 in (33.3 x 13.0 cm), within 0.25 in (0.6 cm)
- After Rnd 13: the solid wall band is 1.1 in (2.8 cm) tall
- After Rnd 18: the wall is 3.9 in (9.9 cm) tall
- After Rnd 22: the wall is 5 in (12.7 cm) tall
If the base is too big, switch to a 4.5 mm hook. If it is too small, switch to a 5.5 mm hook. Don’t add or remove stitches, because the stitch counts tie the base, walls and rim together.
Basket Body
Use cream. Mark the first st of each round and move the marker up as you go. Join each round with a sl st to the first sc. Start each round with ch 1 (it does not count as a st) and work the first sc into the same st as the join.
Oval Base
Foundation: Ch 31.
Rnd 1: 3 sc in 2nd ch from hook (end A). Sc in next 28 ch, then 3 sc in last ch (end B). Rotate and work along the underside of the chain: sc in next 28 ch. Join. (62 sts: 3 + 28 + 3 + 28)
Rnd 2: 2 sc in each of next 3 sts, sc in next 28 sts, 2 sc in each of next 3 sts, sc in next 28 sts. Join. (68 sts: 6 + 28 + 6 + 28)
Rnd 3: (Sc in next st, 2 sc in next st) 3 times, sc in next 28 sts, (sc in next st, 2 sc in next st) 3 times, sc in next 28 sts. Join. (74 sts: 9 + 28 + 9 + 28)
From Rnd 4 on, each end has 1 more plain sc before each increase than in the round before. The 28 side sts never change.
Rnd 4: At each end, (sc in next 2, 2 sc in next) 3 times. (80 sts: 12 + 28 + 12 + 28)
Rnd 5: At each end, (sc in next 3, 2 sc in next) 3 times. (86 sts: 15 + 28 + 15 + 28)
Rnd 6: At each end, (sc in next 4, 2 sc in next) 3 times. (92 sts: 18 + 28 + 18 + 28)
Rnd 7: At each end, (sc in next 5, 2 sc in next) 3 times. (98 sts: 21 + 28 + 21 + 28)
Rnd 8: At each end, (sc in next 6, 2 sc in next) 3 times. (104 sts: 24 + 28 + 24 + 28)
Rnd 9: At each end, (sc in next 7, 2 sc in next) 3 times. (110 sts: 27 + 28 + 27 + 28)
Check the base now: 13.1 x 5.1 in (33.3 x 13.0 cm). It should lie flat without ruffling or cupping.
Solid Wall Band
Rnd 10: Sc in BLO of each st around. Join. (110 sts) This makes a crisp fold line where the walls turn up.
Rnds 11–13: Sc in each st around. Join. (110 sts)
Fasten off cream.
Coral Honeycomb Mesh
Rnd 14: Join coral in the first st. Ch 1, sc in the same st, ch 5, sk 4 sts. Sc in next st, ch 5, sk 4 sts. Rep from * 20 more times. Join to the first sc. (22 sc, 22 ch-5 sps; 22 x 5 = 110 sts used)
Rnd 15: Sl st into the first ch-5 sp. Ch 1, work a honeycomb tie in the same sp, ch 5. Work a honeycomb tie in the next ch-5 sp, ch 5. Rep from * 20 more times. Join to the first sc. (22 ties, 22 ch-5 sps)
Rnds 16–18: Rep Rnd 15. (22 ties, 22 ch-5 sps per round)
Each tie sits in the middle of a loop below, so the loops offset and the short ties form the hexagon sides. The five mesh rounds should measure 2.8 in (7.1 cm) tall when gently stretched upward. Fasten off coral.
Go straight to the Border (rim) rounds below before you make the strap.
Make All Pieces
- Cream: 1 basket base, wall band and rim (one continuous body), plus 1 strap
- Coral: the mesh rounds of the basket body only
Strap
Use cream.
Ring 1: Ch 12, sl st in the first ch to form a ring. Ch 1, work 20 sc into the ring, then join. (20 sts)
Row 1: Ch 1, sc in the same st as the join and in the next 4 sts. Turn. (5 sts)
Rows 2–150: Ch 1, sc in each st across, turn. (5 sts)
Ring 2: At the end of Row 150, ch 12 and sl st in the first sc of Row 150 to form a ring. Ch 1, work 20 sc into the ring, then sl st in the last sc of Row 150. Fasten off. (20 sts)
The strap is 1.4 in (3.6 cm) wide and about 43 in (109.2 cm) long without the rings. Each ring opening is about 1 in (2.5 cm) across, and the outside of each ring is about 1.6 in (4.1 cm).
Strap layout (rows):
[Ring 1] Rows 1–34   | hanging section, 9.7 in (24.6 cm)
         Rows 35–52  | end A wall, 5.1 in (13.0 cm)
         Rows 53–98  | under base, 13.1 in (33.3 cm)
         Rows 99–116 | end B wall, 5.1 in (13.0 cm)
[Ring 2] Rows 117–150| hanging section, 9.7 in (24.6 cm)
34 + 18 + 46 + 18 + 34 = 150 rows.
Joining
Put markers at Rows 35, 52, 99 and 116 of the strap.
- Center Rows 53–98 lengthwise along the underside of the base, directly below the Rnd 1 line. The marked rows should line up with the fold ridge at each short end.
- Whipstitch both long edges of the strap to the base. Go through one strand of the strap edge and one sc of the base about every 0.3 in (0.8 cm).
- Bring Rows 35–52 up the center of end A. Sew both edges to the solid band (Rnds 10–13) and the rim (Rnds 19–22) st by st. In the mesh section, tack the strap to every tie and loop that falls under its edges. Row 35 should end level with the top of the rim.
- Repeat for Rows 99–116 at end B.
Keep the tension snug but not tight. If you pull hard, the mesh puckers and the wall leans inward. Check the size: from the rim top to the inside of each ring should be 9.7 in (24.6 cm), plus the ring.
Border (Rim)
Work these rounds before joining the strap. Border gauge: the same as the body, 14 sc and 14 rounds = 4 in (10.2 cm).
Rnd 19 (conversion round): Join cream in the ch-1 sp of the first tie. Ch 1, sc in the same sp, 4 sc in the next ch-5 sp. Sc in the ch-1 sp of the next tie, 4 sc in the next ch-5 sp. Rep from * 20 more times. Join. (22 sc worked into the ties + 88 sc worked into the loops = 110 sts)
Rnd 20: Sc in each st around. Join. Before you continue, place 4 markers so the round divides into 28 sts (long side), 27 sts (end), 28 sts (long side) and 27 sts (end), lined up with the base’s long sides and ends. (110 sts)
Rnd 21: Sc in each st around. Join. (110 sts: 28 + 27 + 28 + 27)
Rnd 22: Ch 1, rev sc in each st around. Join and fasten off. (110 sts: 28 + 27 + 28 + 27)
Why the math works: The base ends at 110 sts. The mesh uses those 110 sts as 22 repeats of 5. The conversion round puts back exactly 5 sts per repeat (1 in the tie + 4 in the loop), so the rim matches the base and the walls stay straight. The rim measures 1.1 in (2.8 cm), and the reverse sc makes the twisted, rope-like edge.
Final Blocking
- Weave in all ends along same-color stitches.
- Mist the basket until it is damp but not soaked.
- Stuff it firmly with a folded towel or three toilet rolls in a plastic bag so the walls stand straight.
- Pull each hexagon gently open with your fingers.
- Pin the strap flat and straight, and shape the rings into circles.
- Let everything dry completely, usually 24 hours.
Final Quality-Control Checklist
- The base measures 13.1 x 5.1 in (33.3 x 13.0 cm) and lies flat.
- Rnds 9, 10–13, 19, 20, 21 and 22 each have 110 sts.
- Each mesh round has 22 ties and 22 ch-5 sps.
- The walls are 5 in (12.7 cm) tall and straight all the way around.
- The strap is 5 sts wide for all 150 rows.
- Both rings are round and the same size.
- The strap is centered under the base and ends level with the rim at both ends.
- All ends are woven in securely.
Troubleshooting
- The base ruffles: Your tension is loose at the ends. Go down a hook size or tighten your increases.
- The base cups: You may have skipped increases. Count each end against the stated totals.
- The walls flare outward: Rnd 10 was not worked in BLO, or the mesh loops are too long. Keep each ch-5 even.
- The mesh looks like diamonds, not hexagons: Make sure every tie includes the ch-1 between the two sc.
- The rim is wavy: Rnd 19 has the wrong count. Recount to 110.
- The strap twists: Turn at the end of every row, and keep the first and last sts tight.
Care
Hand wash in cool water and lay flat to dry, reshaping the basket around a folded towel. Don’t tumble dry, because heat can shrink the cotton.

Final Notes
The measurements build on each other. The 14-sc gauge gives a 13.1 x 5.1 in (33.3 x 13.0 cm) base with 110 sts. Those 110 sts carry straight up through a 1.1 in (2.8 cm) solid band, 22 honeycomb repeats that are 2.8 in (7.1 cm) tall, and a 1.1 in (2.8 cm) rim. The strap matches the basket section by section, with 46 rows under the base, 18 up each end and 34 for each hanging section. If you check each stage as you go, the finished basket comes out 13 x 5 x 5 in (33.0 x 12.7 x 12.7 cm).
Happy crocheting!