

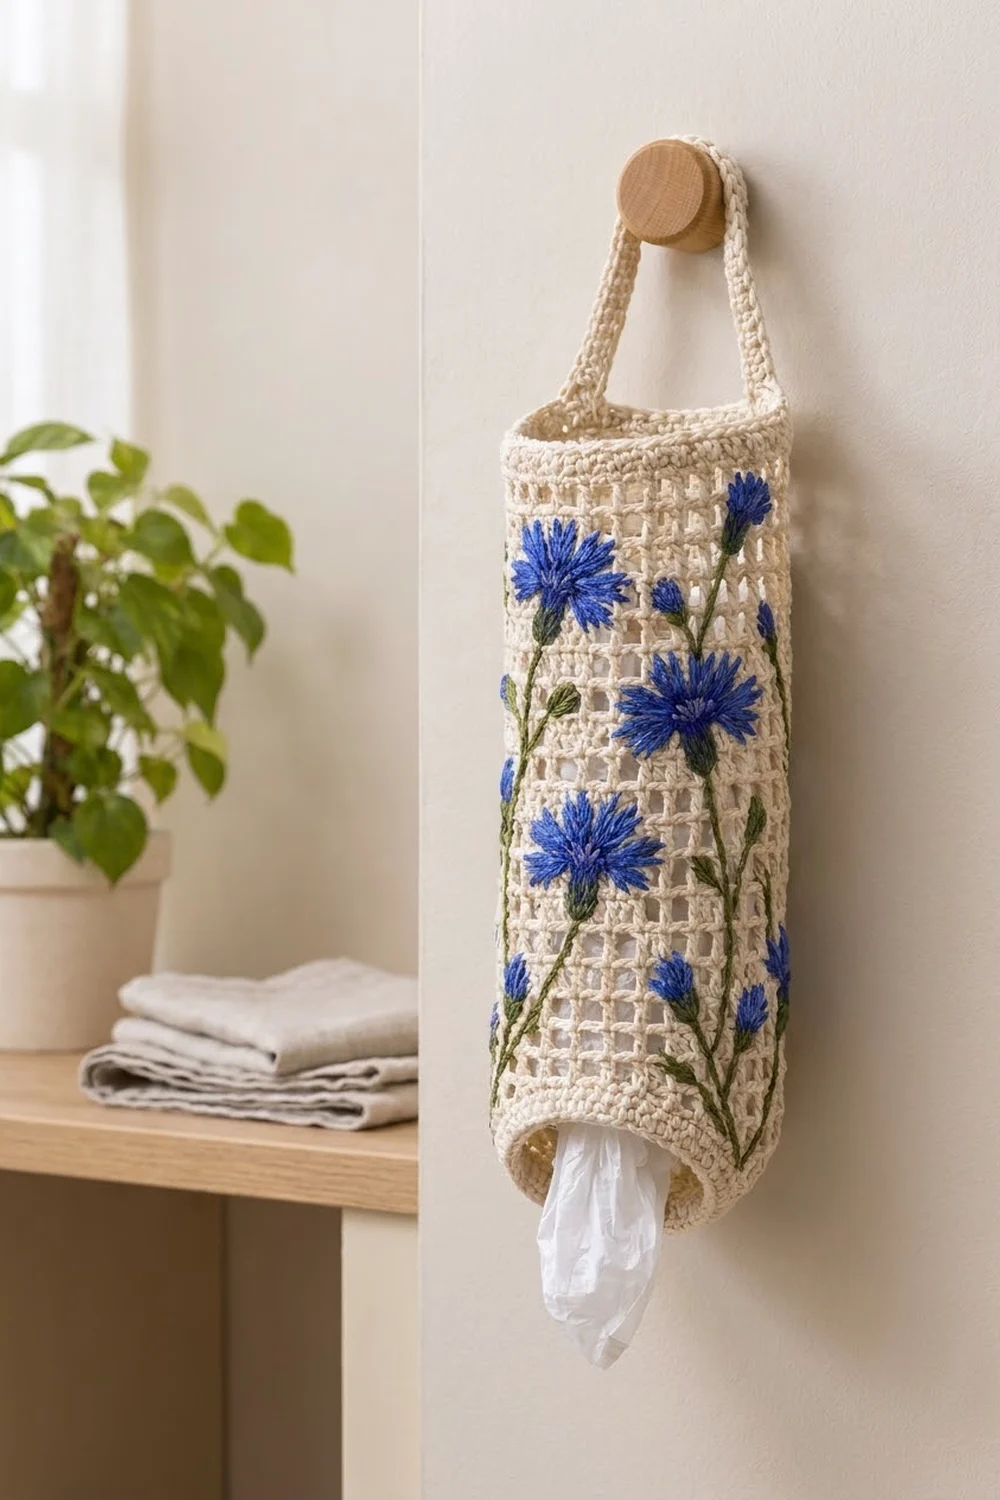
This bag holder turns a pile of loose grocery bags into a tidy wall piece. It is a single cream cotton tube with an airy filet mesh body and firm single-crochet bands at both ends. A sturdy strap at the top lets it hang from a hook or peg.
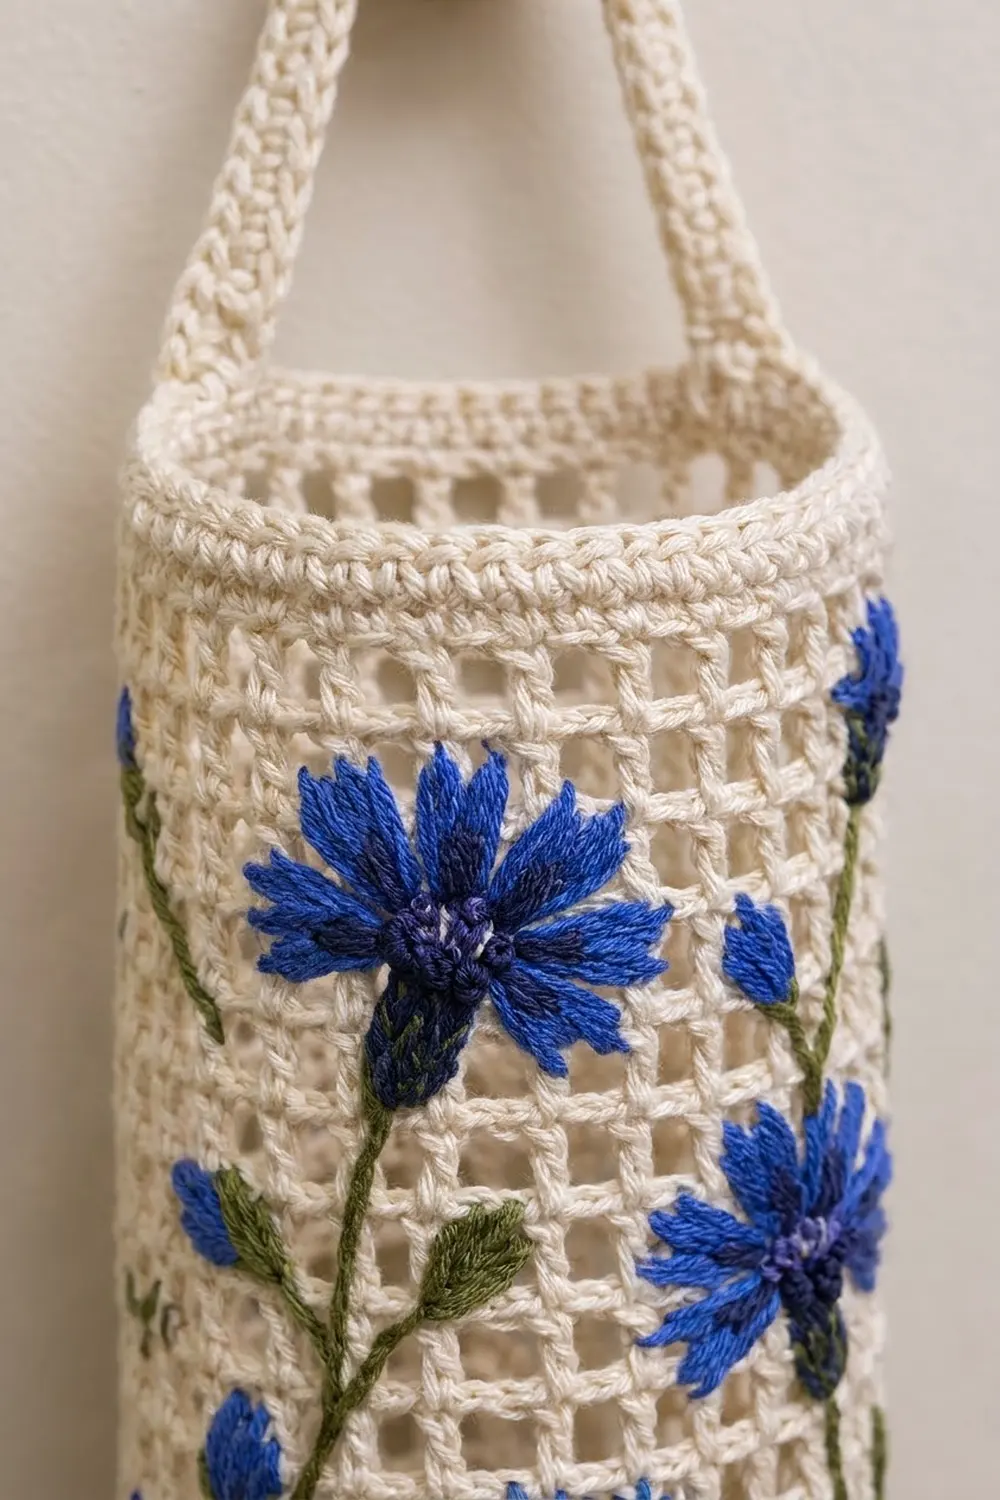
The decoration is all surface embroidery. Royal-blue cornflowers with dark navy centers, small buds, and slim olive-green stems climb the front of the mesh. The finished piece looks a little cottage-style and a little botanical, and the cream background keeps the blue flowers in focus.
The pattern uses US crochet terms. The finished holder measures 6.75 in (17.1 cm) wide when flat, about 13.5 in (34.3 cm) around, and 14.5 in (36.8 cm) tall without the strap. The strap rises about 3.5 in (8.9 cm) above the rim.
Here is the construction in short. You chain a ring, then work in joined rounds: a solid bottom band, the filet mesh, and a solid top band. A slip-stitch edging finishes both rims. Next you work the strap straight off the top band and anchor it on the opposite side. The embroidery goes on last.
Finished Size and Construction
- Finished size: 6.75 in (17.1 cm) flat width × 14.5 in (36.8 cm) tall, plus a strap loop of about 3.5 in (8.9 cm)
- Circumference: 13.5 in (34.3 cm), about 4.3 in (10.9 cm) in diameter
- Skill level: Easy-intermediate (basic crochet, plus simple embroidery)
- Terminology: US
- Yarn weight: Worsted (#4) cotton
- Hook: 4.5 mm (US 7)
- Number of pieces: 1 tube, with the strap worked on
- Layout: Joined rounds from the bottom up, not turned
- Piece size before edging: 6.75 in × 14.25 in (17.1 cm × 36.2 cm)
- Edging (border) depth: about 0.125 in (0.3 cm) at each rim
Materials
Pick a smooth, mercerized or matte cotton in worsted weight. Cotton holds its shape and won’t stretch out under the weight of the bags. It also gives crisp mesh windows. Don’t use acrylic for the body, because it sags over time.
- Cream / ivory (main color): 100 g, about 155 m
- Royal blue (petals and buds): 10 g, about 16 m
- Olive green (stems, leaves, sepals): 8 g, about 12 m
- Dark navy (flower centers): 3 g, about 5 m
These quantities include a safety margin of about 15%.
Tools:
– 4.5 mm (US 7) crochet hook
– Blunt tapestry needle with a large eye
– 4 stitch markers
– Measuring tape
– Scissors
– Water-soluble fabric pen
– A tube about 4.3 in (10.9 cm) across for blocking, such as a rolled towel or a cardboard canister
Abbreviations (US Terms)
- ch – chain
- sl st – slip stitch
- sc – single crochet
- dc – double crochet
- st(s) – stitch(es)
- sp – space
- FLO / BLO – front loop only / back loop only
- rnd – round
Special stitch – mesh unit: one dc followed by ch 2 (the ch 2 skips 2 sts or spans the previous ch-2 sp). Each mesh unit takes up 3 sts’ worth of width.
Gauge and Checkpoints
- Solid sc: 16 sts × 16 rnds = 4 in (10.2 cm)
- Mesh: 4 mesh units (12 sts) = 3 in (7.6 cm) wide, and 8 mesh rnds = 4.5 in (11.4 cm) tall (each mesh rnd is about 0.56 in / 1.4 cm)
Your gauge swatch is the bottom band. Work Rnds 1–6 and measure before you continue.
Checkpoints:
1. After Rnd 1: laid flat, the ring measures 6.75 in (17.1 cm) across.
2. After Rnd 6: the band is 1.5 in (3.8 cm) tall.
3. After Rnd 14 (8 mesh rnds): the total height is 6 in (15.2 cm).
4. After Rnd 26 (all mesh): the total height is 12.75 in (32.4 cm).
5. After Rnd 32: the total height is 14.25 in (36.2 cm).
If the piece is too big: go down to a 4 mm hook and pull the ch-2 spaces a little snugger.
If it’s too small: go up to a 5 mm hook. Don’t change the stitch count, because 54 is what keeps the mesh repeat and the strap placement correct.
Pattern
Join every round with a sl st to the first st. Don’t turn. Mark the first st of each round.
Bottom Band
Foundation: With cream, ch 54. Join with a sl st to the first ch to make a ring, taking care not to twist the chain.
Rnd 1: Ch 1, sc in each ch around, join. (54 sc)
Rnds 2–6: Ch 1, sc in each st around, join. (54 sc)
The band now measures 1.5 in (3.8 cm) tall.
Filet Mesh Body
Rnd 7 (conversion to mesh): Ch 5 (counts as dc + ch 2), skip next 2 sts, dc in next st, ch 2, skip next 2 sts. Repeat from * 16 more times. Join with a sl st to the 3rd ch of the beginning ch-5.
(18 dc + 18 ch-2 sps = 54 sts)
Rnds 8–26: Ch 5 (counts as dc + ch 2), dc in next dc, ch 2. Repeat from * 16 more times. Join to the 3rd ch of the ch-5.
(18 dc + 18 ch-2 sps = 54 sts in each rnd)
Each dc sits directly on the dc below, so the windows stack in straight vertical columns. That gives you 20 mesh rnds (Rnds 7–26), measuring 11.25 in (28.6 cm).
Top Band
Rnd 27 (conversion to solid): Ch 1, sc in the same st as the join, 2 sc in the next ch-2 sp, sc in next dc, 2 sc in next ch-2 sp. Repeat from * around and join.
(18 sc into dc + 36 sc into spaces = 54 sc)
Rnds 28–32: Ch 1, sc in each st around, join. (54 sc)
Don’t fasten off. Place markers in st 1, st 4, st 28, and st 31 of Rnd 32. Sts 1–4 and sts 28–31 sit directly opposite each other, because 54 ÷ 2 = 27 and 1 + 27 = 28.
Border: Rim Edging and Strap
Border gauge: a sl st edging adds about 0.125 in (0.3 cm) of height at each rim and adds no width.
When you flatten the tube, each side holds exactly 27 sts. The tube has no corners, so the per-side count is simply half the round.
Top Rnd 33: Working in FLO, sl st loosely in each st around and join.
(54 sl sts: 27 per flattened side)
Leave the back loops of Rnd 32 free for the strap.
Strap Row 1: Working in the free back loops of Rnd 32, ch 1, sc in sts 1–4, turn. (4 sc)
Strap Rows 2–40: Ch 1, sc in each st across, turn. (4 sc)
The strap is now 10 in (25.4 cm) long and 1 in (2.5 cm) wide.
Anchor the strap: Bring the strap across the opening without twisting it. Holding Row 40 against the free back loops of sts 28–31 on the inside of the rim, sl st through both layers 4 times. Fasten off, leaving a 6 in (15.2 cm) tail, and use the tail to whipstitch the strap edges to the rim for extra strength.
Bottom edging: Turn the tube upside down. Join cream in any loop of the foundation chain. Sl st loosely in each of the 54 foundation loops and join.
(54 sl sts: 27 per flattened side)
Fasten off and weave in the ends.
Why the math works: 54 sts divide evenly by 3, which gives the 18 complete mesh units. They also divide evenly by 2, which places the two strap ends exactly opposite each other. Every round, solid or mesh, keeps the same 54-st count, so the tube stays straight-sided with no flaring or pulling in. Height chain: 1.5 in + 11.25 in + 1.5 in = 14.25 in (36.2 cm), and the two edgings add 0.25 in (0.6 cm), for a finished height of 14.5 in (36.8 cm).
Embroidery: Cornflowers
Flatten the tube so the strap ends sit at the side folds. The front face holds mesh columns 2–9, counting each mesh unit from st 1 as one column. Number the mesh rounds M1–M20 from the bottom.
Mark these flower centers with the fabric pen:
- Large bloom A: M16, column 4
- Large bloom B: M12, column 7
- Large bloom C: M7, column 4
- Small bloom D: M18, column 8
- Buds (5): M4 column 3, M3 column 7, M9 column 8, M14 column 2, M19 column 6
Stems (green): Start each stem at the top edge of the bottom band. Work backstitch along the dc posts and ch bars up to each flower or bud. Let the stems curve gently by moving over one column every 3–4 rounds. Two or three stems can drift onto the side folds, which gives the wrap-around meadow look.
Leaves (green): Make 8–10 long, narrow lazy daisy stitches, each about 0.75 in (1.9 cm) long, angled off the stems.
Large blooms (blue): Work 10–12 straight stitches radiating from the center, each about 0.75 in (1.9 cm) long. Anchor the stitches through the solid dc and ch strands, not through empty windows. Add a short 0.25 in (0.6 cm) stitch beside the tip of each petal to give it the fringed cornflower edge.
Small bloom (blue): Same method, with 8 petals each 0.5 in (1.3 cm) long.
Centers (navy): Fill each bloom center with 3 French knots.
Buds: Make 3 blue straight stitches in a small fan, 0.25 in (0.6 cm) long, then add a green lazy daisy sepal underneath.
Keep the embroidery tension relaxed so the mesh doesn’t pucker.
Final Blocking
- Soak the holder in cool water for 10 minutes.
- Roll it in a towel and press out the excess water. Don’t wring it.
- Slide the tube over your blocking form, which should be 4.3 in (10.9 cm) across.
- Line up the mesh columns so they run vertically, and square up the windows with your fingers.
- Check the height: 14.5 in (36.8 cm).
- Lay the strap flat and straight, and let it dry fully.
- Steam the embroidered blooms lightly from above if any petals curl.
Final Quality-Control Checklist
- Every round has 54 sts, and every mesh round has 18 dc and 18 ch-2 sps.
- The mesh columns run straight without spiraling.
- The flat width is 6.75 in (17.1 cm) and the height is 14.5 in (36.8 cm).
- The strap ends sit exactly opposite each other, and the strap isn’t twisted.
- Both rim edgings lie flat with no ruffling.
- The embroidery is anchored on solid strands, and the back has no loose floats.
- All ends are woven in securely.
Troubleshooting
- Mesh columns lean or spiral: Make sure you are joining into the 3rd ch of the ch-5 and starting the next dc in the next dc, not in the space.
- Top band flares: You worked 3 sc into some spaces. Rnd 27 must be exactly 2 sc per space, for 54 total.
- Edging ruffles or tightens: Work the sl sts looser, or use a hook one size larger just for the edging.
- Strap stretches: Whipstitch both strap ends firmly. You can also add a row of sl sts along each long edge of the strap.
- Embroidery puckers: Loosen your tension and anchor each petal on a dc post or ch bar.
- Bags fall out too easily: Work 1 extra bottom round as sc2tog every 9th st (48 sts) for a slightly smaller opening.
Care
Hand-wash cool and lay flat or over a tube to dry. Don’t tumble dry, because this keeps the blue embroidery from bleeding or fuzzing.
Final Notes
The measurement chain is simple: 54 sts give 13.5 in (34.3 cm) around and 6.75 in (17.1 cm) flat. The 6 sc rounds give 1.5 in (3.8 cm), the 20 mesh rounds give 11.25 in (28.6 cm), and the top 6 sc rounds give another 1.5 in (3.8 cm). The edgings bring the height to 14.5 in (36.8 cm). The 40-row strap measures 10 in (25.4 cm) and arcs about 3.5 in (8.9 cm) above the rim. Check your gauge at the bottom band, and everything after it will fall into place.
Happy crocheting!