

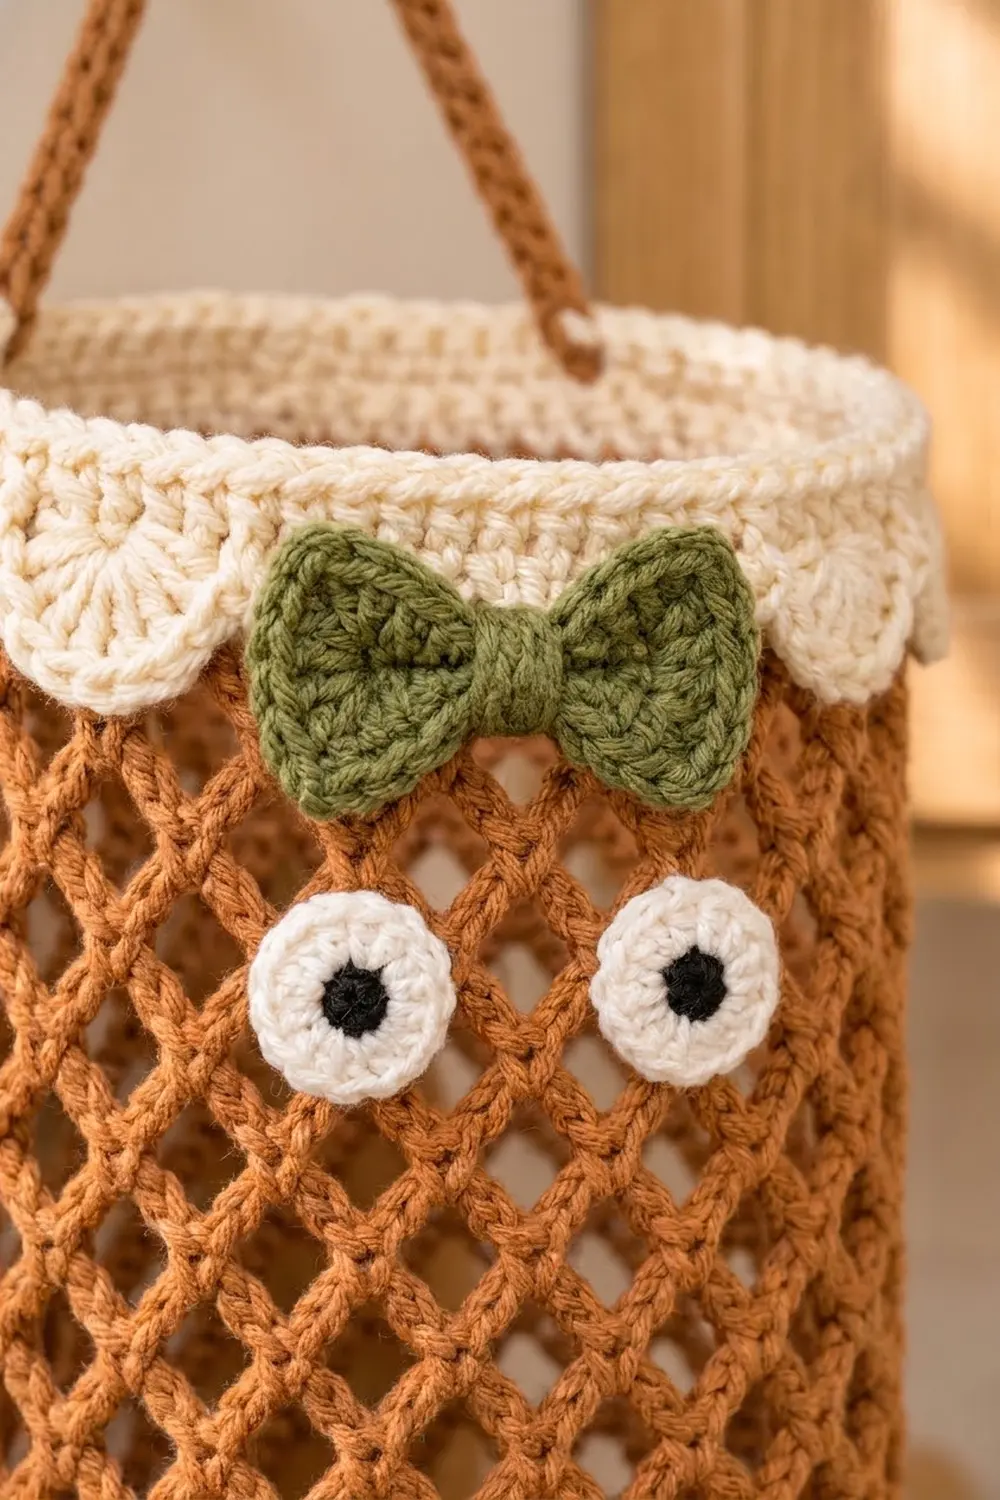
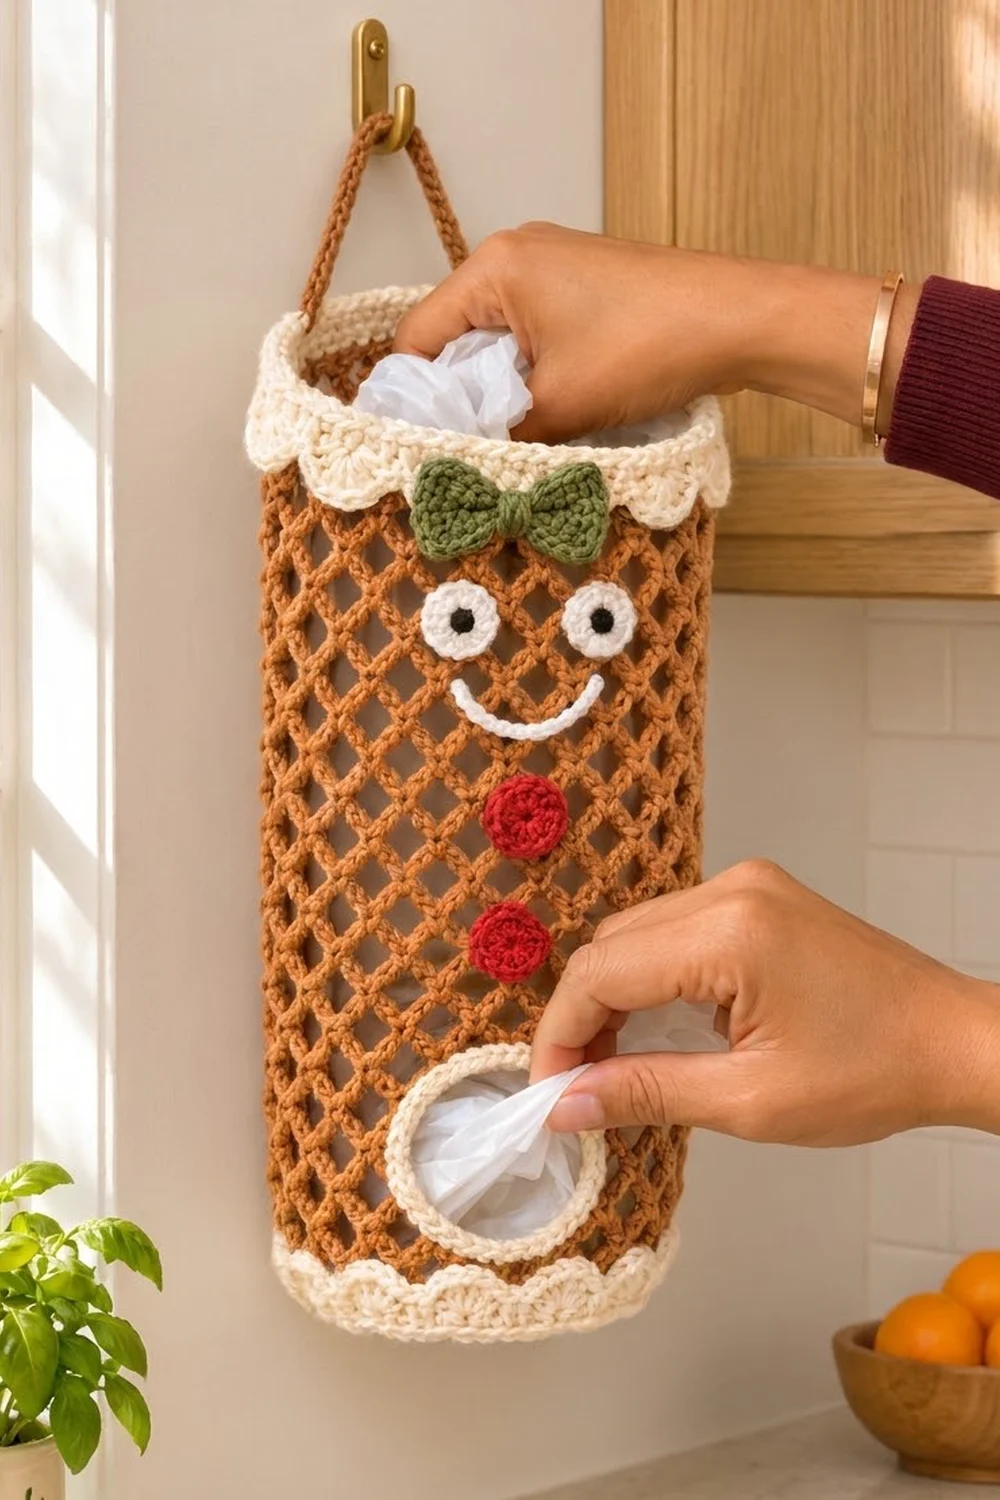
Ginger Jack is a cheerful gingerbread man that keeps your plastic bags in check. The body is an airy diamond mesh in warm cinnamon brown, so you can see at a glance when the stash is running low. Cream scalloped bands at the top and bottom look like piped icing.
The face uses four colors. There is an olive-green bow, white eyes with black centers, a white smile and two bright red buttons. The style is cozy farmhouse Christmas, and it looks good in a kitchen all year.
This pattern uses US crochet terms. The finished holder measures about 6 in (15.2 cm) in diameter and 20 in (50.8 cm) tall, not counting the hanging strap. The strap rises about 6 in (15.2 cm) above the rim.
Construction is simple and seamless. You crochet a flat base, turn it upward into the cream bottom band, and work the brown mesh in rounds. Three turned rows leave a slit for the dispensing hole. A cream top band closes the rim, and both bands get shell scallops. Finally you sew on the ring, the face pieces and the strap.
Finished Size and Construction
- Finished size: 6 in (15.2 cm) diameter, 19 in (48.3 cm) circumference, 20 in (50.8 cm) tall
- Flat width (pressed flat): 9.5 in (24.1 cm)
- Skill level: Easy-intermediate
- Terminology: US
- Yarn weight: Worsted (#4)
- Hook: 5.0 mm (H-8)
- Number of pieces: 1 main body, plus 7 small appliqués (bow, 2 eyes, smile, 2 buttons, hole ring) and 1 strap
- Layout: Single vertical tube, with the face centered on the front
- Piece size: Base 6 in (15.2 cm); mesh section 17.25 in (43.8 cm) tall
- Size before border: About 18.5 in (47.0 cm) tall, from the bottom band through the last mesh round
- Border depth: Top band about 1.4 in (3.6 cm); bottom band about 1.25 in (3.2 cm), including scallops
Materials
Use a smooth worsted-weight cotton or acrylic. Cotton holds the mesh shape well and washes easily. Acrylic is lighter and a little stretchier. Avoid fuzzy yarns, because they hide the diamond pattern.
- Brown (main): 100 g / 180 m
- Cream (bands, scallops, hole ring): 50 g / 90 m
- Olive green (bow): 5 g / 9 m
- Red (buttons): 5 g / 9 m
- White (eyes, smile): 3 g / 5 m
- Black (eye centers): 2 g / 3 m
Tools:
– 5.0 mm (H-8) crochet hook
– Tapestry needle
– 4 locking stitch markers
– Scissors
– Measuring tape
– Rustproof pins for blocking
All quantities include a safety margin of about 25 percent.
Abbreviations (US Terms)
- ch – chain
- sc – single crochet
- dc – double crochet
- sl st – slip stitch
- sk – skip
- st(s) – stitch(es)
- MR – magic ring
- BLO / FLO – back loop only / front loop only
- inc – 2 sc in the same stitch
Special stitches
– Mesh loop: ch 5, then sc in the next ch-5 loop.
– Round-end join: ch 2, dc in the first sc of the round. This forms the last loop and leaves your hook at the center of the first loop, ready for the next round.
– Shell: 5 dc in the same stitch.
Gauge and Checkpoints
Check your gauge on the base first. The base is a real part of the holder, so it doubles as your test piece.
- Sc gauge: 14 sc and 15 rounds = 4 in (10.2 cm)
- Mesh gauge: 4 loops = 3.5 in (8.9 cm) wide, and 4 rounds = 3 in (7.6 cm) tall
Checkpoints
1. After base Round 10: diameter 5.5 in (14.0 cm)
2. After base Round 11: diameter 6 in (15.2 cm)
3. After bottom band Round 15: the tube is 6 in (15.2 cm) across and the wall is 1.1 in (2.8 cm) tall
4. After mesh Round 3: 3.5 in (8.9 cm) total height from the base
5. After mesh Round 23: about 18.5 in (47.0 cm) total height
If the base is too big, go down one hook size. If it is too small, go up one. If only the mesh is off, change only the chain length: use ch 4 for a tighter mesh or ch 6 for a looser one. Keep the loop count at 22 either way.
Base and Bottom Band
Start with brown. Join each round with a sl st to the first sc and ch 1. The ch 1 does not count as a stitch.
Round 1: In MR, 6 sc. (6)
Round 2: Inc in each st around. (12)
Round 3: (Sc 1, inc) 6 times. (18)
Round 4: (Sc 2, inc) 6 times. (24)
Round 5: (Sc 3, inc) 6 times. (30)
Round 6: (Sc 4, inc) 6 times. (36)
Round 7: (Sc 5, inc) 6 times. (42)
Round 8: (Sc 6, inc) 6 times. (48)
Round 9: (Sc 7, inc) 6 times. (54)
Round 10: (Sc 8, inc) 6 times. (60)
Change to cream on the final sl st and cut brown.
Round 11 (cream): (Sc 9, inc) 6 times. (66)
The base now measures 6 in (15.2 cm).
Round 12: Sc in BLO of each st around. (66)
This turns the edge upward and leaves a ring of free front loops from Round 11 along the bottom rim. You will work the bottom scallops into those loops later.
Rounds 13–15: Sc in each st around. (66)
Place a marker in the joining stitch and call it the center front. Every mesh round starts here, so the slit lines up below the face.
Diamond Mesh Body
Join brown in the marked center-front stitch. Cut cream.
Round 1: Ch 1, sc in the same st, (ch 5, sk 2, sc in next st) 21 times. Ch 2, sk 2, then dc in the first sc. (22 loops)
Check: 22 loops × 3 stitches each = 66 stitches used, which matches Round 15.
Rounds 2–3: Ch 1, sc in the loop formed by the dc, (ch 5, sc in next loop) 21 times. Ch 2, dc in the first sc. (22 loops)
Dispensing Slit (Rows 4–6)
These three rows are worked back and forth. This leaves a vertical gap at center front, about 2.25 in (5.7 cm) tall.
Row 4: Ch 1, sc in the loop formed by the dc, (ch 5, sc in next loop) 21 times. Do not join. Turn. (22 sc, 21 loops)
The gap sits between the first and last sc.
Row 5: Ch 3 (this is the edge half-loop), sc in the first ch-5 loop, (ch 5, sc in next loop) 20 times. Ch 2, dc in the last sc. Turn. (21 sc, 20 full loops + 2 half-loops)
Row 6: Ch 1, sc in the dc, (ch 5, sc in next loop) 20 times, ch 5, sc in the 3rd ch of the turning ch. Do not turn. (22 sc, 21 loops)
Bridge: Ch 2, dc in the first sc of Row 6. This closes the top of the slit and forms loop 22. (22 loops)
Upper Mesh
Rounds 7–23: Ch 1, sc in the loop formed by the dc, (ch 5, sc in next loop) 21 times. Ch 2, dc in the first sc. (22 loops in every round)
Fasten off brown. The mesh is 23 tiers tall: 23 × 0.75 in = 17.25 in (43.8 cm).
Top Band and Scalloped Edgings (Border)
Border gauge: Same as the sc gauge, 14 sc = 4 in (10.2 cm). Each shell repeat covers 6 stitches, or about 1.7 in (4.3 cm).
If you press the tube flat, each face has 33 stitches.
Top Band Round 1 (conversion round): Join cream in any loop. Work 3 sc in each ch-5 loop around, including the ch-2/dc loop. Join. (22 loops × 3 sc = 66 sc; 33 per flattened side)
Round 2: Sc in BLO of each st. (66)
Rounds 3–5: Sc in each st. (66)
Fasten off.
Top scallops: Turn the holder upside down. Join cream in a free front loop of Top Band Round 1. Work (sc in this front loop, sk 2, shell in next front loop, sk 2) 11 times. Join. (11 shells; 66 front loops used)
The shells hang down over the top of the mesh.
Bottom scallops: Join cream in a free front loop of base Round 11. Work (sc, sk 2, shell, sk 2) 11 times into the front loops. Join. (11 shells; 66 front loops used)
Why the math works: Each band has 66 stitches, and 66 ÷ 6 = 11 shells with nothing left over. On the mesh side, 22 loops × 3 = 66, so the top band sits flat without ruffling or pulling in.
Appliqués
Leave a 12 in (30.5 cm) tail on each appliqué for sewing.
Hole Ring (cream)
Ch 20 and join into a ring. Do not twist the chain.
Round 1: Ch 1, then work 24 sc over the chain ring. (24)
Round 2: (Sc 3, inc) 6 times. (30)
The opening is 1.8 in (4.6 cm) across and the outer edge is 2.75 in (7.0 cm).
Bow (olive green)
Ch 10.
Row 1: Sc in the 2nd ch from hook and in each ch across. Turn. (9)
Rows 2–6: Ch 1, sc across. Turn. (9)
The rectangle measures about 2.6 × 1.6 in (6.6 × 4.1 cm). Wrap green yarn 8 times tightly around the center to cinch it. The finished bow is about 2.5 in (6.4 cm) wide.
Eyes (make 2)
Round 1 (black): In MR, 6 sc. Join, changing to white. (6)
Round 2 (white): Inc in each st. Join. (12)
Each eye is about 1 in (2.5 cm) across.
Buttons (make 2, red)
Round 1: In MR, 6 sc. (6)
Round 2: Inc in each st. (12)
Round 3: (Sc 1, inc) 6 times. (18)
Each button is about 1.5 in (3.8 cm) across.
Smile (white)
Ch 14, then sl st in the back bump of each ch from the 2nd ch across. (13 sl sts)
The smile is about 2.5 in (6.4 cm) long.
Strap (brown)
Ch 61, then sc in the 2nd ch from hook and in each ch across. (60)
The strap is 15 in (38.1 cm) long.
Assembly
- Center the ring over the slit. Sew its inner edge to the mesh all the way around. The slit ends tuck under the ring band.
- Sew the bow centered just below the top scallops.
- Sew the eyes on mesh Round 20, with 1.5 in (3.8 cm) between their centers.
- Pin the smile in a curve on Round 18 and stitch it down.
- Sew one button on Round 15 and the second on Round 12.
- Sew the strap ends inside the top band at the left and right side folds, directly opposite each other.
Final Blocking
- Wash the holder gently or spritz it until damp.
- Slide a 6 in (15.2 cm) jar, or a rolled towel, into the tube.
- Ease the mesh until the diamonds are even and the height reads 20 in (50.8 cm).
- Pin each scallop flat: the top shells point down and the bottom shells sit flat at the rim.
- Pin the bow ends and the ring round.
- Let it dry completely before removing the form.
Final Quality-Control Checklist
- [ ] The base lies flat and measures 6 in (15.2 cm)
- [ ] Every mesh round has 22 loops
- [ ] The slit is centered under the face
- [ ] The top band has 66 sc, and each scallop edging has 11 shells
- [ ] The ring hides both ends of the slit
- [ ] The eyes are level and the smile is symmetrical
- [ ] The strap is secure and the holder hangs straight
- [ ] All ends are woven in at least 1 in (2.5 cm)
Troubleshooting
- The base cups: Your tension is tight. Use a larger hook for the base only.
- The base ruffles: Your tension is loose, or you added extra increases. Recount each round.
- The mesh twists in a spiral: Make sure every round starts in the loop formed by the dc, not in the next loop.
- The slit is off-center: The marker drifted. Check that each mesh round starts above center front.
- The top band pulls in: Use 3 sc per loop, never 2.
- The scallops flare: Make sure you skip 2 stitches on each side of every shell.
- The holder sags when full: Sew the strap through both the band and the first mesh round.
Care
Hand wash in cool water and lay flat to dry, reshaping it over a jar. Don’t tumble dry, because heat can relax the mesh.
Final Notes
The measurement chain is simple. A 66-stitch base gives a 6 in (15.2 cm) tube. Twenty-two mesh loops keep the circumference at 19 in (48.3 cm), and 23 mesh tiers give a body of 17.25 in (43.8 cm). Adding the 1.25 in (3.2 cm) bottom band and the 1.4 in (3.6 cm) top band brings the holder to about 20 in (50.8 cm). If you check your size at every stage, Ginger Jack will hang straight and hold plenty of bags.
Happy crocheting!