

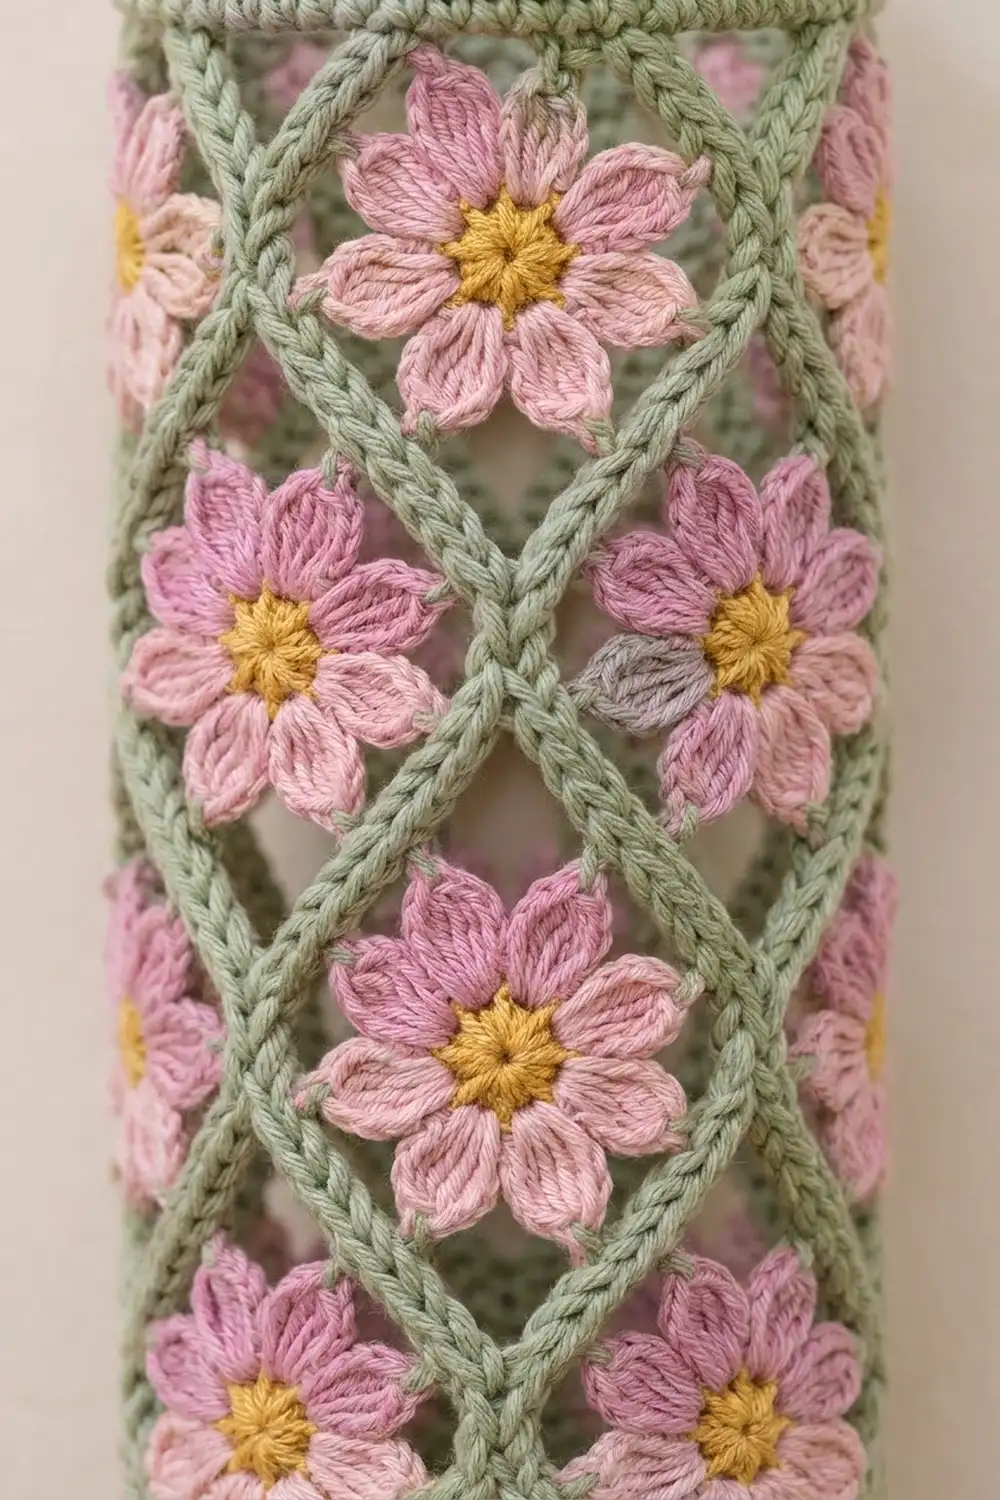
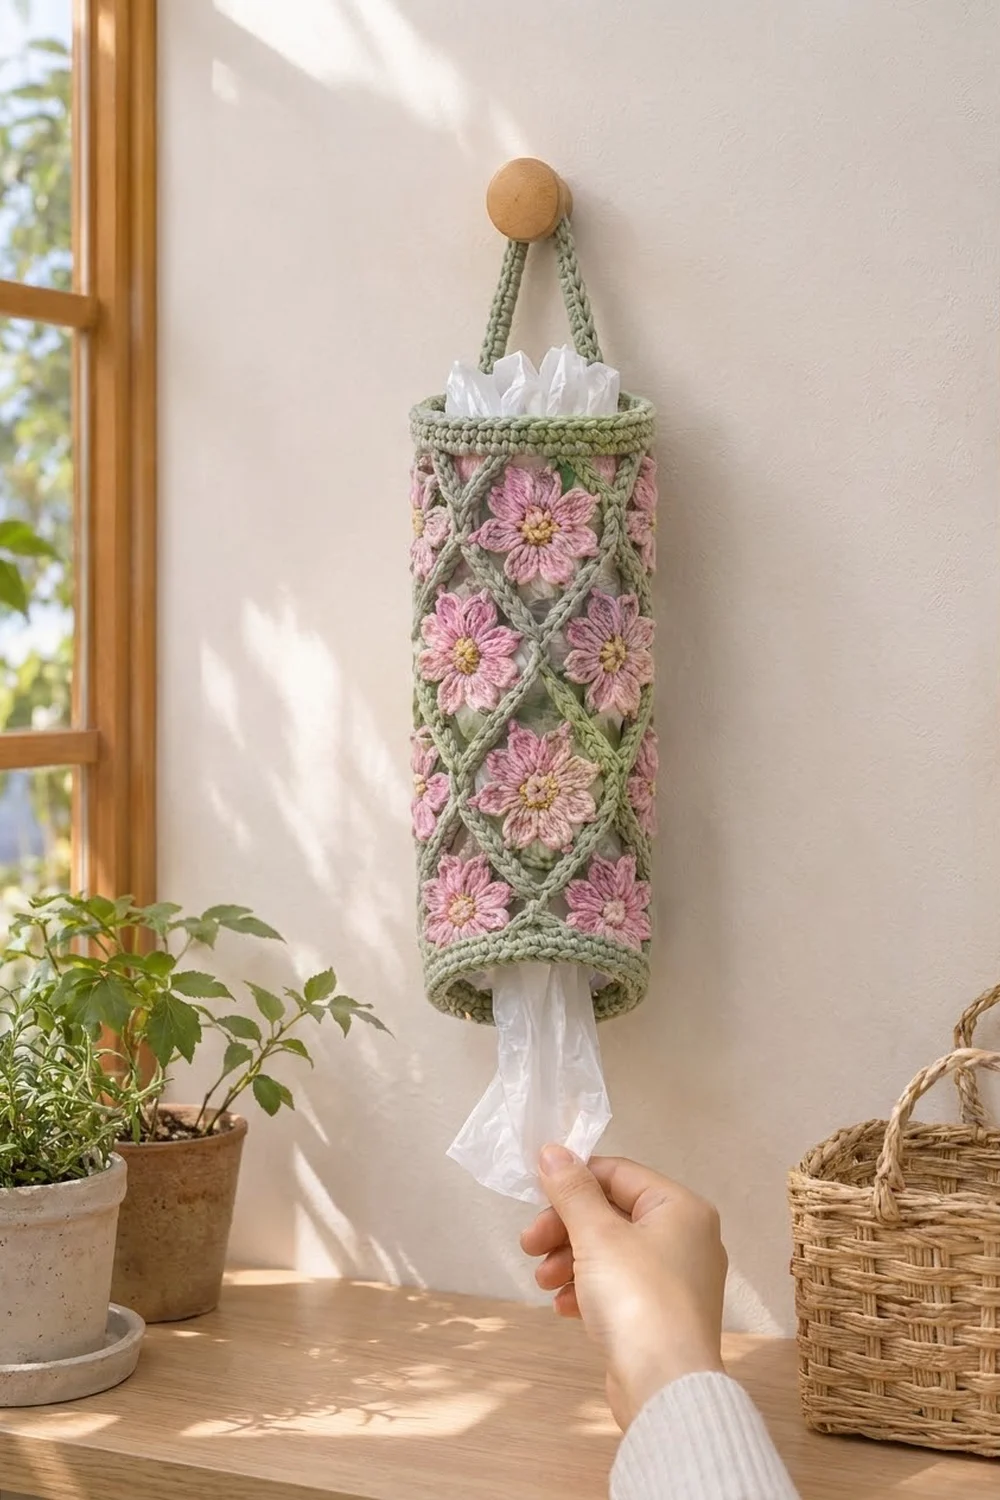
The Cosmos Trellis Plastic Bag Holder is a tall, slim tube that hangs from a peg and keeps grocery bags tidy. You push bags in at the top and pull them out through the bottom. The body is an open diamond lattice of thick sage green bars, and each diamond holds a small pink flower with a golden center.
The palette is soft and cottage-style: sage green for the frame, two pinks for the flowers and a warm yellow for the centers. Alternating rose and blush flowers gives the surface gentle movement without looking busy.
This pattern uses US crochet terms. The finished holder is 14 in (35.6 cm) tall with a 15 in (38.1 cm) circumference, which is about 4.75 in (12.1 cm) across. The hanging loop adds a 6 in (15.2 cm) strap.
You work the body bottom-up in joined rounds: a solid bottom rim, 12 lattice tiers, then a solid top rim. Next you make 66 flowers and sew one into each diamond. A crab-stitch edge on both rims and a sewn-on strap finish the holder.
Finished Size and Construction
- Finished size: 14 in (35.6 cm) tall × 15 in (38.1 cm) circumference
- Skill level: Intermediate
- Terminology: US crochet terms
- Yarn weight: Worsted (#4), cotton or cotton blend
- Hook: 4.5 mm (US 7)
- Number of pieces: 1 tube body, 1 strap and 66 flower appliqués, assembled into one holder
- Layout: 6 diamonds around × 11 staggered diamond levels
- Flower size: 2 in (5.1 cm) across
- Size before border: 14 in (35.6 cm) tall, 60 stitches around each rim
- Border depth: 1 round of reverse single crochet on each rim, about 0.25 in (0.6 cm)
Materials
Use a smooth cotton or cotton-blend worsted yarn. Cotton holds the lattice open and does not stretch out under the weight of the bags. Avoid fuzzy yarn, because it hides the bar texture.
- Sage green (MC): 120 g / 192 m for the rims, lattice, strap and border
- Rose pink (A): 45 g / 72 m for 33 flowers
- Blush pink (B): 45 g / 72 m for 33 flowers
- Golden yellow (C): 30 g / 48 m for 66 flower centers
Tools:
– 4.5 mm (US 7) crochet hook
– Tapestry needle
– Stitch markers (at least 7)
– Scissors
– Measuring tape
– Rust-proof pins and a blocking surface
– A rolled towel or a 4.75 in (12.1 cm) wide bottle or tube for blocking
All quantities already include a margin of about 15% for swatching and weaving in ends.
Abbreviations (US Terms)
- ch: chain
- sl st: slip stitch
- sc: single crochet
- fsc: foundation single crochet
- dc: double crochet
- tr: treble crochet
- rev sc: reverse single crochet (crab stitch)
- sk: skip
- sp: space
- st(s): stitch(es)
- rnd(s): round(s)
Special stitches:
Petal: Work (ch 3, tr, ch 2, sl st in top of the tr just made, tr, ch 3, sl st) all in the same stitch. The ch-2 sl st makes the pointed tip.
Rev sc: Work single crochet from left to right (right-handed) into the next stitch to the right. This makes a twisted, rope-like edge.
Gauge and Checkpoints
Gauge: 16 sc and 20 rnds = 4 in (10.2 cm) in sc worked in joined rounds.
Before you start the holder, test one flower. It should measure 2 in (5.1 cm) across from petal tip to petal tip. If it is wider than 2.25 in (5.7 cm), it will crowd the diamonds.
Checkpoints:
– Bottom rim (Rnd 5): 15 in (38.1 cm) around, or 7.5 in (19.1 cm) wide laid flat, and 1 in (2.5 cm) tall.
– After Tier 1 (Rnd 7): 2 in (5.1 cm) total height.
– After Tier 6 (Rnd 17): 7 in (17.8 cm) total height.
– After Tier 12 (Rnd 29): 13 in (33.0 cm) total height.
– After the top rim (Rnd 34): 14 in (35.6 cm) total height.
Each lattice tier (one mesh round plus one cover round) adds about 1 in (2.5 cm) when the tube is gently stretched lengthwise.
If your piece is too big, go down 0.5 mm in hook size. If it is too small, go up 0.5 mm. Don’t change the stitch counts, because the lattice depends on 60 stitches dividing into 6 repeats of 10.
Body
Bottom Rim
With MC:
Rnd 1: Fsc 60. Join with a sl st to the first fsc, making sure the strip is not twisted. (60 sts)
Rnds 2–5: Ch 1, sc in each st around, join with a sl st to the first sc. (60 sts)
Checkpoint: the rim measures 15 in (38.1 cm) around and 1 in (2.5 cm) tall.
Lattice
Each tier has two rounds: a mesh round of chain loops and a cover round that wraps each loop in sc. The cover round makes the thick, rope-like bars. Each new mesh round is anchored to the center of the covered loops below it, which staggers the loops into diamonds.
Tier 1, Rnd 6 (mesh): Ch 1, sc in the first st. Ch 10, sk 9 sts, sc in the next st. Repeat from * to * 4 more times. Ch 10, sk the last 9 sts and join with a sl st to the first sc. (6 sc anchors and 6 ch-10 loops)
The anchors sit in sts 1, 11, 21, 31, 41 and 51. That gives 6 repeats of 10, which uses all 60 sts.
Tier 1, Rnd 7 (cover): Ch 1, work 13 sc in each ch-10 sp around, working over the anchor sc without stitching into it. Join with a sl st to the first sc. (6 loops × 13 sc = 78 sc)
The 7th sc of each covered loop is the loop’s center point. Place a marker in each one.
Tier 2, Rnd 8 (mesh): Sl st in the next 6 sc to reach the 7th sc of the first loop. Ch 1, sc in the same st. Ch 10, sk 12 sc, sc in the 7th sc of the next loop. Repeat from * to * 4 more times. Ch 10, sl st to the first sc. (6 sc anchors and 6 ch-10 loops)
Tier 2, Rnd 9 (cover): Repeat Rnd 7. (78 sc)
Tiers 3–12 (Rnds 10–29): Repeat Rnds 8 and 9 ten more times. You now have 12 tiers in total, and every cover round ends with 78 sc.
Move your markers up to the new 7th sc of each loop after every cover round.
Checkpoint: after Tier 6 the body is 7 in (17.8 cm) tall, and after Tier 12 it is 13 in (33.0 cm) tall.
Top Rim
Rnd 30 (conversion): Sl st in the next 6 sc to reach the 7th sc of the first loop. Ch 1, sc in the same st. Ch 9, sk 12 sc, sc in the 7th sc of the next loop. Repeat from * to * 4 more times. Ch 9, sl st to the first sc. (6 sc + 54 ch = 60 sts)
Rnd 31: Ch 1, sc in each sc and in each ch around, join. (6 sc worked into the existing sc + 54 sc worked into chains = 60 sc)
Rnds 32–34: Ch 1, sc in each st around, join. (60 sts)
Fasten off and weave in the ends. The top rim is 1 in (2.5 cm) tall, and the body now measures 14 in (35.6 cm).
The ch-9 spans pull the tier-12 loop peaks into a straight line. This leaves 6 small triangular gaps under the top rim, matching the 6 gaps above the bottom rim.
Flowers
Make 66 flowers: 33 with Color A petals and 33 with Color B petals. All centers are Color C.
Rnd 1: With C, make a magic ring. Ch 1, work 8 sc in the ring, and join with a sl st to the first sc. (8 sc) Pull the ring closed and fasten off.
The center measures about 0.75 in (1.9 cm) across.
Rnd 2: Join A or B with a sl st in any sc. Work 1 Petal in the same sc and 1 Petal in each of the next 7 sc. (8 petals) Join with a sl st to the base of the first petal and fasten off. Leave a 12 in (30.5 cm) tail on every flower for sewing.
Checkpoint: the flower measures 2 in (5.1 cm) across, tip to tip, and lies flat. Weave in the yellow tails on the back, but keep the pink sewing tail.
Attach the Flowers
The body has 66 full diamonds: 6 around on each of 11 staggered levels.
- Each diamond is bounded by four half-bars and measures about 2.5 in (6.4 cm) wide × 2 in (5.1 cm) tall when stretched.
- The lowest level of diamonds has its bottom points on the bottom-rim anchors.
- The highest level has its top points at the tier-12 loop centers.
- The triangles touching each rim stay open.
Slide a rolled towel or bottle into the tube so the lattice is held open at full size.
Starting at the bottom level, center one flower over each diamond. Alternate A and B flowers around each level, so you get 3 of each color per level. On the next level up, shift the colors by one so that same-color flowers never touch.
Use the pink tail to sew through the back loops of the petal edges to the inside edge of the four bars around the diamond. Take a stitch at each petal base and a tack stitch at 4 of the petal tips (top, bottom, left and right) where they overlap the bars. The other 4 tips float freely over the bars, which gives the slightly raised, layered look.
Keep the sewing tension relaxed. A flower pulled too tight cups inward and narrows the diamond.
Weave each tail along the back of the bars and trim.
Border
Border gauge: 60 rev sc = 15 in (38.1 cm). That is 4 sts per inch, the same as the body sc gauge, so the border lies flat and does not flare or pull in.
Top edge: With MC and the top rim facing you, join with a sl st in any st of Rnd 34. Ch 1, work 1 rev sc in each st around, then join. (60 rev sc) Fasten off.
Bottom edge: Turn the holder upside down. Join MC in any st along the foundation edge of Rnd 1. Ch 1, work 1 rev sc in each st around, then join. (60 rev sc) Fasten off.
Why the math works: Each rim has exactly 60 sts, 6 lattice repeats × 10 sts, and the border uses 1 rev sc per st. You add no stitches at seams or “corners”, because the tube has neither. The edge count matches the body count exactly.
Strap
Row 1: With MC, ch 4. Sc in the 2nd ch from the hook and in the next 2 ch, then turn. (3 sc)
Rows 2–34: Ch 1, sc in each st, then turn. (3 sc)
The strap measures 0.75 in (1.9 cm) wide × 6.8 in (17.3 cm) long. Fasten off, leaving a 12 in (30.5 cm) tail.
Count the top rim and mark sts 1–3 and 31–33. These two spots sit exactly 30 sts apart, on opposite sides of the tube.
Lay 2 rows of one strap end inside the rim behind sts 1–3 and whipstitch them in place. Sew the other end behind sts 31–33 the same way. This leaves a 6 in (15.2 cm) free loop.
Make sure the strap is not twisted before you sew the second end.
Final Blocking
- Lightly spray the holder with water until it is damp, not soaked.
- Slide in a bottle or rolled towel 4.75 in (12.1 cm) across so the tube is round.
- Gently stretch the tube lengthwise to 14 in (35.6 cm) and check that the diamond rows are level.
- Press each flower flat with your fingertips and straighten any curled petal tips.
- Pin the rims evenly so the rev sc edges sit round and smooth.
- Lay the strap flat beside the tube and pin it straight.
- Let it dry completely before removing the form.
Final Quality-Control Checklist
- [ ] Both rims measure 15 in (38.1 cm) around.
- [ ] The body measures 14 in (35.6 cm) tall.
- [ ] The tube has 12 lattice tiers, and every cover round has 78 sc.
- [ ] The lattice has 6 diamonds around, and all diamond rows are level.
- [ ] All 66 flowers are attached, alternating rose and blush.
- [ ] Each flower measures 2 in (5.1 cm) and lies flat.
- [ ] Both rev sc edges have 60 sts.
- [ ] The strap is untwisted and attached at sts 1–3 and 31–33.
- [ ] All ends are woven in on the inside.
Troubleshooting
The lattice spirals around the tube. You are anchoring in the wrong sc. Always anchor in the 7th of 13 sc and use markers.
The bars look thin or gappy. Your cover-round sc are too loose. Pack all 13 sc snugly over the chain.
The diamonds are too small for the flowers. Your chains are tight. Loosen the ch-10, or go up 0.5 mm for the mesh rounds only.
The flowers cup. The sewing is too tight, or Rnd 1 has too few sc. Re-sew loosely and confirm you have 8 sc in the center.
The top rim ruffles. Check that Rnd 30 used ch 9, not ch 10. It must total 60 sts.
The rims flare. Work the rev sc with a hook 0.5 mm smaller.
Care
Hand wash in cool water with mild soap, press out the water in a towel, and dry flat over a bottle form to keep the tube shape. Do not tumble dry.
Final Notes
Everything in this holder rests on one number: 60 stitches. Sixty sc gives a 15 in (38.1 cm) circumference and splits into 6 lattice repeats of 10. Each mesh round has 6 ch-10 loops, and each cover round turns them into 78 sc. Twelve tiers add 12 in (30.5 cm). The ch-9 conversion brings the count back to 60 for the top rim, and the 1 in (2.5 cm) rims at each end bring the body to 14 in (35.6 cm). Sixty-six 2 in (5.1 cm) flowers fill the diamonds, and a 60-stitch crab edge finishes both openings.
If you check your measurements at each checkpoint, the holder will come out at the right size.
Happy crocheting!