

The Cottage Bloom Café Curtain is a light, lacy window panel made from rows of eight-petal flower motifs in soft cream cotton. Each flower has an open center ring, a ring of dc spokes, and eight rounded petals with a small chain tip. The flowers meet tip to tip and leave small open diamond spaces between them, so daylight comes through the whole panel.
The style is classic cottage kitchen: one natural color, lots of texture, and a scalloped lower edge formed by the flowers themselves. A solid band of dc runs across the top, and eight tab loops slide straight onto a wooden café rod. The pattern uses US crochet terms throughout.
The finished curtain measures 32 in (81.3 cm) wide and 13.75 in (34.9 cm) tall from the bottom petal tips to the top of the band. The tab loops rise about 1.5 in (3.8 cm) above that. It is sized for a standard café rod across the lower half of a window.
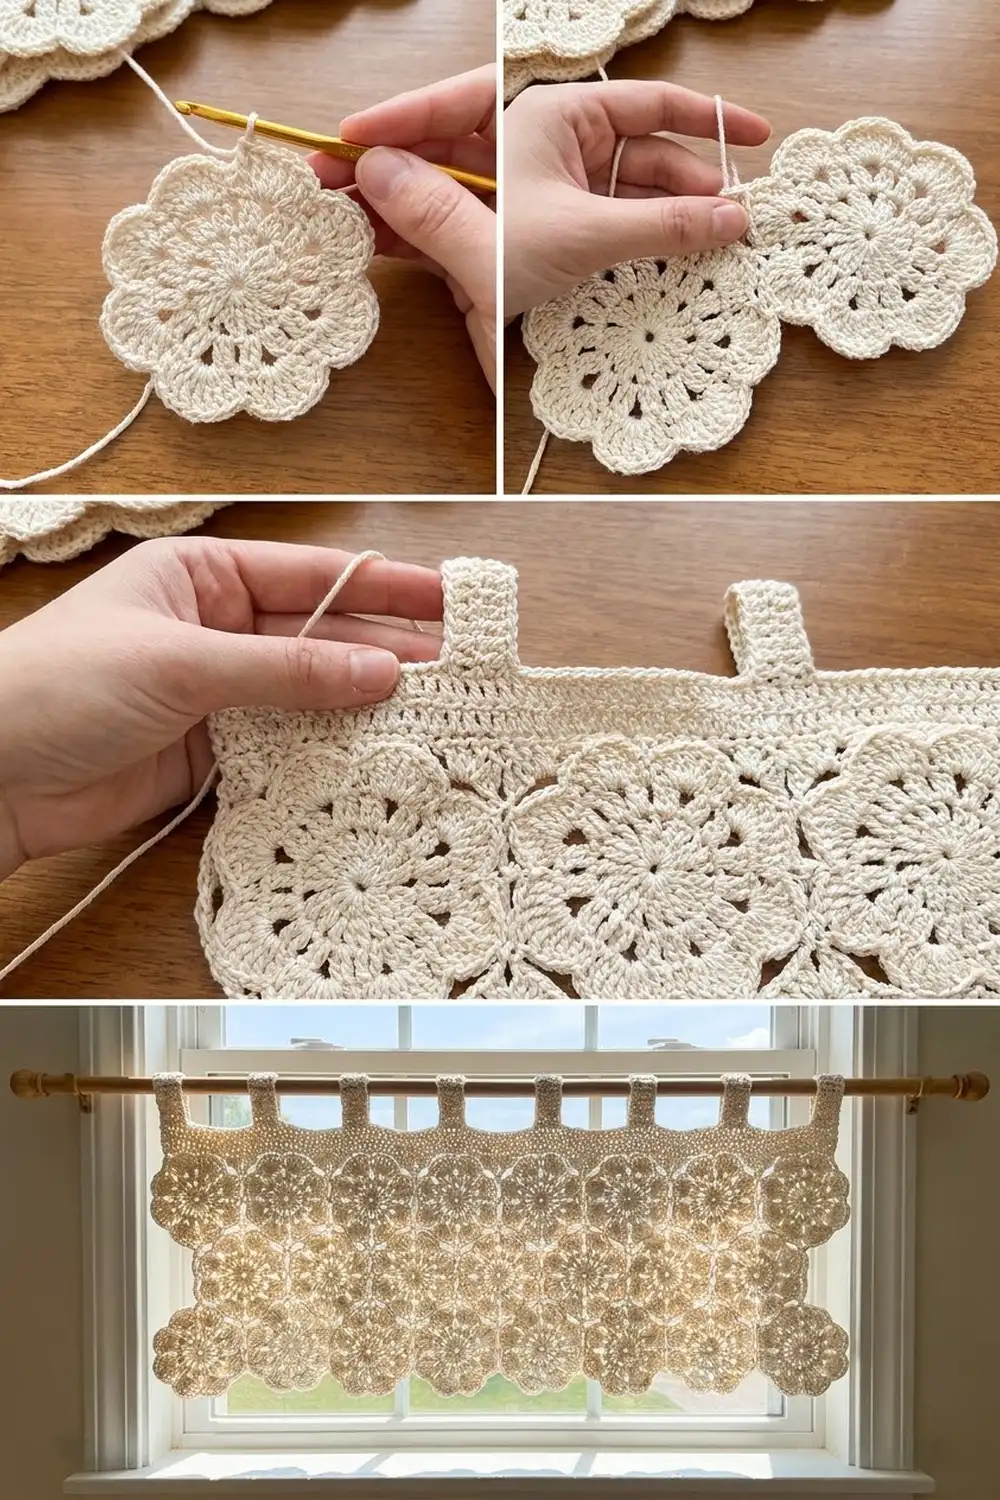
Construction is simple. You make 24 flower motifs and join them as you go on the last round, making a grid 8 across and 3 down. Then you work a straightening row and a dc header band across the top, add the tabs, and block the panel flat.
Finished Size and Construction
- Finished size: 32 in (81.3 cm) wide x 13.75 in (34.9 cm) tall, plus tabs
- Skill level: Intermediate
- Terminology: US crochet terms
- Yarn weight: DK / light (#3) cotton
- Hook: 3.5 mm (E-4)
- Number of pieces: 24 flower motifs, joined as you go, plus 8 tabs
- Layout: 8 motifs across x 3 motifs down
- Motif size: 4 in (10.2 cm) tip to tip
- Size before header band: 32 in (81.3 cm) x 12 in (30.5 cm)
- Header band depth: 1.75 in (4.4 cm)
Materials
Choose a smooth mercerized or combed cotton in DK weight. Cotton holds the petal shapes crisply, blocks well, and stretches very little when it hangs in sunlight. Avoid fuzzy or very soft yarns, because they blur the lace.
- Cream / ecru: 320 g, about 700 m (766 yd). That is 7 balls of 50 g / 110 m (120 yd) each.
These amounts include a margin of roughly 20 percent for gauge swatches, tails, and small differences in tension.
Tools:
- 3.5 mm (E-4) crochet hook
- Tapestry needle
- Stitch markers (at least 4)
- Rust-proof pins and a blocking board or foam mats
- Spray bottle
- Measuring tape
- Scissors
Abbreviations (US Terms)
- ch – chain
- sl st – slip stitch
- sc – single crochet
- hdc – half double crochet
- dc – double crochet
- tr – treble crochet (yarn over twice)
- dtr – double treble crochet (yarn over three times)
- sp – space
- st(s) – stitch(es)
- RS – right side
Special stitch – Petal: (sc, hdc, 3 dc, ch 3, 3 dc, hdc, sc) all in the same ch-5 loop. Each Petal has 10 sts plus one ch-3 tip.
Special stitch – Joining Petal: (sc, hdc, 3 dc, ch 1, sl st in the ch-3 tip of the matching petal on the neighboring motif, ch 1, 3 dc, hdc, sc) all in the same ch-5 loop. The “ch 1, sl st, ch 1” takes the place of the ch-3 tip, so the petal stays the same size.
Gauge and Checkpoints
Header band gauge: 20 dc and 9 rows = 4 in (10.2 cm) in rows of dc.
Motif gauge: One finished motif measures 4 in (10.2 cm) from one petal tip to the opposite petal tip, after a light spray or steam.
Make one complete motif before anything else and measure it. Check these points as you go:
- After Round 1: 1 in (2.5 cm) across
- After Round 2: 2 in (5.1 cm) across
- After Round 3: 2.75 in (7.0 cm) across
- After Round 4: 4 in (10.2 cm) tip to tip
If your motif is larger than 4 in (10.2 cm), go down to a 3.25 mm hook. If it is smaller, go up to a 3.75 mm hook. Being off by only 0.25 in (0.6 cm) per motif adds up to 2 in (5.1 cm) across the eight-motif width, so don’t skip this step.
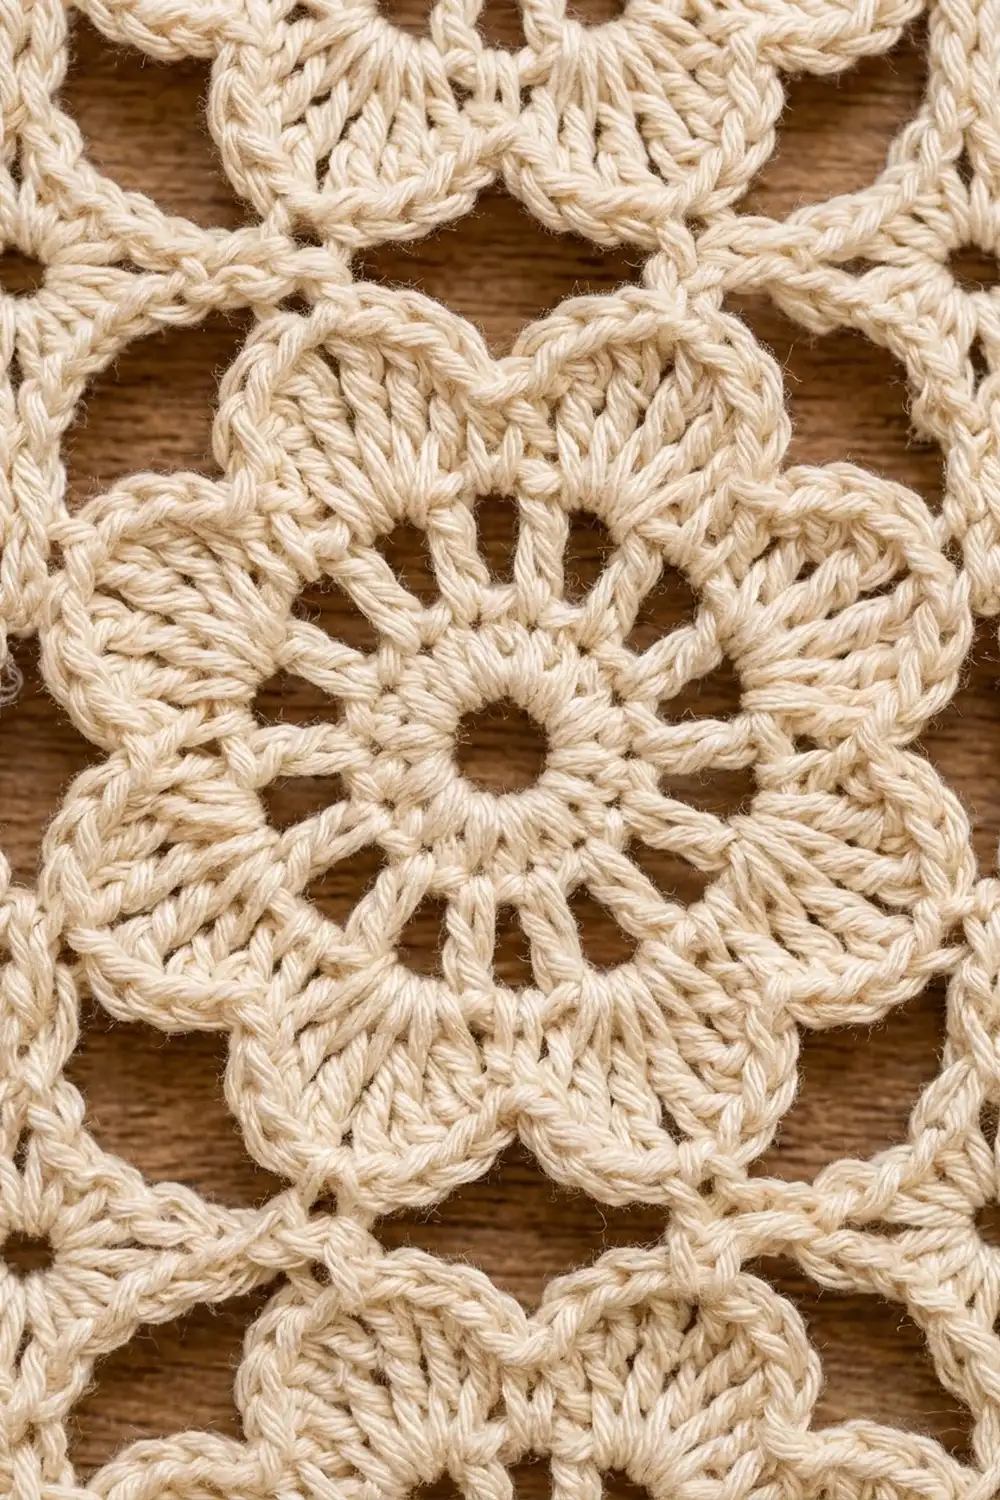
Flower Motif
Work in rounds with the RS facing. Do not turn.
Center ring: Ch 8, then sl st to the first ch to form a ring.
Round 1: Ch 3 (counts as dc), 15 dc in the ring, sl st to the top of the beginning ch-3. (16 dc)
This makes the solid ring around the open center.
Round 2: Ch 4 (counts as dc and ch 1), dc in next dc, ch 1; repeat from * around, sl st to the 3rd ch of the beginning ch-4. (16 dc, 16 ch-1 sps)*
These are the spokes that radiate out from the center.
Round 3: Ch 1, sc in the same st, ch 5, skip the next ch-1 sp, dc, and ch-1 sp, sc in the next dc; repeat from * 6 more times, ch 5, sl st to the first sc. (8 sc, 8 ch-5 loops)*
Each ch-5 loop sits over two spokes and will hold one petal.
Round 4: Sl st into the first ch-5 loop. Work 1 Petal in each ch-5 loop around, then sl st to the first sc. Fasten off. (8 petals: 80 sts and 8 ch-3 tips)
Each petal is a rounded scallop with a small chain point at the top. These points are where the motifs join and where the header band is anchored.
Keep the 3 dc on each side of the tip snug against each other so the petal curves smoothly. If the petals look flat or square, your ch-5 loops are too short. If they flop forward, the loops are too long.
Orientation: Lay the motif flat and name the petals like a compass: N, NE, E, SE, S, SW, W, NW. Joins happen only at the N, E, S, and W tips. The diagonal tips stay free, which makes the small open diamond spaces between the flowers.
Make All Pieces
You need 24 motifs, all in cream.
- Motif A1: Work it completely as written above, with no joins.
- Remaining 23 motifs: Work Rounds 1–3 as written, then work Round 4 with Joining Petals where shown below.
Layout grid (top row is A, the row that carries the header band):
Row A:  A1  A2  A3  A4  A5  A6  A7  A8
Row B:  B1  B2  B3  B4  B5  B6  B7  B8
Row C:  C1  C2  C3  C4  C5  C6  C7  C8
Rows A, B, and C have 8 motifs each: 8 x 3 = 24.
Joining
All joining is done on Round 4 as you go. There is no seaming.
Method: Work Round 4 as usual until you reach a petal that faces a motif you’ve already made. Work that petal as a Joining Petal, slipping into the matching tip. Then go back to regular Petals.
Stitch-to-stitch logic:
- Row A: A2 joins its W tip to the E tip of A1. A3 joins to A2, and so on through A8. That’s one join per motif.
- Row B: B1 joins its N tip to the S tip of A1. B2 through B8 each join their N tip to the motif above and their W tip to the motif on the left. That’s two joins per motif.
- Row C: Same as Row B, joining to Row B above.
That makes 7 joins in Row A, 15 in Row B, and 15 in Row C, for 37 joins in total.
When a motif needs two joins, start Round 4 in the loop just after the N petal and work around so the W and N petals come last. Before you start, put markers in the matching tips of the neighboring motifs so you never join to the wrong point.
Tension advice: Make the ch 1 on each side of the joining sl st the same size as your regular chains. If you pull the sl st tight, it draws the tips together and the motifs cup. If you work it loose, the grid sags. Lay each new motif flat after joining it. The flowers should touch point to point with no ripples, and the diagonal tips should sit at the corners of a small open diamond.
Size checkpoint: After Row A, the strip should measure 32 in (81.3 cm) wide (8 x 4 in / 10.2 cm). After all three rows, the panel should measure 32 in (81.3 cm) x 12 in (30.5 cm), measured tip to tip.
Header Band and Tabs
Only the top edge gets a band. The sides and the lower edge stay as open petal scallops, which gives the curtain its lacy finish.
Border gauge: 20 dc = 4 in (10.2 cm), which is 5 sts per 1 in (2.5 cm). Each motif spans 4 in (10.2 cm), so each motif needs 20 sts across its top.
Row 1 (straightening row)
With RS facing, join the yarn in the free W tip ch-3 of A1. Ch 5 (counts as dtr).
For each of the 8 motifs in Row A, work this repeat:
Ch 4, tr in NW tip, ch 4, sc in N tip, ch 4, tr in NE tip, ch 4, dtr in E tip.
On A1 through A7, the closing dtr goes into the join point, under both joined tips together. On A8, it goes into the free E tip ch-3. Each joint dtr also serves as the starting point for the next motif, so no extra stitch is added at any seam.
Per motif: 4 + 1 + 4 + 1 + 4 + 1 + 4 + 1 = 20 sts (each ch counts as 1 st).
Row total: 1 (starting ch-5) + (8 motifs x 20) = 161 sts.
The tall stitches fill the dips between petals and the sc sits at the high N tip, so the top of the row comes out level.
Rows 2–4
Row 2: Ch 3 (counts as dc), turn. Dc in each st and in each ch across. Work into the chains, not around them. (161 dc)
Row 3: Ch 3 (counts as dc), turn, dc in each dc across. (161 dc)
Row 4: Repeat Row 3. (161 dc)
Row 5
Ch 1, turn, sc in each st across. (161 sc) Fasten off.
Band checkpoint: The band should measure 1.75 in (4.4 cm) from the motif N tips to the top of Row 5, and 32 in (81.3 cm) wide.
Why the math works: 8 motifs x 20 sts = 160 sts, and 160 ÷ 5 = 32 in (81.3 cm), which is exactly the width of the motif grid. The single extra stitch is the starting edge stitch over A1’s W tip. It squares off the corner without adding any width you could measure, so the band doesn’t gather or ruffle the flowers below.
Tabs (make 8)
Tabs are 7 sts wide with 15 sts between them: 8 tabs x 7 sts + 7 gaps x 15 sts = 56 + 105 = 161 sts, which matches Row 5.
Working into Row 5 with RS facing, place the tabs on these sts: 1–7, 23–29, 45–51, 67–73, 89–95, 111–117, 133–139, and 155–161. The first and last tabs sit flush with the side edges.
Tab Row 1: Join the yarn in the first st of a tab position. Ch 3 (counts as dc), dc in the next 6 sts. (7 dc)
Tab Rows 2–8: Ch 3 (counts as dc), turn, dc in each dc across. (7 dc)
Fasten off, leaving a 10 in (25.4 cm) tail. Each tab is 1.4 in (3.6 cm) wide and 3.6 in (9.1 cm) long. Fold the tab to the wrong side and whipstitch its last row to the back of Row 3 of the band. The loop stands about 1.5 in (3.8 cm) above the band and fits a rod up to 1 in (2.5 cm) across.
Each 15-st gap measures 3 in (7.6 cm).
Final Blocking
- Weave in all ends along the back of the dc stitches or through the motif centers before you block.
- Soak the curtain in cool water for 15 minutes. Press the water out gently in a towel; don’t wring it.
- Lay the panel face up on blocking mats.
- Pin the header band first, in a straight line 32 in (81.3 cm) long.
- Pin the panel height to 13.75 in (34.9 cm) at both side edges and at the center.
- Pin every bottom petal tip so the scallops hang evenly, and open each motif to 4 in (10.2 cm).
- Pin the diagonal tips outward slightly to open up the diamond spaces.
- Let it dry completely, then unpin. If you like a crisper look, give the lace a light spray of starch.
Final Quality-Control Checklist
- 24 motifs, 8 across and 3 down
- 37 joins, all at N, E, S, or W tips
- Every motif 4 in (10.2 cm) tip to tip
- Panel 32 in (81.3 cm) wide before and after the band
- Band Row 1: 161 sts; Rows 2–4: 161 dc; Row 5: 161 sc
- Band 1.75 in (4.4 cm) deep and level
- 8 tabs, each 7 sts wide, evenly spaced 15 sts apart
- Tabs sewn on securely and all the same length
- All ends woven in invisibly
Troubleshooting
Motifs cup or ruffle: The Round 3 chains are too tight or too loose. Keep the ch-5 loops relaxed but even, and check against the 2.75 in (7.0 cm) checkpoint.
Joined grid puckers: The joining sl st was pulled tight. Redo the join with looser ch 1s on each side.
Band is wavy: You probably worked around the chains instead of into them on Row 2, or missed a st. Count to 161.
Band pulls the flowers in: Your band gauge is tighter than 5 sts per 1 in (2.5 cm). Go up a hook size for the band rows only.
Tabs are uneven: Count the rows. Each tab needs exactly 8 rows.
Curtain leans to one side: Block it again, and pin the band perfectly straight first.
Care
Hand wash in cool water with a mild detergent and dry flat, re-pinning the petal tips if needed. Don’t hang the curtain while it’s wet, because that can stretch the band.
Final Notes
The whole curtain depends on one chain of measurements. A 4 in (10.2 cm) motif times eight gives 32 in (81.3 cm), and three rows give 12 in (30.5 cm). A 1.75 in (4.4 cm) band brings the panel to 13.75 in (34.9 cm), and 20 band stitches per motif make a 161-stitch header that matches the flowers exactly. Get the first motif right, and every number after it falls into place.
Happy crocheting!