

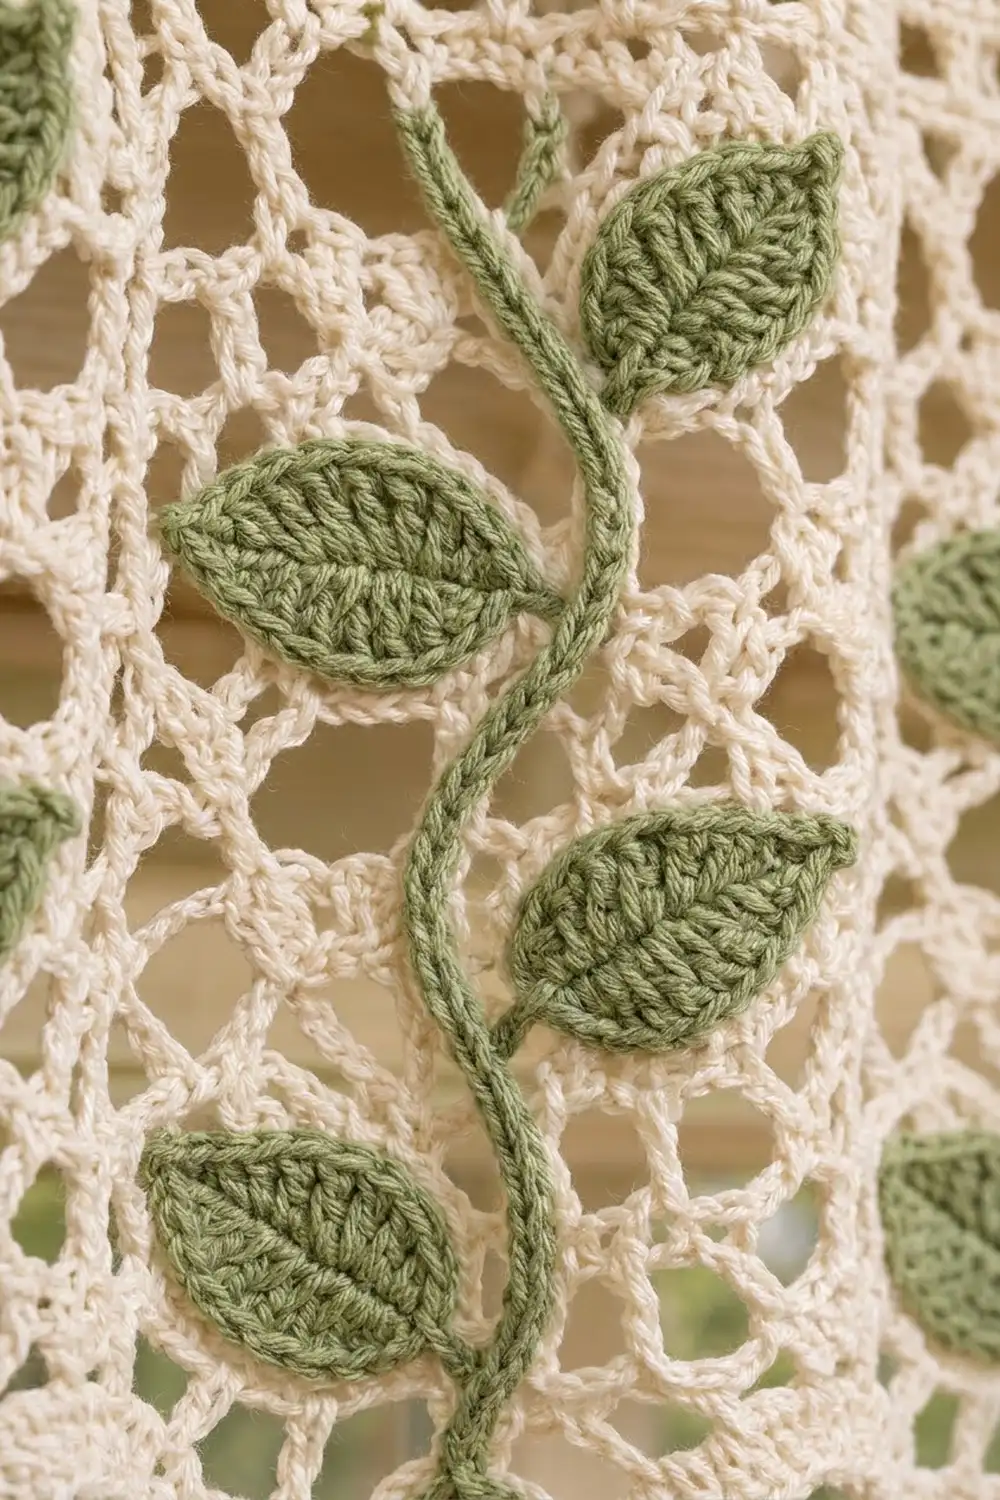
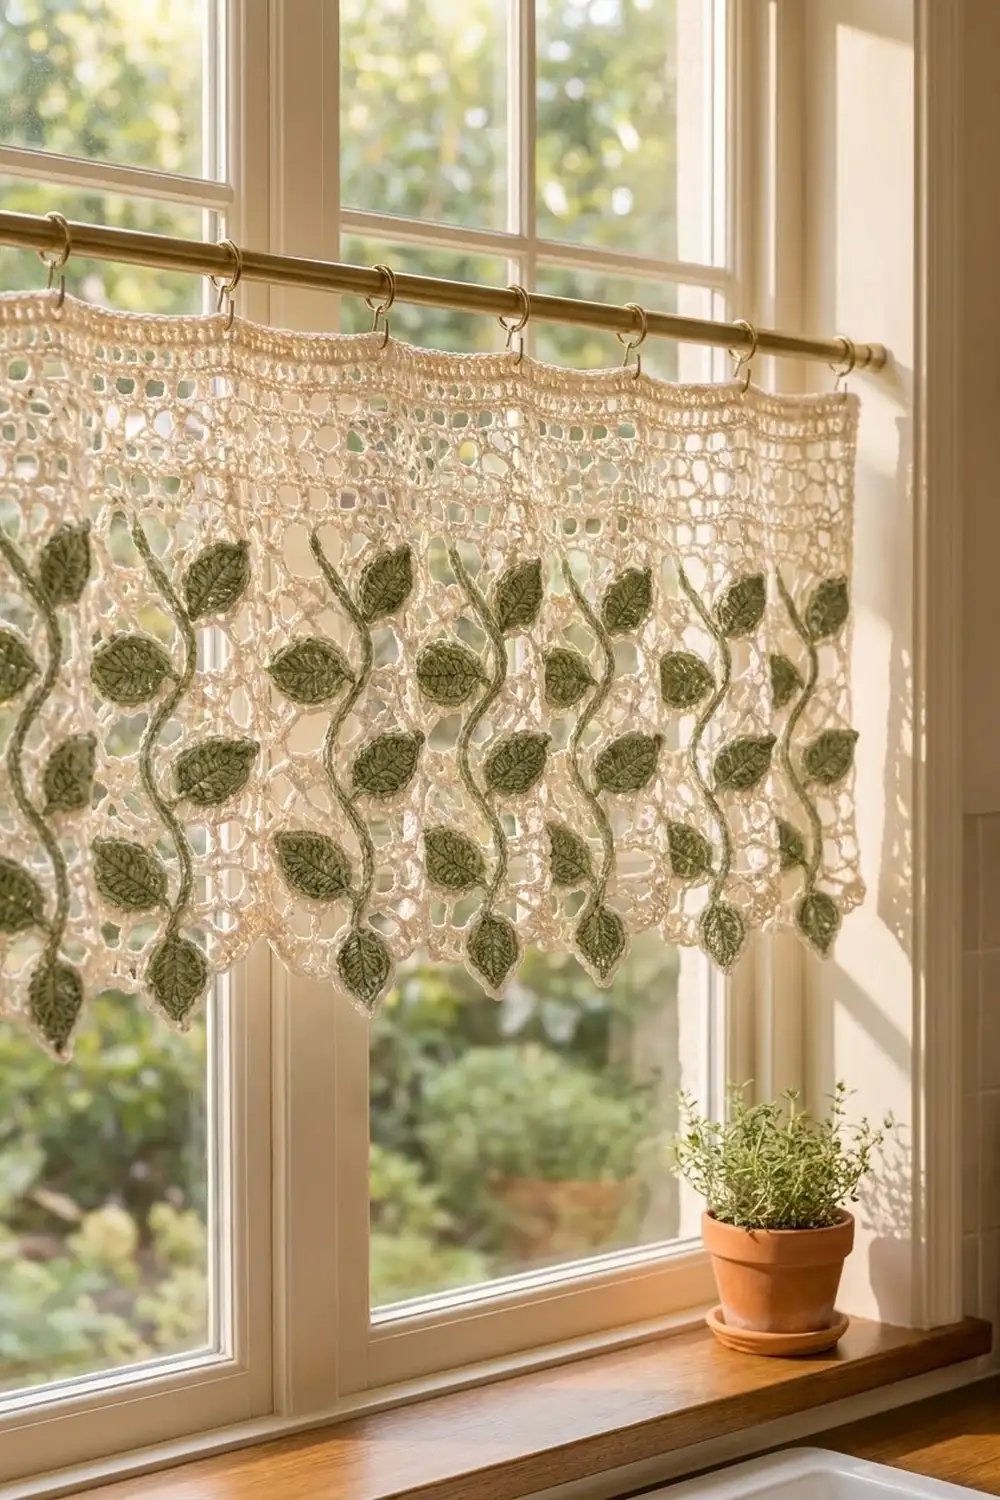
This valance has a soft cottage look. It is a cream open lace mesh with a solid header band at the top. Ten sage green ivy vines climb down the mesh, and each vine ends in a leaf that hangs from a pointed scallop along the bottom edge.
You need only two colors: cream for the lace panel and border, and sage green for the vines and leaves. The style is vintage filet-inspired lace with a raised appliqué layer. All instructions use US crochet terms.
The finished valance measures 45.5 in wide x 17 in tall (115.6 cm x 43.2 cm), measured to the point tips. It hangs from a rod with 11 clip rings.
You work the cream panel in one piece, flat and top-down. It has a header band, 16 rows of open mesh, and then ten separately worked points. Next, you add a two-round border around the whole panel. Finally, you crochet ten wavy stems and 70 leaves in green and sew them on.
Finished Size and Construction
- Finished size: 45.5 in x 17 in (115.6 cm x 43.2 cm), measured to the point tips
- Skill level: Intermediate
- Terminology: US crochet terms
- Yarn weight: Worsted (#4) cotton
- Hooks: 5 mm (H-8) for the panel, 4 mm (G-6) for the appliqués
- Number of pieces: 1 lace panel, plus 10 stems and 70 leaves as appliqués
- Layout: 10 vine sections side by side, each 6 mesh (4.5 in / 11.4 cm) wide
- Size before border: 45 in x 16.5 in (114.3 cm x 41.9 cm)
- Border depth: 0.25 in (0.6 cm) on every edge
Materials
Choose a smooth combed or mercerized cotton in worsted weight. Cotton blocks crisply, holds the points well, and doesn’t stretch as it hangs. Avoid fuzzy yarns, which blur the mesh.
- Cream (main color): 250 g, about 425 m
- Sage green (contrast color): 200 g, about 340 m
These amounts include a 15–20% margin for your swatch and for differences in tension.
Tools: 5 mm (H-8) and 4 mm (G-6) hooks, tapestry needle, about 80 rust-proof pins, blocking mats, spray bottle, measuring tape, and 11 clip rings with a rod at least 48 in (121.9 cm) long.
Abbreviations (US Terms)
- ch – chain
- sl st – slip stitch
- sc – single crochet
- hdc – half double crochet
- dc – double crochet
- rev sc – reverse single crochet
- sp – space
- st(s) – stitch(es)
- RS / WS – right side / wrong side
Mesh: One dc plus ch 2. You skip 2 sts below it, or work it over a ch-2 sp. Each mesh is 3 sts wide.
Reverse single crochet (crab stitch): Work from left to right (from right to left if you crochet left-handed). Insert the hook into the next st to the right, yarn over, and pull up a loop. Then yarn over and draw through both loops. This makes a firm, corded edge.
Gauge and Checkpoints
Panel gauge (5 mm hook): 4 mesh x 4 rows = 3 in (7.6 cm). Each mesh is 0.75 in (1.9 cm) square.
Test swatch: With cream, ch 18. Dc in the 4th ch from the hook and in each ch across (16 sts). Work 5 mesh rows (5 mesh each), following Rows 2 and 5 below. The swatch should be 3.75 in (9.5 cm) wide and 4.5 in (11.4 cm) tall. Block it, then measure the center 4 mesh and the top 4 rows.
Appliqué gauge (4 mm hook): One leaf is 2.25 in (5.7 cm) long and 1.25 in (3.2 cm) wide. Ten sl st of stem cord measure 3 in (7.6 cm). Make one leaf and check it against these sizes.
Checkpoints:
- After Row 1: 45 in (114.3 cm) wide
- After Row 3: header is 2.25 in (5.7 cm) tall
- After Row 19: 14.25 in (36.2 cm) tall
- After the points: 16.5 in (41.9 cm) to the tips
- After the border: 45.5 in x 17 in (115.6 cm x 43.2 cm)
If your swatch is too big: Go down one hook size. If it’s too small: Go up one hook size. Change hooks if 4 mesh are off by more than 1/8 in (0.3 cm). Across 60 mesh, that difference adds up to almost 2 in (5.1 cm).
Lace Panel
Use cream and the 5 mm hook. Turning chains count as stitches.
Header Band
Foundation: Ch 183.
Row 1 (RS): Dc in the 4th ch from the hook (the skipped 3 ch count as a dc), then dc in each ch across. Turn. (181 sts)
Row 2: Ch 5 (counts as dc and ch 2). Skip the next 2 dc, dc in the next dc. Ch 2, skip 2 dc, dc in the next dc. Repeat from * across, ending with a dc in the top of the turning ch. Turn. (60 mesh, 61 dc)
Row 3: Ch 3 (counts as dc). 2 dc in the next ch-2 sp, dc in the next dc. Repeat from * across, ending with a dc in the 3rd ch of the turning ch-5. Turn. (181 sts: 1 + 60 x 3)
The header is now 2.25 in (5.7 cm) tall. It is solid enough for the clip rings to grip.
Mesh Body
Row 4: Repeat Row 2. (60 mesh)
Row 5: Ch 5 (counts as dc and ch 2). Skip the ch-2 sp, dc in the next dc. Ch 2, dc in the next dc. Repeat from * across, ending with a dc in the 3rd ch of the turning ch-5. Turn. (60 mesh)
Rows 6–19: Repeat Row 5. (60 mesh in each row)
Rows 4–19 are 16 mesh rows and add 12 in (30.5 cm). The panel now measures 45 in x 14.25 in (114.3 cm x 36.2 cm). Fasten off.
Pointed Tips
With the RS facing, number the dc of Row 19 from 0 to 60, starting at the right edge. This divides the row into ten sections of 6 mesh each: Section 1 runs from dc 0 to dc 6, Section 2 from dc 6 to dc 12, and so on. The center dc of each section (dc 3, 9, 15, and so on) marks the line of a vine.
Work each point separately with the RS facing.
Row 20 (Point Row 1): Join cream with a sl st in the 2nd dc of the section (dc 1 for Section 1). Ch 5 (counts as dc and ch 2), dc in the next dc. Ch 2, dc in the next dc. Repeat from * twice more. Leave the last mesh of the section unworked. Turn. (4 mesh, 5 dc, 13 sts)
Row 21 (Point Row 2): Sl st in each of the next 2 ch and in the next dc. Ch 5 (counts as dc and ch 2), dc in the next dc, ch 2, dc in the next dc. Leave the last mesh unworked. Turn. (2 mesh, 3 dc, 7 sts)
Row 22 (Point Row 3): Sl st in each of the next 2 ch and in the center dc. Ch 7, then sl st in the same dc to make the tip loop. Fasten off. (1 ch-7 loop)
Repeat Rows 20–22 in each of the other nine sections, joining in dc 7, 13, 19, and so on. Each section’s first and last mesh stay unworked in Row 19. These unworked mesh form a V-shaped notch between neighboring points.
Checkpoint: The points are 2.25 in (5.7 cm) deep, and the panel measures 16.5 in (41.9 cm) to the tips.
Border
Border gauge: About 4 sc = 1 in (2.5 cm) along the top. Along the sides, work 2 sc per dc row-end.
Corner rule: Each side count includes the stitches at both ends of that side. The ch-1 corners are extra and are not counted as stitches.
Round 1: With the RS facing, join cream with a sl st in the first foundation ch at the top left corner. Ch 1.
- Top: Sc in the same ch and in each foundation ch across (181 sc). Ch 1 for the corner.
- Right side: 2 sc in each row-end of Rows 1–19 (38 sc). Ch 1 for the corner.
- Bottom: Work the sequence below (279 sc). Ch 1 for the corner.
- Left side: 2 sc in each row-end of Rows 19–1 (38 sc). Ch 1 for the corner.
Join with a sl st to the first sc. (536 sc plus 4 ch-1 corners)
Bottom sequence for each point (27 sc):
- 2 sc in the unworked ch-2 sp of Row 19
- 2 sc in the Row 20 row-end
- 2 sc in the first Row 20 ch-2 sp
- 2 sc in the Row 21 row-end
- 2 sc in the first Row 21 ch-2 sp
- 7 sc in the ch-7 tip loop
- Work steps 5 to 1 in mirror order down the other side of the point: 2 sc in each ch-2 sp and in each row-end.
Work 1 sc in the notch dc between neighboring points. (10 x 27 + 9 = 279 sc)
Round 2: Ch 1. Rev sc in each sc around, and work 1 rev sc in each ch-1 corner sp. Join and fasten off. (540 rev sc: 536 + 4)
Why the math works:
- The 181 top sc match the 181 foundation ch one to one, so the top neither flares nor pulls in.
- 2 sc fit the 0.75 in (1.9 cm) height of each dc row-end, so the sides lie flat.
- 2 sc fill each ch-2 sp exactly, and the 7 sc turn the point sharply without cupping.
- The border adds 0.25 in (0.6 cm) on every edge, so the panel grows from 45 in x 16.5 in (114.3 cm x 41.9 cm) to 45.5 in x 17 in (115.6 cm x 43.2 cm).
Vine Appliqués
Use sage green and the 4 mm hook.
Stem (make 10)
Ch 46. Starting in the 2nd ch from the hook, sl st in the back bump of each ch across. (45 sl st) Fasten off, leaving a 24 in (61.0 cm) tail. The stem is a firm, round cord 13.5 in (34.3 cm) long.
Leaf (make 70: 6 side leaves and 1 tip leaf per vine)
Rnd 1: Ch 9. Work along the first side of the chain, starting in the 2nd ch from the hook: sc, hdc, dc in each of the next 3 ch, hdc, sc (7 sts). In the last ch, work (sc, ch 2, sc) for the tip. Then work along the opposite side of the foundation chain: sc, hdc, dc in each of the next 3 ch, hdc, sc (7 sts). Sl st in the first sc. (16 sts plus a ch-2 tip)
Fasten off, leaving an 8 in (20.3 cm) tail. The foundation chain forms a raised center vein, and the dc stitches make the leaf widest in the middle.
Placement
- Lay the panel flat with the RS up.
- Tip leaves: Place one leaf on each point with the base up and the leaf tip lined up with the bordered tip. Each tip leaf covers the lower 2.25 in (5.7 cm) of its point and adds no length.
- Stems: Center each stem over its section’s center dc. Run it from just below the header (Row 4) to the base of the tip leaf. Ease it into a gentle S-curve that swings no more than 0.75 in (1.9 cm) to either side.
- Side leaves: Place 6 leaves along each stem, alternating left and right, about 2 in (5.1 cm) apart. Start 1 in (2.5 cm) below the header. Angle each tip down and outward at about 45 degrees.
- Pin everything, then check that all ten vines match.
- Sew: Whipstitch with the green tails, catching the mesh dc posts and chains. Sew through the stem center every 0.5 in (1.3 cm). Tack each leaf at the base, at the tip, and twice along each side.
Final Blocking
- Soak the valance in cool water, then press out the water gently. Don’t wring it.
- Roll it in a towel to remove the excess water.
- Lay it face down on the mats so the appliqués stay raised.
- Pin the top edge straight to 45.5 in (115.6 cm).
- Pin the sides straight to 14.5 in (36.8 cm), down to the notch level.
- Pin each point at its tip, lining up all the tips 17 in (43.2 cm) below the top edge.
- Open each mesh square with your fingertips.
- Let it dry completely, about 24 hours.
Final Quality-Control Checklist
- Rows 2–19 each have 60 mesh.
- All 10 points are the same size and shape.
- Border Round 1 has 536 sc, and Round 2 has 540 rev sc.
- The valance measures 45.5 in x 17 in (115.6 cm x 43.2 cm).
- Each stem is centered on its section.
- Each vine has 6 side leaves and 1 tip leaf.
- No sewing stitches show on the RS.
- All tails are woven in.
Troubleshooting
- Mesh looks uneven: Make every ch-2 the same length, and pull each dc up to its full height.
- Header ruffles or puckers: The foundation chain is too tight. Redo it with a hook one size larger.
- Sides wave: Work 2 sc per row-end, not 3.
- Points curl: Block them firmly, and check that each tip loop has exactly 7 sc.
- Leaves cup: Steam them lightly before sewing.
- Stem twists: Work only into the back bumps, then steam the stem straight.
Care
Hand wash in cool water with a mild detergent. Then reshape the valance and dry it flat so the points and appliqués keep their shape.
Final Notes
All the measurements build on one mesh of 0.75 in (1.9 cm). Sixty mesh make the 45 in (114.3 cm) width. The 19 rows above the points make 14.25 in (36.2 cm), and the points bring the length to 16.5 in (41.9 cm). The 0.25 in (0.6 cm) border finishes the valance at 45.5 in x 17 in (115.6 cm x 43.2 cm). If each checkpoint matches, the finished size will too.
Happy crocheting!