

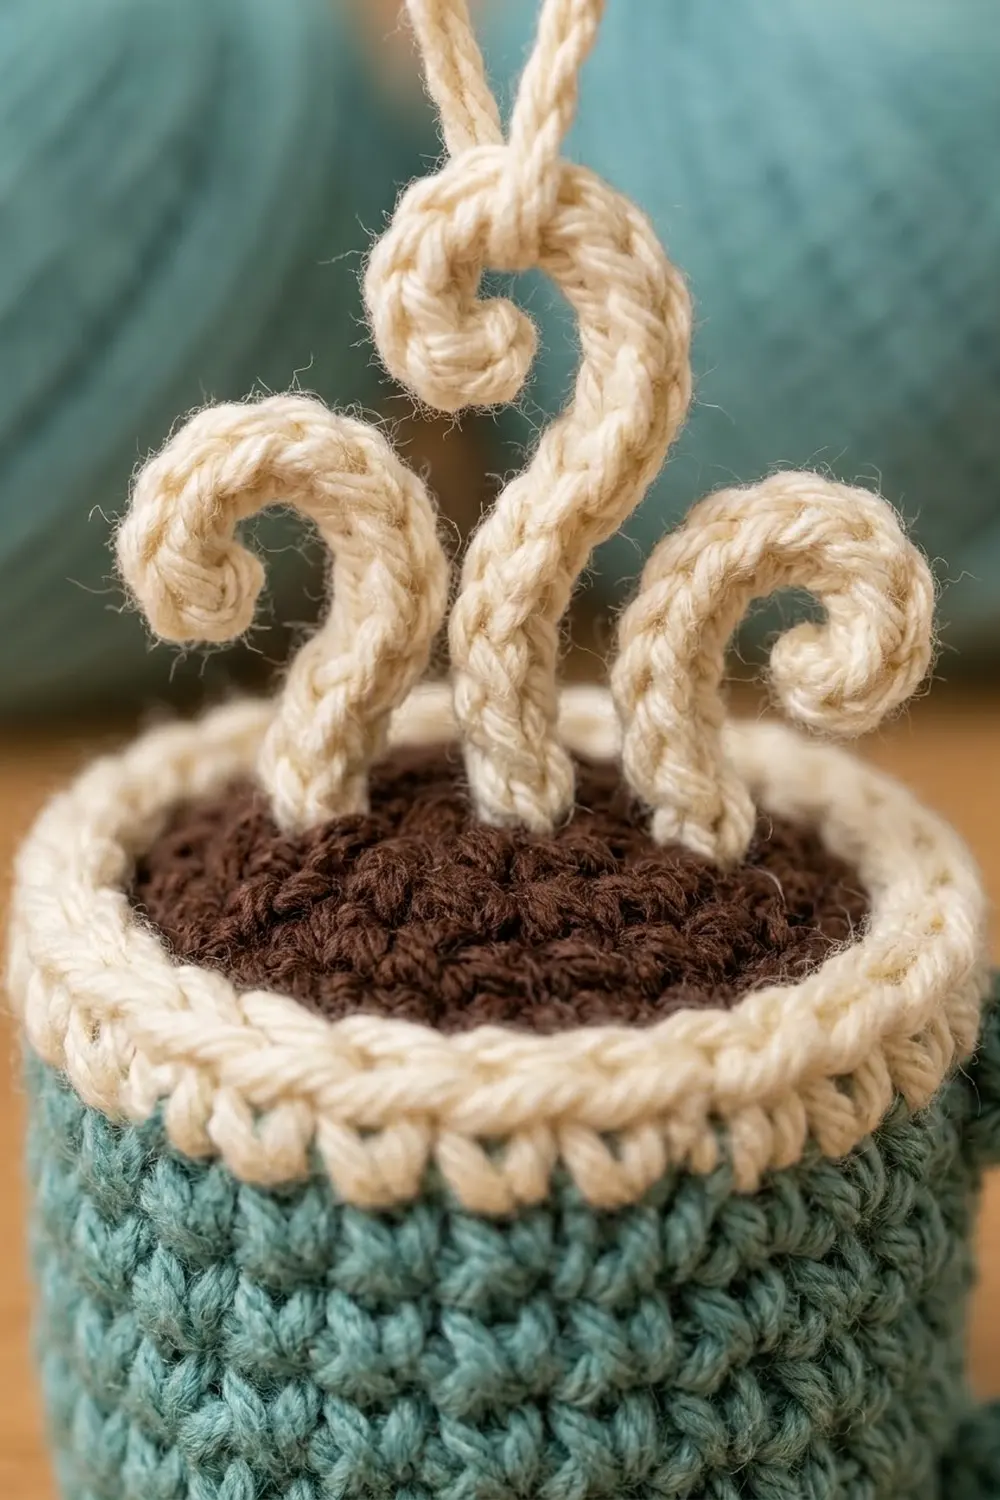
This little mug is a stuffed 3D ornament. The sage-teal cup is filled with dark chocolate “cocoa”, finished with a soft cream rim, and topped by three curling steam swirls. It is small enough to hang from a branch and sturdy enough to tuck into a gift.
The palette is quiet and cozy: sage teal for the cup and handle, cream for the rim, steam and loop, and deep brown for the cocoa. The style is clean single crochet with no embroidery, so the shapes do all the work.
This pattern uses US crochet terms. The finished cup measures 2.1 in (5.3 cm) across and 2.2 in (5.6 cm) tall. With the handle it is 2.8 in (7.1 cm) wide, and with the steam and loop it is about 5 in (12.7 cm) tall.
Construction is simple. You crochet a flat base, turn the edge, and work the walls in continuous rounds, then switch to cream for the rim. After that you make a separate cocoa disc, a curved handle strip, three steam curlicues and a chain loop, and sew everything onto the cup.
Finished Size and Construction
- Finished cup size: 2.1 in (5.3 cm) diameter x 2.2 in (5.6 cm) tall
- Overall size: 2.8 in (7.1 cm) wide with handle; about 5 in (12.7 cm) tall with steam and loop
- Skill level: Easy to intermediate (small-scale work)
- Terminology: US
- Yarn weight: DK / light worsted (weight 3) cotton
- Hook: 3.25 mm (US D/3)
- Number of pieces: 1 finished ornament, built from 1 cup body plus 7 small add-ons (cocoa disc, handle, 3 steam swirls, hanging loop)
- Layout: Single standalone ornament, not joined to other pieces
- Cup size before rim: 2.1 in (5.3 cm) diameter x 1.8 in (4.6 cm) tall
- Rim (border) depth: 0.4 in (1.0 cm)
Materials
Choose a smooth mercerized or matte cotton in DK weight. Cotton gives crisp stitches and holds the curlicues in shape. Acrylic works too, but the steam swirls will be floppier.
- Sage teal (cup and handle): 8 g / about 20 m
- Cream (rim, steam, loop): 4 g / about 10 m
- Dark brown (cocoa): 2 g / about 5 m
These quantities include a safety margin of roughly 25 percent.
Tools:
– 3.25 mm (US D/3) crochet hook
– Tapestry needle
– Stitch marker
– Small amount of polyester fiberfill
– Scissors
– Pins
– Optional: spray starch or stiffener for the steam swirls
Abbreviations (US Terms)
- ch – chain
- sc – single crochet
- sl st – slip stitch
- MR – magic ring
- BLO – back loop only
- inc – 2 sc in the same stitch
- st(s) – stitch(es)
- [ ] – repeat the instructions inside the brackets as directed
Special stitch – curlicue sc: Work 3 sc into a single chain. Doing this along several chains in a row makes the strip twist into a spiral on its own.
Gauge and Checkpoints
Gauge: 11 sc and 12 rounds = 2 in (5.1 cm) in single crochet worked in the round. That works out to 5.5 sts and 6 rounds per inch.
Work the base (Rounds 1–6) first and measure it before you continue. It is the quickest test of your gauge.
Checkpoints:
– After Round 3: about 1 in (2.5 cm) across
– After Round 5: about 1.7 in (4.3 cm) across
– After Round 6: 2.1 in (5.3 cm) across
– After Round 12: walls 1 in (2.5 cm) tall, measured from the base fold
– After Round 17: walls 1.8 in (4.6 cm) tall
– After Round 20: cup 2.2 in (5.6 cm) tall
If your base is too big, go down to a 3.0 mm hook or tighten your tension. If it is too small, go up to a 3.5 mm hook. Ornament stitches should be firm, with no fiberfill showing through. If you see gaps, go down a hook size even when your measurements are close.
Cup Body
Use sage teal. Work in continuous spiral rounds, don’t join, and move the marker up to the first stitch of each round.
Round 1: Make a MR and work 6 sc into the ring. (6 sts)
Round 2: Inc in each st around. (12 sts)
Round 3: [Sc in next st, inc] 6 times. (18 sts)
Round 4: [Sc in next 2 sts, inc] 6 times. (24 sts)
Round 5: [Sc in next 3 sts, inc] 6 times. (30 sts)
Round 6: [Sc in next 4 sts, inc] 6 times. (36 sts)
Pull the MR tail tight and weave it in. The base should now lie flat at 2.1 in (5.3 cm).
Round 7 (turning round): Sc in BLO of each st around. (36 sts)
The unworked front loops leave a crisp ridge that turns the edge, so the walls rise straight up from the flat base.
Rounds 8–17: Sc in each st around. (36 sts in each round, 10 rounds)
There are no increases here, so the walls stay vertical and the cup keeps its cylinder shape. At Round 12, check that the walls are 1 in (2.5 cm) tall.
On the last sc of Round 17, change color: draw the final yarn over through in cream. Cut the teal, leaving a 4 in (10.2 cm) tail.
Check that the walls are 1.8 in (4.6 cm) tall. This is the cup before the rim.
Cocoa Disc
Use dark brown and work in continuous rounds.
Round 1: Make a MR and work 6 sc into the ring. (6 sts)
Round 2: Inc in each st around. (12 sts)
Round 3: [Sc in next st, inc] 6 times. (18 sts)
Round 4: [Sc in next 2 sts, inc] 6 times. (24 sts)
Round 5: [Sc in next 3 sts, inc] 6 times. (30 sts)
Sl st in the next st and fasten off, leaving a 12 in (30.5 cm) tail for sewing. The disc should measure about 1.7 in (4.3 cm).
The disc is slightly smaller than the cup opening, so it sits just below the cream rim, the way the cocoa does in the photo.
Handle
Use sage teal and work in rows.
Foundation: Ch 13.
Row 1: Sc in the 2nd ch from the hook and in each ch across. (12 sts)
Row 2: Ch 1, turn. Sc in the next 2 sts, [inc, sc in next st] 4 times, sc in the last 2 sts. (2 + 12 + 2 = 16 sts)
Fasten off, leaving a 10 in (25.4 cm) tail.
Row 2 adds 4 stitches along the outer edge only. That makes the strip curl into a C on its own: the inner edge is 12 sts long and the outer edge is 16 sts. Once it’s shaped, the handle spans about 1.3 in (3.3 cm) top to bottom.
Steam Swirls
Use cream.
Side swirl (make 2): Ch 11. Work 3 sc in the 2nd ch from the hook and in each of the next 4 ch (15 sts), then sc in each of the last 5 ch (5 sts). (20 sts total)
Fasten off, leaving a 6 in (15.2 cm) tail. The first 5 chains twist into a tight curl and the last 5 make a straight stem about 1 in (2.5 cm) tall.
Center swirl (make 1): Ch 17. Work 3 sc in the 2nd ch from the hook and in each of the next 7 ch (24 sts), then sc in each of the last 8 ch (8 sts). (32 sts total)
Fasten off, leaving a 6 in (15.2 cm) tail. Give the curl a gentle S-bend with your fingers. This swirl stands about 1.5 in (3.8 cm) tall.
Hanging loop: Ch 24 and fasten off, leaving both tails about 4 in (10.2 cm) long. Fold the chain in half to make a loop about 1.5 in (3.8 cm) long.
Rim (Border)
The cream rim is this piece’s border. It goes straight onto the live stitches of Round 17, so you don’t need to pick up any stitches.
Border gauge: Use the same tension as the body: 5.5 sts per inch, 6 rounds per inch.
For counting, treat the cup as two halves: the front half (the side opposite the handle) and the back half (the side where the handle goes). Each half has 18 sts.
Round 18: Sc in each st around. (Front 18 + back 18 = 36 sts)
Round 19: Sc in each st around. (Front 18 + back 18 = 36 sts)
Round 20: Sl st loosely in each st around. (Front 18 + back 18 = 36 sts)
Fasten off with an invisible join and weave in the ends.
Why the math works: All 36 stitches carry straight up from Round 17, one stitch into each existing stitch, with no increases or decreases. That keeps the rim the same diameter as the cup. The slip stitch round firms the top edge and rolls it slightly outward, which gives the padded look. Two sc rounds plus the sl st round add 0.4 in (1.0 cm), so the cup reaches 1.8 + 0.4 = 2.2 in (5.6 cm).
Assembly
1. Stuff the cup. Fill the cup firmly with fiberfill up to about Round 15. Leave the top 0.4 in (1.0 cm) of teal empty so the cocoa sits below the rim.
2. Attach the cocoa. Set the disc inside the cup, right side up, level with Round 17. Whipstitch the disc’s edge to the inside of Round 17 using the brown tail.
The disc has 30 edge stitches and the cup has 36, so use this ratio: [sew 1 disc st to 1 cup st 4 times, then sew 1 disc st to 2 cup sts] 6 times. That’s 5 disc sts to 6 cup sts, six times over, so the disc lies flat with no puckers. Top up the stuffing just before you close the last gap.
3. Attach the handle. Center the handle on the back half. Pin the top end just below the rim at Round 16 and the bottom end at Round 9, with the shorter inner edge facing the cup. Whipstitch each end across 3 stitches, then run the tail through the middle of the handle and weave it in.
4. Attach the steam. Push the stem of the center swirl down through the middle of the cocoa disc. Push the side swirls through about 0.4 in (1.0 cm) to either side, with their curls facing outward. Use the tails to make 2–3 small stitches through the disc for each stem, then bury the tails in the stuffing.
5. Attach the loop. Sew both loop tails to the top curl of the center swirl. Knot them together inside the curl and bury the ends.
Final Blocking
- Lightly mist the steam swirls and handle with water or spray starch.
- Twist each curlicue tighter with your fingers, then let it relax into a neat spiral.
- Bend the center swirl into a soft S. Angle the side swirls slightly outward.
- Press the handle into an even C, keeping its outer edge rounded.
- Roll the rim between your fingers so it sits evenly round.
- Stand the ornament upright and let it dry completely, at least 2 hours.
- Measure the cup again: 2.1 in (5.3 cm) across and 2.2 in (5.6 cm) tall.
Final Quality-Control Checklist
- Base is flat with a clear ridge at Round 7
- Walls are straight and 36 sts around in every round
- No fiberfill shows between stitches
- Cream rim is even, 0.4 in (1.0 cm) deep, and the color change jog is hidden on the back half
- Cocoa disc sits flat just below the rim
- Handle ends are secure at Rounds 9 and 16 and centered opposite the front
- Center steam is tallest and the side swirls curl outward
- Loop is firmly anchored and the ornament hangs level
- All ends are woven in
Troubleshooting
Walls flare outward: You probably skipped the BLO round or added extra stitches. Count 36 sts every round.
Walls lean inward: You’re accidentally decreasing. Check that the last stitch of each round isn’t being missed.
Cocoa disc puckers: Your sewing ratio slipped. Unpick it and use 5 disc sts to 6 cup sts.
Cocoa sits too low or too high: Add or remove stuffing before you close the last gap.
Swirls won’t curl: Work the 3-sc curlicue sts tighter, or use starch.
Handle is flat, not curved: Check that Row 2 has 16 sts, with all the increases along one edge.
Ornament hangs crooked: Move the loop slightly toward the handle side to counterbalance it.
Care
Spot-clean with a damp cloth and mild soap, then reshape and air dry. Store the ornament in a box so the steam swirls aren’t crushed.

Final Notes
Here is the full measurement chain. A 36-st base measures 2.1 in (5.3 cm) across. Eleven 36-st wall rounds bring the cup to 1.8 in (4.6 cm). The three-round cream rim adds 0.4 in (1.0 cm), for a finished cup 2.2 in (5.6 cm) tall. The 30-st cocoa disc is sewn in at 5 to 6, the 12-to-16-st handle curves into a C at 1.3 in (3.3 cm), and the steam and loop bring the ornament to about 5 in (12.7 cm) tall.
If each checkpoint matches, your mug will match too. Make one for every cocoa lover on your list.
Happy crocheting!