

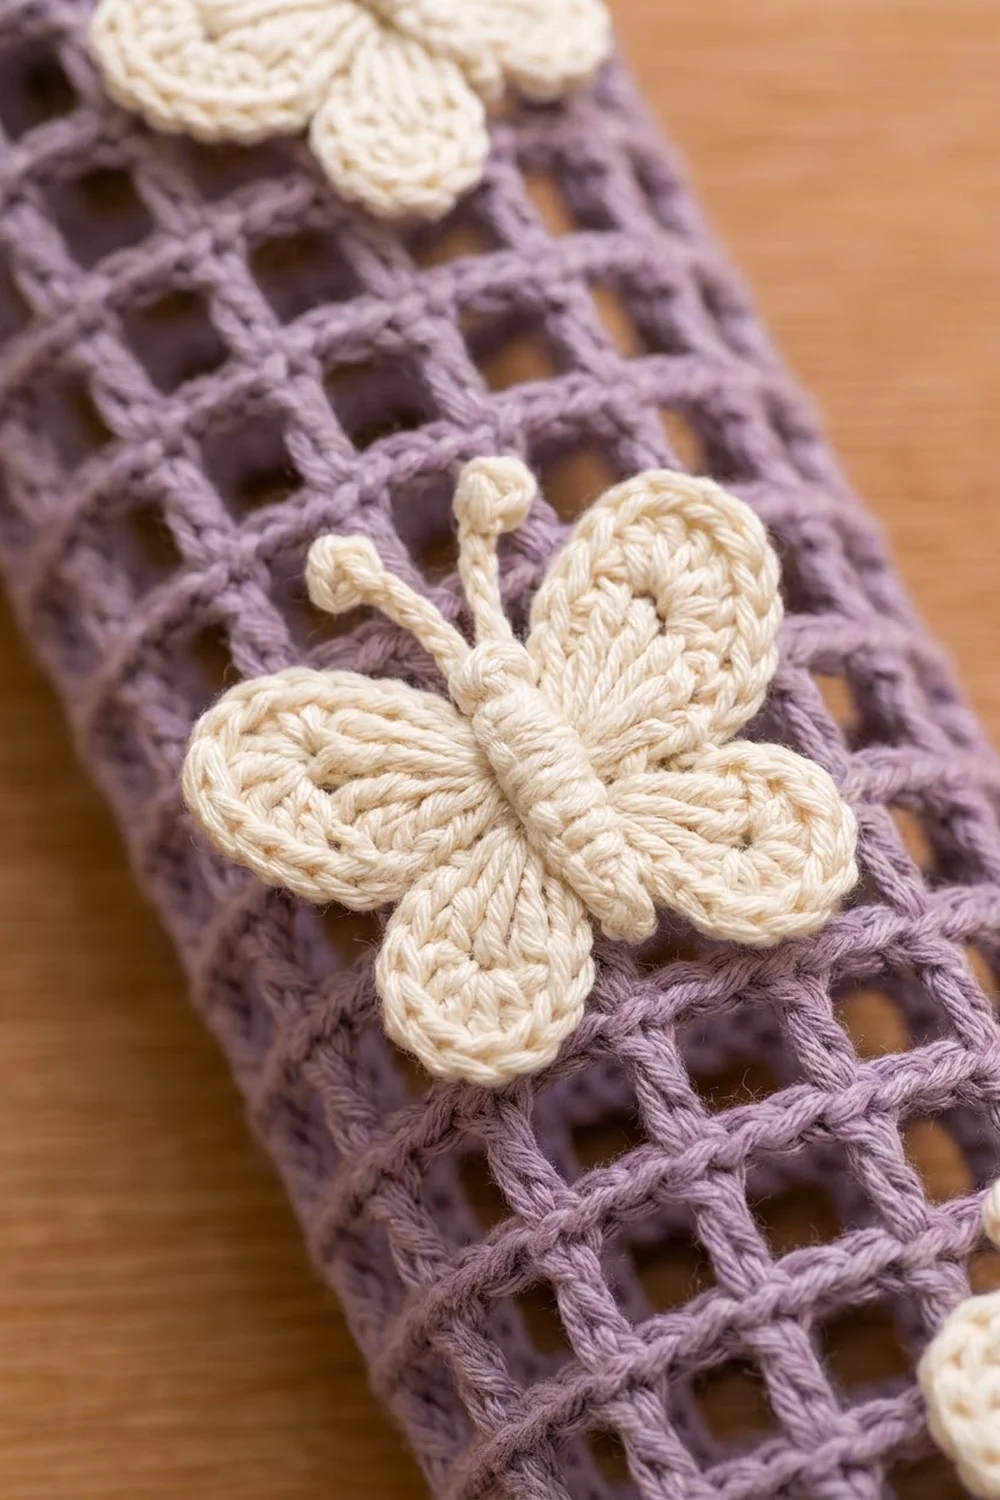
Plastic grocery bags pile up fast, and this hanging holder keeps them tidy and easy to reach. The Lavender Flutter Bag Holder has a soft lavender grid of open squares, a solid cream base with a slot for pulling bags out, and a matching cream band at the top. Three cream butterflies flutter down the front in a zigzag. A wooden ring at the top lets it hang from a hook or cabinet knob.
The style is clean, cottage-like and practical. Through the mesh you can see how full the holder is, and the solid base and top keep everything in shape. You stuff bags in through the open top and pull them out one at a time through the bottom slot.
This pattern uses US crochet terms. The finished body is 5.25 in (13.3 cm) wide when flat and 17.4 in (44.2 cm) long. It hangs about 21 in (53.3 cm) long from the bottom of the base to the top of the ring.
Construction overview: You work the body in one piece from the bottom up, in joined rounds without turning. You start with a chain ring that becomes the slot. Then you increase into a flat oval floor, build up solid cream walls, switch to lavender mesh, and finish with a cream top band and a crab-stitch edge. The tab and the three butterflies are made separately and sewn on.
Finished Size and Construction
- Finished size: 5.25 in (13.3 cm) wide flat × 17.4 in (44.2 cm) long
- Skill level: Easy
- Terminology: US
- Yarn weight: Worsted (#4), cotton recommended
- Hook: 5.0 mm (H-8)
- Number of pieces: 1 body, 1 hanging tab, 3 butterfly appliqués
- Layout: Single tube; butterflies staggered right, left, right down the front
- Circumference: 42 stitches = 10.5 in (26.7 cm)
- Size before border: 15.9 in (40.4 cm) long (base plus mesh)
- Border (top band) depth: 1.5 in (3.8 cm)
Materials
Use a smooth worsted-weight cotton or cotton blend. Cotton holds its shape when the holder is stuffed and keeps the mesh squares crisp. Acrylic works too, but it stretches more over time.
- Lavender: 70 g / 110 m (mesh)
- Cream: 60 g / 95 m (base, top band, tab, butterflies)
- 5.0 mm (H-8) crochet hook
- Wooden ring, 3 in (7.6 cm) outer diameter
- Tapestry needle
- 2 locking stitch markers
- Scissors
- Rust-proof pins
The yarn quantities include a safety margin of about 15 percent.
Abbreviations (US Terms)
- ch – chain
- sl st – slip stitch
- sc – single crochet
- dc – double crochet
- tr – treble crochet
- sp – space
- st(s) – stitch(es)
- rnd – round
- beg – beginning
Special stitch: reverse single crochet (rev sc, crab stitch). Working from left to right (right to left if you crochet left-handed), insert the hook into the next stitch to the right. Yarn over, pull up a loop, then yarn over and pull through both loops on the hook. This makes a corded, bumpy edge.
Gauge and Checkpoints
Single crochet gauge: 16 sc and 16 rnds = 4 in (10.2 cm), worked in rounds.
Mesh gauge: 4 mesh squares and 5 mesh rnds = 3 in (7.6 cm). Each square is 0.75 in (1.9 cm) wide, and each mesh rnd is 0.6 in (1.5 cm) tall.
Test first: Make Rnds 1–10 of the base and measure before you go on. The base is your gauge swatch.
Checkpoints:
- After Rnd 4: The flat oval floor measures about 4.5 in (11.4 cm) long, and the slot is 3 in (7.6 cm) long.
- After Rnd 10: Flattened, the tube is 5.25 in (13.3 cm) wide, and the walls rise 1.5 in (3.8 cm).
- After 8 mesh rnds: The mesh section is 4.8 in (12.2 cm) tall.
- After 16 mesh rnds: The mesh section is 9.6 in (24.4 cm) tall.
- After all 24 mesh rnds: The mesh section is 14.4 in (36.6 cm) tall.
If your piece is too big, go down to a 4.5 mm hook. If it is too small, go up to a 5.5 mm hook. Change the hook, not the stitch counts; all the math depends on 42 stitches around.
Body
Part 1: Base (Cream)
Rnd 1: Ch 24 and sl st to the first ch to form a ring, without twisting. Ch 1, sc in each ch around, then sl st to the first sc. (24 sc)
This chain ring becomes the bag slot. Flatten it so 12 sts lie on each side, and place markers at stitch 1 and stitch 13.
Rnd 2: Ch 1, [sc in next 9 sts, 2 sc in each of next 3 sts] twice, then sl st to the first sc. (30 sc)
Rnd 3: Ch 1, [sc in next 9 sts, (sc in next st, 2 sc in next st) 3 times] twice, then sl st to the first sc. (36 sc)
Rnd 4: Ch 1, [sc in next 9 sts, (sc in next 2 sts, 2 sc in next st) 3 times] twice, then sl st to the first sc. (42 sc)
The increases stack at the two ends of the slot, so the floor grows into a flat oval ring around a long opening. Check that the floor lies flat.
Rnds 5–10: Ch 1, sc in each st around, then sl st to the first sc. (42 sc each rnd)
The walls curve upward naturally from Rnd 5. Fasten off cream and check the Rnd 10 checkpoint.
Part 2: Mesh (Lavender)
Rnd 11: Join lavender in the same st as the last join. Ch 5 (counts as dc + ch 2), skip next 2 sts, dc in next st, ch 2, skip next 2 sts 13 times, then sl st to the 3rd ch of the beg ch-5. (14 dc and 14 ch-2 sps = 14 squares)
Check the math: the ch-5 uses 1 stitch and skips 2, and 13 repeats use 39 stitches, for a total of 42.
Rnds 12–34: Ch 5 (counts as dc + ch 2), dc in next dc, ch 2 13 times, then sl st to the 3rd ch of the beg ch-5. (14 squares each rnd)
Each dc sits right on top of the dc below, which builds the straight vertical bars of the grid. You now have 24 mesh rnds (Rnds 11–34). Fasten off lavender.
Checkpoint: The body measures 15.9 in (40.4 cm) long: 1.5 in (3.8 cm) of base plus 14.4 in (36.6 cm) of mesh.
Border: Top Band (Cream)
Border gauge: 16 sc = 4 in (10.2 cm), the same as the base.
Flattened, the tube has no corners. Each round has 21 stitches on the front and 21 on the back. The fold points are ordinary stitches, so nothing is added or counted twice.
Rnd 35 (conversion round): Join cream at the top of the beg ch-5. Ch 1, sc in the same st, 2 sc in the next ch-2 sp, sc in next dc, 2 sc in next ch-2 sp 13 times, then sl st to the first sc. (14 sc in dc + 28 sc in sps = 42 sc; 21 per side)
Rnds 36–39: Ch 1, sc in each st around, then sl st to the first sc. (42 sc each rnd; 21 per side)
Rnd 40: Ch 1, rev sc in each st around, then sl st to the first rev sc. (42 rev sc; 21 per side) Fasten off and weave in the end.
Why the math works: The base ends with 42 sts, and the mesh has 14 squares of 3 stitch-widths each (14 × 3 = 42). The band converts back to exactly 42. All three sections have the same circumference, so the band neither flares nor pulls in. The 6 band rounds at 4 rnds per inch give 1.5 in (3.8 cm), so the finished length is 15.9 + 1.5 = 17.4 in (44.2 cm).
Hanging Tab (Cream)
Row 1: Ch 7. Sc in the 2nd ch from the hook and in each ch across, then turn. (6 sc)
Rows 2–16: Ch 1, sc in each st across, then turn. (6 sc each row)
Fasten off and leave a 16 in (40.6 cm) tail. The tab measures 1.5 in × 4 in (3.8 cm × 10.2 cm).
Attach:
- Center Rows 1–6 on the inside back of the top band, with the tab’s bottom edge level with Rnd 35, and whipstitch around all edges.
- Rows 7–12 rise 1.5 in (3.8 cm) above the band.
- Wrap Rows 13–16 (1 in, 2.5 cm) over the wooden ring toward the back, then stitch Row 16 to Row 12.
Butterflies (Make 3, Cream)
Rnd 1 (wings): Make a magic ring and work each wing into it:
- Large wing: ch 4, 4 tr, ch 4, sl st in ring.
- Small wing: ch 3, 3 dc, ch 3, sl st in ring.
Work them in this order: large wing, large wing, small wing, small wing. Pull the ring closed. (4 wings)
Rnd 2 (outline):
- On each large wing: 3 sc along the ch-4, 2 sc in each of the 4 tr, 3 sc along the closing ch-4, then sl st at the center. (14 sc)
- On each small wing: 2 sc along the ch-3, 2 sc in each of the 3 dc, 2 sc along the closing ch-3, then sl st at the center. (10 sc)
Each butterfly has 48 sc in total (14 + 14 + 10 + 10). Fasten off.
Body: Ch 9, then sl st in the 2nd ch from the hook and in each ch across. (8 sl st) Leave a tail and sew the body vertically down the center, between the large and small wings.
Antennae: With cream yarn, backstitch two short 0.5 in (1.3 cm) lines angling out from the top of the body, and add a French knot at the end of each.
Each butterfly measures about 2.25 in wide × 1.75 in tall (5.7 cm × 4.4 cm).
Placement: Flatten the body with the tab centered at the back. Sew the butterflies to the front mesh bars with matching cream yarn, as follows:
- Lower butterfly: centered on mesh rnd 6, right of center.
- Middle butterfly: centered on mesh rnd 12, left of center.
- Upper butterfly: centered on mesh rnd 18, right of center.
The butterfly centers are 3.6 in (9.1 cm) apart. Stitch only through the front layer.
Final Blocking
- Wet-block the butterflies separately. Pin them flat, open the wings, and let them dry before sewing them on. If they are already attached, steam them lightly instead.
- Roll a bath towel into a firm cylinder about 10.5 in (26.7 cm) around.
- Dampen the body and slide it over the towel.
- Straighten the mesh columns so the dc bars run vertically and the squares look square.
- Gently shape the oval floor and the slot.
- Check the length: 17.4 in (44.2 cm). Ease the mesh lengthwise if it is short.
- Let it dry completely on the towel.
Final Quality-Control Checklist
- Base: 24 / 30 / 36 / 42 sc, with the floor lying flat around a 3 in (7.6 cm) slot
- 24 mesh rnds of 14 squares each, with the bars lined up vertically
- Band: 42 sc with a full crab-stitch edge
- Flat width 5.25 in (13.3 cm); length 17.4 in (44.2 cm)
- Tab is centered at the back and the ring is stitched in securely
- Three butterflies of 48 sc each, staggered right, left, right
- All ends are woven in through solid stitches, not through the mesh
Troubleshooting
The floor cups or ruffles. Cupping means your tension is too tight; ruffling means too loose. Redo Rnds 2–4 with even tension, keeping the increases at the slot ends only.
The mesh slants into a spiral. Joined rounds often lean slightly. Keep each dc directly above the dc below. Blocking on the towel roll straightens a mild slant.
The squares are tall rectangles. Your dc is too tall. Pull the loops snug before the yarn-overs, or use a smaller hook for the mesh only.
The band flares. Check that Rnd 35 has 42 sts, not more. Work two sc per space, never three.
Bags fall out too easily. Work one sl st round into the foundation chain of the slot to firm it up.
The butterflies curl. Block them flat before sewing, and keep the tension on the outline round relaxed.
Care
Hand wash in cool water with mild soap, squeeze gently, and dry it over a rolled towel. Don’t tumble dry, because the heat can loosen the mesh and the butterfly shapes.

Final Notes
The measurement chain is simple. The 24-stitch slot ring increases to 42 stitches, which is 5.25 in (13.3 cm) flat. That stays constant through the 1.5 in (3.8 cm) base, the 14.4 in (36.6 cm) mesh and the 1.5 in (3.8 cm) top band, for a total of 17.4 in (44.2 cm). Check the base, check the mesh at rounds 8 and 16, and the rest follows. Stuff it with bags, hang it on its ring, and enjoy your tidy little butterfly garden.
Happy crocheting!