

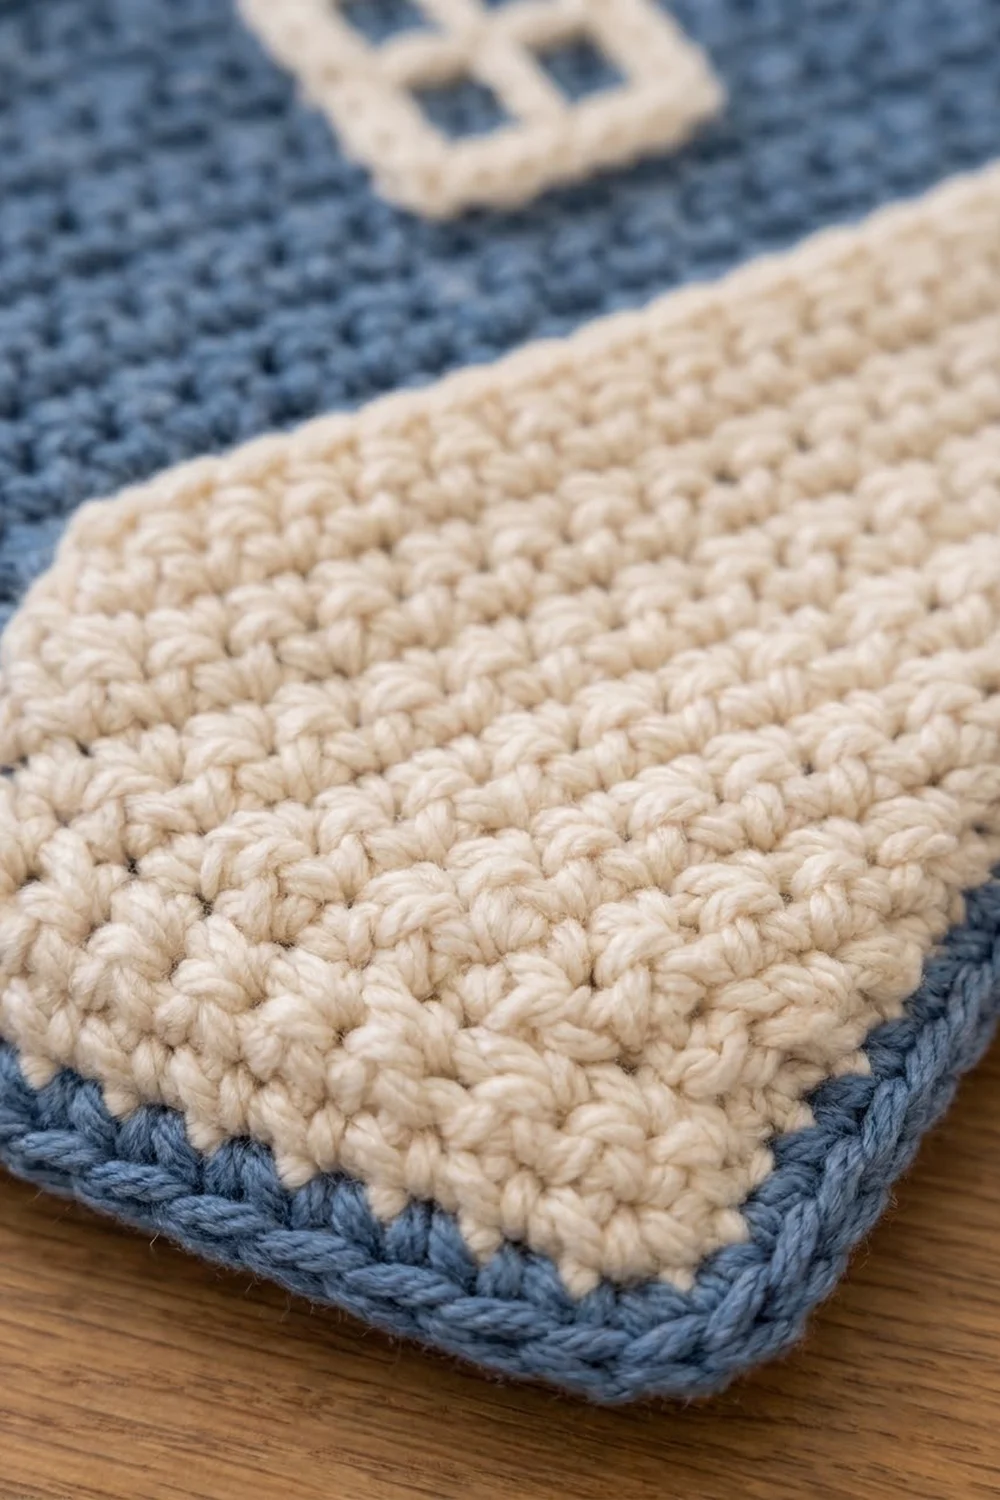
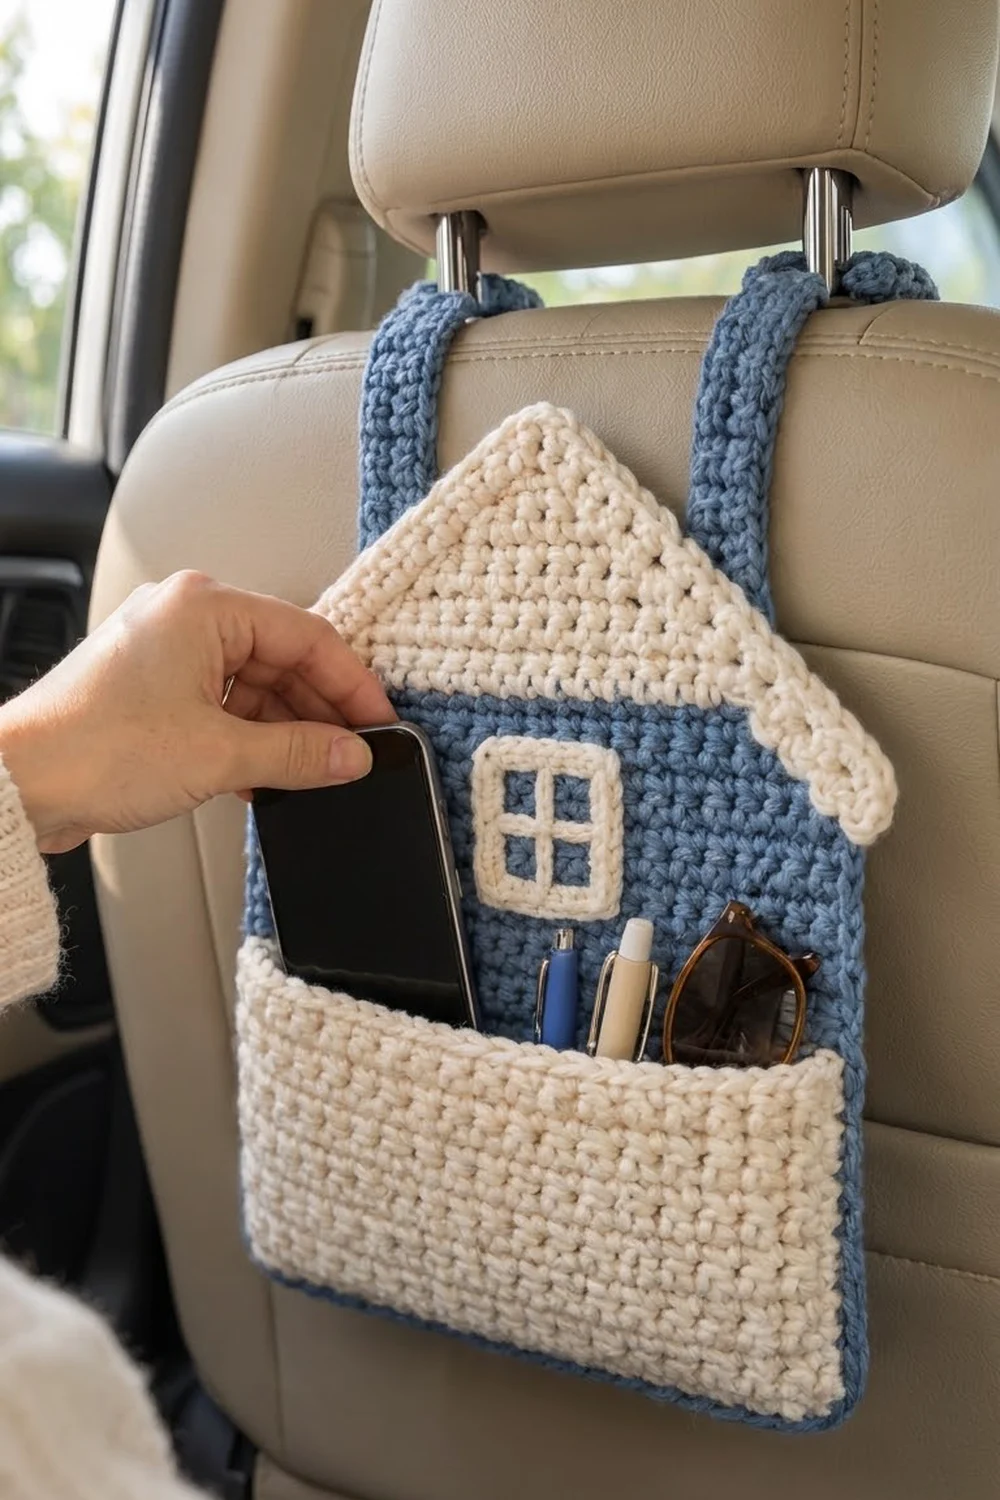
This little house keeps phones, pens and sunglasses within reach on the back of a car seat. The front is a denim-blue “wall” panel. On top sits a cream roof that hangs past the sides like eaves, with a four-pane cream window underneath and a wide cream pocket across the bottom.
The look is simple and tidy: two colors, plain single crochet and clean edges. A thin blue rim frames the pocket, and the blue shows through the window panes, so the house reads clearly from the back seat.
This pattern uses US crochet terms. The finished organizer measures about 14.25 in (36.2 cm) wide at the roof eaves and 16 in (40.6 cm) tall from the bottom edge to the roof peak, not counting the straps. The body panel alone is 12.5 x 10.5 in (31.8 x 26.7 cm).
You make six flat pieces: the body panel, the roof, the window, the pocket and two straps. You edge the body panel, sew the pocket, window and roof onto the front, and sew the straps to the back. Each strap buttons around a headrest post.
Finished Size and Construction
- Finished size: 14.25 in (36.2 cm) wide at the eaves x 16 in (40.6 cm) tall
- Skill level: Easy / advanced beginner
- Terminology: US
- Yarn weight: Worsted (#4), cotton or cotton blend
- Hook: 5.0 mm (H-8)
- Number of pieces: 6 (1 body, 1 roof, 1 window, 1 pocket, 2 straps)
- Layout: Roof on top, window centered below it, pocket across the bottom, straps on the back
- Body panel before border: 12 x 10 in (30.5 x 25.4 cm)
- Border depth: 1 round, about 0.25 in (0.6 cm)
- Body panel after border: 12.5 x 10.5 in (31.8 x 26.7 cm)
Materials
Cotton holds its shape well and handles car heat and sun better than acrylic. Pick a smooth, tightly plied worsted cotton so the stitches look crisp.
- Blue (body, border, straps): about 120 g / 210 m (230 yd)
- Cream (roof, window, pocket): about 85 g / 150 m (164 yd)
These amounts include roughly a 25% margin for your gauge swatch and seaming.
Tools:
– 5.0 mm (H-8) crochet hook
– Tapestry needle
– 6–8 locking stitch markers
– Rust-proof pins and a blocking mat
– Two 3/4 in (1.9 cm) buttons
– Measuring tape
– Scissors
Abbreviations (US Terms)
- ch – chain
- sc – single crochet
- dc – double crochet
- sl st – slip stitch
- sk – skip
- st(s) – stitch(es)
- sp – space
- RS / WS – right side / wrong side
- sc2tog – single crochet 2 together: (insert hook in next st, yarn over, pull up a loop) twice, yarn over, pull through all 3 loops.
Gauge and Checkpoints
Gauge: 14 sc and 16 rows = 4 in (10.2 cm) in rows of sc with a 5.0 mm hook. That works out to 3.5 sts and 4 rows per inch.
Make a 4 in (10.2 cm) swatch first. Then make the window, which is the smallest piece, and check it against the 2.5 in (6.4 cm) target before you start the large panels.
Checkpoints:
– Body after Row 10: 12 in (30.5 cm) wide and 2.5 in (6.4 cm) tall
– Body after Row 40: 12 x 10 in (30.5 x 25.4 cm)
– Body after the border: 12.5 x 10.5 in (31.8 x 26.7 cm)
– Roof after Row 12: 26 sts, about 7.4 in (18.8 cm) wide and 3 in (7.6 cm) tall
– Pocket: 12 x 5.5 in (30.5 x 14.0 cm)
– Strap: 1.4 x 12.5 in (3.6 x 31.8 cm)
If your piece is too big, go down half a hook size. If it is too small, go up half a hook size. Don’t change the stitch counts. Every seam in this pattern matches stitch to stitch, so the counts have to stay as written.
Body Panel (Blue, Make 1)
Row 1 (RS): Ch 43, sc in 2nd ch from hook and in each ch across, turn. (42 sc)
Rows 2–40: Ch 1 (does not count as a st), sc in each st across, turn. (42 sc)
Checkpoint: 12 x 10 in (30.5 x 25.4 cm). Do not fasten off. Go straight on to the border.
Body Border (Blue)
Border gauge: The border is worked at the same 3.5 sts per inch as the panel. It adds about 0.25 in (0.6 cm) on every side.
At the end of Row 40, ch 1 and turn so the RS faces you.
Rnd 1:
– Top edge: 3 sc in first st (corner), sc in next 40 sts, 3 sc in last st (corner).
– Left side: Rotate the panel. Working into the row ends from Row 39 down to Row 2 (38 row ends), [sc in next 6 row ends, sk 1 row end] 5 times, then sc in last 3 row ends. (33 sc)
– Bottom edge: Working into the other side of the foundation ch, 3 sc in first ch (corner), sc in next 40 ch, 3 sc in last ch (corner).
– Right side: Working into the row ends from Row 2 up to Row 39, repeat the left-side sequence. (33 sc)
– Sl st to first sc. Fasten off. (158 sts)
Counts per side, each including its 2 corner center stitches:
– Top and bottom: 40 + 2 = 42
– Left and right: 33 + 2 = 35
Total: 40 + 40 + 33 + 33 + (4 corners x 3) = 158 sts.
Why the math works:
– 42 sts at 3.5 sts per inch = 12 in (30.5 cm), which matches the panel width.
– 35 sts at 3.5 sts per inch = 10 in (25.4 cm), which matches 40 rows at 4 rows per inch.
– Working 1 sc in every row end would put 38 sts on a 10 in (25.4 cm) edge and make it ruffle. Skipping 5 row ends keeps the sides flat.
Roof (Cream, Make 1)
The roof is worked from the bottom edge up to the peak, losing 1 st at each end of every row.
Row 1 (RS): Ch 49, sc in 2nd ch from hook and in each ch across, turn. (48 sc)
Rows 2–24: Ch 1, sc2tog, sc in each st across to last 2 sts, sc2tog, turn.
Each row has 2 sts fewer than the row before. Row n has 48 − 2(n − 1) sts.
- Row 6: 38 sts
- Row 12: 26 sts
- Row 18: 14 sts
- Row 24: 2 sts
Row 25: Ch 1, sc2tog. (1 st)
The roof is now about 13.75 in (34.9 cm) wide and 6.25 in (15.9 cm) tall. Do not fasten off.
Slope Edging:
1. Ch 1. Working down the first slope into the row ends of Rows 24 to 1, [sc in next row end, 2 sc in next row end] 12 times. (36 sc)
2. Fasten off.
3. Rejoin cream at the bottom corner of the other slope. Working up the row ends of Rows 1 to 24, [sc in next row end, 2 sc in next row end] 12 times. (36 sc)
4. Work 3 sc in the Row 25 stitch at the peak. Fasten off.
Total edging: 36 + 36 + 3 = 75 sts.
Why 3 sc for every 2 row ends? Each row end on the slope runs both up and across, so it is longer than one sc is wide. The extra stitches keep the slope from pulling tight.
With the edging, the roof measures about 14.25 x 6.5 in (36.2 x 16.5 cm).
Window (Cream, Make 1)
Row 1 (RS): Ch 8, sc in 2nd ch from hook and in each ch across, turn. (7 sc)
Row 2 (pane row): Ch 3 (counts as dc), ch 2, sk next 2 sts, dc in next st, ch 2, sk next 2 sts, dc in last st, turn. (3 dc and 2 ch-2 sps)
Row 3 (cross bar): Ch 1, sc in first dc, 2 sc in ch-2 sp, sc in next dc, 2 sc in ch-2 sp, sc in top of turning ch, turn. This is a conversion row: 3 sc worked into the 3 dc + 4 sc added in the ch-2 sps = 7 sc.
Row 4: Repeat Row 2.
Row 5: Repeat Row 3. (7 sc)
The window is now about 2 x 2 in (5.1 x 5.1 cm), with 4 open panes. Do not fasten off.
Frame Round: Ch 1, turn so the RS faces you.
- Top edge: 3 sc in first st, sc in next 5 sts, 3 sc in last st.
- First side: Work 2 sc in the dc row end of Row 4, sc in the Row 3 row end, 2 sc in the Row 2 row end. (5 sc)
- Bottom edge: 3 sc in first foundation ch, sc in next 5 ch, 3 sc in last ch.
- Second side: Work 5 sc up the row ends, as for the first side.
- Sl st to first sc. Fasten off, leaving a 24 in (61.0 cm) tail for sewing.
(32 sts: 7 per side including the corner centers, so 4 x 5 + 4 x 3 = 32)
The finished window is 2.5 x 2.5 in (6.4 x 6.4 cm).
Pocket (Cream, Make 1)
Row 1 (RS): Ch 43, sc in 2nd ch from hook and in each ch across, turn. (42 sc)
Rows 2–22: Ch 1, sc in each st across, turn. (42 sc)
Row 23: Ch 1, sl st loosely in each st across. (42 sl sts)
This slip-stitch row firms up the top edge so the pocket opening doesn’t stretch out. Fasten off, leaving a 60 in (152.4 cm) tail. The pocket measures 12 x 5.5 in (30.5 x 14.0 cm).
Straps (Blue, Make 2)
Row 1: Ch 6, sc in 2nd ch from hook and in each ch across, turn. (5 sc)
Rows 2–45: Ch 1, sc in each st across, turn. (5 sc)
Row 46 (buttonhole): Ch 1, sc in first 2 sts, ch 2, sk 1 st, sc in last 2 sts, turn. (4 sc and 1 ch-2 sp)
Row 47: Ch 1, sc in next 2 sts, sc in ch-2 sp, sc in last 2 sts, turn. This is a conversion row: 4 sc worked into the existing sc + 1 sc in the sp = 5 sc.
Rows 48–50: Ch 1, sc in each st across, turn. (5 sc)
Fasten off, leaving a 24 in (61.0 cm) tail. Each strap measures 1.4 x 12.5 in (3.6 x 31.8 cm).
Make All Pieces
Blue: 1 body panel with border, 2 straps
Cream: 1 roof, 1 window, 1 pocket
Layout (front view):
            /\
           /  \        <- Roof (cream)
          /    \
     ____/______\____  <- eaves, about 7/8 in past each side
    |    [ + ]       | <- Window (cream) on blue body
    |________________|
    |                |
    |     POCKET     | <- Pocket (cream)
    |________________|
     blue rim shows at sides and bottom
The straps are sewn to the back, behind the roof. They are not shown in the front view.
Joining
Use a whipstitch and the matching yarn color. Make each stitch firm but not tight: the seam should lie flat without puckering, and you should not see gaps between stitches. Pin every piece before you sew it.
1. Pocket
– Lay the pocket on the RS of the body, inside the blue border.
– Bottom edge: Sew the pocket’s 42 foundation stitches to the body’s 42 Row 1 stitches, one to one.
– Sides: Sew the pocket’s 22 row ends to body Rows 1–22, one row end to one row end. The two pieces have the same gauge, so the edges match exactly.
– Leave the top open.
– The 0.25 in (0.6 cm) blue border should now show along the pocket sides and bottom.
2. Window
– Center the window side to side on the body.
– Place its bottom edge 0.6 in (1.5 cm) above the top of the pocket.
– Sew around all 32 frame stitches.
– Sew only the outer frame. Leave the cross bar and the panes loose so the blue shows through.
3. Roof
– Center the roof over the top of the body, so 3 roof stitches hang past the body at each end.
– Sew the middle 42 roof stitches from Row 1 to the 42 stitches of body Row 38, one to one. The roof now covers the top 1 in (2.5 cm) of the body.
– Tack the eaves to the border at each side corner.
4. Straps
– Turn the organizer over to the back.
– Place each strap so its outer edge is 1.5 in (3.8 cm) in from the side edge of the body.
– Line up strap Rows 1–10 with body Rows 31–40, one row to one row.
– Sew around all 4 sides of the overlap.
– The strap centers will be about 8.1 in (20.6 cm) apart.
5. Buttons
– Sew one button on the side of each strap that faces the seat, centered on Row 28.
– That leaves an 18-row loop, 4.5 in (11.4 cm) long, between the button and the buttonhole.
Size checkpoint: The organizer should measure 14.25 in (36.2 cm) across the eaves and 16 in (40.6 cm) from the bottom edge to the peak (10.5 in body + 6.5 in roof − 1 in overlap).
Final Blocking
- Lightly spray the assembled organizer with water until it is damp, not soaked.
- Lay it RS up on a blocking mat.
- Pin the body to 12.5 x 10.5 in (31.8 x 26.7 cm), keeping the corners square.
- Pin the roof slopes straight and the eave points level with each other.
- Square the window to 2.5 in (6.4 cm), and open the panes with your fingertip.
- Pin the pocket top edge straight, without stretching it.
- Pin the straps flat at 1.4 in (3.6 cm) wide.
- Let it dry completely, at least 24 hours.
Final Quality-Control Checklist
- Body border is 158 sts, and the corners lie flat
- Blue rim shows evenly along the pocket sides and bottom
- Roof overhang is the same on both sides
- Window is centered and level, with all 4 panes open
- Pocket opening is firm and straight
- Straps are the same length, and the buttons pass through the buttonholes snugly
- All yarn tails are woven in on the WS
- Overall size is 14.25 x 16 in (36.2 x 40.6 cm)
Troubleshooting
- Body sides ruffle: You probably worked 1 sc into every row end. Redo the sides with 33 sc as written.
- Roof slopes curl: The edging is too tight. Redo it with a looser tension, keeping the 3-for-2 ratio.
- Window looks lopsided: Check that each pane row has exactly 3 dc and that each cross-bar row has 7 sc.
- Pocket gapes: Your slip stitches are too loose. Redo Row 23 a little firmer.
- Organizer hangs crooked: Move one button up or down 1 row to level the straps.
- Panel sags with heavy items: Slide a cut piece of plastic canvas behind the pocket, between the two layers.
Care
Hand wash in cool water with mild soap, press out the water in a towel, and dry flat, reshaping it to the blocked measurements. Avoid the dryer so the cotton keeps its size.
Final Notes
Each part of this organizer is sized from the one before it:
– The 14-stitch gauge gives a 42-stitch body that is 12 in (30.5 cm) wide.
– One border round brings the body to 12.5 x 10.5 in (31.8 x 26.7 cm).
– The 48-stitch roof hangs past both sides, and the edging brings it to 14.25 in (36.2 cm).
– The 42-stitch pocket matches the body width exactly.
– Together these give a finished house 16 in (40.6 cm) tall.
Check your gauge and each checkpoint as you go, and everything will fit together. Happy crocheting!