

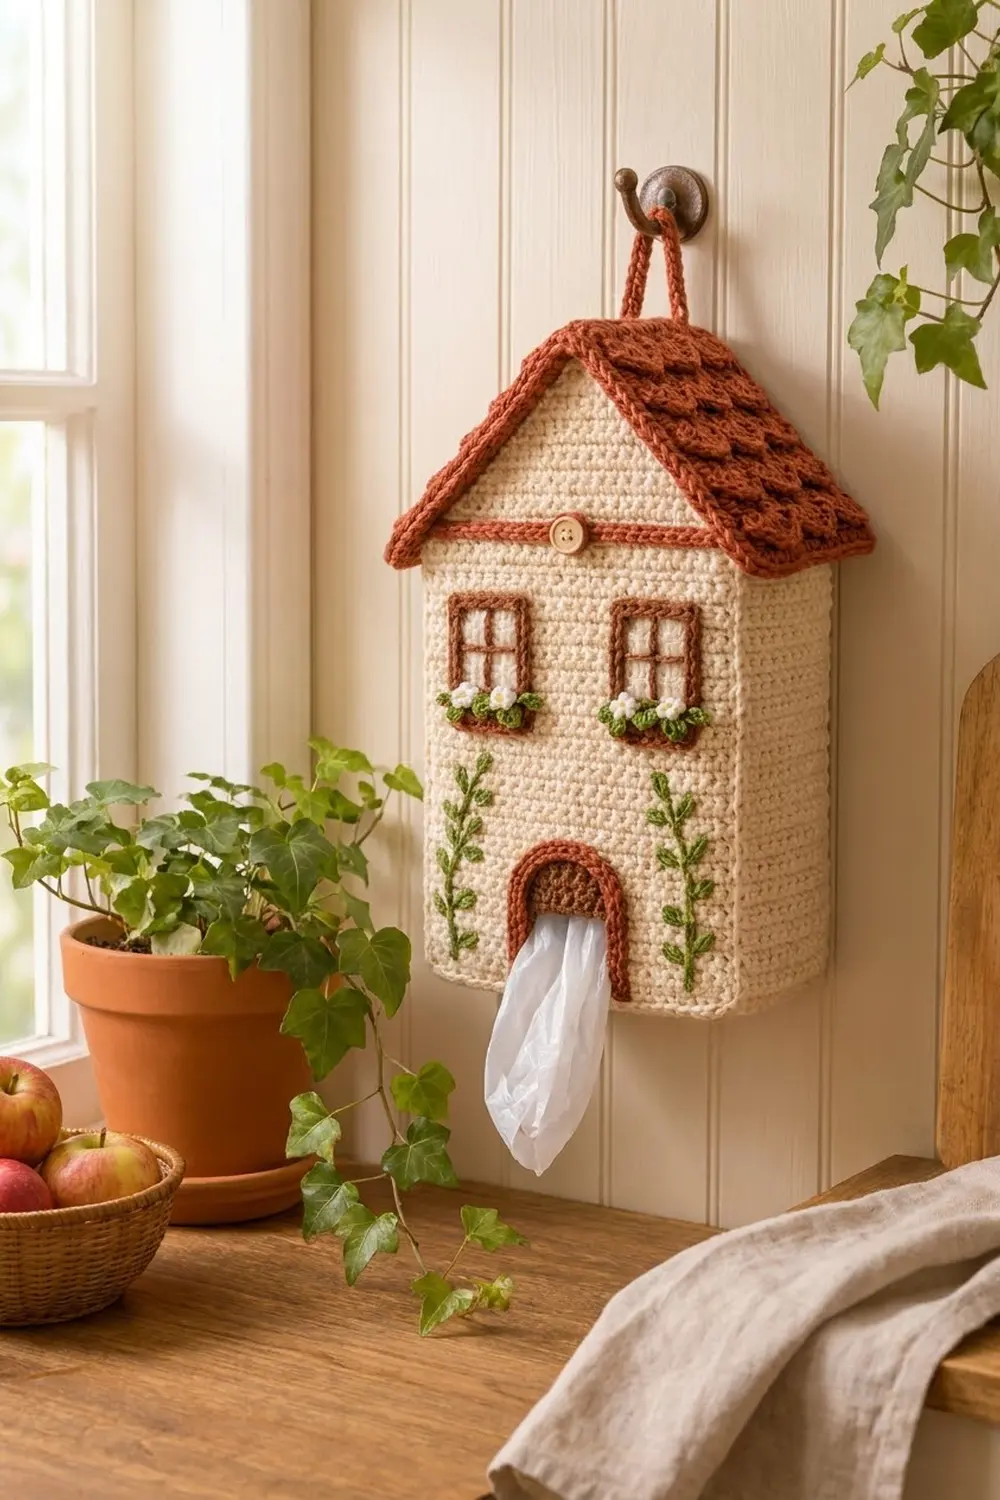
This little cottage hangs on a kitchen hook and keeps your plastic bags in one tidy place. You stuff bags in under the roof and pull them out one at a time through the arched front door.
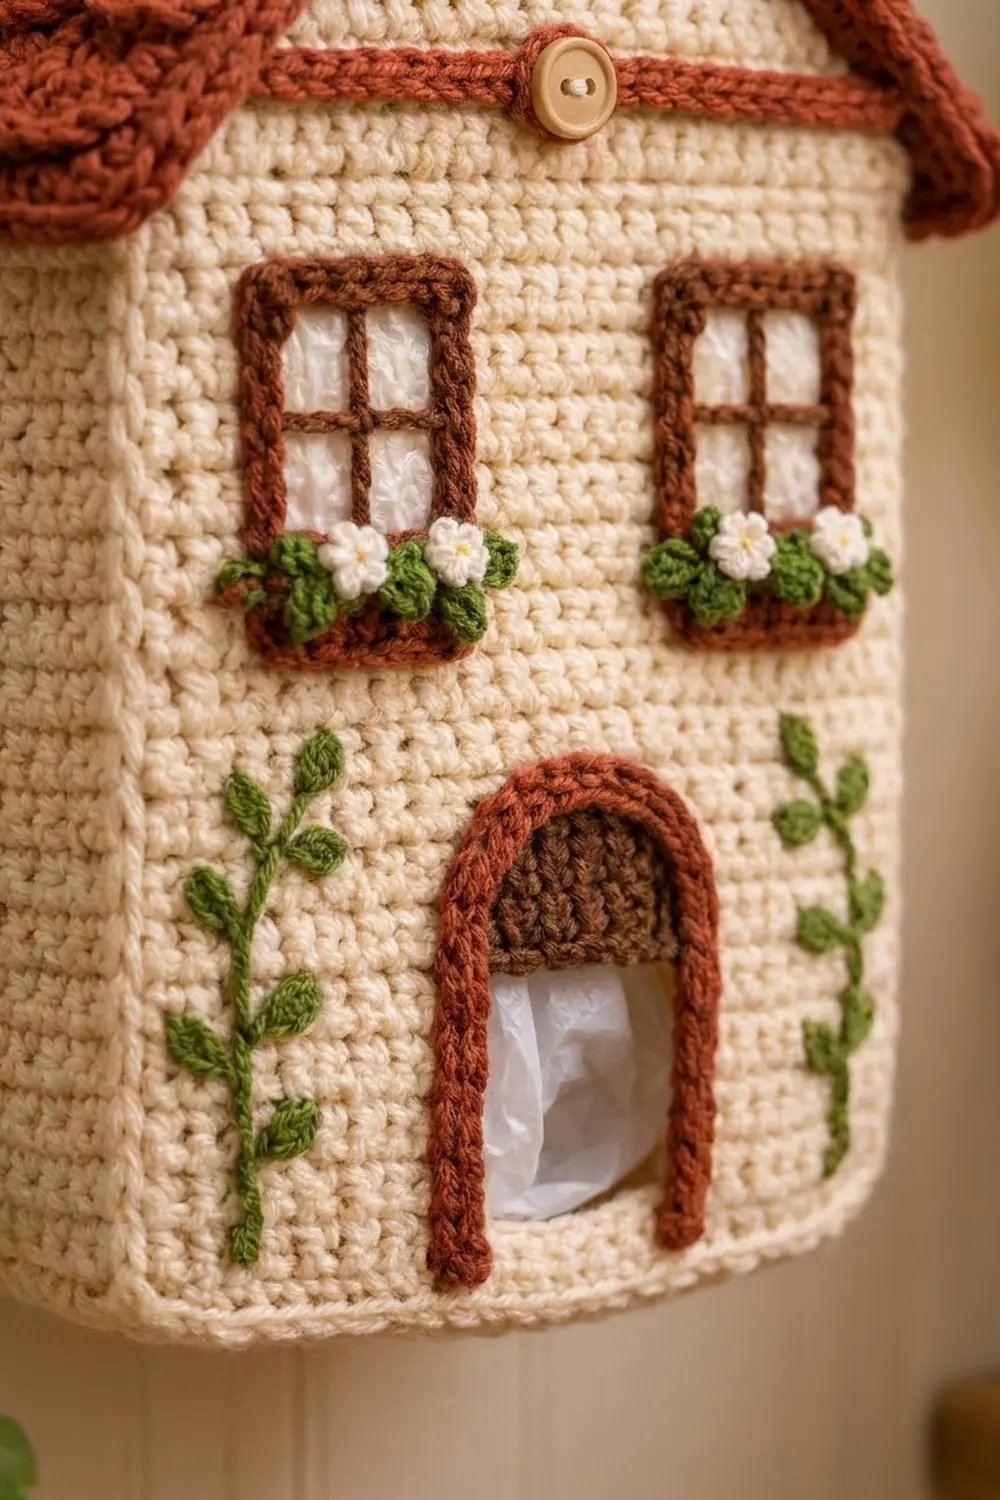
The walls are cream, and the roof is warm rust with layered shell shingles. White windows sit in rust frames above green flower boxes, and green vines climb beside a rust-and-brown arched door. A wooden button on the eave band finishes the farmhouse look.
The finished house measures about 6.5 in (16.5 cm) wide, 3 in (7.6 cm) deep and 11.5 in (29.2 cm) tall, not counting the hanging loop. This pattern uses US crochet terms throughout.
You crochet the base, walls and both gables as one seamless body. You leave a gap at the bottom for the door. Next you make two shingled roof panels, join them at the ridge, and add an edging. Small appliqués finish the front.
Finished Size and Construction
- Finished size: 6.5 in (16.5 cm) wide × 3 in (7.6 cm) deep × 11.5 in (29.2 cm) tall
- Skill level: Intermediate
- Terminology: US
- Yarn weight: Worsted (#4)
- Hook: 4.0 mm (G-6)
- Number of pieces: 1 house body (base, walls and gables in one piece), 2 roof panels, plus small appliqués
- Layout: Front face of 26 stitches, with 2 windows over 1 door
- Body size: walls 8 in (20.3 cm) to the eaves, gables 3.1 in (7.9 cm) tall
- Roof size before border: 4.75 in × 10.2 in (12.1 cm × 25.9 cm) once both panels are joined
- Border depth: about 0.4 in (1.0 cm), which makes the roof 5.5 in × 11 in (14.0 cm × 27.9 cm)
Materials
Use a smooth worsted cotton or cotton blend. It holds its shape and does not cling to plastic bags. The amounts below assume a yarn with about 200 m per 100 g.
- Cream (walls): 75 g / 150 m
- Rust (roof, trims, loop): 50 g / 100 m
- Green (vines, flower boxes): 10 g / 20 m
- White (window panes, flowers): 10 g / 20 m
- Dark brown (door arch): 5 g / 10 m
- Yellow (flower centers): 2 g / 4 m
All quantities include a safety margin of about 20%.
Tools: 4.0 mm (G-6) hook, tapestry needle, 8 stitch markers, a 0.75 in (1.9 cm) wooden button, sewing thread and needle, pins, scissors, and a steam iron or garment steamer.
Abbreviations (US Terms)
- ch: chain
- sl st: slip stitch
- sc: single crochet
- dc: double crochet
- sc2tog: single crochet 2 together
- BLO: back loop only
- rev sc: reverse single crochet (crab stitch)
- st(s): stitch(es)
- rnd: round
- inc: 2 sc in the same stitch
Special stitches
- Shell: 5 dc in the same stitch.
- Half shell: ch 3 (counts as 1 dc) and 2 dc in the first stitch, or 3 dc in the last stitch.
- Picot: ch 3, then sl st in the 3rd ch from the hook.
Gauge and Checkpoints
Gauge is 16 sc × 18 rows = 4 in (10.2 cm) in cream, so 4 sts and 4.5 rows make 1 in (2.5 cm). Work tightly so the bags cannot show through the fabric.
Test the base first. It works as your gauge swatch.
- After base Rnd 6: the oval measures about 6.9 in × 2.9 in (17.5 cm × 7.4 cm).
- After Row 19: the door opening is about 2.5 in (6.4 cm) wide and 2.7 in (6.9 cm) tall.
- After Rnd 42: the walls stand 8 in (20.3 cm) above the base edge.
- Each roof panel: 4.75 in × 5.1 in (12.1 cm × 13.0 cm).
If your oval is too big, go down half a hook size. If it is too small, go up half a size. Change hooks rather than stitch counts, because every later piece depends on the 68-stitch perimeter.
House Body
Base (cream)
Work joined rounds without turning.
Rnd 1: Ch 19. Work 3 sc in the 2nd ch from hook, sc in the next 16 ch, and 3 sc in the last ch. Rotate and work along the other side of the chain: sc in the next 16 ch. Join with a sl st. (38 sts)
Rnd 2: Ch 1. [Work 2 sc in each of the next 3 sts, sc in the next 16] twice. Join. (44 sts)
Rnd 3: Ch 1. [(Sc 1, inc) 3 times, sc 16] twice. Join. (50 sts)
Rnd 4: Ch 1. [(Sc 2, inc) 3 times, sc 16] twice. Join. (56 sts)
Rnd 5: Ch 1. [(Sc 3, inc) 3 times, sc 16] twice. Join. (62 sts)
Rnd 6: Ch 1. [(Sc 4, inc) 3 times, sc 16] twice. Join. (68 sts)
Rnd 6 has two curved ends of 18 sts and two straight sides of 16 sts. Mark these sections:
- Sts 14–39: front (26 sts)
- Sts 40–47: right side (8 sts)
- Sts 48–68 plus sts 1–5: back (26 sts)
- Sts 6–13: left side (8 sts)
Walls
Rnd 7: Ch 1. Sc in the BLO of each st around. Join and fasten off. (68 sts) This round creates a crisp fold along the base edge.
Door opening: The door uses front sts 22–31, which are 10 sts in the center of the front. That leaves 8 front sts on each side.
Row 8: Join cream in st 32. Ch 1 and sc in sts 32–68, then in sts 1–21. Turn. (58 sts) Leave sts 22–31 unworked.
Rows 9–18: Ch 1, sc in each st, turn. (58 sts)
Row 19: Ch 1, sc in each of the 58 sts. Ch 10, then sl st in the first sc of this row to bridge the gap. Fasten off. (58 sc + 10 ch)
Rnd 20: Join cream in st 1, which is at the back corner, to keep the seam off the front. Ch 1 and sc in each sc and each ch around. Join and turn. (68 sts)
Rnds 21–42: Ch 1, sc in each st, join, turn. (68 sts) Do not fasten off.
Checkpoint: the walls should measure 8 in (20.3 cm) from the base fold, and the front should measure 6.5 in (16.5 cm) across when flattened.
Gables
You work both gables in rows on top of the front and back sections. The 8 side sts stay unworked and become the bag-loading slits.
Front gable
Row G1: Join cream in st 14. Ch 1 and sc in sts 14–39. Turn. (26 sts)
Rows G2–G13: Ch 1, sc2tog, sc to the last 2 sts, sc2tog, turn. The counts are 24, 22, 20, 18, 16, 14, 12, 10, 8, 6, 4 and 2 sts.
Row G14: Ch 1, sc2tog. Fasten off. (1 st)
Back gable: Join cream in st 48 and work Rows G1–G14 the same way over sts 48–68 and 1–5.
Checkpoint: each gable is 3.1 in (7.9 cm) tall, and each sloped edge is about 4.5 in (11.4 cm) long.
Front Details
Eave band and button
Use rust to work a surface sl st line across the front at the boundary between Rnd 42 and Row G1, one sl st per column. (26 sl sts) Sew the button over the band at the center, between front sts 26 and 27.
Windows (make 2)
Pane (white): Ch 6.
- Row 1: Sc in the 2nd ch from hook and each ch across, turn. (5 sts)
- Rows 2–7: Ch 1, sc 5, turn.
Fasten off. The pane measures 1.25 in × 1.55 in (3.2 cm × 3.9 cm).
Frame (rust): Join rust in the first st of Row 7.
- Top: 3 sc in the first st, sc in the next 3 sts, 3 sc in the last st. (9 sts)
- Side: 5 sc in the row ends of Rows 6–2. (5 sts)
- Bottom: working into the chain, 3 sc in the first ch, sc in the next 3 ch, 3 sc in the last ch. (9 sts)
- Other side: 5 sc in the row ends of Rows 2–6. (5 sts)
Join. (28 sts) The framed window measures 1.75 in × 2.05 in (4.4 cm × 5.2 cm).
Cross bar: With rust, embroider one straight stitch down the middle column and one straight stitch across Row 4.
Flower boxes (make 2, green)
Ch 9.
- Row 1: Sc in the 2nd ch from hook and each ch across, turn. (8 sts)
- Row 2: Ch 1, sc in the first st, [picot, sc in the next st] 7 times. (8 sc + 7 picots)
The box is 2 in (5.1 cm) wide.
Flowers (make 6, white)
Make a magic ring, then [ch 2, sl st in the ring] 5 times. Pull the ring closed. Add one yellow French knot in the center of each flower.
Door arch (dark brown)
- Row 1: Make a magic ring. Ch 3 (counts as dc) and work 6 dc in the ring. Turn. (7 sts)
- Row 2: Ch 3, dc in the same st, then 2 dc in each remaining st. (14 sts)
The half-circle is about 2.4 in (6.1 cm) across. The dc posts give it the ribbed door texture.
Door frame (rust)
Ch 39.
- Row 1: Sc in the 2nd ch from hook and each ch across, turn. (38 sts)
- Row 2: Ch 1, sc 38.
The strip is 9.5 in (24.1 cm) long and 0.45 in (1.1 cm) wide.
Vines (make 2, green)
Ch 15 for a stem 3.5 in (8.9 cm) long. After sewing the stem on, embroider 3 pairs of lazy-daisy leaves and 1 leaf at the tip.
Placement
Pin everything in place before sewing.
- Door arch: Sew the brown half-circle with its flat edge along the bridge chain, so it covers Rnds 20–25.
- Door frame: Sew the rust strip up the left edge of the opening, around the arch and down the right edge. Its inner edge should cover the cut edge of the opening.
- Windows: Sew one window over front sts 16–22 and one over sts 31–37, each covering Rnds 30–39.
- Flower boxes: Center each box on Rnds 28–29, just under its window. Sew 3 flowers along each picot row.
- Vines: Sew one vine over st 17 and one over st 36, running from Rnd 9 to Rnd 24.
Roof Panels (make 2, rust)
Work from the ridge down so the shell scallops point toward the eaves.
Row 1: Ch 20. Sc in the 2nd ch from hook and each ch across, turn. (19 sts)
Row 2 (Shell A): Ch 1, sc in the first st, [skip 2, shell in the next st, skip 2, sc in the next st] 3 times. Turn. (19 sts)
Row 3: Ch 1, sc in the BLO of each st, turn. (19 sts) Working in the back loops leaves each shell standing out as a shingle lip.
Row 4 (Shell B): Ch 3 and work 2 dc in the first st. [Skip 2, sc in the next st, skip 2, shell in the next st] twice. Skip 2, sc in the next st, skip 2, 3 dc in the last st. Turn. (19 sts) This row staggers the shingles.
Row 5: Ch 1, sc in the BLO of each st, including the top of the ch-3. (19 sts)
Rows 6–15: Repeat Rows 2–5 twice more (Rows 6–13), then work Row 14 as Shell A and Row 15 as a BLO sc row. Fasten off.
That gives 7 shell rows and 7 sc rows above the foundation row. Each panel measures 4.75 in × 5.1 in (12.1 cm × 13.0 cm), with each shell row plus its sc row adding about 0.7 in (1.8 cm).
Join: Place the panels with their foundation chains together and whipstitch them along the ridge. The joined roof measures 4.75 in × 10.2 in (12.1 cm × 25.9 cm).
Border (Roof Edging)
Border gauge: 4 sc per 1 in (2.5 cm), the same as the body. On the edges made of row ends, use 2 sc per shell row and 1 sc per sc row.
Rnd 1: Join rust at an eave corner.
- Each eave side (the top of Row 15 on each panel): 3 sc in the first st, sc 17, 3 sc in the last st. (23 sts, including both corner groups)
- Each gable edge (row ends across both panels): for each panel, 1 sc in the end of Row 1, 2 sc in each of the 7 shell-row ends, and 1 sc in each of the 6 sc-row ends from Rows 3–13. Row 15’s end is already covered by the corner group. That is 21 sts per panel and 42 sts per gable edge.
Join. (23 + 42 + 23 + 42 = 130 sts)
Rnd 2: Ch 1 and work rev sc in each st around. Join and fasten off. (130 sts)
Why the math works:
- Eave sides: the 17 sc plus one stitch from each corner give 19 sts. At 4 sts per inch, that matches the 4.75 in (12.1 cm) panel width.
- Gable edges: a shell row is about 0.5 in (1.3 cm) tall, so 2 sc fill it. A sc row is about 0.2 in tall, so 1 sc fills it. The 42 sts give 10.5 in against an edge of 10.2 in (25.9 cm). That small amount of ease lets the rolled edge lie flat without ruffling.
Hanging Loop and Final Assembly
Hanging loop (rust): Ch 31. Sc in the 2nd ch from hook and each ch across. (30 sts) The strip is 7.5 in long. Fold it in half to make a loop 3.75 in (9.5 cm) tall, and sew both ends firmly to the center of the ridge.
Attach the roof:
- Center the roof over the house.
- Whipstitch the underside of the roof to both sloped edges of each gable, about 0.4 in (1.0 cm) in from the roof’s front and back edges.
- Leave the eaves loose over the side walls. To load bags, lift either eave and push them into the slit over the side wall.
Final Blocking
- Fill the house firmly with a folded towel.
- Pin the base flat into an even oval and square up the front face.
- Steam lightly, holding the iron about 1 in (2.5 cm) above the fabric. Do not press.
- Lay the roof flat, pin it to 5.5 in × 11 in (14.0 cm × 27.9 cm) and steam it.
- Let both pieces dry completely.
- Remove the towel, refold the roof along the ridge, and check that the shingles hang evenly.
Final Quality-Control Checklist
- The base has 68 sts, and the BLO fold is crisp.
- The door opening is 10 sts wide and 12 rows tall, with no gaps at the bridge.
- The walls are 8 in (20.3 cm) tall and the gables are 3.1 in (7.9 cm) tall.
- The windows are level and mirror each other at sts 16–22 and 31–37.
- The roof edging has 130 sts and lies flat.
- The loop is secure, and the house hangs straight when filled.
- All yarn ends are woven in on the inside.
Troubleshooting
- The base cups or ruffles: Your tension changed between rounds. Recount Rnd 6, which should have 68 sts.
- There are holes at the door corners: Weave a yarn tail across the corner before sewing on the frame.
- The gable leans: You missed a decrease. Each gable row should shrink by exactly 2 sts.
- The shingles lie flat: You worked the sc rows through both loops. Work them in the BLO only.
- The roof edge waves: Use 1 sc per shell row instead of 2 on that section.
- The house tips forward: Center the loop on the ridge and add a few anchoring stitches.
Care
Hand wash in cool water, reshape and dry flat. Do not tumble dry, because the roof can lose its shape.
Final Notes
Everything depends on one measurement chain. The 68-stitch base sets a 26-stitch front that measures 6.5 in (16.5 cm). Walls of 36 rounds reach 8 in (20.3 cm), and the gables add 3.1 in (7.9 cm). Roof panels of 19 stitches give a 4.75 in (12.1 cm) width, and the 130-stitch edging finishes them flat. The result is a 6.5 in × 3 in × 11.5 in (16.5 cm × 7.6 cm × 29.2 cm) cottage. For a second colorway, swap the cream for soft blue and the rust for navy.
Happy crocheting!