

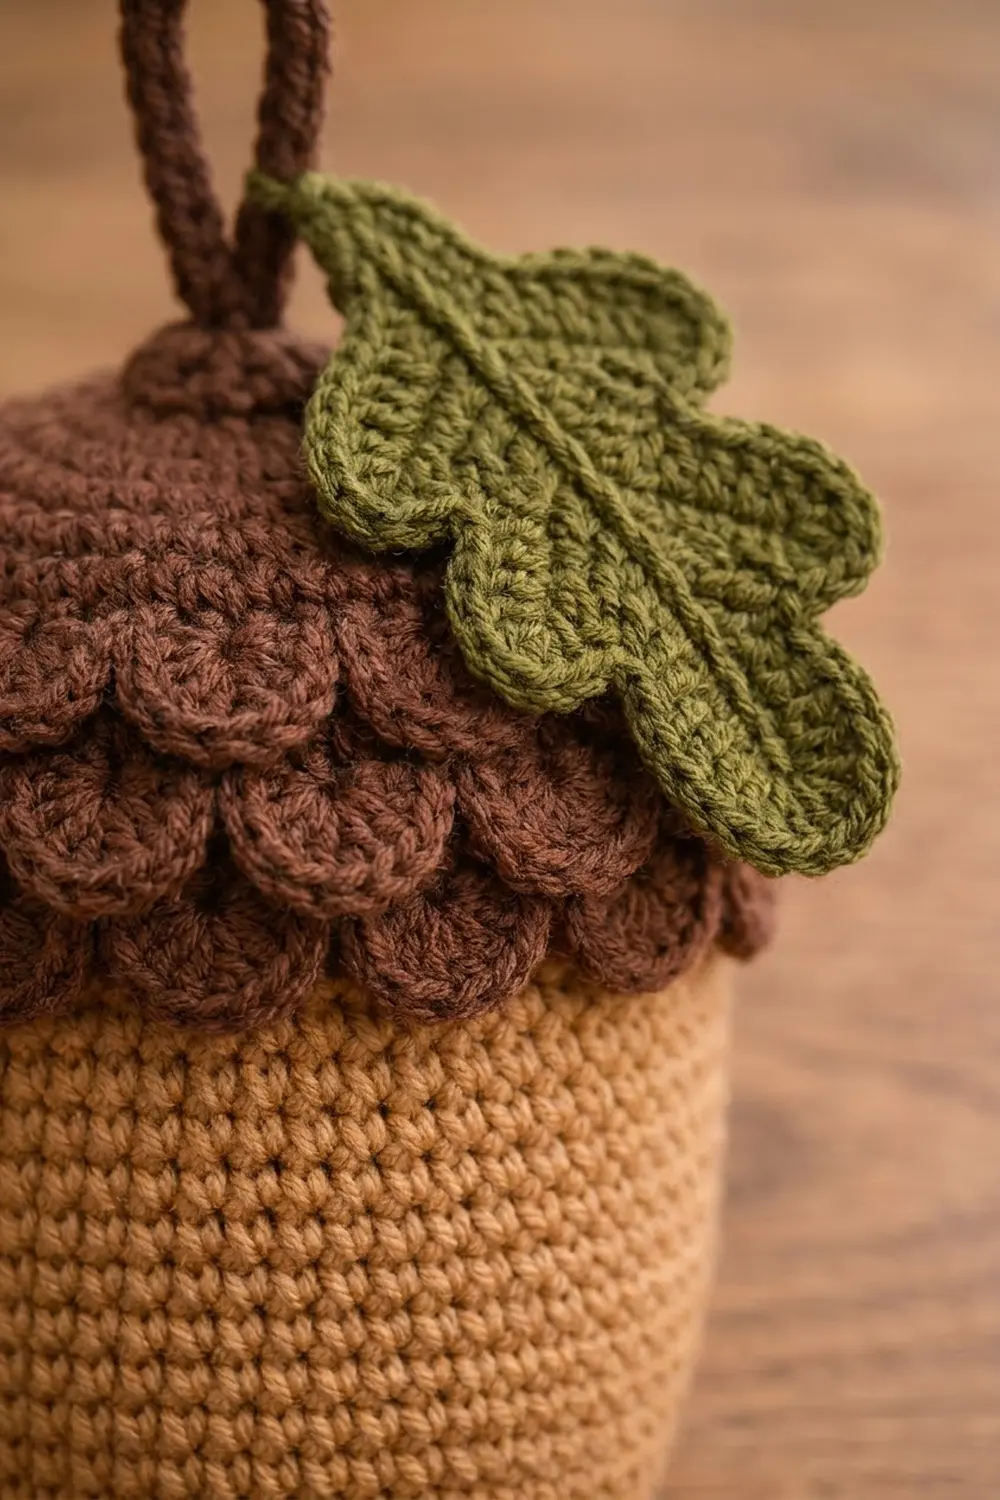
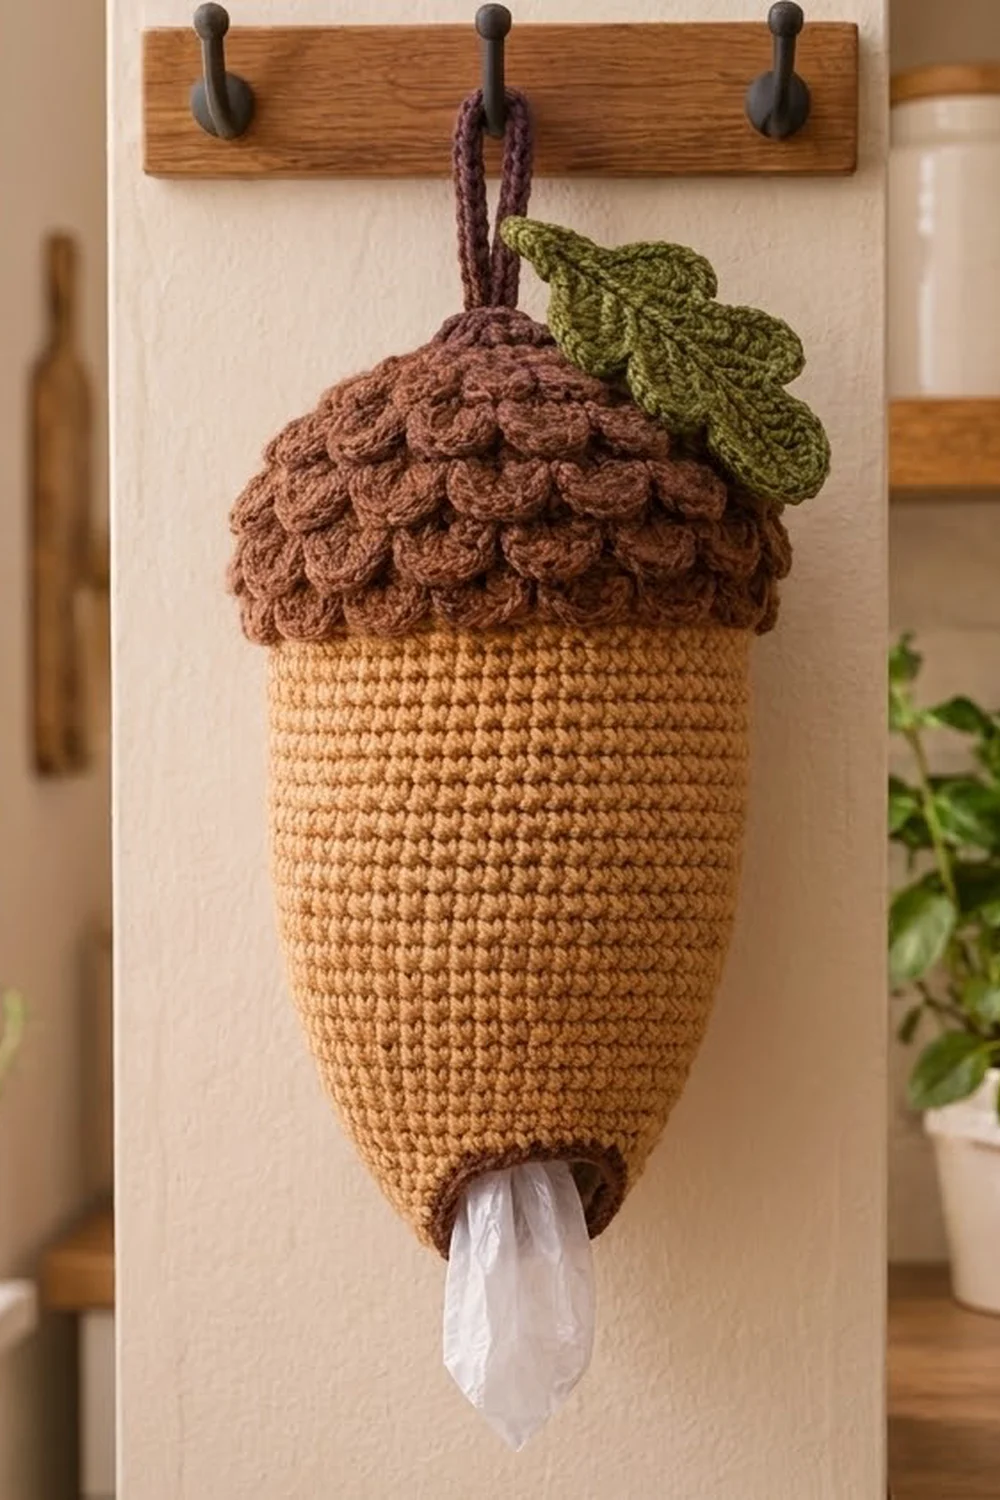
The Woodland Acorn Bag Holder turns a kitchen chore into a small piece of autumn decor. It’s a plump acorn with a tan body, a dark brown cap covered in crocodile-stitch scales, an olive green oak leaf and a hanging loop. You stuff plastic grocery bags up through the bottom opening and pull them out one at a time.
The colors are warm and natural: caramel tan, chocolate brown and olive green. The style is cozy farmhouse. The body is worked in tight single crochet so bags don’t poke through.
This pattern uses US crochet terms. The finished holder is about 11 in (27.9 cm) tall, not counting the loop, and 5.7 in (14.5 cm) across when filled. The hanging loop adds about 3.5 in (8.9 cm).
Construction is simple. You work the body top-down in joined rounds: a domed top, a straight section, a taper, and a dark brown edge around the bottom opening. You work the cap separately from the center out, alternating base rounds and scale rounds, then sew it over the dome. Make the leaf and loop last and sew them on.
Finished Size and Construction
- Finished size: 11 in (27.9 cm) tall, 5.7 in (14.5 cm) diameter when filled
- Skill level: Intermediate (crocodile stitch)
- Terminology: US
- Yarn weight: Worsted (#4)
- Hook: 4.5 mm (US 7)
- Number of pieces: 1 finished holder made from 4 parts (body, cap, leaf, loop)
- Layout: Single item, no grid
- Body circumference: 72 sc = 18 in (45.7 cm); 9 in (22.9 cm) wide laid flat
- Body length before border: 12.0 in (30.5 cm), measured along the side
- Border depth: 0.4 in (1.0 cm)
- Bottom opening: 36 sts, about 2.9 in (7.4 cm) across
Materials
Choose a smooth worsted acrylic or cotton blend with good stitch definition. Acrylic holds the dome shape well and is easy to wash. The quantities below assume a yarn with about 180 m per 100 g.
- Tan (body): 70 g, about 126 m
- Dark brown (cap, border, loop): 45 g, about 81 m
- Olive green (leaf): 10 g, about 18 m
All quantities include a margin of about 20 percent for a gauge swatch and tails.
Tools:
- 4.5 mm (US 7) crochet hook
- Tapestry needle
- Stitch marker
- Scissors
- Measuring tape
- Rust-proof pins
Abbreviations (US Terms)
- ch – chain
- sl st – slip stitch
- sc – single crochet
- hdc – half double crochet
- dc – double crochet
- tr – treble crochet
- inc – 2 sc in the same stitch
- sc2tog – single crochet 2 together
- MR – magic ring
- st(s) – stitch(es)
Pair: 2 dc worked in the same stitch or space. The two dc posts form a narrow V.
Scale (crocodile stitch): Turn the work so the first dc of the pair lies sideways. Working down the front of its post, work 5 dc around the post. Ch 1. Working up the post of the second dc of the pair, work 5 dc around that post. One scale is 10 dc plus 1 ch and is shaped like a small fan.
Gauge and Checkpoints
Gauge: 16 sc and 18 rounds = 4 in (10.2 cm), in sc worked in joined rounds. That’s 4 sts per inch and 4.5 rounds per inch.
Make the body first, because every other part is sized to it. Work body Rounds 1–10 and measure. Use these checkpoints as you go:
- After Rnd 10 (60 sts): the circle measures 4.4 in (11.2 cm) across.
- After Rnd 14 (72 sts): the tube lies 9 in (22.9 cm) wide when flattened.
- After Rnd 40: 8.9 in (22.6 cm) from the top center, measured along the side.
- After Rnd 51 (36 sts): the lower tube lies 4.5 in (11.4 cm) wide when flattened.
If your circle is too big, go down a hook size. If it’s too small, go up a size. Width matters more than exact height, so match the width first.
Body
Use tan. Rounds are joined. The ch 1 at the start of each round doesn’t count as a stitch. Place a marker in the first stitch of each round.
Rnd 1: MR, ch 1, 6 sc in ring, sl st to first sc. (6)
Rnd 2: Ch 1, inc in each st around, join. (12)
Rnd 3: Ch 1, sc in next st, inc 6 times, join. (18)
Rnd 4: Ch 1, sc in next 2 sts, inc 6 times, join. (24)
Rnd 5: Ch 1, sc in next 3 sts, inc 6 times, join. (30)
Rnd 6: Ch 1, sc in next 4 sts, inc 6 times, join. (36)
Rnd 7: Ch 1, sc in next 5 sts, inc 6 times, join. (42)
Rnd 8: Ch 1, sc in next 6 sts, inc 6 times, join. (48)
Rnd 9: Ch 1, sc in next 7 sts, inc 6 times, join. (54)
Rnd 10: Ch 1, sc in next 8 sts, inc 6 times, join. (60)
Checkpoint: 4.4 in (11.2 cm) across.
The next rounds increase more slowly, so the top curves into a dome.
Rnd 11: Ch 1, sc in each st around, join. (60)
Rnd 12: Ch 1, sc in next 9 sts, inc 6 times, join. (66)
Rnd 13: Ch 1, sc in each st around, join. (66)
Rnd 14: Ch 1, sc in next 10 sts, inc 6 times, join. (72)
Rnds 15–40: Ch 1, sc in each st around, join. (72 in each round)
Checkpoint: 9 in (22.9 cm) wide flat and 8.9 in (22.6 cm) along the side.
Now taper. Decrease rounds alternate with plain rounds to make a smooth acorn point.
Rnd 41: Ch 1, sc in next 10 sts, sc2tog 6 times, join. (66)
Rnd 42: Ch 1, sc in each st, join. (66)
Rnd 43: Ch 1, sc in next 9 sts, sc2tog 6 times, join. (60)
Rnd 44: Ch 1, sc in each st, join. (60)
Rnd 45: Ch 1, sc in next 8 sts, sc2tog 6 times, join. (54)
Rnd 46: Ch 1, sc in each st, join. (54)
Rnd 47: Ch 1, sc in next 7 sts, sc2tog 6 times, join. (48)
Rnd 48: Ch 1, sc in each st, join. (48)
Rnd 49: Ch 1, sc in next 6 sts, sc2tog 6 times, join. (42)
Rnd 50: Ch 1, sc in each st, join. (42)
Rnd 51: Ch 1, sc in next 5 sts, sc2tog 6 times, join. (36)
Rnds 52–54: Ch 1, sc in each st around, join. (36 in each round)
Checkpoint: 4.5 in (11.4 cm) wide flat and 12.0 in (30.5 cm) along the side. Fasten off the tan. You’ll finish the bottom edge in the Border section.
Cap
Use dark brown and work from the center out. Base rounds build pairs. Scale rounds put a scale over every other pair, so each tier sits in the gaps of the tier above.
Rnd 1: MR, ch 3 (counts as dc), 11 dc in ring, sl st to top of ch-3. (12 dc)
Checkpoint: 1.25 in (3.2 cm) across.
Rnd 2 (base): Ch 3 (counts as dc), dc in same st, 2 dc in each remaining st, join to top of ch-3. (12 pairs = 24 dc)
Rnd 3 (Tier 1): Don’t chain. Work a scale over the first pair (the ch-3 counts as the first post), then sl st between the 2 dc of the next pair. Scale over next pair, sl st between the 2 dc of next pair 5 times. (6 scales, 6 sl sts)
From here on, each base round works into two kinds of position:
- the sl sts, which are the gaps between scales
- the center of the pair behind each scale (fold the scale forward to reach it)
Rnd 4 (base): Ch 3 in the last sl st, (dc, ch 1, 2 dc) in same sl st, (2 dc, ch 1, 2 dc) behind next scale; (2 dc, ch 1, 2 dc) in next sl st, (2 dc, ch 1, 2 dc) behind next scale 5 times, join. (12 groups = 24 pairs, 48 dc, 12 ch-1 sps)
Rnd 5 (Tier 2): Work as Rnd 3, but repeat the scale-and-skip step 12 times in total. (12 scales, 12 sl sts)
Rnd 6 (base): Ch 3 in the last sl st, (dc, ch 1, 2 dc) in same sl st, 2 dc behind next scale; (2 dc, ch 1, 2 dc) in next sl st, 2 dc behind next scale 11 times, join. (36 pairs = 72 dc, 12 ch-1 sps)
Checkpoint: about 5.5 in (14.0 cm) across, slightly ruffled.
Rnd 7 (Tier 3): Repeat the scale-and-skip step 18 times. (18 scales, 18 sl sts)
Rnd 8 (base): Ch 3 in the last sl st, dc in same sl st, 2 dc behind next scale; 2 dc in next sl st, 2 dc behind next scale 17 times, join. (36 pairs = 72 dc)
Rnd 9 (Tier 4): Repeat the scale-and-skip step 18 times. (18 scales)
Rnd 10 (base): Repeat Rnd 8. (36 pairs = 72 dc)
Rnd 11 (Tier 5): Repeat the scale-and-skip step 18 times. (18 scales)
Fasten off, leaving a 24 in (61.0 cm) tail. Rnds 8 and 10 don’t increase, so the cap curves down into a dome. The finished scale edge is about 19 in (48.3 cm) around. That’s a little larger than the 18 in (45.7 cm) body, so the scales flare over it. The cap has 72 scales in 5 tiers.
Oak Leaf
Use olive green.
Ch 15.
Side 1: Sc in 2nd ch from hook, hdc in next ch, (dc, tr, dc) in next ch, hdc in next ch, sl st in next ch 3 times. (19 sts, 3 lobes)
Tip: In the last ch, work (hdc, dc, ch 3, sl st in 3rd ch from hook, dc, hdc). (4 sts + picot)
Side 2: Turn the leaf and work along the other side of the foundation chain: sl st in next ch, hdc in next ch, (dc, tr, dc) in next ch, hdc in next ch 3 times, sc in last ch. (19 sts, 3 lobes)
Stem: Ch 6, sl st in 2nd ch from hook and in next 4 ch, sl st to the leaf base. Fasten off, leaving a 12 in (30.5 cm) tail.
Optional vein: surface sl st along the foundation chain from the base to the tip.
The leaf is about 4 in (10.2 cm) long and 2 in (5.1 cm) wide, plus a 1.25 in (3.2 cm) stem.
Hanging Loop
Use dark brown. Ch 30, leaving a 12 in (30.5 cm) starting tail. Sl st in 2nd ch from hook and in each ch across. (29 sl sts)
The strip is about 7 in (17.8 cm) long. Fold it in half to make a 3.5 in (8.9 cm) loop.
Assembly
- Fill the body with a few bags so it holds its shape.
- Center cap Rnd 1 over body Rnd 1 and tack the centers together.
- Lift the Tier 5 scales and pin cap Rnd 10 to body Rnd 16. Both rounds have 72 sts, so match them one to one.
- Whipstitch with the cap tail, one cap dc to one body sc, all the way around. Keep your tension even so neither layer puckers.
- Sew both ends of the loop through the cap center and the body top, and knot them inside the body.
- Sew the leaf flat to the top of the cap next to the loop, with the stem toward the center. Tack it at the base, the tip and each lobe.
Border
The border is the edge of the bottom opening. Work it in dark brown at body gauge: 4 sts per inch.
Border Rnd 1: Join dark brown to any st of body Rnd 54. Ch 1, sc in each st around, join. (36)
Border Rnd 2: Ch 1, sl st in each st around, join. (36)
Fasten off and weave in the tail.
Why the math works: Rnd 1 puts one stitch in each existing stitch, so 36 + 0 = 36. Rnd 2 adds no stitches either. The edge stays 9 in (22.9 cm) around, and the opening stays about 2.9 in (7.4 cm) across. That’s wide enough for bags to pull out but firm enough to hold them in. The two rounds add 0.4 in (1.0 cm), so the side length goes from 12.0 in (30.5 cm) to 12.4 in (31.5 cm).
Final Blocking
- Take the bags out.
- Lightly mist the body with water. Don’t soak the cap.
- Fill the body with a rolled towel to shape the dome and the taper.
- Fluff each scale with your fingers so it curves outward and overlaps the tier below.
- Pin the leaf flat on a mat with the lobes spread open, and mist it.
- Let everything dry completely, for at least 12 hours.
- Refill with bags and hang.
Final Quality-Control Checklist
- The body is 9 in (22.9 cm) wide flat at its widest point.
- The bottom opening has 36 sts and is about 2.9 in (7.4 cm) across.
- The cap has 5 tiers of 6, 12, 18, 18 and 18 scales.
- Each tier sits in the gaps of the tier above.
- The cap is sewn evenly at body Rnd 16 with no puckers.
- The loop is secure and centered.
- The leaf lies flat and shows 3 lobes on each side.
- All tails are woven in on the inside.
Troubleshooting
Bags poke through the body. Your sc is too loose. Go down a hook size.
The top is pointy instead of domed. Make sure Rnds 11 and 13 are plain rounds and that Rnd 10 ends with 60 sts.
The scales stack instead of staggering. Start each base round in the last sl st so the first pair sits in a gap.
The cap edge won’t reach body Rnd 16. Sew it to Rnd 15 instead, still one stitch to one stitch.
The cap is too tight to flare. Work Rnd 6 with a hook one size larger.
The leaf curls. Block it flat and tack down each lobe.
Bags fall out too easily. Work Border Rnd 1 tighter, or add one more sl st round.
Care
Hand wash in cool water and lay flat to dry, reshaping the scales while they’re damp. Don’t tumble dry, because heat can flatten the crocodile texture.
Final Notes
Every measurement in this pattern builds on the one before it. A body gauge of 16 sc = 4 in (10.2 cm) gives 72 sts that measure 18 in (45.7 cm) around. Cap Rnd 10 also has 72 dc, so it sews on one to one at body Rnd 16. The taper ends at 36 sts, 9 in (22.9 cm) around. The two-round border keeps that count for a firm 2.9 in (7.4 cm) opening. The finished side length is 12.4 in (31.5 cm), and the holder hangs about 11 in (27.9 cm) tall.
For a second colorway, try an olive green body with a cream cap and the same green leaf. The stitch counts stay the same.
Happy crocheting!